
WJHD309A User Guide
Page 1
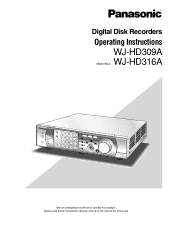
Digital Disk Recorders Operating Instructions WJ-HD309A WJ-HD316A Model Nos. ALARM ALARM SUSPEND OPERATE TIMER ERROR ALARM RESET HDD 1 HDD 2 MMOONNIITTOORR12 SHIFT 1 2 3 4 STOP PLAY PAUSE REC-- BUSY SET FWD + PULL Digital Disk Recorder 316 WJ-HD A Before attempting to connect or operate this product, please read these instructions carefully and save this manual for future use. REC STOP 5 DISK SELECT 9 EL-ZOOM SEQ...
Digital Disk Recorders Operating Instructions WJ-HD309A WJ-HD316A Model Nos. ALARM ALARM SUSPEND OPERATE TIMER ERROR ALARM RESET HDD 1 HDD 2 MMOONNIITTOORR12 SHIFT 1 2 3 4 STOP PLAY PAUSE REC-- BUSY SET FWD + PULL Digital Disk Recorder 316 WJ-HD A Before attempting to connect or operate this product, please read these instructions carefully and save this manual for future use. REC STOP 5 DISK SELECT 9 EL-ZOOM SEQ...

WJHD309A User Guide
Page 15
...event types and event actions. Refer to the Operating Instructions of partition Status Normal recording area Event recording area Copy area External recording device connected to the COPY1 port on the rear panel External recording device connected to the COPY2 port on the HDD ...recording device REMOVE: The hard disk is removed from the system automatically because of an access error FAN: The fan is faulty HDD-ERROR: The hard disk designated as image storage was not found M-FAIL: Mirror recovery failed R-FAIL: RAID recovery failed *: Camera number (1 - 16 for the WJ-HD316A, 1 - 9 for the WJ...
...event types and event actions. Refer to the Operating Instructions of partition Status Normal recording area Event recording area Copy area External recording device connected to the COPY1 port on the rear panel External recording device connected to the COPY2 port on the HDD ...recording device REMOVE: The hard disk is removed from the system automatically because of an access error FAN: The fan is faulty HDD-ERROR: The hard disk designated as image storage was not found M-FAIL: Mirror recovery failed R-FAIL: RAID recovery failed *: Camera number (1 - 16 for the WJ-HD316A, 1 - 9 for the WJ...
WJHD309A User Guide
Page 44
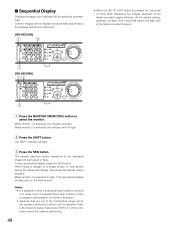
...10/0 11 12 IRIS LISTED EL-ZOOM LOGOUT PRESET 2 13 14 15 16 /AUTO SET BUSY x [WJ-HD309A] zc MONITOR1 MONITOR2 R 123 R SHIFT SEQ TEXT OSD 456 DISK SELECT COPY MARK 789 EL-ZOOM LOGOUT 2 0 STOP PLAY PAUSE REC - The camera selection button respective...further information. • Cameras that are out of the latest recorded images.) When trying to the settings performed in advance. [WJ-HD316A] z c MONITOR1 MONITOR2 R 1234 STOP PLAY PAUSE REC - Refer to the Network Setup Instructions (PDF) for further information about the camera partitioning. 44 &#...
...10/0 11 12 IRIS LISTED EL-ZOOM LOGOUT PRESET 2 13 14 15 16 /AUTO SET BUSY x [WJ-HD309A] zc MONITOR1 MONITOR2 R 123 R SHIFT SEQ TEXT OSD 456 DISK SELECT COPY MARK 789 EL-ZOOM LOGOUT 2 0 STOP PLAY PAUSE REC - The camera selection button respective...further information. • Cameras that are out of the latest recorded images.) When trying to the settings performed in advance. [WJ-HD316A] z c MONITOR1 MONITOR2 R 1234 STOP PLAY PAUSE REC - Refer to the Network Setup Instructions (PDF) for further information about the camera partitioning. 44 &#...

WJHD309A User Guide
Page 45
... arrows button while holding the PAN/TILT SLOW button down. Moves a camera horizontally/vertically. x Use the arrows button to the operating instruction for the camera. MONITOR1 MONITOR2 R 123 4 STOP PLAY PAUSE REC - For further information, refer to adjust the vertical or horizontal ...7 8 ZOOM/ A-B SLOW /ESC FOCUS REPEAT - + DISK SELECT COPY TEXT MARK 9 10/0 11 12 IRIS LISTED EL-ZOOM LOGOUT LOGOUT PRESET /AUTO 2 13 14 15 16 SET BUSY c Press the camera selection button ([1] - [16] for the WJ-HD316A, [1] - [9] for descriptions of how to display and perform...
... arrows button while holding the PAN/TILT SLOW button down. Moves a camera horizontally/vertically. x Use the arrows button to the operating instruction for the camera. MONITOR1 MONITOR2 R 123 4 STOP PLAY PAUSE REC - For further information, refer to adjust the vertical or horizontal ...7 8 ZOOM/ A-B SLOW /ESC FOCUS REPEAT - + DISK SELECT COPY TEXT MARK 9 10/0 11 12 IRIS LISTED EL-ZOOM LOGOUT LOGOUT PRESET /AUTO 2 13 14 15 16 SET BUSY c Press the camera selection button ([1] - [16] for the WJ-HD316A, [1] - [9] for descriptions of how to display and perform...

WJHD309A User Guide
Page 65
Refer to the operating instructions of the WJ-HD316A/309A in use. In this case, select the desired camera channel first using an optional PS·Data compatible controller by designating a unit number using ...
Refer to the operating instructions of the WJ-HD316A/309A in use. In this case, select the desired camera channel first using an optional PS·Data compatible controller by designating a unit number using ...

WJHD309A User Guide
Page 70
...OPERATE indicator on the front panel will go off . Refer to the operating instructions of the extension unit for the descriptions of the optional extension unit. The camera selection buttons (1 - 16 for the WJ-HD316A, 1 - 9, 0 for the WJ-HD309A) will light green and go off (for 2 seconds each ) .... G When installing/uninstalling the unit into/from the rack (rack mounting/unmounting) Once displaying the HDD SAFETY MODE window in hard disk of the unit (rack mounting/unmounting). When the system check complete window is displayed, carry out the procedures described on page 140...
...OPERATE indicator on the front panel will go off . Refer to the operating instructions of the extension unit for the descriptions of the optional extension unit. The camera selection buttons (1 - 16 for the WJ-HD316A, 1 - 9, 0 for the WJ-HD309A) will light green and go off (for 2 seconds each ) .... G When installing/uninstalling the unit into/from the rack (rack mounting/unmounting) Once displaying the HDD SAFETY MODE window in hard disk of the unit (rack mounting/unmounting). When the system check complete window is displayed, carry out the procedures described on page 140...

WJHD309A User Guide
Page 95
... for further information about "Embedded REC (title)". 8 Live Sequence Perform the settings for the WJ-HD316A): Displays images from camera channels 13 - 16 on a 4-split screen. 1 - 9: Displays... SETU2sP 9 I9 Camer--a Title D2issplay P9ositio9n 10 11 I1101Live S--e-- Refer to the Network Setup Instruction (PDF) for further information. 8 Camera Title Display Position Select a camera title display position...SET22ss I7 Time &-- Note: When setting the camera title to be recorded together with images, the camera title display will be corrected and press the STOP button to delete it.
... for further information about "Embedded REC (title)". 8 Live Sequence Perform the settings for the WJ-HD316A): Displays images from camera channels 13 - 16 on a 4-split screen. 1 - 9: Displays... SETU2sP 9 I9 Camer--a Title D2issplay P9ositio9n 10 11 I1101Live S--e-- Refer to the Network Setup Instruction (PDF) for further information. 8 Camera Title Display Position Select a camera title display position...SET22ss I7 Time &-- Note: When setting the camera title to be recorded together with images, the camera title display will be corrected and press the STOP button to delete it.

WJHD309A User Guide
Page 139
.... • Depending on the camera setup menu. 2. Refer to the operating instructions of the PAN/TILT button, the ZOOM/FOCUS button, the IRIS button, the PRESET/AUTO button and the camera selection buttons 4 - 16 for the WJ-HD316A (4 - 9 for a desired camera channel and the SET button simultaneously. &#...calling up it from this unit, it is necessary to set the camera functions in advance. For further information, refer to the operating instructions of the camera setup menu. Press the camera selection button 3 after moving the cursor to perform the settings of the camera. DISPLAY...
.... • Depending on the camera setup menu. 2. Refer to the operating instructions of the PAN/TILT button, the ZOOM/FOCUS button, the IRIS button, the PRESET/AUTO button and the camera selection buttons 4 - 16 for the WJ-HD316A (4 - 9 for a desired camera channel and the SET button simultaneously. &#...calling up it from this unit, it is necessary to set the camera functions in advance. For further information, refer to the operating instructions of the camera setup menu. Press the camera selection button 3 after moving the cursor to perform the settings of the camera. DISPLAY...


