
WJHD309A User Guide
Page 12
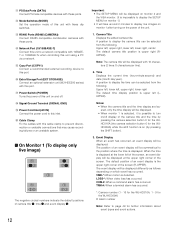
... number (1 - 16 for the WJ-HD316A, 1 - 9 for the WJ-HD309A) #: Alarm number Note: Refer to page 49 for the WJHD309A) while the shift function is impossible to display the SETUP MENU on monitor 1.) • ...with this unit on (by pressing the camera selection button 8 for the WJHD316A (the camera selection button 6 for further information about event types and event ... !4 Network Port (10/100BASE-T) Connect this unit to a network compatible with 10BASET or 100BASE-Tx when controlling this unit using a PC via a network. !5 Copy Port (COPY1) Connect a recommended external recording device ...
... number (1 - 16 for the WJ-HD316A, 1 - 9 for the WJ-HD309A) #: Alarm number Note: Refer to page 49 for the WJHD309A) while the shift function is impossible to display the SETUP MENU on monitor 1.) • ...with this unit on (by pressing the camera selection button 8 for the WJHD316A (the camera selection button 6 for further information about event types and event ... !4 Network Port (10/100BASE-T) Connect this unit to a network compatible with 10BASET or 100BASE-Tx when controlling this unit using a PC via a network. !5 Copy Port (COPY1) Connect a recommended external recording device ...
WJHD309A User Guide
Page 44
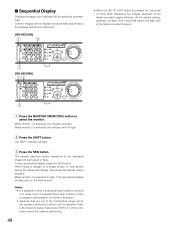
...SETUP /ESC FOCUS REPEAT - + DISK SELECT COPY TEXT MARK 9 10/0 11 12 IRIS LISTED EL-ZOOM LOGOUT PRESET 2 13 14 15 16 /AUTO SET BUSY x [WJ-HD309A] zc MONITOR1 MONITOR2 R 123 R SHIFT SEQ TEXT OSD 456 DISK...Refer to the Network Setup Instructions (PDF) for 2 seconds or more while displaying live images, playback of the latest recorded images will ...WJ-HD316A] z c MONITOR1 MONITOR2 R 1234 STOP PLAY PAUSE REC - x Press the SHIFT button. To stop sequential display, press the SEQ button. REC STOP REV FWD PAN/ GOTO TILT LAST SEARCH PAN/TILT SETUP...
...SETUP /ESC FOCUS REPEAT - + DISK SELECT COPY TEXT MARK 9 10/0 11 12 IRIS LISTED EL-ZOOM LOGOUT PRESET 2 13 14 15 16 /AUTO SET BUSY x [WJ-HD309A] zc MONITOR1 MONITOR2 R 123 R SHIFT SEQ TEXT OSD 456 DISK...Refer to the Network Setup Instructions (PDF) for 2 seconds or more while displaying live images, playback of the latest recorded images will ...WJ-HD316A] z c MONITOR1 MONITOR2 R 1234 STOP PLAY PAUSE REC - x Press the SHIFT button. To stop sequential display, press the SEQ button. REC STOP REV FWD PAN/ GOTO TILT LAST SEARCH PAN/TILT SETUP...

WJHD309A User Guide
Page 95
...camera title will be closed. Refer to be recorded together with images, the camera title display will be embedded in "STEP 1" from camera channels 1 - 9 on monitor 1 individually using a PC via a network. SETUP MENU QuickCamera Title Display REC & Event CAM1...camera channels 1 - 4 on a 4-split screen. 5 - 8: Displays images from camera channels 5 - 8 on a 4-split screen. 9 - 9 (only for the WJ-HD316A): Displays images from camera channels 13 - 16 on a 4-split screen. 1 - 9: Displays images from the following . SETU2sP 9 I9 Camer--a Title D2issplay P9ositio9n 10 11 ...
...camera title will be closed. Refer to be recorded together with images, the camera title display will be embedded in "STEP 1" from camera channels 1 - 9 on monitor 1 individually using a PC via a network. SETUP MENU QuickCamera Title Display REC & Event CAM1...camera channels 1 - 4 on a 4-split screen. 5 - 8: Displays images from camera channels 5 - 8 on a 4-split screen. 9 - 9 (only for the WJ-HD316A): Displays images from camera channels 13 - 16 on a 4-split screen. 1 - 9: Displays images from the following . SETU2sP 9 I9 Camer--a Title D2issplay P9ositio9n 10 11 ...

WJHD309A User Guide
Page 96
SETUP MENU Quick Monitor 1 Monitor 2 LIVE STEP CAM PRESET DWELL STEP CAM PRESET DWELL Display 1 I1 Date F--ormat 2s 1 1 --MMM.D2Ds.YY REC & Event 2 3 Network 4 5 6 7 I2 Time F--ormat 2s 2 2 --12h 2s I3 Time &-- SETU2sP 9 I9 Camer--a Title D2issplay P9ositio9n 10 11...15 I15Langu-a- n Select "DWELL" in "STEP 1" using the arrows button. [Screenshot 4] The cursor moves to select a preset position number for the WJ-HD316A): Displays images from 1 - 30 seconds (in "STEP 1". SETU2sP 9 I9 Camer--a Title D2issplay P9ositio9n 10 11 I1101Live S--e-- The sequence step is ...
SETUP MENU Quick Monitor 1 Monitor 2 LIVE STEP CAM PRESET DWELL STEP CAM PRESET DWELL Display 1 I1 Date F--ormat 2s 1 1 --MMM.D2Ds.YY REC & Event 2 3 Network 4 5 6 7 I2 Time F--ormat 2s 2 2 --12h 2s I3 Time &-- SETU2sP 9 I9 Camer--a Title D2issplay P9ositio9n 10 11...15 I15Langu-a- n Select "DWELL" in "STEP 1" using the arrows button. [Screenshot 4] The cursor moves to select a preset position number for the WJ-HD316A): Displays images from 1 - 30 seconds (in "STEP 1". SETU2sP 9 I9 Camer--a Title D2issplay P9ositio9n 10 11 I1101Live S--e-- The sequence step is ...

WJHD309A User Guide
Page 97
... (1 - 16 for the WJ-HD316A, 1 - 9 for the WJHD309A) on the SETUP MENU (Advanced) will be validated when recording. The following . I [REC & Event] Perform the settings for the basic recording and the settings for event actions of each event type (motion detection, video loss, command alarm and terminal alarm.) SETUP MENU Quick Display REC & Event Network I REC Type...
... (1 - 16 for the WJ-HD316A, 1 - 9 for the WJHD309A) on the SETUP MENU (Advanced) will be validated when recording. The following . I [REC & Event] Perform the settings for the basic recording and the settings for event actions of each event type (motion detection, video loss, command alarm and terminal alarm.) SETUP MENU Quick Display REC & Event Network I REC Type...
WJHD309A User Guide
Page 108
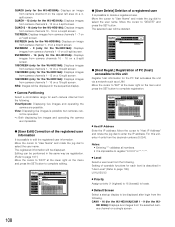
... as a LAN. Move the cursor to enter the IP address. SETUP MENU Advanced System Switcher Recording Display Basic Setup Time & Date User Regist. Move the cursor to "Host IP .... Editing can - SETUP MENU Advanced Basic Setup Time & Date User Regist. For this unit Register host information for the PC that accesses the unit via a network such as registration. ...be displayed. CAM1 - 16 (for the WJ-HD316A)/CAM 1 - 9 (for the WJ- QUAD9 - 12 (only for the WJ-HD316A): Displays images from the following . QUAD13 - 16 (only for the WJ-HD316A): Displays images from camera channels 13 -...
... as a LAN. Move the cursor to enter the IP address. SETUP MENU Advanced System Switcher Recording Display Basic Setup Time & Date User Regist. Move the cursor to "Host IP .... Editing can - SETUP MENU Advanced Basic Setup Time & Date User Regist. For this unit Register host information for the PC that accesses the unit via a network such as registration. ...be displayed. CAM1 - 16 (for the WJ-HD316A)/CAM 1 - 9 (for the WJ- QUAD9 - 12 (only for the WJ-HD316A): Displays images from the following . QUAD13 - 16 (only for the WJ-HD316A): Displays images from camera channels 13 -...

WJHD309A User Guide
Page 130
...WJ-HD309A) (coaxial communication compatible). Set this when connecting units in the cascade connection. SETUP MENU Advanced Camera Control PS.DATA Setup RS485 Setup RS232C Setup NW Setup 1 NW Setup 2 NTP Setup System Switcher Recording... the cameras connected to this unit a PC via a network such as a controller when connecting those external devices to ...camera control Select a communication method for each (only for the WJHD316A). • When using the VIDEO IN connector 1 - ... according to the VIDEO IN connectors 1 8 for the WJ-HD316A (1 - 6 for the PS·Data. ON: Select...
...WJ-HD309A) (coaxial communication compatible). Set this when connecting units in the cascade connection. SETUP MENU Advanced Camera Control PS.DATA Setup RS485 Setup RS232C Setup NW Setup 1 NW Setup 2 NTP Setup System Switcher Recording... the cameras connected to this unit a PC via a network such as a controller when connecting those external devices to ...camera control Select a communication method for each (only for the WJHD316A). • When using the VIDEO IN connector 1 - ... according to the VIDEO IN connectors 1 8 for the WJ-HD316A (1 - 6 for the PS·Data. ON: Select...
WJHD309A User Guide
Page 164
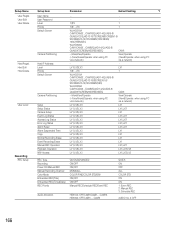
...PARAMETERS AND THE DEFAULT SETTINGS OF THE SETUP MENU These are the setting parameters and the default settings of the unit] WJ-HD316A: 1/2/.../16/1-4/5-8/9-12/13-16/1-9/10-16/-WJ-HD309A: 1/2/.../9/1-4/5-8/9-9/1-9/-[Operating via a network] WJ-HD316A: CAM1/CAM2/.../CAM16/QUAD1-4/QUAD5-8/ QUAD9...-12/QUAD13-16/9SCREEN1-9/ 9SCREEN10-16/-WJ-HD309A: CAM1/CAM2/.../CAM9/QUAD1-4/QUAD5-8/ QUAD9...
...PARAMETERS AND THE DEFAULT SETTINGS OF THE SETUP MENU These are the setting parameters and the default settings of the unit] WJ-HD316A: 1/2/.../16/1-4/5-8/9-12/13-16/1-9/10-16/-WJ-HD309A: 1/2/.../9/1-4/5-8/9-9/1-9/-[Operating via a network] WJ-HD316A: CAM1/CAM2/.../CAM16/QUAD1-4/QUAD5-8/ QUAD9...-12/QUAD13-16/9SCREEN1-9/ 9SCREEN10-16/-WJ-HD309A: CAM1/CAM2/.../CAM9/QUAD1-4/QUAD5-8/ QUAD9...
WJHD309A User Guide
Page 166
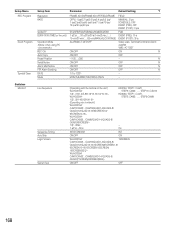
... Screen Camera Partitioning Setup Setup Status Camera Setup Event Log Status Access Log Status Error Log Status Alarm Reset Alarm Suspended Time Copy Normal Recording Erase Event Recording Erase Manual REC Operation Playback Operation N/W Access - - - - 1/2/3 1 1/2/...../16 1 WJ-HD316A CAM1/CAM2/.../CAM16/QUAD1... when using PC via a network) View/Operate (View&Operate: when using PC via a network) - - LV1/LV2/LV3 LV1 1/2/...../16 1 WJ-HD316A CAM1/CAM2/.../CAM16/QUAD1-4/QUAD5-8/ QUAD9-12/QUAD13-16/9SCREEN1-9/ 9SCREEN10-16/16SCREEN/SEQ WJ-HD309A CAM1/CAM2/.../CAM9/QUAD1-4/QUAD5...
... Screen Camera Partitioning Setup Setup Status Camera Setup Event Log Status Access Log Status Error Log Status Alarm Reset Alarm Suspended Time Copy Normal Recording Erase Event Recording Erase Manual REC Operation Playback Operation N/W Access - - - - 1/2/3 1 1/2/...../16 1 WJ-HD316A CAM1/CAM2/.../CAM16/QUAD1... when using PC via a network) View/Operate (View&Operate: when using PC via a network) - - LV1/LV2/LV3 LV1 1/2/...../16 1 WJ-HD316A CAM1/CAM2/.../CAM16/QUAD1-4/QUAD5-8/ QUAD9-12/QUAD13-16/9SCREEN1-9/ 9SCREEN10-16/16SCREEN/SEQ WJ-HD309A CAM1/CAM2/.../CAM9/QUAD1-4/QUAD5...
WJHD309A User Guide
Page 168
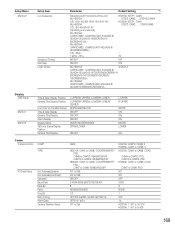
.../7SCREEN/9SCREEN1-9/ 9SCREEN10-16/10SCREEN/13SCREEN/ 16SCREEN/SEQ/-- STEP16: CAM16 HD309A: STEP1: CAM1, STEP2: CAM2, ...... Setup Menu REC Program Event Program Special Days Setup Item Resolution RATE QUALITY DURATION (TIME for the unit) Operation Mode (Mode: when using PC via a network] WJ-HD316A: CAM1/CAM2/.../CAM16/QUAD1-4/QUAD5-8/ QUAD9-12/QUAD13-16/9SCREEN1-9/ 9SCREEN10-16...
.../7SCREEN/9SCREEN1-9/ 9SCREEN10-16/10SCREEN/13SCREEN/ 16SCREEN/SEQ/-- STEP16: CAM16 HD309A: STEP1: CAM1, STEP2: CAM2, ...... Setup Menu REC Program Event Program Special Days Setup Item Resolution RATE QUALITY DURATION (TIME for the unit) Operation Mode (Mode: when using PC via a network] WJ-HD316A: CAM1/CAM2/.../CAM16/QUAD1-4/QUAD5-8/ QUAD9-12/QUAD13-16/9SCREEN1-9/ 9SCREEN10-16...
WJHD309A User Guide
Page 169
...: CAM1/CAM2/.../CAM9/QUAD1-4/QUAD5-8/ QUAD9/7SCREEN/9SCREEN/SEQ/-- Setup Menu Monitor2 Setup Item Live Sequence Sequence Timing Auto Skip Login Screen Parameter Default Setting *1 [Operating with the buttons of the unit] WJ-HD316A: 1/2/.../16/1-4/5-8/9-12/13-16/1-9/10-16/-WJ-HD309A: 1/2/.../9/1-4/5-8/9-9/1-9/-[Operating via a network] WJ-HD316A: CAM1/CAM2/.../CAM16/QUAD1-4/QUAD5-8/ QUAD9-12/QUAD13-16/9SCREEN1-9/ 9SCREEN10...
...: CAM1/CAM2/.../CAM9/QUAD1-4/QUAD5-8/ QUAD9/7SCREEN/9SCREEN/SEQ/-- Setup Menu Monitor2 Setup Item Live Sequence Sequence Timing Auto Skip Login Screen Parameter Default Setting *1 [Operating with the buttons of the unit] WJ-HD316A: 1/2/.../16/1-4/5-8/9-12/13-16/1-9/10-16/-WJ-HD309A: 1/2/.../9/1-4/5-8/9-9/1-9/-[Operating via a network] WJ-HD316A: CAM1/CAM2/.../CAM16/QUAD1-4/QUAD5-8/ QUAD9-12/QUAD13-16/9SCREEN1-9/ 9SCREEN10...


