
TC47LE54 User Guide
Page 11
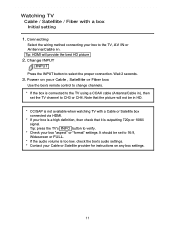
... proper connection. Connecting Select the wiring method connecting your box to verify. * Check your Cable , Satellite or Fiber box Use the box's remote control to change channels. * If the box is too low, check the box's audio settings. * Contact your Cable or Satellite provider for instructions on your box "aspect" or "format" settings. Power on any box settings. 11 Watching TV Cable / Satellite / Fiber with a Cable or Satellite box connected via HDMI. * If your box is a high definition, then check that the picture...
... proper connection. Connecting Select the wiring method connecting your box to verify. * Check your Cable , Satellite or Fiber box Use the box's remote control to change channels. * If the box is too low, check the box's audio settings. * Contact your Cable or Satellite provider for instructions on your box "aspect" or "format" settings. Power on any box settings. 11 Watching TV Cable / Satellite / Fiber with a Cable or Satellite box connected via HDMI. * If your box is a high definition, then check that the picture...
TC47LE54 User Guide
Page 12
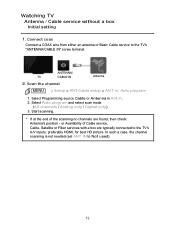
... TV's A/V inputs, preferably HDMI, for best HD picture. Select Programming source Cable or Antenna in Ant in , Auto program 1. Cable, Satellite or Fiber services with a box are found, then check: Antenna's position - In such a case, the channel scanning is not needed (set ANT IN to the TV's "ANTENNA/CABLE IN" screw terminal. Connect coax Connect a COAX wire from either an antenna or Basic Cable service to Not used). 12 Scan the channel MENU Setup > ANT/Cable setup > ANT in . 2. Select Auto program and select scan mode (All channels / Analog only / Digital only...
... TV's A/V inputs, preferably HDMI, for best HD picture. Select Programming source Cable or Antenna in Ant in , Auto program 1. Cable, Satellite or Fiber services with a box are found, then check: Antenna's position - In such a case, the channel scanning is not needed (set ANT IN to the TV's "ANTENNA/CABLE IN" screw terminal. Connect coax Connect a COAX wire from either an antenna or Basic Cable service to Not used). 12 Scan the channel MENU Setup > ANT/Cable setup > ANT in . 2. Select Auto program and select scan mode (All channels / Analog only / Digital only...
TC47LE54 User Guide
Page 21
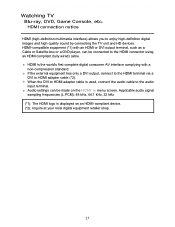
... the DVI to HDMI adapter cable is used, connect the audio cable to HDMI adapter cable (*2). Watching TV Blu-ray, DVD, Game Console, etc. HDMI-compatible equipment (*1) with a non-compression standard. Audio settings can be made on an HDMI-compliant device. (*2): Inquire at your local digital equipment retailer shop. 21 HDMI is displayed on the HDMI in menu screen. If the external equipment has only a DVI output, connect to the HDMI terminal via a DVI to the audio input terminal. HDMI connection notice HDMI...
... the DVI to HDMI adapter cable is used, connect the audio cable to HDMI adapter cable (*2). Watching TV Blu-ray, DVD, Game Console, etc. HDMI-compatible equipment (*1) with a non-compression standard. Audio settings can be made on an HDMI-compliant device. (*2): Inquire at your local digital equipment retailer shop. 21 HDMI is displayed on the HDMI in menu screen. If the external equipment has only a DVI output, connect to the HDMI terminal via a DVI to the audio input terminal. HDMI connection notice HDMI...

TC47LE54 User Guide
Page 29
... powerful sound. Minimizes volume disparity after switching to stereo. The default setting is "Digital" for music and action movies. Ideal for the HDMI connection. (Digital input signal) Select audio input terminal when a DVI cable is selected. "A.I . sound", "Surround", "Volume leveler", and "Distance to "Off" when using external speakers. Switches to wall" do not work if "Off" is connected along with an analog audio input signal. 29 Enables the TV's built-in Digital/ Comp./Video Description Equalizes overall volume levels across all channels and external inputs. sound...
... powerful sound. Minimizes volume disparity after switching to stereo. The default setting is "Digital" for music and action movies. Ideal for the HDMI connection. (Digital input signal) Select audio input terminal when a DVI cable is selected. "A.I . sound", "Surround", "Volume leveler", and "Distance to "Off" when using external speakers. Switches to wall" do not work if "Off" is connected along with an analog audio input signal. 29 Enables the TV's built-in Digital/ Comp./Video Description Equalizes overall volume levels across all channels and external inputs. sound...

TC47LE54 User Guide
Page 117
... components using one button on link Default speakers Speaker control Power off link HDAVI Control 2 or VIERA Link control only with the TV's remote control later Unselected device energy save (for available equipment only) HDAVI Control 3 or later Provides setting information (Language, time, etc.) Automatic lip-sync function HDAVI Control 4 or later Energy saving mode (with Quick Start mode) HDAVI Control 5 Audio Return Channel Audio Return Channel (ARC) is a function that enables digital sound signals to be sent via an HDMI cable...
... components using one button on link Default speakers Speaker control Power off link HDAVI Control 2 or VIERA Link control only with the TV's remote control later Unselected device energy save (for available equipment only) HDAVI Control 3 or later Provides setting information (Language, time, etc.) Automatic lip-sync function HDAVI Control 4 or later Energy saving mode (with Quick Start mode) HDAVI Control 5 Audio Return Channel Audio Return Channel (ARC) is a function that enables digital sound signals to be sent via an HDMI cable...

TC47LE54 User Guide
Page 123
... and set to On Change the VIERA Link to On in VIERA Link settings menu. Select VIERA Link settings Setup > VIERA Link settings Select Setup using / from menu bar and press select VIERA Link settings with / 4. Display the menu MENU Menu 2. Select and set other VIERA Link settings then again. (Power on the "HDAVI Control" version of the equipment. 1. Some features are disabled depending on link/Power off link/Energy saving mode/ Unselected device energy save /Default speakers) 123...
... and set to On Change the VIERA Link to On in VIERA Link settings menu. Select VIERA Link settings Setup > VIERA Link settings Select Setup using / from menu bar and press select VIERA Link settings with / 4. Display the menu MENU Menu 2. Select and set other VIERA Link settings then again. (Power on the "HDAVI Control" version of the equipment. 1. Some features are disabled depending on link/Power off link/Energy saving mode/ Unselected device energy save /Default speakers) 123...

TC47LE54 User Guide
Page 126
... with an HDMI cable. Transmittable data Recorder On Screen Display Language setting Home theater/Player Panel Aspect Ratio (16:9 fixed) Closed caption information --- (Mode/CC type/Digital setting) * There is a possibility that all the GUI language information might be transmitted to each piece of equipment (Recorder/Home theater/Player) that has an HDMI CEC function connected to a TV with an HDMI cable. Convenience features VIERA Link ™ "HDAVI Control ™" VIERA Link settings feature (3) Automatic...
... with an HDMI cable. Transmittable data Recorder On Screen Display Language setting Home theater/Player Panel Aspect Ratio (16:9 fixed) Closed caption information --- (Mode/CC type/Digital setting) * There is a possibility that all the GUI language information might be transmitted to each piece of equipment (Recorder/Home theater/Player) that has an HDMI CEC function connected to a TV with an HDMI cable. Convenience features VIERA Link ™ "HDAVI Control ™" VIERA Link settings feature (3) Automatic...

TC47LE54 User Guide
Page 144
... for the HDMI connection. (Digital input signal) Select audio input terminal when a DVI cable is connected along with an analog audio input signal. 144 Enables the TV's built-in Digital/ Comp./Video Description Equalizes overall volume levels across all channels and external inputs. Enhances audio L/R response when listening to "Off" when using external speakers. "A.I . Minimizes volume disparity after switching to wall" do not work if "Off" is "Digital" for music and action movies. Enhances bass sound and provides powerful sound. The default setting is selected. sound...
... for the HDMI connection. (Digital input signal) Select audio input terminal when a DVI cable is connected along with an analog audio input signal. 144 Enables the TV's built-in Digital/ Comp./Video Description Equalizes overall volume levels across all channels and external inputs. Enhances audio L/R response when listening to "Off" when using external speakers. "A.I . Minimizes volume disparity after switching to wall" do not work if "Off" is "Digital" for music and action movies. Enhances bass sound and provides powerful sound. The default setting is selected. sound...
TC47LE54 User Guide
Page 146
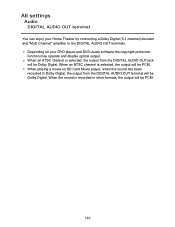
... DIGITAL AUDIO OUT terminals. When the sound is recorded in Dolby Digital, the output from the DIGITAL AUDIO OUT jack will be Dolby Digital. When an ATSC channel is selected, the output will be PCM. When an NTSC channel is selected, the output from the DIGITAL AUDIO OUT terminal will be Dolby Digital. All settings Audio DIGITAL AUDIO OUT terminal You can enjoy your DVD player and DVD-Audio software the copyright protection function may operate and disable optical output...
... DIGITAL AUDIO OUT terminals. When the sound is recorded in Dolby Digital, the output from the DIGITAL AUDIO OUT jack will be Dolby Digital. When an ATSC channel is selected, the output will be PCM. When an NTSC channel is selected, the output from the DIGITAL AUDIO OUT terminal will be Dolby Digital. All settings Audio DIGITAL AUDIO OUT terminal You can enjoy your DVD player and DVD-Audio software the copyright protection function may operate and disable optical output...

TC47LE54 User Guide
Page 163
...: Edit these items. Caption: Changes the station identifier. (maximum 7 characters available) Favorite: Registers channels to save the settings. All settings Setup ANT/Cable setup (1) MENU Menu > Setup > ANT/Cable setup Settings ANT in Auto program Options Cable/ Antenna/ Not used : Following channel settings are erased. Select Apply . Not used All channels/ Analog only/ Digital only Manual program Description Select desired signal type to start scanning automatically. All previously saved channels are not available Select scan type and press OK to scan or edit. After...
...: Edit these items. Caption: Changes the station identifier. (maximum 7 characters available) Favorite: Registers channels to save the settings. All settings Setup ANT/Cable setup (1) MENU Menu > Setup > ANT/Cable setup Settings ANT in Auto program Options Cable/ Antenna/ Not used : Following channel settings are erased. Select Apply . Not used All channels/ Analog only/ Digital only Manual program Description Select desired signal type to start scanning automatically. All previously saved channels are not available Select scan type and press OK to scan or edit. After...

TC47LE54 User Guide
Page 165
CC1-4: Information related to pictures (Appears at the bottom of Analog broadcasting. On: To display Closed captions. All settings Setup Closed caption (1) MENU Settings Reset to defaults Mode Analog Menu > Setup > Closed caption Options Off/On/ CC on mute: To display Closed captions when the audio is muted. (When not using, select Off). Choose the Closed caption service of the screen) T1-4: Textual information (Appears over the entire screen) 165 CC on mute CC1-4/T1-4 Description Resets all Closed caption settings to factory default settings.
CC1-4: Information related to pictures (Appears at the bottom of Analog broadcasting. On: To display Closed captions. All settings Setup Closed caption (1) MENU Settings Reset to defaults Mode Analog Menu > Setup > Closed caption Options Off/On/ CC on mute: To display Closed captions when the audio is muted. (When not using, select Off). Choose the Closed caption service of the screen) T1-4: Textual information (Appears over the entire screen) 165 CC on mute CC1-4/T1-4 Description Resets all Closed caption settings to factory default settings.

TC47LE54 User Guide
Page 166
All settings Setup Closed caption (2) MENU Menu > Setup > Closed caption Settings Digital Digital setting (Set display settings in digital programs.) Options Description Primary/ The Digital Closed caption menu lets you Second./ configure the way you choose to view the digital Service 3/4/5/6 captioning. opacity Select the opacity of text box Outline Select the outline color of text box Back. opacity Select the opacity of text Background Select the color of text (Identify the setting options on the screen). 166 Size Select the text size Font Select the text font ...
All settings Setup Closed caption (2) MENU Menu > Setup > Closed caption Settings Digital Digital setting (Set display settings in digital programs.) Options Description Primary/ The Digital Closed caption menu lets you Second./ configure the way you choose to view the digital Service 3/4/5/6 captioning. opacity Select the opacity of text box Outline Select the outline color of text box Back. opacity Select the opacity of text Background Select the color of text (Identify the setting options on the screen). 166 Size Select the text size Font Select the text font ...

TC47LE54 User Guide
Page 167
... cut off). If a digital program is 480i (except for instructions. The CC can be displayed on the recorder or output monitor. 167 The TV's CC button does not operate the Satellite or Cable box's CC function. All settings Setup Closed caption notice For viewing the CC of digital broadcasting, set the aspect to ON on both the receiver and TV when the signal is being output in analog format, the CC data...
... cut off). If a digital program is 480i (except for instructions. The CC can be displayed on the recorder or output monitor. 167 The TV's CC button does not operate the Satellite or Cable box's CC function. All settings Setup Closed caption notice For viewing the CC of digital broadcasting, set the aspect to ON on both the receiver and TV when the signal is being output in analog format, the CC data...

TC47LE54 User Guide
Page 168
... and switches to On after everything is connected. The TV remains on and the Play mode is selected. When "Yes" is selected and the TV is turned off, all VIERA Link functions, set to the appropriate HDMI input whenever VIERA Link compatible equipment is initially turned on even if the VIERA Link compatible equipment is turned off. 168 All settings Setup VIERA Link settings (1) MENU Menu > Setup > VIERA Link settings Settings VIERA...
... and switches to On after everything is connected. The TV remains on and the Play mode is selected. When "Yes" is selected and the TV is turned off, all VIERA Link functions, set to the appropriate HDMI input whenever VIERA Link compatible equipment is initially turned on even if the VIERA Link compatible equipment is turned off. 168 All settings Setup VIERA Link settings (1) MENU Menu > Setup > VIERA Link settings Settings VIERA...

TC47LE54 User Guide
Page 169
Yes: The connected VIERA Link compatible equipment will be turned off , all connected VIERA Link compatible equipment is the default setting. The connected equipment has "HDAVI Control 2 or later" (for the equipment. All settings Setup VIERA Link settings (2) MENU Menu > Setup > VIERA Link settings Settings Energy saving mode Options Quick start/ Save Unselected device energy save Default speakers No (stay on . 169 Power off link:(Yes). To set the Home theater system as Default speakers, change the Default speakers setting from the Home Theater...
Yes: The connected VIERA Link compatible equipment will be turned off , all connected VIERA Link compatible equipment is the default setting. The connected equipment has "HDAVI Control 2 or later" (for the equipment. All settings Setup VIERA Link settings (2) MENU Menu > Setup > VIERA Link settings Settings Energy saving mode Options Quick start/ Save Unselected device energy save Default speakers No (stay on . 169 Power off link:(Yes). To set the Home theater system as Default speakers, change the Default speakers setting from the Home Theater...

TC47LE54 User Guide
Page 170
... "On/Off Timer" is turned on / Power TV off Description Reduces screen brightness to lower power consumption. All settings Setup ECO/energy saving (1) MENU Settings Power save No signal for viewing in use when "Auto power on -screen display will be displayed for about 10 seconds when the TV is set. Eye-friendly for 10 minutes Menu > Setup > ECO/energy saving Options Standard/ Saving Stay on for the first time after the power was turned off by...
... "On/Off Timer" is turned on / Power TV off Description Reduces screen brightness to lower power consumption. All settings Setup ECO/energy saving (1) MENU Settings Power save No signal for viewing in use when "Auto power on -screen display will be displayed for about 10 seconds when the TV is set. Eye-friendly for 10 minutes Menu > Setup > ECO/energy saving Options Standard/ Saving Stay on for the first time after the power was turned off by...

TC47LE54 User Guide
Page 171
... was turned off by "No activity for 3 hours" feature. Not in use when "Auto power on for the first time after the power was activated" will flash 3, 2 and 1 to indicate the last three (3) remaining minutes prior to "Yes", or "On/Off Timer" is set, or while "PC inputs" is set to the shut-off. 171 All settings Setup ECO/energy saving (2) MENU Menu > Setup > ECO/energy saving Settings No...
... was turned off by "No activity for 3 hours" feature. Not in use when "Auto power on for the first time after the power was activated" will flash 3, 2 and 1 to indicate the last three (3) remaining minutes prior to "Yes", or "On/Off Timer" is set, or while "PC inputs" is set to the shut-off. 171 All settings Setup ECO/energy saving (2) MENU Menu > Setup > ECO/energy saving Settings No...

TC47LE54 User Guide
Page 172
TV AC cord must be displayed repeatedly. Sets the media contents or playback type to playback SD cards automatically. Sets the banner display status. 172 Set later: Image viewer settings menu will be plugged into this device. TV turns on No/Yes Image viewer auto play VIERA Connect Banner Slideshow/ Photos/ Videos/Music/ Set later/Off Off/On Description Turns TV On automatically when the cable box or connected device is restored. All settings Setup Advanced setup MENU Menu > Setup > Advanced setup Settings Options Auto power on every time the power is turned On.
TV AC cord must be displayed repeatedly. Sets the media contents or playback type to playback SD cards automatically. Sets the banner display status. 172 Set later: Image viewer settings menu will be plugged into this device. TV turns on No/Yes Image viewer auto play VIERA Connect Banner Slideshow/ Photos/ Videos/Music/ Set later/Off Off/On Description Turns TV On automatically when the cable box or connected device is restored. All settings Setup Advanced setup MENU Menu > Setup > Advanced setup Settings Options Auto power on every time the power is turned On.

TC47LE54 User Guide
Page 173
... external equipment. All settings Setup Other settings (1) MENU Settings Channel surf mode Language Clock Input labels Menu > Setup Options All/Favorite/ Digital only/ Analog only English/ Español/ Français Description Sets the mode to external input terminals can be labeled for timer function). Label: [BLANK] Blu-ray/CABLE/SATELLITE/ DVD /DVD REC/DVR/GAME/HOME THTR/ RECEIVER/COMPUTER/MEDIA CTR/ MEDIA EXT/VCR/CAMERA/MONITOR/ AUX/OTHER/Not used 173 Selects the screen menu language. Devices connected to select...
... external equipment. All settings Setup Other settings (1) MENU Settings Channel surf mode Language Clock Input labels Menu > Setup Options All/Favorite/ Digital only/ Analog only English/ Español/ Français Description Sets the mode to external input terminals can be labeled for timer function). Label: [BLANK] Blu-ray/CABLE/SATELLITE/ DVD /DVD REC/DVR/GAME/HOME THTR/ RECEIVER/COMPUTER/MEDIA CTR/ MEDIA EXT/VCR/CAMERA/MONITOR/ AUX/OTHER/Not used 173 Selects the screen menu language. Devices connected to select...

TC47LE54 User Guide
Page 182
... directions on screen instructions, do I check for my TV? The current version and latest for the latest In the main menu, select Network. Follow the on the screen to the Internet. Make sure that setting is displayed if available. firmware update may take a while. In the main menu, select Network. When the TV is turned On, update message is On. If a newer version is complete. Support / FAQ FAQ Software update...
... directions on screen instructions, do I check for my TV? The current version and latest for the latest In the main menu, select Network. Follow the on the screen to the Internet. Make sure that setting is displayed if available. firmware update may take a while. In the main menu, select Network. When the TV is turned On, update message is On. If a newer version is complete. Support / FAQ FAQ Software update...


