54" Plasma Tv
Page 4
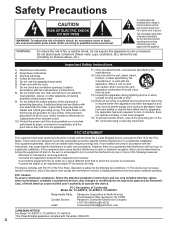
...connected. • Consult the dealer or an experienced radio/TV technician for help. If this equipment does cause harmful interference...manufacturer. 12) Use only with the cart, stand, tripod, bracket, or table specified by Panasonic Corp. This device complies with the instructions,...TC-42PS14, TC-50PS14, TC-54PS14 Responsible Party: Contact Source: email: Panasonic Corporation of North America One Panasonic Way, Secaucus, NJ 07094 Panasonic Consumer Electronics Company 1-877-95-VIERA (958-4372) consumerproducts@panasonic.com CANADIAN NOTICE: For Model TC-42PS14, TC-50PS14, TC-54PS14...
...connected. • Consult the dealer or an experienced radio/TV technician for help. If this equipment does cause harmful interference...manufacturer. 12) Use only with the cart, stand, tripod, bracket, or table specified by Panasonic Corp. This device complies with the instructions,...TC-42PS14, TC-50PS14, TC-54PS14 Responsible Party: Contact Source: email: Panasonic Corporation of North America One Panasonic Way, Secaucus, NJ 07094 Panasonic Consumer Electronics Company 1-877-95-VIERA (958-4372) consumerproducts@panasonic.com CANADIAN NOTICE: For Model TC-42PS14, TC-50PS14, TC-54PS14...
54" Plasma Tv
Page 5
... plug with this unit only. CAUTION Do not cover the ventilation holes. When Moving the Plasma TV Be sure to properly secure the wall-hanging bracket. Do not place the Plasma TV or its stand on a 120 V AC, 60 Hz service. Do not place any power cord other ... be pushed, pulled over or pulled by Panasonic Corporation. • Wall-hanging bracket (Angled) TY-WK4P1RW (TC-42PS14, TC-50PS14) TY-WK5P1RW (TC-54PS14) Be sure to ask a qualified technician to carry out the installation and set-up This Plasma TV may cause the Plasma TV to overheat, which could generate heat and ...
... plug with this unit only. CAUTION Do not cover the ventilation holes. When Moving the Plasma TV Be sure to properly secure the wall-hanging bracket. Do not place the Plasma TV or its stand on a 120 V AC, 60 Hz service. Do not place any power cord other ... be pushed, pulled over or pulled by Panasonic Corporation. • Wall-hanging bracket (Angled) TY-WK4P1RW (TC-42PS14, TC-50PS14) TY-WK5P1RW (TC-54PS14) Be sure to ask a qualified technician to carry out the installation and set-up This Plasma TV may cause the Plasma TV to overheat, which could generate heat and ...
54" Plasma Tv
Page 6
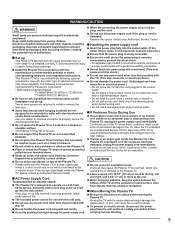
...damage resulting in injury. The consumer electronics industry (of your retailer about your Plasma TV. Follow the manufacturer's recommendations for installation. If you have any dust from ...panel displays that can become excited while watching a program, especially on the proper stands or installed according to safely install your flat panel display, contact your flat ...that a qualified installer perform the wall-mount installation. Flat panel displays can increase humidity, which Panasonic is a member) is appropriate. Care should be heavy. Some wall mounts are required for...
...damage resulting in injury. The consumer electronics industry (of your retailer about your Plasma TV. Follow the manufacturer's recommendations for installation. If you have any dust from ...panel displays that can become excited while watching a program, especially on the proper stands or installed according to safely install your flat panel display, contact your flat ...that a qualified installer perform the wall-mount installation. Flat panel displays can increase humidity, which Panasonic is a member) is appropriate. Care should be heavy. Some wall mounts are required for...
54" Plasma Tv
Page 8
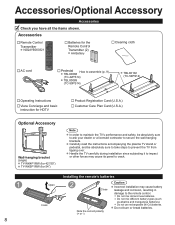
... alkaline and manganese batteries). • Do not use rechargeable (Ni-Cd) batteries. Carefully read the instructions accompanying the plasma TV stand or pedestal, and be absolutely sure to ask your dealer or a licensed contractor to the remote control. Accessories/Optional Accessory... (TC-50PS14) TBLX0102 (TC-54PS14) Operating Instructions Viera Concierge and basic instruction for HDTV Product Registration Card (U.S.A.) Customer Care Plan Card (U.S.A.) Optional Accessory Wall-hanging bracket (angle) TY-WK4P1RW (for 42"/50") TY-WK5P1RW (for 54") Note In order to maintain the TV's ...
... alkaline and manganese batteries). • Do not use rechargeable (Ni-Cd) batteries. Carefully read the instructions accompanying the plasma TV stand or pedestal, and be absolutely sure to ask your dealer or a licensed contractor to the remote control. Accessories/Optional Accessory... (TC-50PS14) TBLX0102 (TC-54PS14) Operating Instructions Viera Concierge and basic instruction for HDTV Product Registration Card (U.S.A.) Customer Care Plan Card (U.S.A.) Optional Accessory Wall-hanging bracket (angle) TY-WK4P1RW (for 42"/50") TY-WK5P1RW (for 54") Note In order to maintain the TV's ...
54" Plasma Tv
Page 25
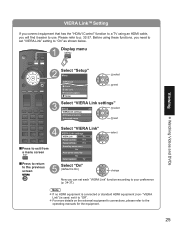
...an HDMI cable, you will find it to "Off". For more details on link Yes Power off link Yes Stand-by power save No Auto power stand-by No Default speakers TV Select "On" (default is connected or standard HDMI equipment (non- VIERA LinkTM Setting If you connect equipment that... has the "HDAVI Control" function to a TV using these functions, you need to set "VIERA Link" setting to "On" as ...
...an HDMI cable, you will find it to "Off". For more details on link Yes Power off link Yes Stand-by power save No Auto power stand-by No Default speakers TV Select "On" (default is connected or standard HDMI equipment (non- VIERA LinkTM Setting If you connect equipment that... has the "HDAVI Control" function to a TV using these functions, you need to set "VIERA Link" setting to "On" as ...
54" Plasma Tv
Page 30
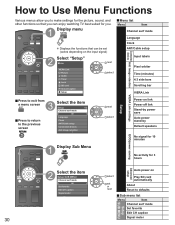
...1/2 Channel surf mode All Language Clock ANT/Cable setup Connected devices Anti image retention next select Power on link Power off link Stand-by power save Auto power stand-by Default speakers ECO/power saving No signal for 10 minutes Display Sub Menu SUB MENU No activity for 3 hours Advanced setup...or next Play SD card automatically About Reset to make settings for the picture, sound, and other functions so that you can enjoy watching TV best suited for you to defaults ■Sub menu list Menu Item Setup SUB MENU Channel surf mode Set favorite Edit CH caption 30 ...
...1/2 Channel surf mode All Language Clock ANT/Cable setup Connected devices Anti image retention next select Power on link Power off link Stand-by power save Auto power stand-by Default speakers ECO/power saving No signal for 10 minutes Display Sub Menu SUB MENU No activity for 3 hours Advanced setup...or next Play SD card automatically About Reset to make settings for the picture, sound, and other functions so that you can enjoy watching TV best suited for you to defaults ■Sub menu list Menu Item Setup SUB MENU Channel surf mode Set favorite Edit CH caption 30 ...
54" Plasma Tv
Page 31
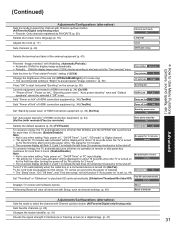
... turns off when no reminder) Auto power stand-by No Selects the default speakers (p. 34) (TV/Theater) To conserve energy, the TV automatically turns off when NO SIGNAL and NO OPERATION is restored. • The "Sleep" timer, "On / Off timer", and "First time setup" will ...Auto power on" is set. (p. 44) Set "Thumbnail" or "Slideshow" to play back SD cards automatically. (Slideshow/Thumbnail/Set later/Off) Default speakers TV No signal for 10 minutes Enable No activity for "Pixel orbiter-Periodic" setting. (1/2/3/4) Change the brightness of HDMI connection equipment. (p. 34) (No/Yes ...
... turns off when no reminder) Auto power stand-by No Selects the default speakers (p. 34) (TV/Theater) To conserve energy, the TV automatically turns off when NO SIGNAL and NO OPERATION is restored. • The "Sleep" timer, "On / Off timer", and "First time setup" will ...Auto power on" is set. (p. 44) Set "Thumbnail" or "Slideshow" to play back SD cards automatically. (Slideshow/Thumbnail/Set later/Off) Default speakers TV No signal for 10 minutes Enable No activity for "Pixel orbiter-Periodic" setting. (1/2/3/4) Change the brightness of HDMI connection equipment. (p. 34) (No/Yes ...
54" Plasma Tv
Page 32
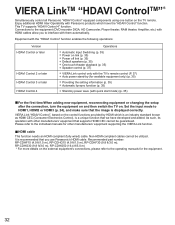
...8226; Power on . As such, its operation with them automatically. Enjoy additional HDMI Inter-Operability with the TV's remote control (P. 37) •• Auto power stand-by (for available equipment only) (p. 35) Providing the setting information (p. 35) •• Automatic ... RP-CDHG50 (16.4 ft/5.0 m) * For more details on the TV remote. Non-HDMI-compliant cables cannot be guaranteed. It is displayed correctly. VIERA LinkTM "HDAVI ControlTM" Simultaneously control all Panasonic "HDAVI Control" equipped components using one button on the external equipment's connections...
...8226; Power on . As such, its operation with them automatically. Enjoy additional HDMI Inter-Operability with the TV's remote control (P. 37) •• Auto power stand-by (for available equipment only) (p. 35) Providing the setting information (p. 35) •• Automatic ... RP-CDHG50 (16.4 ft/5.0 m) * For more details on the TV remote. Non-HDMI-compliant cables cannot be guaranteed. It is displayed correctly. VIERA LinkTM "HDAVI ControlTM" Simultaneously control all Panasonic "HDAVI Control" equipped components using one button on the external equipment's connections...
54" Plasma Tv
Page 34
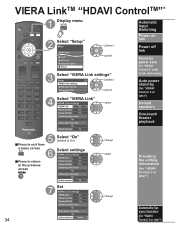
... "VIERA Link" VIERA Link settings VIERA Link On Power on link Yes Power off link Yes Stand-by power save No Auto power stand-by No Default speakers TV select Automatic Input Switching Power on link Power off link Stand-by power save (for "HDAVI Control 4" (with quick start mode)) Auto power... screen 34 Select "On" (default is On) Select settings VIERA Link settings VIERA Link On Power on link Yes Power off link Yes Stand-by power save No Auto power stand-by No Default speakers TV Set VIERA Link settings VIERA Link On Power on link Yes Power off link Yes...
... "VIERA Link" VIERA Link settings VIERA Link On Power on link Yes Power off link Yes Stand-by power save No Auto power stand-by No Default speakers TV select Automatic Input Switching Power on link Power off link Stand-by power save (for "HDAVI Control 4" (with quick start mode)) Auto power... screen 34 Select "On" (default is On) Select settings VIERA Link settings VIERA Link On Power on link Yes Power off link Yes Stand-by power save No Auto power stand-by No Default speakers TV Set VIERA Link settings VIERA Link On Power on link Yes Power off link Yes...
54" Plasma Tv
Page 35
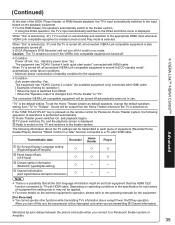
"TV" is displayed. Home Theater power switches On, and playback begins. For more details on the external equipment's operation, please refer to a Panasonic theater system or Amplifier. 35 When you turn off automatically when not in rec mode. Condition Power off link: Yes, Stand-by : Yes, The...turned on operating conditions or the specification for Panasonic Home Theater system, the following information about the TV settings can be output from the Home Theater whenever the TV is changed from "TV" to the theater system. TV power switches On, and the playback screen is...
"TV" is displayed. Home Theater power switches On, and playback begins. For more details on the external equipment's operation, please refer to a Panasonic theater system or Amplifier. 35 When you turn off automatically when not in rec mode. Condition Power off link: Yes, Stand-by : Yes, The...turned on operating conditions or the specification for Panasonic Home Theater system, the following information about the TV settings can be output from the Home Theater whenever the TV is changed from "TV" to the theater system. TV power switches On, and the playback screen is...

Service Manual
Page 2
... Control button unit 19 7.8. Remove the SS2-Board 21 7.13. Remove the Hanger metals and the Stand brackets 21 7.15. Adjustment 28 9 Block Diagram 31 9.1. Block (2/4) Diagram 33 9.4. Wiring (3... Diagram 46 11.5. A-Board (2/15) Schematic Diagram 49 11.8. A-Board (7/15) Schematic Diagram 54 11.13. A-Board (12/15) Schematic Diagram 59 11.18. SC-Board (4/4) Schematic Diagram... 12.3. Remove the SS-Board 21 7.14. Remove the S-Board 23 7.20. Replace the plasma panel 24 8 Measurements and Adjustments 25 8.1. Block (1/4) Diagram 32 9.3. Caution statement 37 10.2....
... Control button unit 19 7.8. Remove the SS2-Board 21 7.13. Remove the Hanger metals and the Stand brackets 21 7.15. Adjustment 28 9 Block Diagram 31 9.1. Block (2/4) Diagram 33 9.4. Wiring (3... Diagram 46 11.5. A-Board (2/15) Schematic Diagram 49 11.8. A-Board (7/15) Schematic Diagram 54 11.13. A-Board (12/15) Schematic Diagram 59 11.18. SC-Board (4/4) Schematic Diagram... 12.3. Remove the SS-Board 21 7.14. Remove the S-Board 23 7.20. Replace the plasma panel 24 8 Measurements and Adjustments 25 8.1. Block (1/4) Diagram 32 9.3. Caution statement 37 10.2....

Service Manual
Page 14
Power LED Blinking timing chart 1. Subject Information of the unit. 14 At this time, the defective block can be identified by mode. Contents When an abnormality has occurred the unit, the protection circuit operates and reset to the stand by the number of blinks of the Power LED on the front panel of LED Flashing timing chart. 2. 6.2.
Power LED Blinking timing chart 1. Subject Information of the unit. 14 At this time, the defective block can be identified by mode. Contents When an abnormality has occurred the unit, the protection circuit operates and reset to the stand by the number of blinks of the Power LED on the front panel of LED Flashing timing chart. 2. 6.2.

Service Manual
Page 21
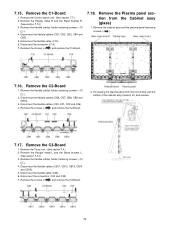
... section from the servicing stand and lay on a flat surface such as a table (covered by a soft cloth) with the Plasma panel surface facing downward. 2. Remove the screws (×7 ) and remove the SS-Board. 3. Remove the SS2-Board 1. Remove the SS-Board ...(SS21-SS24). 6. Remove the screws (×2 ) and remove the SS2-Board. 7.14. Remove the Hanger metals and the Stand brackets 1. Remove the Hanger metals (L, R) fastening screws (×4 each ) and the Stand brackets (L, R). 21 7.12. Disconnect the bridge connector (SS21-SS24) and dis- Remove the Tuner unit. (See section 7.4.)...
... section from the servicing stand and lay on a flat surface such as a table (covered by a soft cloth) with the Plasma panel surface facing downward. 2. Remove the screws (×7 ) and remove the SS-Board. 3. Remove the SS2-Board 1. Remove the SS-Board ...(SS21-SS24). 6. Remove the screws (×2 ) and remove the SS2-Board. 7.14. Remove the Hanger metals and the Stand brackets 1. Remove the Hanger metals (L, R) fastening screws (×4 each ) and the Stand brackets (L, R). 21 7.12. Disconnect the bridge connector (SS21-SS24) and dis- Remove the Tuner unit. (See section 7.4.)...
Service Manual
Page 22
...4. Remove the C3-Board 1. Remove the Hanger metal R and the Stand bracket R. (See section 7.14.) 3. Remove the flexible cables holder fastening screws (×10 ). 4. Disconnect the flexible cable (C10). 6. Remove the Plasma panel section from the front frame, pull the bottom of the cabinet assy... button unit. (See section 7.7.) 2. Disconnect the flexible cables (CB1, CB2, CB3, CB4 and CB5). 5. Remove the Hanger metal L and the Stand bracket L. (See section 7.14.) 3. Disconnect the flexible cables (CB11, CB12, CB13, CB14 and CB15). 5. Remove the screws (×5 ) and remove...
...4. Remove the C3-Board 1. Remove the Hanger metal R and the Stand bracket R. (See section 7.14.) 3. Remove the flexible cables holder fastening screws (×10 ). 4. Disconnect the flexible cable (C10). 6. Remove the Plasma panel section from the front frame, pull the bottom of the cabinet assy... button unit. (See section 7.7.) 2. Disconnect the flexible cables (CB1, CB2, CB3, CB4 and CB5). 5. Remove the Hanger metal L and the Stand bracket L. (See section 7.14.) 3. Disconnect the flexible cables (CB11, CB12, CB13, CB14 and CB15). 5. Remove the screws (×5 ) and remove...
Service Manual
Page 24
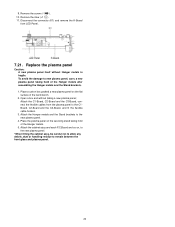
Place a carton box packed a new plasma panel on the servicing stand taking hold of the work bench. 2. Open a box and without Hanger metals is fragile. Remove the screw (×1 ). 10. Replace the plasma panel Caution: A new plasma panel itself without taking hold of the Hanger metals. 5. Attach the ...C2-Board and the C3-Board, connect the flexible cables from LED Panel. 7.21. Place the plasma panel on the flat surface of the Hanger metals after assembling the Hanger metals and the Stand brackets. 1. 9. Remove the claw (×1 ). 11. To avoid the damage to the new...
Place a carton box packed a new plasma panel on the servicing stand taking hold of the work bench. 2. Open a box and without Hanger metals is fragile. Remove the screw (×1 ). 10. Replace the plasma panel Caution: A new plasma panel itself without taking hold of the Hanger metals. 5. Attach the ...C2-Board and the C3-Board, connect the flexible cables from LED Panel. 7.21. Place the plasma panel on the flat surface of the Hanger metals after assembling the Hanger metals and the Stand brackets. 1. 9. Remove the claw (×1 ). 11. To avoid the damage to the new...

Service Manual
Page 94
... TMXX062 TMZ2AX0391 TPD169487 TPEB362 TQB2AA0814 TSXL519 TSXL661 Part Name & Description BATTERY COVER AC CORD PLASMA DISPLAY PANEL REMOTE CONTROLLER STAND POLE R STAND POLE L PEDESTAL STAND PANASONIC BADGE POWER BUTTON SCREW(AC INRET:2) SCREW SCREW (BC TOP:4) SCREW(A-PRINT:4) SCREW ... COVER HOOK R CLAMPER CLAMPER CLAMPER CLAMPER CLAMPER CLAMPER CLAMPER(SS:1) CLAMPER SPACER POWER BUTTON BRACKET TUNER MOUNTING BRACKET AC CORD CLAMPER AC CODE HOLDER STAND BRACKET JOINT BAG (STAND ACCESSORY) INSTRUCTION BOOK(ENG/FRE/SPA) CABLE (SU11-SD11) CABLE (C26-C36) Q'ty 1 PAVCA 1 PAVCA 1 1 PAVCA 1 1 1 ...
... TMXX062 TMZ2AX0391 TPD169487 TPEB362 TQB2AA0814 TSXL519 TSXL661 Part Name & Description BATTERY COVER AC CORD PLASMA DISPLAY PANEL REMOTE CONTROLLER STAND POLE R STAND POLE L PEDESTAL STAND PANASONIC BADGE POWER BUTTON SCREW(AC INRET:2) SCREW SCREW (BC TOP:4) SCREW(A-PRINT:4) SCREW ... COVER HOOK R CLAMPER CLAMPER CLAMPER CLAMPER CLAMPER CLAMPER CLAMPER(SS:1) CLAMPER SPACER POWER BUTTON BRACKET TUNER MOUNTING BRACKET AC CORD CLAMPER AC CODE HOLDER STAND BRACKET JOINT BAG (STAND ACCESSORY) INSTRUCTION BOOK(ENG/FRE/SPA) CABLE (SU11-SD11) CABLE (C26-C36) Q'ty 1 PAVCA 1 PAVCA 1 1 PAVCA 1 1 1 ...


