
PVL453 User Guide
Page 6
...Auto Daylight Saving Time 14~15 AccuBrite™ Built-in Light (Using the Light, Replacing the Bulb 16 Camera Recording (Basic, Stand-by, Programmed Recording 17~19 Playing Back Recordings (Basic Playback, Visual Search, Still ...Shutter (Auto/Manual Shutter) 26 Auto Fade 27 Color Digital Fade 28 Color Digital Filter 29 Digital Zoom 30 Digital Electronic Image Stabilization (E.I.S 31 Still/Strobe/Wide 32 MotionSensor 33 Digital Still Camera 34~40 • Memory Card (optional) Insertion/Removal ...please call : 1-800-211-PANA(7262) or send e-mail to : consumerproducts@panasonic.com
...Auto Daylight Saving Time 14~15 AccuBrite™ Built-in Light (Using the Light, Replacing the Bulb 16 Camera Recording (Basic, Stand-by, Programmed Recording 17~19 Playing Back Recordings (Basic Playback, Visual Search, Still ...Shutter (Auto/Manual Shutter) 26 Auto Fade 27 Color Digital Fade 28 Color Digital Filter 29 Digital Zoom 30 Digital Electronic Image Stabilization (E.I.S 31 Still/Strobe/Wide 32 MotionSensor 33 Digital Still Camera 34~40 • Memory Card (optional) Insertion/Removal ...please call : 1-800-211-PANA(7262) or send e-mail to : consumerproducts@panasonic.com
PVL453 User Guide
Page 13
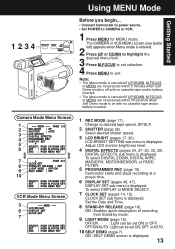
... or AUTO. 10 SELF DEMO (page 7). Select desired shutter speed. 3 LCD BRIGHT (pages 17, 20). DIGITAL EFFECTS sub menu is displayed. Press M.FOCUS to set selection. 4 Press MENU to CAMERA or VCR. 1 Press MENU for MENU mode. To select DISPLAY or MODE SELECT. 7 CLOCK SET (pages 14..., 15). Adjust LCD monitor brightness level. 4 DIGITAL EFFECTS (pages 24, 27~30, 33, 39). Using MENU Mode Getting Started 1, 2, 3, 4 Before you begin... • Connect Camcorder to power source...
... or AUTO. 10 SELF DEMO (page 7). Select desired shutter speed. 3 LCD BRIGHT (pages 17, 20). DIGITAL EFFECTS sub menu is displayed. Press M.FOCUS to set selection. 4 Press MENU to CAMERA or VCR. 1 Press MENU for MENU mode. To select DISPLAY or MODE SELECT. 7 CLOCK SET (pages 14..., 15). Adjust LCD monitor brightness level. 4 DIGITAL EFFECTS (pages 24, 27~30, 33, 39). Using MENU Mode Getting Started 1, 2, 3, 4 Before you begin... • Connect Camcorder to power source...
PVL453 User Guide
Page 24
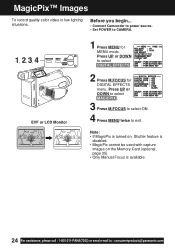
... available. 24 For assistance, please call : 1-800-211-PANA(7262) or send e-mail to CAMERA. 1, 2, 3, 4 EVF or LCD Monitor 1 Press MENU for DIGITAL EFFECTS menu. Before you begin... • Connect Camcorder to power source. • Set POWER to : consumerproducts@panasonic.com Press UP or DOWN to exit. Press UP or DOWN to select MAGICPIX...
... available. 24 For assistance, please call : 1-800-211-PANA(7262) or send e-mail to CAMERA. 1, 2, 3, 4 EVF or LCD Monitor 1 Press MENU for DIGITAL EFFECTS menu. Before you begin... • Connect Camcorder to power source. • Set POWER to : consumerproducts@panasonic.com Press UP or DOWN to exit. Press UP or DOWN to select MAGICPIX...
PVL453 User Guide
Page 26
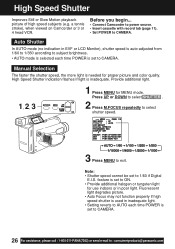
...SHUTTER . 2 Press M.FOCUS repeatedly to select shutter speed. 3 Press MENU to 1/60 if Digital E.I.S. Provide additional light. 1, 2, 3 1 Press MENU for proper picture and color quality. ...begin... • Connect Camcorder to power source. • Insert cassette with record tab (page 11). • Set POWER to : consumerproducts@panasonic.com feature is needed for... MENU mode. Manual Selection The faster the shutter speed, the more light is set to CAMERA. 26 For assistance, please call : 1-800-211-PANA(7262) or send e-mail to CAMERA...
...SHUTTER . 2 Press M.FOCUS repeatedly to select shutter speed. 3 Press MENU to 1/60 if Digital E.I.S. Provide additional light. 1, 2, 3 1 Press MENU for proper picture and color quality. ...begin... • Connect Camcorder to power source. • Insert cassette with record tab (page 11). • Set POWER to : consumerproducts@panasonic.com feature is needed for... MENU mode. Manual Selection The faster the shutter speed, the more light is set to CAMERA. 26 For assistance, please call : 1-800-211-PANA(7262) or send e-mail to CAMERA...

PVL453 User Guide
Page 27
Press UP or DOWN to select FADE/FILTER . 3 Press M.FOCUS for DIGITAL EFFECTS menu. Press RECORD/PAUSE. Press UP or DOWN to CAMERA. 1 Press MENU for AUTO FADE ; Press UP or DOWN to select BLACK or WHITE. 5 Press M.FOCUS to open and close scenes. Fade Out:...interesting way to confirm entry. FADE 1, 2, 3, 4, 5 RECORD/ PAUSE Fade In WHITE BLACK Fade Out Before you begin... • Connect Camcorder to power source. • Set POWER to select DIGITAL EFFECTS . 2 Press M.FOCUS for FADE/FILTER menu. Press MENU twice to select AUTO FADE . 4 Press M.FOCUS for MENU mode. Fade ...
Press UP or DOWN to select FADE/FILTER . 3 Press M.FOCUS for DIGITAL EFFECTS menu. Press RECORD/PAUSE. Press UP or DOWN to CAMERA. 1 Press MENU for AUTO FADE ; Press UP or DOWN to select BLACK or WHITE. 5 Press M.FOCUS to open and close scenes. Fade Out:...interesting way to confirm entry. FADE 1, 2, 3, 4, 5 RECORD/ PAUSE Fade In WHITE BLACK Fade Out Before you begin... • Connect Camcorder to power source. • Set POWER to select DIGITAL EFFECTS . 2 Press M.FOCUS for FADE/FILTER menu. Press MENU twice to select AUTO FADE . 4 Press M.FOCUS for MENU mode. Fade ...

PVL453 User Guide
Page 28
...entry. Then, press (FADE) to : consumerproducts@panasonic.com Color Digital Fade Choose from 7 fade effects in 8 different colors. 8 1, 2, 3, 4, 5, 6 7 EVF or LCD monitor Before you begin... • Connect Camcorder to power source. • Set POWER to CAMERA. 1 Press MENU for TYPE menu. Press UP ...or DOWN to select DIGITAL FADE . 4 Press M.FOCUS for DIGITAL FADE menu. Press (FADE) again to fade in or fade out at any...
...entry. Then, press (FADE) to : consumerproducts@panasonic.com Color Digital Fade Choose from 7 fade effects in 8 different colors. 8 1, 2, 3, 4, 5, 6 7 EVF or LCD monitor Before you begin... • Connect Camcorder to power source. • Set POWER to CAMERA. 1 Press MENU for TYPE menu. Press UP ...or DOWN to select DIGITAL FADE . 4 Press M.FOCUS for DIGITAL FADE menu. Press (FADE) again to fade in or fade out at any...
PVL453 User Guide
Page 29
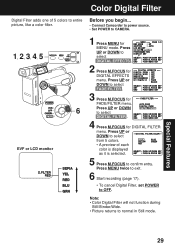
Before you begin... • Connect Camcorder to power source. • Set POWER to select DIGITAL FILTER . 4 Press M.FOCUS for DIGITAL FILTER menu. Press UP or DOWN to select FADE/FILTER . 3 Press M.FOCUS for FADE/FILTER menu. 6 Press UP or DOWN to CAMERA. 1, 2, 3, 4, 5 EVF or LCD monitor 1 Press MENU for DIGITAL EFFECTS menu. Press MENU twice to...
Before you begin... • Connect Camcorder to power source. • Set POWER to select DIGITAL FILTER . 4 Press M.FOCUS for DIGITAL FILTER menu. Press UP or DOWN to select FADE/FILTER . 3 Press M.FOCUS for FADE/FILTER menu. 6 Press UP or DOWN to CAMERA. 1, 2, 3, 4, 5 EVF or LCD monitor 1 Press MENU for DIGITAL EFFECTS menu. Press MENU twice to...

PVL453 User Guide
Page 30
Press UP or DOWN to : consumerproducts@panasonic.com Digital Zoom starts when normal zoom reaches maximum (20×). • Zoom level appears in EVF or LCD monitor. • POWER ZOOM switch controls digital zoom level. • Normal zoom resumes when ...2 Press M.FOCUS for MENU mode. Press UP or DOWN to select DIGITAL ZOOM . 3 Press M.FOCUS repeatedly to CAMERA. 1 Press MENU for DIGITAL EFFECTS menu. Digital Zoom Power Zoom magnification is digitally increased. 1, 2, 3, 4, 5 Before you begin... • Connect Camcorder to power source. • Set POWER to select D.ZOOM1, D.ZOOM2,...
Press UP or DOWN to : consumerproducts@panasonic.com Digital Zoom starts when normal zoom reaches maximum (20×). • Zoom level appears in EVF or LCD monitor. • POWER ZOOM switch controls digital zoom level. • Normal zoom resumes when ...2 Press M.FOCUS for MENU mode. Press UP or DOWN to select DIGITAL ZOOM . 3 Press M.FOCUS repeatedly to CAMERA. 1 Press MENU for DIGITAL EFFECTS menu. Digital Zoom Power Zoom magnification is digitally increased. 1, 2, 3, 4, 5 Before you begin... • Connect Camcorder to power source. • Set POWER to select D.ZOOM1, D.ZOOM2,...

PVL453 User Guide
Page 31
... E.I.S. Shutter speed setting remains after EIS is canceled. 2 Press in use. (EIS) again to brightness. • Use High Speed Shutter (page 26) if needed. NORMAL Digital EIS ON Special Features 31 unstable situations. • Connect Camcorder to power source. • Set POWER to CAMERA. 1, 2 1 Press (EIS) to display "EIS" in Before you begin...
... E.I.S. Shutter speed setting remains after EIS is canceled. 2 Press in use. (EIS) again to brightness. • Use High Speed Shutter (page 26) if needed. NORMAL Digital EIS ON Special Features 31 unstable situations. • Connect Camcorder to power source. • Set POWER to CAMERA. 1, 2 1 Press (EIS) to display "EIS" in Before you begin...
PVL453 User Guide
Page 32
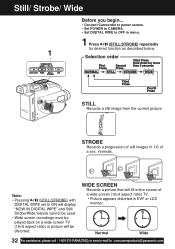
...used. • Wide screen recordings must be distorted. intervals. Still/ Strobe/ Wide Before you begin... • Connect Camcorder to power source. • Set POWER to CAMERA. • Set DIGITAL WIPE to OFF in EVF or LCD monitor. STROBE Records a progression of still images in 1/6 of a wide screen ...still image from the current picture. Normal Wide 32 For assistance, please call : 1-800-211-PANA(7262) or send e-mail to : consumerproducts@panasonic.com WIDE SCREEN Records a picture that will be played back on a wide screen TV (16×9 aspect ratio) or picture will fill ...
...used. • Wide screen recordings must be distorted. intervals. Still/ Strobe/ Wide Before you begin... • Connect Camcorder to power source. • Set POWER to CAMERA. • Set DIGITAL WIPE to OFF in EVF or LCD monitor. STROBE Records a progression of still images in 1/6 of a wide screen ...still image from the current picture. Normal Wide 32 For assistance, please call : 1-800-211-PANA(7262) or send e-mail to : consumerproducts@panasonic.com WIDE SCREEN Records a picture that will be played back on a wide screen TV (16×9 aspect ratio) or picture will fill ...
PVL453 User Guide
Page 33
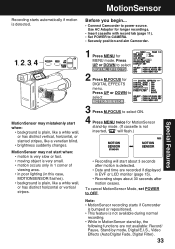
...stripes, like a white wall, or has distinct horizontal or vertical stripes. 1 Press MENU for MENU mode. Press UP or DOWN to CAMERA. • Securely position and aim Camcorder. Special Features 1, 2, 3, 4 MotionSensor may not start when: • background is plain, like a venetian blind. • ... after motion ceases. Use AC Adaptor for longer recordings. • Insert cassette with record tab (page 11). • Set POWER to select DIGITAL EFFECTS . 2 Press M.FOCUS for MotionSensor stand-by mode. (If cassette is not inserted, " " will flash.) • Recording will start...
...stripes, like a white wall, or has distinct horizontal or vertical stripes. 1 Press MENU for MENU mode. Press UP or DOWN to CAMERA. • Securely position and aim Camcorder. Special Features 1, 2, 3, 4 MotionSensor may not start when: • background is plain, like a venetian blind. • ... after motion ceases. Use AC Adaptor for longer recordings. • Insert cassette with record tab (page 11). • Set POWER to select DIGITAL EFFECTS . 2 Press M.FOCUS for MotionSensor stand-by mode. (If cassette is not inserted, " " will flash.) • Recording will start...
PVL453 User Guide
Page 34
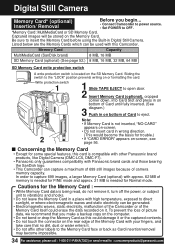
... bottom of Card until fully inserted. (See 3 diagram.) Push in on it . • Do not affix other Panasonic brand products, like Digital Camera (DMC-LC5, DMC-F7). • Panasonic only guarantees compatibility with Panasonic brand cards and those bearing the SanDisk logo. • This Camcorder can be generated. • Electromagnetic waves, static electricity, malfunction of the...
... bottom of Card until fully inserted. (See 3 diagram.) Push in on it . • Do not affix other Panasonic brand products, like Digital Camera (DMC-LC5, DMC-F7). • Panasonic only guarantees compatibility with Panasonic brand cards and those bearing the SanDisk logo. • This Camcorder can be generated. • Electromagnetic waves, static electricity, malfunction of the...
PVL453 User Guide
Page 35
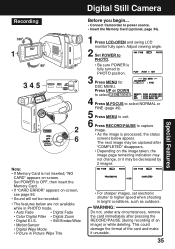
...mode. • Auto Fade • Digital Fade • Color Digital Filter • Digital Zoom • Digital E.I.S. • Still/Strobe/Wide • MotionSensor • Digital Wipe Mode • Picture in Picture Wipe Title Before you begin... • Connect Camcorder to higher speed when shooting in bright...8226; If "CARD ERROR" appears on-screen, see page 56. • Sound will not be recorded. • The features below appear. Digital Still Camera Special Features Recording 1 3, 4, 5 2 6 Note: • If Memory Card is not inserted, "NO CARD" appears on the image ...
...mode. • Auto Fade • Digital Fade • Color Digital Filter • Digital Zoom • Digital E.I.S. • Still/Strobe/Wide • MotionSensor • Digital Wipe Mode • Picture in Picture Wipe Title Before you begin... • Connect Camcorder to higher speed when shooting in bright...8226; If "CARD ERROR" appears on-screen, see page 56. • Sound will not be recorded. • The features below appear. Digital Still Camera Special Features Recording 1 3, 4, 5 2 6 Note: • If Memory Card is not inserted, "NO CARD" appears on the image ...
PVL453 User Guide
Page 36
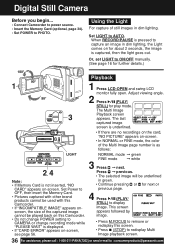
...lighting, the Light comes on -screen. NORMAL mode © green FINE mode © white 3 Press © next. Digital Still Camera Before you begin... • Connect Camcorder to power source. • Insert the Memory Card (optional, page 34). • Set POWER to AUTO. Set LIGHT to...be underlined in dim lighting. Or, set LIGHT to : consumerproducts@panasonic.com This screen appears followed by image. • Press M.FOCUS to remove or redisplay this Camcorder. • Do not change POWER setting to CAMERA or change recording mode while "PLEASE WAIT" is displayed. •...
...lighting, the Light comes on -screen. NORMAL mode © green FINE mode © white 3 Press © next. Digital Still Camera Before you begin... • Connect Camcorder to power source. • Insert the Memory Card (optional, page 34). • Set POWER to AUTO. Set LIGHT to...be underlined in dim lighting. Or, set LIGHT to : consumerproducts@panasonic.com This screen appears followed by image. • Press M.FOCUS to remove or redisplay this Camcorder. • Do not change POWER setting to CAMERA or change recording mode while "PLEASE WAIT" is displayed. •...
PVL453 User Guide
Page 37
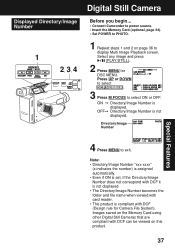
... are compliant with DCF (Design rule for DSC MENU. OFF© Directory/Image Number is displayed. Displayed Directory/Image Number 1 2, 3, 4 Digital Still Camera Before you begin... • Connect Camcorder to power source. • Insert the Memory Card (optional, page 34). • Set POWER to PHOTO. 1 Repeat steps 1 and 2 on this product. 37 Directory...
... are compliant with DCF (Design rule for DSC MENU. OFF© Directory/Image Number is displayed. Displayed Directory/Image Number 1 2, 3, 4 Digital Still Camera Before you begin... • Connect Camcorder to power source. • Insert the Memory Card (optional, page 34). • Set POWER to PHOTO. 1 Repeat steps 1 and 2 on this product. 37 Directory...
PVL453 User Guide
Page 38
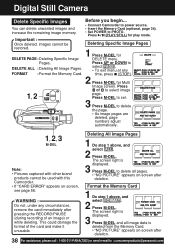
...Deleting All Image Pages. Press (PLAY/STILL) for play mode. Important : Once deleted, images cannot be used with this Camcorder. • If "CARD ERROR" appears on-screen, see page 56. FORMAT : Format the Memory Card. Press or...3 M-DEL Note: • Pictures captured with other brand products cannot be Deleting Specific Image Pages restored. Digital Still Camera Delete Specific Images You can delete unwanted images and increase the remaining image memory. This could damage the format... after deletion. Press M-DEL to set. 3 Press M-DEL to : consumerproducts@panasonic.com
...Deleting All Image Pages. Press (PLAY/STILL) for play mode. Important : Once deleted, images cannot be used with this Camcorder. • If "CARD ERROR" appears on-screen, see page 56. FORMAT : Format the Memory Card. Press or...3 M-DEL Note: • Pictures captured with other brand products cannot be Deleting Specific Image Pages restored. Digital Still Camera Delete Specific Images You can delete unwanted images and increase the remaining image memory. This could damage the format... after deletion. Press M-DEL to set. 3 Press M-DEL to : consumerproducts@panasonic.com
PVL453 User Guide
Page 39
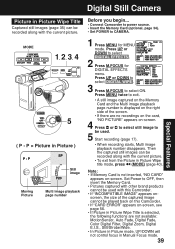
...Still image Moving Picture Multi image playback page number Before you begin... • Connect Camcorder to power source. • Insert the Memory Card (optional, page 34). • Set POWER to CAMERA. 1 Press MENU for DIGITAL EFFECTS menu. Note: • If Memory Card is selected, the following functions are...along with the current picture. • To exit from the Picture in Picture Wipe title mode, press (MODE) (page 40). Digital Still Camera Special Features Picture in Picture Wipe Title Captured still images (page 35) can be recorded along with the current picture. Set Power to...
...Still image Moving Picture Multi image playback page number Before you begin... • Connect Camcorder to power source. • Insert the Memory Card (optional, page 34). • Set POWER to CAMERA. 1 Press MENU for DIGITAL EFFECTS menu. Note: • If Memory Card is selected, the following functions are...along with the current picture. • To exit from the Picture in Picture Wipe title mode, press (MODE) (page 40). Digital Still Camera Special Features Picture in Picture Wipe Title Captured still images (page 35) can be recorded along with the current picture. Set Power to...
PVL453 User Guide
Page 40
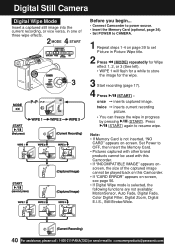
...(optional, page 34). • Set POWER to CAMERA. 1 Repeat steps 1-4 on page 39 to store the image for the wipe. 3 Start recording (page 17). 4 Press (START) : once © inserts captured image. Press (START) again to : consumerproducts@panasonic.com twice © inserts current recording picture. &#... 1-800-211-PANA(7262) or send e-mail to resume wipe. Digital Still Camera Digital Wipe Mode Insert a captured still image into the current recording, or vice versa, in one of the captured image cannot be played back on this Camcorder. • If "CARD ERROR" appears on -screen.
...(optional, page 34). • Set POWER to CAMERA. 1 Repeat steps 1-4 on page 39 to store the image for the wipe. 3 Start recording (page 17). 4 Press (START) : once © inserts captured image. Press (START) again to : consumerproducts@panasonic.com twice © inserts current recording picture. &#... 1-800-211-PANA(7262) or send e-mail to resume wipe. Digital Still Camera Digital Wipe Mode Insert a captured still image into the current recording, or vice versa, in one of the captured image cannot be played back on this Camcorder. • If "CARD ERROR" appears on -screen.
PVL453 User Guide
Page 43
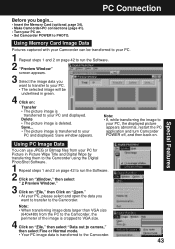
... • The picture image is transferred to PHOTO. Using PC Image Data You can be underlined in Picture Wipe Title and Digital Wipe by transferring them to the Camcorder using the Digital PhotoShot Software. 1 Repeat steps 1 and 2 on page 42 to run the Software. 2 "Preview Window" screen appears. 3 ... open the data you begin... • Insert the Memory Card (optional, page 34). • Make Camcorder-PC connections (page 41). • Turn your PC on "File," then select "Data out to camera," then select Fine or Normal mode. • Your PC image data is deleted. Save window appears....
... • The picture image is transferred to PHOTO. Using PC Image Data You can be underlined in Picture Wipe Title and Digital Wipe by transferring them to the Camcorder using the Digital PhotoShot Software. 1 Repeat steps 1 and 2 on page 42 to run the Software. 2 "Preview Window" screen appears. 3 ... open the data you begin... • Insert the Memory Card (optional, page 34). • Make Camcorder-PC connections (page 41). • Turn your PC on "File," then select "Data out to camera," then select Fine or Normal mode. • Your PC image data is deleted. Save window appears....
PVL453 User Guide
Page 44
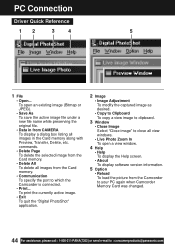
... Delete All To delete all images in from CAMERA To display a dialog box listing all images from the Card memory. • Communication To specify the port to : consumerproducts@panasonic.com To print the currently active image. • Exit To quit the "Digital PhotoShot" application. 2 Image • Image ...the Card memory along with Preview, Transfer, Delete, etc. commands. • Delete Page To delete the selected image from the Camcorder to your PC again when Camcorder Memory Card was changed. 44 For assistance, please call : 1-800-211-PANA(7262) or send e-mail to which the...
... Delete All To delete all images in from CAMERA To display a dialog box listing all images from the Card memory. • Communication To specify the port to : consumerproducts@panasonic.com To print the currently active image. • Exit To quit the "Digital PhotoShot" application. 2 Image • Image ...the Card memory along with Preview, Transfer, Delete, etc. commands. • Delete Page To delete the selected image from the Camcorder to your PC again when Camcorder Memory Card was changed. 44 For assistance, please call : 1-800-211-PANA(7262) or send e-mail to which the...


