
PVL453 User Guide
Page 6
..., Auto Daylight Saving Time 14~15 AccuBrite™ Built-in Light (Using the Light, Replacing the Bulb 16 Camera Recording (Basic, Stand-by, Programmed Recording 17~19 Playing Back Recordings (Basic Playback, Visual Search, Still Picture,...Color Digital Filter 29 Digital Zoom 30 Digital Electronic Image Stabilization (E.I.S 31 Still/Strobe/Wide 32 MotionSensor 33 Digital Still Camera 34~40 • Memory Card (optional) Insertion/Removal 34 • Recording 35 • Using the Light 36...assistance, please call : 1-800-211-PANA(7262) or send e-mail to : consumerproducts@panasonic.com
..., Auto Daylight Saving Time 14~15 AccuBrite™ Built-in Light (Using the Light, Replacing the Bulb 16 Camera Recording (Basic, Stand-by, Programmed Recording 17~19 Playing Back Recordings (Basic Playback, Visual Search, Still Picture,...Color Digital Filter 29 Digital Zoom 30 Digital Electronic Image Stabilization (E.I.S 31 Still/Strobe/Wide 32 MotionSensor 33 Digital Still Camera 34~40 • Memory Card (optional) Insertion/Removal 34 • Recording 35 • Using the Light 36...assistance, please call : 1-800-211-PANA(7262) or send e-mail to : consumerproducts@panasonic.com
PVL453 User Guide
Page 7
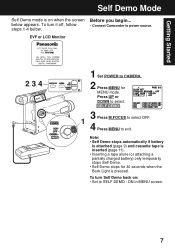
To turn it off, follow • Connect Camcorder to power source. Note: • Self Demo stops automatically if battery is attached (page 9) and cassette tape is inserted (page 11). • Inserting a tape alone (... Demo. • Self Demo stops for MENU mode. Getting Started Self Demo Mode Self Demo mode is pressed. EVF or LCD Monitor 2, 3, 4 1 Set POWER to CAMERA. 2 Press MENU for 30 seconds when the Back Light is on : • Set to exit. below . To turn Self Demo back on when the screen...
To turn it off, follow • Connect Camcorder to power source. Note: • Self Demo stops automatically if battery is attached (page 9) and cassette tape is inserted (page 11). • Inserting a tape alone (... Demo. • Self Demo stops for MENU mode. Getting Started Self Demo Mode Self Demo mode is pressed. EVF or LCD Monitor 2, 3, 4 1 Set POWER to CAMERA. 2 Press MENU for 30 seconds when the Back Light is on : • Set to exit. below . To turn Self Demo back on when the screen...
PVL453 User Guide
Page 8
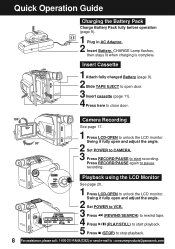
...and adjust the angle. 2 Set POWER to VCR. 3 Press (REWIND/SEARCH) to rewind tape. 4 Press (PLAY/STILL) to start recording. Camera Recording See page 17. 1 Press LCD-OPEN to pause recording. Press RECORD/PAUSE again to unlock the LCD monitor. Playback using the LCD Monitor... See page 20. 1 Press LCD-OPEN to : consumerproducts@panasonic.com Insert Cassette 1Attach fully charged Battery (page 9). 2Slide TAPE EJECT to open and adjust the angle. 2 Set POWER to CAMERA. 3 Press RECORD/PAUSE to close door. Quick Operation Guide Charging the Battery Pack...
...and adjust the angle. 2 Set POWER to VCR. 3 Press (REWIND/SEARCH) to rewind tape. 4 Press (PLAY/STILL) to start recording. Camera Recording See page 17. 1 Press LCD-OPEN to pause recording. Press RECORD/PAUSE again to unlock the LCD monitor. Playback using the LCD Monitor... See page 20. 1 Press LCD-OPEN to : consumerproducts@panasonic.com Insert Cassette 1Attach fully charged Battery (page 9). 2Slide TAPE EJECT to open and adjust the angle. 2 Set POWER to CAMERA. 3 Press RECORD/PAUSE to close door. Quick Operation Guide Charging the Battery Pack...
PVL453 User Guide
Page 13
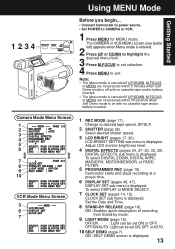
...). To select DISPLAY or MODE SELECT. 7 CLOCK SET (pages 14, 15). Press M.FOCUS to highlight the 3 desired menu item. DISPLAY SET sub menu is displayed. Camera Mode Menu Screen 1 2 3 4 5 6 7 8 9 10 VCR Mode Menu Screen 3 6 7 1 REC MODE (page 17). LCD BRIGHT SETTING sub menu is displayed. ...24, 27~30, 33, 39). DIGITAL EFFECTS sub menu is displayed. 13 Using MENU Mode Getting Started 1, 2, 3, 4 Before you begin... • Connect Camcorder to power source. • Set POWER to desired tape speed, SP/SLP. 2 SHUTTER (page 26). Set the Date and Time. 8 STAND-BY RELEASE (page...
...). To select DISPLAY or MODE SELECT. 7 CLOCK SET (pages 14, 15). Press M.FOCUS to highlight the 3 desired menu item. DISPLAY SET sub menu is displayed. Camera Mode Menu Screen 1 2 3 4 5 6 7 8 9 10 VCR Mode Menu Screen 3 6 7 1 REC MODE (page 17). LCD BRIGHT SETTING sub menu is displayed. ...24, 27~30, 33, 39). DIGITAL EFFECTS sub menu is displayed. 13 Using MENU Mode Getting Started 1, 2, 3, 4 Before you begin... • Connect Camcorder to power source. • Set POWER to desired tape speed, SP/SLP. 2 SHUTTER (page 26). Set the Date and Time. 8 STAND-BY RELEASE (page...

PVL453 User Guide
Page 14
To change the setting: TIME ZONE ➔ Go to CAMERA or VCR. 1 Press MENU for MENU mode. Before you begin... • Connect Camcorder to power source. • Set POWER to step 3a on page 15. Press UP or DOWN to step 3b on page 15. 4 Press MENU twice ...-PANA(7262) or send e-mail to select TIME ZONE, DST, or DATE/TIME. 3 Press M.FOCUS for CLOCK SET menu. D.S.T. ➔ Go to select CLOCK SET . 1, 2, 3, 4 [ CAMERA MODE ] [ VCR MODE ] 2 Press M.FOCUS for menu of item selected in order: Time Zone, Daylight Saving Time, Date, and Time. DATE/TIME ➔ Go to...
To change the setting: TIME ZONE ➔ Go to CAMERA or VCR. 1 Press MENU for MENU mode. Before you begin... • Connect Camcorder to power source. • Set POWER to step 3a on page 15. Press UP or DOWN to step 3b on page 15. 4 Press MENU twice ...-PANA(7262) or send e-mail to select TIME ZONE, DST, or DATE/TIME. 3 Press M.FOCUS for CLOCK SET menu. D.S.T. ➔ Go to select CLOCK SET . 1, 2, 3, 4 [ CAMERA MODE ] [ VCR MODE ] 2 Press M.FOCUS for menu of item selected in order: Time Zone, Daylight Saving Time, Date, and Time. DATE/TIME ➔ Go to...

PVL453 User Guide
Page 16
.... VLLW0015 for MENU mode. Excessive force may shorten bulb life. • Set Light to OFF when not in use. • When Camcorder is in CAMERA or PHOTO Rec mode with LIGHT MODE set to ON or AUTO, changing to VCR or PHOTO Play mode will cause the light to...8226; Using Light reduces battery operating time. • Provide proper ventilation when using Light extensively in a hot environment. • Using Light when the Camcorder is powered by Panasonic to reduce risk of lens cover to unhook, and slide portion B forward to remove. 2 Using Tweezers or needle-nose pliers, carefully remove bulb....
.... VLLW0015 for MENU mode. Excessive force may shorten bulb life. • Set Light to OFF when not in use. • When Camcorder is in CAMERA or PHOTO Rec mode with LIGHT MODE set to ON or AUTO, changing to VCR or PHOTO Play mode will cause the light to...8226; Using Light reduces battery operating time. • Provide proper ventilation when using Light extensively in a hot environment. • Using Light when the Camcorder is powered by Panasonic to reduce risk of lens cover to unhook, and slide portion B forward to remove. 2 Using Tweezers or needle-nose pliers, carefully remove bulb....
PVL453 User Guide
Page 17
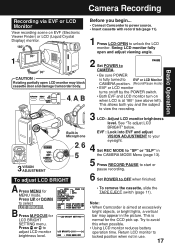
... to avoid this when possible. • Using LCD monitor reduces battery operation time. Press or to adjust LCD monitor brightness level. 2 Set POWER to CAMERA. • Be sure POWER is fully turned to OFF when finished. • To remove the cassette, slide the TAPE EJECT switch (page 11). See... Viewer Finder) or LCD (Liquid Crystal Display) monitor. This is at excessively bright objects, or bright lights, a vertical bar may block cassette door and damage Camcorder body. 4, A, B Built-in the picture. Before you and the subject to "SP" or "SLP" in use. 17 EVF : Look into EVF and ...
... to avoid this when possible. • Using LCD monitor reduces battery operation time. Press or to adjust LCD monitor brightness level. 2 Set POWER to CAMERA. • Be sure POWER is fully turned to OFF when finished. • To remove the cassette, slide the TAPE EJECT switch (page 11). See... Viewer Finder) or LCD (Liquid Crystal Display) monitor. This is at excessively bright objects, or bright lights, a vertical bar may block cassette door and damage Camcorder body. 4, A, B Built-in the picture. Before you and the subject to "SP" or "SLP" in use. 17 EVF : Look into EVF and ...
PVL453 User Guide
Page 18
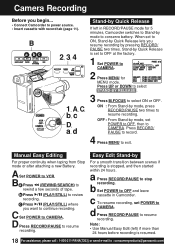
... two times. c To resume recording, set to OFF at the factory. 1 Set POWER to CAMERA. 2 Press MENU for 5 minutes, Camcorder switches to Stand-by mode, press RECORD/PAUSE two times to CAMERA. Camera Recording Before you begin... • Connect Camcorder to exit. B a bc 2, 3, 4 1, A, C, b, c D, a, d Stand-by... to select STAND-BY RELEASE . 3 Press M.FOCUS to rewind a few seconds of tape. ON : From Stand-by mode to : consumerproducts@panasonic.com b Press (PLAY/STILL) to continue recording. c Press (PLAY/STILL) where you want to review recording. D Press RECORD/PAUSE to...
... two times. c To resume recording, set to OFF at the factory. 1 Set POWER to CAMERA. 2 Press MENU for 5 minutes, Camcorder switches to Stand-by mode, press RECORD/PAUSE two times to CAMERA. Camera Recording Before you begin... • Connect Camcorder to exit. B a bc 2, 3, 4 1, A, C, b, c D, a, d Stand-by... to select STAND-BY RELEASE . 3 Press M.FOCUS to rewind a few seconds of tape. ON : From Stand-by mode to : consumerproducts@panasonic.com b Press (PLAY/STILL) to continue recording. c Press (PLAY/STILL) where you want to review recording. D Press RECORD/PAUSE to...
PVL453 User Guide
Page 19
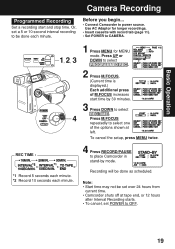
.... Use AC Adaptor for MENU mode. To cancel the setup, press MENU twice. 4 Press RECORD/PAUSE to place Camcorder in stand-by 30 minutes. 3 Press DOWN to CAMERA. Basic Operation Camera Recording Programmed Recording Set a recording start time by mode. *1 Record 5 seconds each minute. *2 Record 10 seconds ... shown at tape end, or 12 hours after Interval Recording starts. • To cancel, set over 24 hours from current time. • Camcorder shuts off at left. Note: • Start time may not be done as scheduled. Press M.FOCUS repeatedly to power source. Before you begin...
.... Use AC Adaptor for MENU mode. To cancel the setup, press MENU twice. 4 Press RECORD/PAUSE to place Camcorder in stand-by 30 minutes. 3 Press DOWN to CAMERA. Basic Operation Camera Recording Programmed Recording Set a recording start time by mode. *1 Record 5 seconds each minute. *2 Record 10 seconds ... shown at tape end, or 12 hours after Interval Recording starts. • To cancel, set over 24 hours from current time. • Camcorder shuts off at left. Note: • Start time may not be done as scheduled. Press M.FOCUS repeatedly to power source. Before you begin...
PVL453 User Guide
Page 21
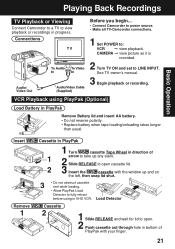
Connections Audio/ Video Out Before you begin... • Connect Camcorder to power source. • Make all TV-Camcorder connections. 1 Set POWER to view playback or recordings in progress. VCR Playback using in direction of PlayPak with the window up any slack....manual. 3 Begin playback or recording. Playing Back Recordings Basic Operation TV Playback or Viewing Connect Camcorder to a TV to : VCR © view playback. Insert Remove 1 Cassette in PlayPak 1 Turn cassette Tape Wheel in VHS VCR. CAMERA © view picture as it is recorded. 2 Turn TV ON and set to fully ...
Connections Audio/ Video Out Before you begin... • Connect Camcorder to power source. • Make all TV-Camcorder connections. 1 Set POWER to view playback or recordings in progress. VCR Playback using in direction of PlayPak with the window up any slack....manual. 3 Begin playback or recording. Playing Back Recordings Basic Operation TV Playback or Viewing Connect Camcorder to a TV to : VCR © view playback. Insert Remove 1 Cassette in PlayPak 1 Turn cassette Tape Wheel in VHS VCR. CAMERA © view picture as it is recorded. 2 Turn TV ON and set to fully ...
PVL453 User Guide
Page 23
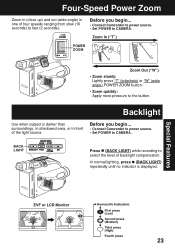
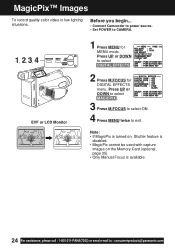
...Connect Camcorder to power source. • Set POWER to fast (2 seconds). Backlight Use when subject is displayed. Special Features EVF or LCD Monitor 23 Zoom In ("T") POWER ZOOM Zoom Out ("W") • Zoom slowly: Lightly press "T" (telephoto) or "W" (wide angle) POWER ZOOM button. • Zoom quickly: Apply more pressure to CAMERA. ... the light source. BACK LIGHT Press (BACK LIGHT) while recording to select the level of four speeds ranging from slow (16 seconds) to CAMERA. Before you begin ... • Connect Camcorder to power source. • Set POWER to the button.
...Connect Camcorder to power source. • Set POWER to fast (2 seconds). Backlight Use when subject is displayed. Special Features EVF or LCD Monitor 23 Zoom In ("T") POWER ZOOM Zoom Out ("W") • Zoom slowly: Lightly press "T" (telephoto) or "W" (wide angle) POWER ZOOM button. • Zoom quickly: Apply more pressure to CAMERA. ... the light source. BACK LIGHT Press (BACK LIGHT) while recording to select the level of four speeds ranging from slow (16 seconds) to CAMERA. Before you begin ... • Connect Camcorder to power source. • Set POWER to the button.
PVL453 User Guide
Page 24
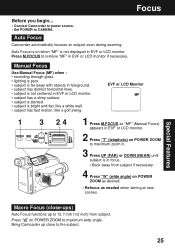
... in low lighting situations. Press UP or DOWN to CAMERA. 1, 2, 3, 4 EVF or LCD Monitor 1 Press MENU for DIGITAL EFFECTS menu. Press UP or DOWN to select MAGICPIX . 3 Press M.FOCUS to select ON. 4 Press MENU twice to : consumerproducts@panasonic.com Before you begin... • Connect Camcorder to power source. • Set POWER to select...
... in low lighting situations. Press UP or DOWN to CAMERA. 1, 2, 3, 4 EVF or LCD Monitor 1 Press MENU for DIGITAL EFFECTS menu. Press UP or DOWN to select MAGICPIX . 3 Press M.FOCUS to select ON. 4 Press MENU twice to : consumerproducts@panasonic.com Before you begin... • Connect Camcorder to power source. • Set POWER to select...
PVL453 User Guide
Page 25
..."MF" (Manual Focus) appears in EVF or LCD monitor. 2 Press "T" (telephoto) on POWER ZOOM to maximum wide angle. Focus Before you begin... • Connect Camcorder to power source. • Set POWER to 12.7 mm (1/2 inch) from subject if necessary. 4 Press "W" (wide angle) on when "MF" is bright and flat.... • subject has a shiny surface. • subject is slanted. • subject is not displayed in focus. • Back away from subject. Bring Camcorder up to CAMERA. Auto Focus is on POWER ZOOM as desired. • Refocus as needed when aiming at new scenes.
..."MF" (Manual Focus) appears in EVF or LCD monitor. 2 Press "T" (telephoto) on POWER ZOOM to maximum wide angle. Focus Before you begin... • Connect Camcorder to power source. • Set POWER to 12.7 mm (1/2 inch) from subject if necessary. 4 Press "W" (wide angle) on when "MF" is bright and flat.... • subject has a shiny surface. • subject is slanted. • subject is not displayed in focus. • Back away from subject. Bring Camcorder up to CAMERA. Auto Focus is on POWER ZOOM as desired. • Refocus as needed when aiming at new scenes.
PVL453 User Guide
Page 26
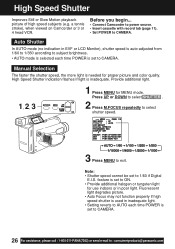
... auto-adjusted from 1/60 to 1/350 according to subject brightness. • AUTO mode is selected each time POWER is set to : consumerproducts@panasonic.com Manual Selection The faster the shutter speed, the more light is inadequate. Press UP or DOWN to select SHUTTER . 2 Press M.FOCUS ... indoors or in poor light. feature is set to CAMERA. 26 For assistance, please call : 1-800-211-PANA(7262) or send e-mail to CAMERA. Note: • Shutter speed cannot be set to exit. Before you begin... • Connect Camcorder to power source. • Insert cassette with record tab...
... auto-adjusted from 1/60 to 1/350 according to subject brightness. • AUTO mode is selected each time POWER is set to : consumerproducts@panasonic.com Manual Selection The faster the shutter speed, the more light is inadequate. Press UP or DOWN to select SHUTTER . 2 Press M.FOCUS ... indoors or in poor light. feature is set to CAMERA. 26 For assistance, please call : 1-800-211-PANA(7262) or send e-mail to CAMERA. Note: • Shutter speed cannot be set to exit. Before you begin... • Connect Camcorder to power source. • Insert cassette with record tab...

PVL453 User Guide
Page 27
... menu. COLOR menu. If (FADE) is paused. FADE 1, 2, 3, 4, 5 RECORD/ PAUSE Fade In WHITE BLACK Fade Out Before you begin... • Connect Camcorder to power source. • Set POWER to CAMERA. 1 Press MENU for MENU mode. Press RECORD/PAUSE. Picture and sound gradually fade out, and recording is pressed accidentally, press again so...
... menu. COLOR menu. If (FADE) is paused. FADE 1, 2, 3, 4, 5 RECORD/ PAUSE Fade In WHITE BLACK Fade Out Before you begin... • Connect Camcorder to power source. • Set POWER to CAMERA. 1 Press MENU for MENU mode. Press RECORD/PAUSE. Picture and sound gradually fade out, and recording is pressed accidentally, press again so...

PVL453 User Guide
Page 28
... displayed as it is selected. 5 Press M.FOCUS for DIGITAL FADE menu. Press UP or DOWN to CAMERA. 1 Press MENU for MENU mode. Note: • Audio is selected. Press (FADE) again to... EFFECTS . 2 Press M.FOCUS for DIGITAL FADE menu. Press UP or DOWN to : consumerproducts@panasonic.com Press UP or DOWN to select COLOR . Press UP or DOWN to select from 7 fade...in 8 different colors. 8 1, 2, 3, 4, 5, 6 7 EVF or LCD monitor Before you begin... • Connect Camcorder to power source. • Set POWER to select from 8 colors. • A preview of each color is displayed as...
... displayed as it is selected. 5 Press M.FOCUS for DIGITAL FADE menu. Press UP or DOWN to CAMERA. 1 Press MENU for MENU mode. Note: • Audio is selected. Press (FADE) again to... EFFECTS . 2 Press M.FOCUS for DIGITAL FADE menu. Press UP or DOWN to : consumerproducts@panasonic.com Press UP or DOWN to select COLOR . Press UP or DOWN to select from 7 fade...in 8 different colors. 8 1, 2, 3, 4, 5, 6 7 EVF or LCD monitor Before you begin... • Connect Camcorder to power source. • Set POWER to select from 8 colors. • A preview of each color is displayed as...
PVL453 User Guide
Page 29
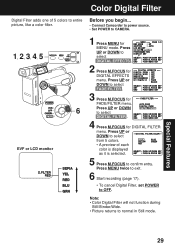
... to select DIGITAL EFFECTS . 2 Press M.FOCUS for MENU mode. Press UP or DOWN to select from 5 colors. • A preview of 5 colors to CAMERA. 1, 2, 3, 4, 5 EVF or LCD monitor 1 Press MENU for DIGITAL EFFECTS menu. Note: • Color Digital Filter will not function during Still/Strobe/...Wide. • Picture returns to confirm entry. Special Features 29 Before you begin... • Connect Camcorder to power source. • Set POWER to entire picture, like a color filter. Color Digital Filter Digital Filter adds one of each color ...
... to select DIGITAL EFFECTS . 2 Press M.FOCUS for MENU mode. Press UP or DOWN to select from 5 colors. • A preview of 5 colors to CAMERA. 1, 2, 3, 4, 5 EVF or LCD monitor 1 Press MENU for DIGITAL EFFECTS menu. Note: • Color Digital Filter will not function during Still/Strobe/...Wide. • Picture returns to confirm entry. Special Features 29 Before you begin... • Connect Camcorder to power source. • Set POWER to entire picture, like a color filter. Color Digital Filter Digital Filter adds one of each color ...

PVL453 User Guide
Page 30
...(7262) or send e-mail to select D.ZOOM1, D.ZOOM2, or OFF. Press UP or DOWN to select DIGITAL ZOOM . 3 Press M.FOCUS repeatedly to : consumerproducts@panasonic.com Digital Zoom Power Zoom magnification is digitally increased. 1, 2, 3, 4, 5 Before you begin... • Connect Camcorder to power source. • Set POWER to CAMERA. 1 Press MENU for DIGITAL EFFECTS menu.
...(7262) or send e-mail to select D.ZOOM1, D.ZOOM2, or OFF. Press UP or DOWN to select DIGITAL ZOOM . 3 Press M.FOCUS repeatedly to : consumerproducts@panasonic.com Digital Zoom Power Zoom magnification is digitally increased. 1, 2, 3, 4, 5 Before you begin... • Connect Camcorder to power source. • Set POWER to CAMERA. 1 Press MENU for DIGITAL EFFECTS menu.

PVL453 User Guide
Page 31
.... • low light situations (EIS indicator flashes). • intense fluorescent lighting situations. • recording of very fast motion. unstable situations. • Connect Camcorder to power source. • Set POWER to CAMERA. 1, 2 1 Press (EIS) to brightness. • Use High Speed Shutter (page 26) if needed. NORMAL Digital EIS ON Special Features 31 Shutter...
.... • low light situations (EIS indicator flashes). • intense fluorescent lighting situations. • recording of very fast motion. unstable situations. • Connect Camcorder to power source. • Set POWER to CAMERA. 1, 2 1 Press (EIS) to brightness. • Use High Speed Shutter (page 26) if needed. NORMAL Digital EIS ON Special Features 31 Shutter...
PVL453 User Guide
Page 32
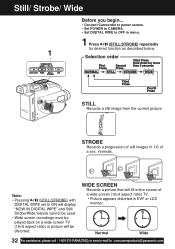
... below. 1 Selection order STILL Records a still image from the current picture. intervals. STROBE Records a progression of a sec. Still/ Strobe/ Wide Before you begin... • Connect Camcorder to power source. • Set POWER to CAMERA. • Set DIGITAL WIPE to : consumerproducts@panasonic.com
... below. 1 Selection order STILL Records a still image from the current picture. intervals. STROBE Records a progression of a sec. Still/ Strobe/ Wide Before you begin... • Connect Camcorder to power source. • Set POWER to CAMERA. • Set DIGITAL WIPE to : consumerproducts@panasonic.com
