

PVL453 User Guide
Page 3
... users authority to record and play a Compact VHS Camcorder recording on your VHS VCR using the optional VHS PlayPak. Also, any problems. The above markings are designed to the following two conditions: (1) This device may cause undesired operation. Note: This equipment has been tested and found to comply with Part 15 of contact with ferrite cores when connecting to radio or television reception, which can also play...
... users authority to record and play a Compact VHS Camcorder recording on your VHS VCR using the optional VHS PlayPak. Also, any problems. The above markings are designed to the following two conditions: (1) This device may cause undesired operation. Note: This equipment has been tested and found to comply with Part 15 of contact with ferrite cores when connecting to radio or television reception, which can also play...

PVL453 User Guide
Page 4
... and to cords of the unit should follow the manufacturer's instructions and should be followed. 5. Water and Moisture - Do not use liquid or aerosol cleaners. The video unit may cause the appliance and cart combination to . 4. Use only with the video unit. Ventilation - Slots and openings in the operating instructions should be adhered to overturn. 9. This video unit should be operated only from battery power, or other...
... and to cords of the unit should follow the manufacturer's instructions and should be followed. 5. Water and Moisture - Do not use liquid or aerosol cleaners. The video unit may cause the appliance and cart combination to . 4. Use only with the video unit. Ventilation - Slots and openings in the operating instructions should be adhered to overturn. 9. This video unit should be operated only from battery power, or other...

PVL453 User Guide
Page 5
... direct sunlight, inside a closed car, next to determine that will often require extensive work by improper handling or storage. Before handling your Camcorder, make sure your Camcorder body. • TO PROTECT THE LENS ... Power Lines - Servicing - this indicates a need for outdoor use strong or abrasive detergents when cleaning your hands and face are no user serviceable parts inside the unit. • DO NOT LEAVE YOUR CAMCORDER...
... direct sunlight, inside a closed car, next to determine that will often require extensive work by improper handling or storage. Before handling your Camcorder, make sure your Camcorder body. • TO PROTECT THE LENS ... Power Lines - Servicing - this indicates a need for outdoor use strong or abrasive detergents when cleaning your hands and face are no user serviceable parts inside the unit. • DO NOT LEAVE YOUR CAMCORDER...
PVL453 User Guide
Page 6
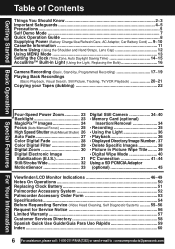
... ...5 Self Demo Mode 7 Quick Operation Guide 8 Supplying Power (Battery Charge/Use/Refresh/Care, AC Adaptor, Car Battery Cord) .... 9~10 Cassette Information 11 Before Using (Using the Shoulder and Hand Straps, Lens Cap 12 Using MENU Mode 13 Setting the Clock (Time Zone, Auto Daylight Saving Time 14~15 AccuBrite™ Built-in Light (Using the Light, Replacing the Bulb 16 Camera Recording (Basic, Stand-by, Programmed Recording 17~19 Playing Back Recordings (Basic Playback, Visual Search, Still Picture, Tracking, TV/VCR Playback 20~21 Copying...
... ...5 Self Demo Mode 7 Quick Operation Guide 8 Supplying Power (Battery Charge/Use/Refresh/Care, AC Adaptor, Car Battery Cord) .... 9~10 Cassette Information 11 Before Using (Using the Shoulder and Hand Straps, Lens Cap 12 Using MENU Mode 13 Setting the Clock (Time Zone, Auto Daylight Saving Time 14~15 AccuBrite™ Built-in Light (Using the Light, Replacing the Bulb 16 Camera Recording (Basic, Stand-by, Programmed Recording 17~19 Playing Back Recordings (Basic Playback, Visual Search, Still Picture, Tracking, TV/VCR Playback 20~21 Copying...

PVL453 User Guide
Page 11
... Cassette Insertion/Removal 13 2 5 4 1 Turn Tape Wheel in direction of arrow until there is no slack. 2 Attach Battery (page 9). 3 Slide TAPE EJECT to open .) 2 To record again, cover hole with the mark in this unit. Record/Playback Time Use tapes with adhesive tape. (Or, slide tab closed.) 11 Tape Speed Selector Position Cassette type TC-20 TC-30 TC-40 SP (Standard Play) 20 minutes 30 minutes 40 minutes SLP (Super Long Play) 1 hour 1 hour...
... Cassette Insertion/Removal 13 2 5 4 1 Turn Tape Wheel in direction of arrow until there is no slack. 2 Attach Battery (page 9). 3 Slide TAPE EJECT to open .) 2 To record again, cover hole with the mark in this unit. Record/Playback Time Use tapes with adhesive tape. (Or, slide tab closed.) 11 Tape Speed Selector Position Cassette type TC-20 TC-30 TC-40 SP (Standard Play) 20 minutes 30 minutes 40 minutes SLP (Super Long Play) 1 hour 1 hour...
PVL453 User Guide
Page 13
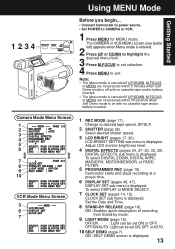
.... 2 Press UP or DOWN to exit. Change to CAMERA or VCR. 1 Press MENU for MENU mode. ON : SELF DEMO screen is on with no cassette tape and/or battery inserted. Camera Mode Menu Screen 1 2 3 4 5 6 7 8 9 10 VCR Mode Menu Screen 3 6 7 1 REC MODE (page 17). Adjust LCD monitor brightness level. 4 DIGITAL EFFECTS (pages 24, 27~30, 33, 39). Camcorder starts and stops recording at a preset time. 6 DISPLAY SET (pages 46, 47). Set the Date and Time. 8 STAND-BY RELEASE (page 18). OFF...
.... 2 Press UP or DOWN to exit. Change to CAMERA or VCR. 1 Press MENU for MENU mode. ON : SELF DEMO screen is on with no cassette tape and/or battery inserted. Camera Mode Menu Screen 1 2 3 4 5 6 7 8 9 10 VCR Mode Menu Screen 3 6 7 1 REC MODE (page 17). Adjust LCD monitor brightness level. 4 DIGITAL EFFECTS (pages 24, 27~30, 33, 39). Camcorder starts and stops recording at a preset time. 6 DISPLAY SET (pages 46, 47). Set the Date and Time. 8 STAND-BY RELEASE (page 18). OFF...
PVL453 User Guide
Page 15
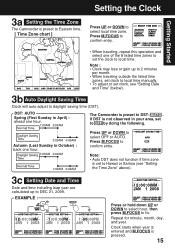
.... • When traveling outside the listed time zones, set clock to local time manually. • To adjust or set to Hawaii or Samoa (see "Setting Date and Time" (below). 3b Auto Daylight Saving Time Clock will auto-adjust to OFF by doing the following. Press UP or DOWN to DST: AUTO . Setting the Clock Getting Started 3a Setting the Time Zone The Camcorder is preset to Eastern time. [ Time Zone chart ] Press UP or...
.... • When traveling outside the listed time zones, set clock to local time manually. • To adjust or set to Hawaii or Samoa (see "Setting Date and Time" (below). 3b Auto Daylight Saving Time Clock will auto-adjust to OFF by doing the following. Press UP or DOWN to DST: AUTO . Setting the Clock Getting Started 3a Setting the Time Zone The Camcorder is preset to Eastern time. [ Time Zone chart ] Press UP or...

PVL453 User Guide
Page 16
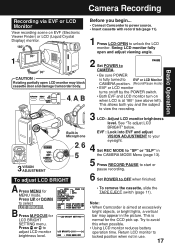
.... When returning to set OFF/ON or OFF/ON/AUTO. DANGER: Use only replacement bulb (PART NO. VLLW0015) supplied by a car battery may cause bulb to lighting conditions. Before you begin ... • Connect Camcorder to power source. • Set POWER to service center if you need assistance. 3 Replace bulb using Light extensively in CAMERA or PHOTO Rec mode with fingers.) 4 Replace lens cover. EVF or LCD Monitor A : Light is auto. Remove lens cover and...
.... When returning to set OFF/ON or OFF/ON/AUTO. DANGER: Use only replacement bulb (PART NO. VLLW0015) supplied by a car battery may cause bulb to lighting conditions. Before you begin ... • Connect Camcorder to power source. • Set POWER to service center if you need assistance. 3 Replace bulb using Light extensively in CAMERA or PHOTO Rec mode with fingers.) 4 Replace lens cover. EVF or LCD Monitor A : Light is auto. Remove lens cover and...
PVL453 User Guide
Page 17
... TAPE EJECT switch (page 11). B Press M.FOCUS for the CCD pick-up. Note: • When Camcorder is at excessively bright objects, or bright lights, a vertical bar may block cassette door and damage Camcorder body. 4, A, B Built-in the picture. Return LCD monitor to locked position when not in the CAMERA MODE Menu (page 13). 5 Press RECORD/PAUSE to start or pause recording. 6 Set POWER to view the recording. 3 LCD : Adjust...
... TAPE EJECT switch (page 11). B Press M.FOCUS for the CCD pick-up. Note: • When Camcorder is at excessively bright objects, or bright lights, a vertical bar may block cassette door and damage Camcorder body. 4, A, B Built-in the picture. Return LCD monitor to locked position when not in the CAMERA MODE Menu (page 13). 5 Press RECORD/PAUSE to start or pause recording. 6 Set POWER to view the recording. 3 LCD : Adjust...
PVL453 User Guide
Page 20
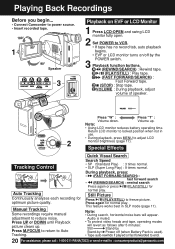
.... 3 Playback function buttons. Playing Back Recordings Before you begin... • Connect Camcorder to power source. • Insert recorded tape. 1 Speaker 3 D A B C E Playback on EVF or LCD Monitor 1 Press LCD-OPEN and swing LCD monitor fully open. 2 Set POWER to VCR. • If tape has no record tab, auto playback begins. • EVF or LCD monitor turns on/off by Power off (when Battery Pack is muted. • To protect video heads and tape, operating modes will appear. A (REWIND/SEARCH) : Rewind tape. E VOLUME : During playback, adjust volume...
.... 3 Playback function buttons. Playing Back Recordings Before you begin... • Connect Camcorder to power source. • Insert recorded tape. 1 Speaker 3 D A B C E Playback on EVF or LCD Monitor 1 Press LCD-OPEN and swing LCD monitor fully open. 2 Set POWER to VCR. • If tape has no record tab, auto playback begins. • EVF or LCD monitor turns on/off by Power off (when Battery Pack is muted. • To protect video heads and tape, operating modes will appear. A (REWIND/SEARCH) : Rewind tape. E VOLUME : During playback, adjust volume...
PVL453 User Guide
Page 21
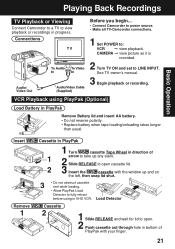
...Do not reverse polarity. • Replace battery when tape loading/unloading takes longer than usual. Load Detector Cassette 2 1 Slide RELEASE and wait for lid to view playback or recordings in VHS VCR. VCR Playback using in progress. Connections Audio/ Video Out Before you begin... • Connect Camcorder to power source. • Make all TV-Camcorder connections. 1 Set POWER to LINE INPUT. See TV owner's manual. 3 Begin playback or recording. Playing Back Recordings Basic Operation TV Playback or Viewing Connect Camcorder to a TV to open cassette lid. 2 3 Insert the...
...Do not reverse polarity. • Replace battery when tape loading/unloading takes longer than usual. Load Detector Cassette 2 1 Slide RELEASE and wait for lid to view playback or recordings in VHS VCR. VCR Playback using in progress. Connections Audio/ Video Out Before you begin... • Connect Camcorder to power source. • Make all TV-Camcorder connections. 1 Set POWER to LINE INPUT. See TV owner's manual. 3 Begin playback or recording. Playing Back Recordings Basic Operation TV Playback or Viewing Connect Camcorder to a TV to open cassette lid. 2 3 Insert the...
PVL453 User Guide
Page 24
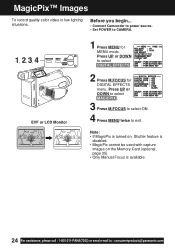
...@panasonic.com Before you begin... • Connect Camcorder to power source. • Set POWER to select DIGITAL EFFECTS . 2 Press M.FOCUS for MENU mode. Press UP or DOWN to CAMERA. 1, 2, 3, 4 EVF or LCD Monitor 1 Press MENU for DIGITAL EFFECTS menu. Note: • If MagicPix is turned on, Shutter feature is disabled. • MagicPix cannot be used with capture images on the Memory Card (optional, page 35). • Only Manual...
...@panasonic.com Before you begin... • Connect Camcorder to power source. • Set POWER to select DIGITAL EFFECTS . 2 Press M.FOCUS for MENU mode. Press UP or DOWN to CAMERA. 1, 2, 3, 4 EVF or LCD Monitor 1 Press MENU for DIGITAL EFFECTS menu. Note: • If MagicPix is turned on, Shutter feature is disabled. • MagicPix cannot be used with capture images on the Memory Card (optional, page 35). • Only Manual...
PVL453 User Guide
Page 33
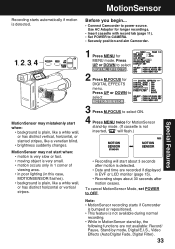
... MotionSensor stand-by mode, Digital E.I.S., Video Effects (Auto/Digital Fade, Digital Filter). 33 Note: • MotionSensor recording starts if Camcorder is bumped or repositioned. • This feature is detected. • Date and time are not available: Record/ Pause, Stand-by , the following functions are recorded if displayed in this case, MOTIONSENSOR flashes). • background is detected. Press UP or DOWN to CAMERA. • Securely position...
... MotionSensor stand-by mode, Digital E.I.S., Video Effects (Auto/Digital Fade, Digital Filter). 33 Note: • MotionSensor recording starts if Camcorder is bumped or repositioned. • This feature is detected. • Date and time are not available: Record/ Pause, Stand-by , the following functions are recorded if displayed in this case, MOTIONSENSOR flashes). • background is detected. Press UP or DOWN to CAMERA. • Securely position...
PVL453 User Guide
Page 34
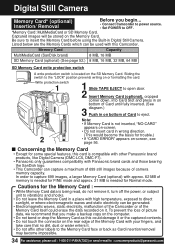
... "LOCK" position prevents writing on -screen, see page 56. In order to capture 699 images, a larger Memory Card (optional) with this Camcorder. To prevent the loss of memory is needed for FINE mode and approx. 21 MB is needed for trouble.) 2 • If "CARD ERROR" appears on or formatting the card. Digital Still Camera Memory Card* (optional) Insertion/ Removal Before you make...
... "LOCK" position prevents writing on -screen, see page 56. In order to capture 699 images, a larger Memory Card (optional) with this Camcorder. To prevent the loss of memory is needed for FINE mode and approx. 21 MB is needed for trouble.) 2 • If "CARD ERROR" appears on or formatting the card. Digital Still Camera Memory Card* (optional) Insertion/ Removal Before you make...
PVL453 User Guide
Page 35
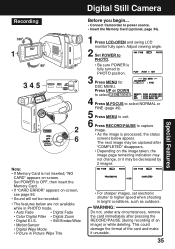
... -screen, see page 56. • Sound will not be captured after pressing the RECORD/PAUSE (during recording of the card and make it unusable. 35 Set POWER to OFF, then insert the Memory Card. • If "CARD ERROR" appears on the image taken, the image page remaining indication may not change, or it may be recorded. • The features below appear. Adjust viewing...
... -screen, see page 56. • Sound will not be captured after pressing the RECORD/PAUSE (during recording of the card and make it unusable. 35 Set POWER to OFF, then insert the Memory Card. • If "CARD ERROR" appears on the image taken, the image page remaining indication may not change, or it may be recorded. • The features below appear. Adjust viewing...
PVL453 User Guide
Page 36
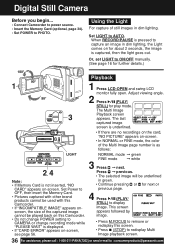
... : consumerproducts@panasonic.com Adjust viewing angle. 2 Press (PLAY/ STILL) for further details.) Playback 1 1 Press LCD-OPEN and swing LCD monitor fully open. Set Power to ON/OFF manually. (See page 16 for play mode. Set LIGHT to PHOTO. When RECORD/PAUSE is captured, then the light goes out. The last captured image screen is displayed. • If "CARD ERROR" appears on this screen. • Press (STOP) to redisplay Multi Image playback screen. 36 For...
... : consumerproducts@panasonic.com Adjust viewing angle. 2 Press (PLAY/ STILL) for further details.) Playback 1 1 Press LCD-OPEN and swing LCD monitor fully open. Set Power to ON/OFF manually. (See page 16 for play mode. Set LIGHT to PHOTO. When RECORD/PAUSE is captured, then the light goes out. The last captured image screen is displayed. • If "CARD ERROR" appears on this screen. • Press (STOP) to redisplay Multi Image playback screen. 36 For...
PVL453 User Guide
Page 54
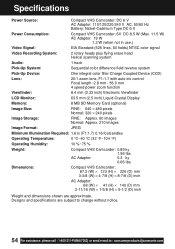
Specifications Power Source: Compact VHS Camcorder: DC 6 V AC Adaptor: 110/120/220/240 V AC, 50/60 Hz Battery: Nickel-Cadmium Type DC 6 V Power Consumption: Compact VHS Camcorder: 6V DC 8.5 W (Max. 11.5 W) AC Adaptor: 19 W 1.2 W (when not in use.) Video Signal: EIA Standard (525 lines, 60 fields) NTSC color signal Video Recording System: 2 rotary heads plus flying erase head Helical scanning system Audio: 1 track Pick-Up System: Sequential color difference field...
Specifications Power Source: Compact VHS Camcorder: DC 6 V AC Adaptor: 110/120/220/240 V AC, 50/60 Hz Battery: Nickel-Cadmium Type DC 6 V Power Consumption: Compact VHS Camcorder: 6V DC 8.5 W (Max. 11.5 W) AC Adaptor: 19 W 1.2 W (when not in use.) Video Signal: EIA Standard (525 lines, 60 fields) NTSC color signal Video Recording System: 2 rotary heads plus flying erase head Helical scanning system Audio: 1 track Pick-Up System: Sequential color difference field...
PVL453 User Guide
Page 55
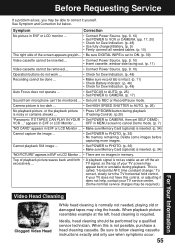
...) Operation buttons do not work ... • Check for Dew Indication. (p. 48) Recording cannot be done ... • Make sure record tab is noisy or contains streaks ... (Tracking Control). (p.20) "Panasonic ITS TAPES CAN PLAY IN YOUR • Set POWER to CAMERA, then set SELF DEMO : VCR ..." This is not possible, purchase a head cleaning cassette. When this control, or adjusting it does not help, contact your TV screen may appear bent or unstable during playback is...
...) Operation buttons do not work ... • Check for Dew Indication. (p. 48) Recording cannot be done ... • Make sure record tab is noisy or contains streaks ... (Tracking Control). (p.20) "Panasonic ITS TAPES CAN PLAY IN YOUR • Set POWER to CAMERA, then set SELF DEMO : VCR ..." This is not possible, purchase a head cleaning cassette. When this control, or adjusting it does not help, contact your TV screen may appear bent or unstable during playback is...

PVL453 User Guide
Page 57
... chart below, which starts with the date of original purchase ("warranty period"), at the addresses listed for the warrantor. Product Parts Labor Service Contact Number Camcorder One (1) Year (except CCD Ninety (90) Days Image Sensor) Carry-In or Mail-In CCD Image Sensor - 6 (Six) Months Ninety (90) Days 1-800-211-PANA(7262) DVD/VCR Deck, A/V Mixer One (1) Year Ninety (90) Days Carry-In...
... chart below, which starts with the date of original purchase ("warranty period"), at the addresses listed for the warrantor. Product Parts Labor Service Contact Number Camcorder One (1) Year (except CCD Ninety (90) Days Image Sensor) Carry-In or Mail-In CCD Image Sensor - 6 (Six) Months Ninety (90) Days 1-800-211-PANA(7262) DVD/VCR Deck, A/V Mixer One (1) Year Ninety (90) Days Carry-In...

PVL453 User Guide
Page 60
... Time 15 B Backlight 23 BACK LIGHT Button ...... 23 Battery Pack 9, 10 BATTERY RELEASE Button 9 Before Requesting Service 55, 56 Built-in Microphone ........ 17 C Camera Recording ... 17~19 Car Battery Cord 10 Cassette Information ....... 11 Charging Battery 9 Clock Battery 51 Clock Set 14, 15 Color Digital Filter 29 Copying your Tapes ....... 22 Customer Servicenter Directory 58 D DC IN 10 DC Power Cable 10 Digital E.I.S 31 Digital PhotoShot Disk ... 41 Digital Still Camera ... 34~40 Digital Wipe Mode .......... 40 Digital Zoom 30 Display...
... Time 15 B Backlight 23 BACK LIGHT Button ...... 23 Battery Pack 9, 10 BATTERY RELEASE Button 9 Before Requesting Service 55, 56 Built-in Microphone ........ 17 C Camera Recording ... 17~19 Car Battery Cord 10 Cassette Information ....... 11 Charging Battery 9 Clock Battery 51 Clock Set 14, 15 Color Digital Filter 29 Copying your Tapes ....... 22 Customer Servicenter Directory 58 D DC IN 10 DC Power Cable 10 Digital E.I.S 31 Digital PhotoShot Disk ... 41 Digital Still Camera ... 34~40 Digital Wipe Mode .......... 40 Digital Zoom 30 Display...


