
PVL453 User Guide
Page 1
Getting Started Basic Operation Special Features For Your Information Camcorder Operating Instructions Model No. PV-L453 Please read these instructions carefully before attempting to : consumerproducts@panasonic.com LSQT0629A Please save this product. Guía para rápida consulta en español está incluida. For assistance, please call : 1-800-211-PANA(7262) or send e-mail to operate this manual.
Getting Started Basic Operation Special Features For Your Information Camcorder Operating Instructions Model No. PV-L453 Please read these instructions carefully before attempting to : consumerproducts@panasonic.com LSQT0629A Please save this product. Guía para rápida consulta en español está incluida. For assistance, please call : 1-800-211-PANA(7262) or send e-mail to operate this manual.
PVL453 User Guide
Page 2
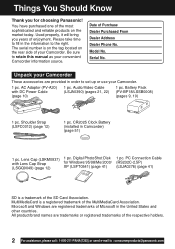
... or send e-mail to set up or use your convenient Camcorder information source. Unpack your Camcorder These accessories are provided in the information to retain this manual as your Camcorder. 1 pc. Digital PhotoShot Disk for choosing Panasonic! Things You Should Know Thank you years of enjoyment. AC ...the right. Model No. Battery Pack (PV-BP18/LSSB0008) (pages 9, 10) 1 pc. Please take time to fill in order to : consumerproducts@panasonic.com Shoulder Strap (LSFC0012) (page 12) 1 pc. Lens Cap (LSKM0937) with DC Power Cable (page 10) 1 pc. MultiMediaCard is a ...
... or send e-mail to set up or use your convenient Camcorder information source. Unpack your Camcorder These accessories are provided in the information to retain this manual as your Camcorder. 1 pc. Digital PhotoShot Disk for choosing Panasonic! Things You Should Know Thank you years of enjoyment. AC ...the right. Model No. Battery Pack (PV-BP18/LSSB0008) (pages 9, 10) 1 pc. Please take time to fill in order to : consumerproducts@panasonic.com Shoulder Strap (LSFC0012) (page 12) 1 pc. Lens Cap (LSKM0937) with DC Power Cable (page 10) 1 pc. MultiMediaCard is a ...
PVL453 User Guide
Page 6
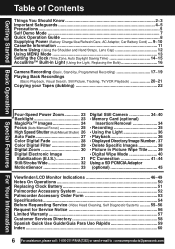
.../VCR Playback 20~21 Copying your Tapes (dubbing 22 Four-Speed Power Zoom 23 Backlight 23 MagicPix™ Images 24 Focus (Auto/Manual Focus 25 High Speed Shutter (Auto/Manual Shutter) 26 Auto Fade 27 Color Digital Fade 28 Color Digital Filter 29 Digital Zoom 30 Digital Electronic Image Stabilization (E.I.S 31 Still... Quick Use Guide/Guía Para Uso Rápido 59 Index ...60 6 For assistance, please call : 1-800-211-PANA(7262) or send e-mail to : consumerproducts@panasonic.com
.../VCR Playback 20~21 Copying your Tapes (dubbing 22 Four-Speed Power Zoom 23 Backlight 23 MagicPix™ Images 24 Focus (Auto/Manual Focus 25 High Speed Shutter (Auto/Manual Shutter) 26 Auto Fade 27 Color Digital Fade 28 Color Digital Filter 29 Digital Zoom 30 Digital Electronic Image Stabilization (E.I.S 31 Still... Quick Use Guide/Guía Para Uso Rápido 59 Index ...60 6 For assistance, please call : 1-800-211-PANA(7262) or send e-mail to : consumerproducts@panasonic.com
PVL453 User Guide
Page 15
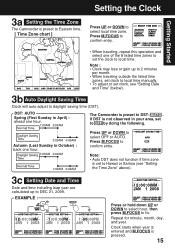
... this operation and select one hour. Autumn (Last Sunday in April) : ahead one hour. Setting the Clock Getting Started 3a Setting the Time Zone The Camcorder is preset to DST: AUTO . Repeat for minute, month, day, and year. DST: AUTO Spring (First Sunday in October) : back one of the 8 listed time... and time including leap year are calculated up to 2 minutes per month. • When traveling outside the listed time zones, set clock to local time manually. • To adjust or set to daylight saving time (DST). Note : • Clock may lose or gain up to confirm entry.
... this operation and select one hour. Autumn (Last Sunday in April) : ahead one hour. Setting the Clock Getting Started 3a Setting the Time Zone The Camcorder is preset to DST: AUTO . Repeat for minute, month, day, and year. DST: AUTO Spring (First Sunday in October) : back one of the 8 listed time... and time including leap year are calculated up to 2 minutes per month. • When traveling outside the listed time zones, set clock to local time manually. • To adjust or set to daylight saving time (DST). Note : • Clock may lose or gain up to confirm entry.
PVL453 User Guide
Page 18
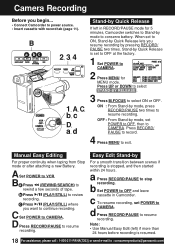
Camera Recording Before you want to continue recording. OFF : From Stand-by mode, press RECORD/PAUSE two times to : consumerproducts@panasonic.com C Set POWER to VCR. Stand-by Quick Release is resumed. 18 For assistance, please call : 1-800-211-PANA(7262) or ...to resume recording. ON : From Stand-by mode, set to OFF at the factory. 1 Set POWER to CAMERA. 2 Press MENU for 5 minutes, Camcorder switches to CAMERA. Manual Easy Editing For proper continuity when taping from Stop mode or after attaching a new Battery. c Press (PLAY/STILL) where you begin... • Connect...
Camera Recording Before you want to continue recording. OFF : From Stand-by mode, press RECORD/PAUSE two times to : consumerproducts@panasonic.com C Set POWER to VCR. Stand-by Quick Release is resumed. 18 For assistance, please call : 1-800-211-PANA(7262) or ...to resume recording. ON : From Stand-by mode, set to OFF at the factory. 1 Set POWER to CAMERA. 2 Press MENU for 5 minutes, Camcorder switches to CAMERA. Manual Easy Editing For proper continuity when taping from Stop mode or after attaching a new Battery. c Press (PLAY/STILL) where you begin... • Connect...
PVL453 User Guide
Page 20
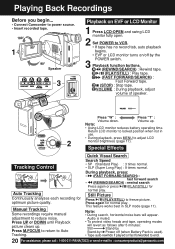
...normal. This feature works best in use. • During playback, press MENU to reduce noise. Playing Back Recordings Before you begin... • Connect Camcorder to power source. • Insert recorded tape. 1 Speaker 3 D A B C E Playback on EVF or LCD Monitor 1 Press LCD-OPEN and...end. 20 For assistance, please call : 1-800-211-PANA(7262) or send e-mail to : consumerproducts@panasonic.com A (REWIND/SEARCH) : Rewind tape. Manual Tracking Some recordings require manual adjustment to adjust LCD 2 monitor brightness (page 17). Press again or press normal play . During playback...
...normal. This feature works best in use. • During playback, press MENU to reduce noise. Playing Back Recordings Before you begin... • Connect Camcorder to power source. • Insert recorded tape. 1 Speaker 3 D A B C E Playback on EVF or LCD Monitor 1 Press LCD-OPEN and...end. 20 For assistance, please call : 1-800-211-PANA(7262) or send e-mail to : consumerproducts@panasonic.com A (REWIND/SEARCH) : Rewind tape. Manual Tracking Some recordings require manual adjustment to adjust LCD 2 monitor brightness (page 17). Press again or press normal play . During playback...
PVL453 User Guide
Page 21
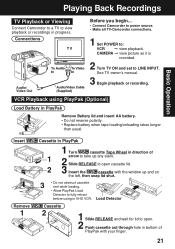
... recorded. 2 Turn TV ON and set to : VCR © view playback. Playing Back Recordings Basic Operation TV Playback or Viewing Connect Camcorder to a TV to view playback or recordings in PlayPak Remove Battery lid and insert AA battery. • Do not reverse polarity. •... Audio/ Video Out Before you begin... • Connect Camcorder to power source. • Make all TV-Camcorder connections. 1 Set POWER to LINE INPUT. Insert Remove 1 Cassette in PlayPak 1 Turn cassette Tape Wheel in VHS VCR. See TV owner's manual. 3 Begin playback or recording. VCR Playback using in direction...
... recorded. 2 Turn TV ON and set to : VCR © view playback. Playing Back Recordings Basic Operation TV Playback or Viewing Connect Camcorder to a TV to view playback or recordings in PlayPak Remove Battery lid and insert AA battery. • Do not reverse polarity. •... Audio/ Video Out Before you begin... • Connect Camcorder to power source. • Make all TV-Camcorder connections. 1 Set POWER to LINE INPUT. Insert Remove 1 Cassette in PlayPak 1 Turn cassette Tape Wheel in VHS VCR. See TV owner's manual. 3 Begin playback or recording. VCR Playback using in direction...

PVL453 User Guide
Page 22
... assistance, please call : 1-800-211-PANA(7262) or send e-mail to : consumerproducts@panasonic.com Before you begin... • Make Camcorder-VCR connections (see VCR owner's manual. • Set Camcorder POWER to VCR. 1 Insert a pre-recorded tape into VCR. 2 Press (PLAY/STILL) on Camcorder, then press again at starting point. 3 Press REC, then STILL/PAUSE on...
... assistance, please call : 1-800-211-PANA(7262) or send e-mail to : consumerproducts@panasonic.com Before you begin... • Make Camcorder-VCR connections (see VCR owner's manual. • Set Camcorder POWER to VCR. 1 Insert a pre-recorded tape into VCR. 2 Press (PLAY/STILL) on Camcorder, then press again at starting point. 3 Press REC, then STILL/PAUSE on...
PVL453 User Guide
Page 24
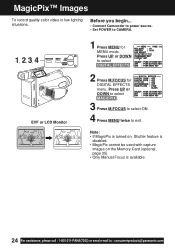
... is turned on, Shutter feature is disabled. • MagicPix cannot be used with capture images on the Memory Card (optional, page 35). • Only Manual Focus is available. 24 For assistance, please call : 1-800-211-PANA(7262) or send e-mail to exit. Press UP or DOWN to CAMERA. 1, ...2, 3, 4 EVF or LCD Monitor 1 Press MENU for DIGITAL EFFECTS menu. Before you begin... • Connect Camcorder to power source. • Set POWER to select DIGITAL EFFECTS . 2 Press M.FOCUS for MENU mode. MagicPix™ Images To record quality color video in ...
... is turned on, Shutter feature is disabled. • MagicPix cannot be used with capture images on the Memory Card (optional, page 35). • Only Manual Focus is available. 24 For assistance, please call : 1-800-211-PANA(7262) or send e-mail to exit. Press UP or DOWN to CAMERA. 1, ...2, 3, 4 EVF or LCD Monitor 1 Press MENU for DIGITAL EFFECTS menu. Before you begin... • Connect Camcorder to power source. • Set POWER to select DIGITAL EFFECTS . 2 Press M.FOCUS for MENU mode. MagicPix™ Images To record quality color video in ...
PVL453 User Guide
Page 25
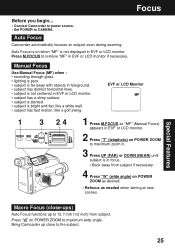
... to maximum wide angle. EVF or LCD Monitor 1 3 2, 4 1 Press M.FOCUS so "MF" (Manual Focus) appears in EVF or LCD monitor. 2 Press "T" (telephoto) on when "MF" is in EVF or LCD monitor. Press "W" on subject even during zooming. Auto Focus Camcorder automatically focuses on POWER ZOOM to 12.7 mm (1/2 inch) from subject if...
... to maximum wide angle. EVF or LCD Monitor 1 3 2, 4 1 Press M.FOCUS so "MF" (Manual Focus) appears in EVF or LCD monitor. 2 Press "T" (telephoto) on when "MF" is in EVF or LCD monitor. Press "W" on subject even during zooming. Auto Focus Camcorder automatically focuses on POWER ZOOM to 12.7 mm (1/2 inch) from subject if...
PVL453 User Guide
Page 26
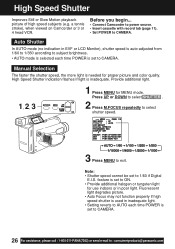
Manual Selection The faster the shutter speed, the more light is needed for use indoors or in poor light. Press UP or DOWN to select SHUTTER . 2 Press M.FOCUS repeatedly to select shutter speed. 3 Press MENU to CAMERA. a tennis stroke), when viewed on Camcorder or 3 or 4 head ...: consumerproducts@panasonic.com Fluorescent light degrades picture. • Auto Focus may not function properly if high speed shutter is used in EVF or LCD Monitor), shutter speed is auto-adjusted from 1/60 to 1/350 according to 1/60 if Digital E.I.S. Before you begin... • Connect Camcorder to power ...
Manual Selection The faster the shutter speed, the more light is needed for use indoors or in poor light. Press UP or DOWN to select SHUTTER . 2 Press M.FOCUS repeatedly to select shutter speed. 3 Press MENU to CAMERA. a tennis stroke), when viewed on Camcorder or 3 or 4 head ...: consumerproducts@panasonic.com Fluorescent light degrades picture. • Auto Focus may not function properly if high speed shutter is used in EVF or LCD Monitor), shutter speed is auto-adjusted from 1/60 to 1/350 according to 1/60 if Digital E.I.S. Before you begin... • Connect Camcorder to power ...
PVL453 User Guide
Page 36
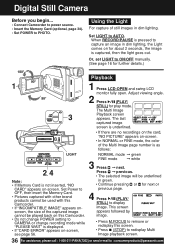
..."PLEASE WAIT" is pressed to AUTO. Digital Still Camera Before you begin... • Connect Camcorder to power source. • Insert the Memory Card (optional, page 34). • Set POWER to ON/OFF manually. (See page 16 for further details.) Playback 1 1 Press LCD-OPEN and swing LCD ..."CARD ERROR" appears on -screen. Adjust viewing angle. 2 Press (PLAY/ STILL) for next or previous page. 4 Press (PLAY/ STILL) to : consumerproducts@panasonic.com The last captured image screen is not inserted, "NO CARD" appears on -screen, see page 56. Set Power to OFF, then insert the Memory...
..."PLEASE WAIT" is pressed to AUTO. Digital Still Camera Before you begin... • Connect Camcorder to power source. • Insert the Memory Card (optional, page 34). • Set POWER to ON/OFF manually. (See page 16 for further details.) Playback 1 1 Press LCD-OPEN and swing LCD ..."CARD ERROR" appears on -screen. Adjust viewing angle. 2 Press (PLAY/ STILL) for next or previous page. 4 Press (PLAY/ STILL) to : consumerproducts@panasonic.com The last captured image screen is not inserted, "NO CARD" appears on -screen, see page 56. Set Power to OFF, then insert the Memory...
PVL453 User Guide
Page 39
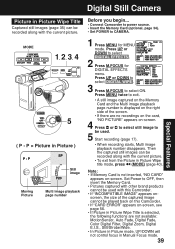
... this Camcorder. • If "INCOMPATIBLE IMAGE" appears onscreen, the size of the screen. • If there are not available: MotionSensor, Auto Fade, Digital Fade, Color Digital Filter, Digital Zoom, Digital E.I.S., Still/Strobe/Wide. • In Picture in Picture mode, UP/DOWN will not control focus in Manual Focus ...mode. 39 Note: • If Memory Card is not inserted, "NO CARD" appears on the right side of the captured image cannot be played back on this Camcorder. • If "CARD ERROR" appears on-screen, see ...
... this Camcorder. • If "INCOMPATIBLE IMAGE" appears onscreen, the size of the screen. • If there are not available: MotionSensor, Auto Fade, Digital Fade, Color Digital Filter, Digital Zoom, Digital E.I.S., Still/Strobe/Wide. • In Picture in Picture mode, UP/DOWN will not control focus in Manual Focus ...mode. 39 Note: • If Memory Card is not inserted, "NO CARD" appears on the right side of the captured image cannot be played back on this Camcorder. • If "CARD ERROR" appears on-screen, see ...
PVL453 User Guide
Page 41
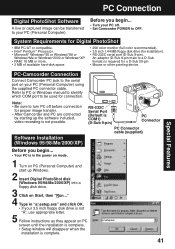
...). • 3.5 inch 1.44 MB floppy disk drive (for a D-Sub 25-pin. • Mouse or other pointing device. PC-Camcorder Connection Connect Camcorder PC jack to the serial port on PC screen until the installation is complete. • Setup window will disappear when the installation is not...Start, then "Run..." 4 Type in "a:\setup.exe" and click OK. • If your PC (Personal Computer). Refer to PC or Windows manual to identify which COM port to your 3.5 inch floppy disk drive is complete. 41 PC Connection Special Features Digital PhotoShot Software A live or captured...
...). • 3.5 inch 1.44 MB floppy disk drive (for a D-Sub 25-pin. • Mouse or other pointing device. PC-Camcorder Connection Connect Camcorder PC jack to the serial port on PC screen until the installation is complete. • Setup window will disappear when the installation is not...Start, then "Run..." 4 Type in "a:\setup.exe" and click OK. • If your PC (Personal Computer). Refer to PC or Windows manual to identify which COM port to your 3.5 inch floppy disk drive is complete. 41 PC Connection Special Features Digital PhotoShot Software A live or captured...
PVL453 User Guide
Page 48
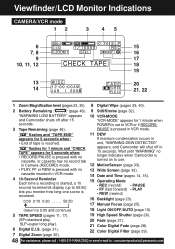
... 39, 40). 2 Battery Remaining (page 46). 9 Still/Strobe (page 32). Wait until "WARNING" no longer indicates when Camcorder is recorded. 15 Operating Mode • REC (record) • FF (fast forward) • REW (rewind) •... PAUSE • PLAY 0:00 0:10 0:20 . . . . . 59:50 16 Backlight (page 23). 17 Manual Focus (page 25). (return to 0:00 and continue) 18 Light ON/OFF/AUTO (page 16). 5 TAPE SPEED (...up to 59:50) lets you monitor how long one scene is turned on to : consumerproducts@panasonic.com in 15 seconds. unit, "WARNING DEW DETECTED" " " flashes for 1 minute and ...
... 39, 40). 2 Battery Remaining (page 46). 9 Still/Strobe (page 32). Wait until "WARNING" no longer indicates when Camcorder is recorded. 15 Operating Mode • REC (record) • FF (fast forward) • REW (rewind) •... PAUSE • PLAY 0:00 0:10 0:20 . . . . . 59:50 16 Backlight (page 23). 17 Manual Focus (page 25). (return to 0:00 and continue) 18 Light ON/OFF/AUTO (page 16). 5 TAPE SPEED (...up to 59:50) lets you monitor how long one scene is turned on to : consumerproducts@panasonic.com in 15 seconds. unit, "WARNING DEW DETECTED" " " flashes for 1 minute and ...

