
PVL453 User Guide
Page 1
For assistance, please call : 1-800-211-PANA(7262) or send e-mail to operate this manual. Please save this product. Guía para rápida consulta en español está incluida. Getting Started Basic Operation Special Features For Your Information Camcorder Operating Instructions Model No. PV-L453 Please read these instructions carefully before attempting to : consumerproducts@panasonic.com LSQT0629A
For assistance, please call : 1-800-211-PANA(7262) or send e-mail to operate this manual. Please save this product. Guía para rápida consulta en español está incluida. Getting Started Basic Operation Special Features For Your Information Camcorder Operating Instructions Model No. PV-L453 Please read these instructions carefully before attempting to : consumerproducts@panasonic.com LSQT0629A
PVL453 User Guide
Page 2
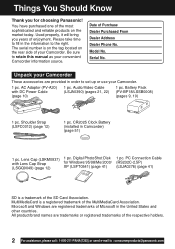
... of Microsoft in the information to fill in the United States and other countries. Digital PhotoShot Disk for choosing Panasonic! Used properly, it will bring you for Windows 95/98/Me/2000/ 1 pc. CR2025 Clock Battery (installed in order to ...: consumerproducts@panasonic.com MultiMediaCard is a registered trademark of Purchase Dealer Purchased From Dealer Address Dealer Phone No. Unpack your convenient Camcorder information source. Things You Should Know Thank you years of enjoyment. Model No. Serial...
... of Microsoft in the information to fill in the United States and other countries. Digital PhotoShot Disk for choosing Panasonic! Used properly, it will bring you for Windows 95/98/Me/2000/ 1 pc. CR2025 Clock Battery (installed in order to ...: consumerproducts@panasonic.com MultiMediaCard is a registered trademark of Purchase Dealer Purchased From Dealer Address Dealer Phone No. Unpack your convenient Camcorder information source. Things You Should Know Thank you years of enjoyment. Model No. Serial...

PVL453 User Guide
Page 3
...symbol alerts the user that used . You may cause interference to record and play a Compact VHS Camcorder recording on , use only provided shielded interfacing cable with standard VHS equipment. Therefore, it should not be determined by the receiver. Operation is dangerous to the following...with any kind of this unit. Declaration of Conformity Model Number : PV-L453 Trade Name : Panasonic Responsibility Party : Matsushita Electric Corporation of America Address : One Panasonic Way Secaucus New Jersey 07094 Telephone Number : 1-800-211-PANA(7262) This device complies with...
...symbol alerts the user that used . You may cause interference to record and play a Compact VHS Camcorder recording on , use only provided shielded interfacing cable with standard VHS equipment. Therefore, it should not be determined by the receiver. Operation is dangerous to the following...with any kind of this unit. Declaration of Conformity Model Number : PV-L453 Trade Name : Panasonic Responsibility Party : Matsushita Electric Corporation of America Address : One Panasonic Way Secaucus New Jersey 07094 Telephone Number : 1-800-211-PANA(7262) This device complies with...

PVL453 User Guide
Page 5
...parts of the lens with them might be taken to unnecessary movement (avoid shaking and striking). Do not touch the surface of your Camcorder. • AVOID SUDDEN CHANGES IN TEMPERATURE ... Damage Requiring Service - If any service or repairs to this video unit from the ...the power-supply cord or plug is suddenly moved from touching such power lines or circuits as the original part. e. Before handling your Camcorder, make sure your Camcorder body. • TO PROTECT THE LENS ... Precautions USE & LOCATION • TO AVOID SHOCK HAZARD ... Unauthorized substitutions may form on...
...parts of the lens with them might be taken to unnecessary movement (avoid shaking and striking). Do not touch the surface of your Camcorder. • AVOID SUDDEN CHANGES IN TEMPERATURE ... Damage Requiring Service - If any service or repairs to this video unit from the ...the power-supply cord or plug is suddenly moved from touching such power lines or circuits as the original part. e. Before handling your Camcorder, make sure your Camcorder body. • TO PROTECT THE LENS ... Precautions USE & LOCATION • TO AVOID SHOCK HAZARD ... Unauthorized substitutions may form on...
PVL453 User Guide
Page 7
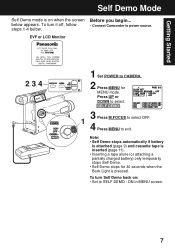
... 1-4 below appears. below . Getting Started Self Demo Mode Self Demo mode is on : • Set to power source. To turn it off, follow • Connect Camcorder to SELF DEMO : ON in MENU screen. 7
... 1-4 below appears. below . Getting Started Self Demo Mode Self Demo mode is on : • Set to power source. To turn it off, follow • Connect Camcorder to SELF DEMO : ON in MENU screen. 7

PVL453 User Guide
Page 10
... (in an area which has special AC outlets. Car Battery Cord (Optional) 1 Connect PV-C16 Car Battery Cord (optional) to : consumerproducts@panasonic.com We recommend using the accessory power plug adaptor (VJSS0070/K2DB42E00001) in amps). DC IN Connector Car Battery Cord (optional) Cigarette Lighter Socket (...8226; Never attempt to the AC Adaptor, the Battery cannot be well ventilated. • When not in use , unplug AC Adaptor from the Camcorder and AC Adaptor, and store in selecting an alternate AC plug. Safety precautions: • Do not get Battery near, or dispose of the...
... (in an area which has special AC outlets. Car Battery Cord (Optional) 1 Connect PV-C16 Car Battery Cord (optional) to : consumerproducts@panasonic.com We recommend using the accessory power plug adaptor (VJSS0070/K2DB42E00001) in amps). DC IN Connector Car Battery Cord (optional) Cigarette Lighter Socket (...8226; Never attempt to the AC Adaptor, the Battery cannot be well ventilated. • When not in use , unplug AC Adaptor from the Camcorder and AC Adaptor, and store in selecting an alternate AC plug. Safety precautions: • Do not get Battery near, or dispose of the...
PVL453 User Guide
Page 12
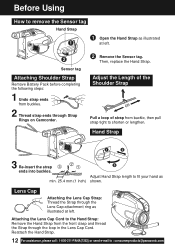
... buckle, then pull strap tight to the Hand Strap: Remove the Hand Strap from the front clasp and thread the Strap through Strap Rings on Camcorder. 2 Remove the Sensor tag. Hand Strap 3 Re-insert the strap 3 ends into buckles. 2 1 min. 25.4 mm (1 inch) Adjust Hand Strap length to : consumerproducts...
... buckle, then pull strap tight to the Hand Strap: Remove the Hand Strap from the front clasp and thread the Strap through Strap Rings on Camcorder. 2 Remove the Sensor tag. Hand Strap 3 Re-insert the strap 3 ends into buckles. 2 1 min. 25.4 mm (1 inch) Adjust Hand Strap length to : consumerproducts...
PVL453 User Guide
Page 13
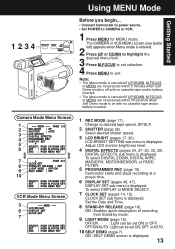
...SETTING sub menu is displayed. Adjust LCD monitor brightness level. 4 DIGITAL EFFECTS (pages 24, 27~30, 33, 39). CLOCK SET sub menu is displayed. Camcorder starts and stops recording at a preset time. 6 DISPLAY SET (pages 46, 47). Set the Date and Time. 8 STAND-BY RELEASE (page 18)....Demo mode is off with no cassette tape and/or battery inserted. Using MENU Mode Getting Started 1, 2, 3, 4 Before you begin... • Connect Camcorder to power source. • Set POWER to highlight the 3 desired menu item. The CAMERA or VCR MENU screen (see below left) appears when ...
...SETTING sub menu is displayed. Adjust LCD monitor brightness level. 4 DIGITAL EFFECTS (pages 24, 27~30, 33, 39). CLOCK SET sub menu is displayed. Camcorder starts and stops recording at a preset time. 6 DISPLAY SET (pages 46, 47). Set the Date and Time. 8 STAND-BY RELEASE (page 18)....Demo mode is off with no cassette tape and/or battery inserted. Using MENU Mode Getting Started 1, 2, 3, 4 Before you begin... • Connect Camcorder to power source. • Set POWER to highlight the 3 desired menu item. The CAMERA or VCR MENU screen (see below left) appears when ...

PVL453 User Guide
Page 14
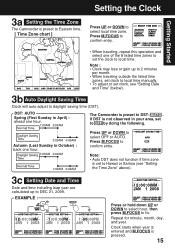
Before you begin... • Connect Camcorder to power source. • Set POWER to select TIME ZONE, DST, or DATE/TIME. 3 Press M.FOCUS for menu of item selected in order: Time Zone, ... twice to exit. 14 For assistance, please call : 1-800-211-PANA(7262) or send e-mail to step 3b on page 15. D.S.T. ➔ Go to : consumerproducts@panasonic.com To change the setting: TIME ZONE ➔ Go to select CLOCK SET . 1, 2, 3, 4 [ CAMERA MODE ] [ VCR MODE ] 2 Press M.FOCUS for MENU mode. Press UP or...
Before you begin... • Connect Camcorder to power source. • Set POWER to select TIME ZONE, DST, or DATE/TIME. 3 Press M.FOCUS for menu of item selected in order: Time Zone, ... twice to exit. 14 For assistance, please call : 1-800-211-PANA(7262) or send e-mail to step 3b on page 15. D.S.T. ➔ Go to : consumerproducts@panasonic.com To change the setting: TIME ZONE ➔ Go to select CLOCK SET . 1, 2, 3, 4 [ CAMERA MODE ] [ VCR MODE ] 2 Press M.FOCUS for MENU mode. Press UP or...
PVL453 User Guide
Page 15
DST: AUTO Spring (First Sunday in April) : ahead one hour. Press UP or DOWN to confirm entry. Press M.FOCUS to select OFF or AUTO. The Camcorder is preset to DEC 31, 2099. Note: • Auto DST does not function if time zone is set the clock to daylight saving time (DST). ... press M.FOCUS to select local time zone. Repeat for minute, month, day, and year. Setting the Clock Getting Started 3a Setting the Time Zone The Camcorder is preset to Eastern time. [ Time Zone chart ] Press UP or DOWN to fix. If DST is pressed. 15 Clock starts when year is entered...
DST: AUTO Spring (First Sunday in April) : ahead one hour. Press UP or DOWN to confirm entry. Press M.FOCUS to select OFF or AUTO. The Camcorder is preset to DEC 31, 2099. Note: • Auto DST does not function if time zone is set the clock to daylight saving time (DST). ... press M.FOCUS to select local time zone. Repeat for minute, month, day, and year. Setting the Clock Getting Started 3a Setting the Time Zone The Camcorder is preset to Eastern time. [ Time Zone chart ] Press UP or DOWN to fix. If DST is pressed. 15 Clock starts when year is entered...

PVL453 User Guide
Page 16
...to avoid possible burn hazard. 16 For assistance, please call : 1-800-211-PANA(7262) or send e-mail to : consumerproducts@panasonic.com Replacing the Bulb B 1 A 2 3 Before you begin ... • Connect Camcorder to power source. • Set POWER to CAMERA. 1 Press MENU for replacement bulb. • Set POWER to OFF. ...ON/AUTO. Press UP or DOWN to select LIGHT MODE . 2 Press M.FOCUS to set again. EVF or LCD Monitor A : Light is powered by Panasonic to reduce risk of fire. AccuBrite™ Built-in Light Using the Light For recording in dim lighting. 1, 2 3 Note: • Using Light...
...to avoid possible burn hazard. 16 For assistance, please call : 1-800-211-PANA(7262) or send e-mail to : consumerproducts@panasonic.com Replacing the Bulb B 1 A 2 3 Before you begin ... • Connect Camcorder to power source. • Set POWER to CAMERA. 1 Press MENU for replacement bulb. • Set POWER to OFF. ...ON/AUTO. Press UP or DOWN to select LIGHT MODE . 2 Press M.FOCUS to set again. EVF or LCD Monitor A : Light is powered by Panasonic to reduce risk of fire. AccuBrite™ Built-in Light Using the Light For recording in dim lighting. 1, 2 3 Note: • Using Light...
PVL453 User Guide
Page 17
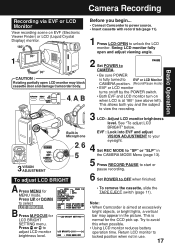
... or LCD Monitor View recording scene on when LCD is at excessively bright objects, or bright lights, a vertical bar may block cassette door and damage Camcorder body. 4, A, B Built-in Microphone 2, 6 5 3 VISION ADJUSTMENT To adjust LCD BRIGHT A Press MENU for MENU mode. Try to select LCD ...BRIGHT . This allows both you begin... • Connect Camcorder to power source. • Insert cassette with record tab (page 11). 1 Press LCD-OPEN to OFF when finished. • To remove the cassette, ...
... or LCD Monitor View recording scene on when LCD is at excessively bright objects, or bright lights, a vertical bar may block cassette door and damage Camcorder body. 4, A, B Built-in Microphone 2, 6 5 3 VISION ADJUSTMENT To adjust LCD BRIGHT A Press MENU for MENU mode. Try to select LCD ...BRIGHT . This allows both you begin... • Connect Camcorder to power source. • Insert cassette with record tab (page 11). 1 Press LCD-OPEN to OFF when finished. • To remove the cassette, ...
PVL453 User Guide
Page 18
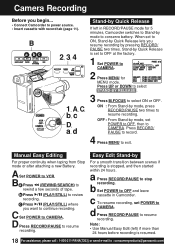
...D Press RECORD/PAUSE to exit. c To resume recording, set to OFF at the factory. 1 Set POWER to CAMERA. 2 Press MENU for 5 minutes, Camcorder switches to Stand-by Quick Release is set POWER to CAMERA. OFF : From Stand-by For a smooth transition between scenes if recording is resumed. 18... For assistance, please call : 1-800-211-PANA(7262) or send e-mail to : consumerproducts@panasonic.com Press RECORD/ PAUSE to record. 4 Press MENU to resume recording. C Set POWER to OFF and leave cassette in RECORD/PAUSE mode for MENU...
...D Press RECORD/PAUSE to exit. c To resume recording, set to OFF at the factory. 1 Set POWER to CAMERA. 2 Press MENU for 5 minutes, Camcorder switches to Stand-by Quick Release is set POWER to CAMERA. OFF : From Stand-by For a smooth transition between scenes if recording is resumed. 18... For assistance, please call : 1-800-211-PANA(7262) or send e-mail to : consumerproducts@panasonic.com Press RECORD/ PAUSE to record. 4 Press MENU to resume recording. C Set POWER to OFF and leave cassette in RECORD/PAUSE mode for MENU...
PVL453 User Guide
Page 19
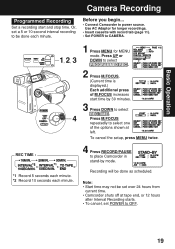
Recording will be set over 24 hours from current time. • Camcorder shuts off at left. Press UP or DOWN to CAMERA. Press M.FOCUS repeatedly to power source. REC TIME : 1, 2, 3 4 1 Press MENU for longer recordings. • Insert ... AC Adaptor for MENU mode. To cancel the setup, press MENU twice. 4 Press RECORD/PAUSE to place Camcorder in stand-by 30 minutes. 3 Press DOWN to OFF. 19 Before you begin... • Connect Camcorder to select one of M.FOCUS increases start and stop time. Note: • Start time may not be done...
Recording will be set over 24 hours from current time. • Camcorder shuts off at left. Press UP or DOWN to CAMERA. Press M.FOCUS repeatedly to power source. REC TIME : 1, 2, 3 4 1 Press MENU for longer recordings. • Insert ... AC Adaptor for MENU mode. To cancel the setup, press MENU twice. 4 Press RECORD/PAUSE to place Camcorder in stand-by 30 minutes. 3 Press DOWN to OFF. 19 Before you begin... • Connect Camcorder to select one of M.FOCUS increases start and stop time. Note: • Start time may not be done...
PVL453 User Guide
Page 20
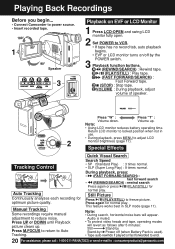
Playing Back Recordings Before you begin... • Connect Camcorder to power source. • Insert recorded tape. 1 Speaker 3 D A B C E Playback on /off (when Battery Pack is used). • Tape auto-rewinds if played or fast ... SP (Standard Play) : 3 times normal. • SLP (Super Long Play) : 9 times normal. This feature works best in use. • During playback, press MENU to : consumerproducts@panasonic.com Note: • During search, horizontal noise bars will revert as follows after 5 minutes: Still Stand-by Stand-by Power off by the POWER switch...
Playing Back Recordings Before you begin... • Connect Camcorder to power source. • Insert recorded tape. 1 Speaker 3 D A B C E Playback on /off (when Battery Pack is used). • Tape auto-rewinds if played or fast ... SP (Standard Play) : 3 times normal. • SLP (Super Long Play) : 9 times normal. This feature works best in use. • During playback, press MENU to : consumerproducts@panasonic.com Note: • During search, horizontal noise bars will revert as follows after 5 minutes: Still Stand-by Stand-by Power off by the POWER switch...
PVL453 User Guide
Page 21
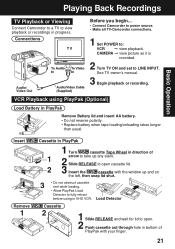
... playback or recordings in progress. See TV owner's manual. 3 Begin playback or recording. Playing Back Recordings Basic Operation TV Playback or Viewing Connect Camcorder to a TV to fully retract before using PlayPak (Optional) Load Battery in PlayPak Remove Battery lid and insert AA battery. • Do not...LINE INPUT. VCR Playback using in bottom of 1 arrow to take up any slack. 2 Slide RELEASE to open . 2 Push cassette out through hole in VHS VCR. CAMERA © view picture as it is recorded. 2 Turn TV ON and set to open cassette lid. 2 3 Insert the cassette with your...
... playback or recordings in progress. See TV owner's manual. 3 Begin playback or recording. Playing Back Recordings Basic Operation TV Playback or Viewing Connect Camcorder to a TV to fully retract before using PlayPak (Optional) Load Battery in PlayPak Remove Battery lid and insert AA battery. • Do not...LINE INPUT. VCR Playback using in bottom of 1 arrow to take up any slack. 2 Slide RELEASE to open . 2 Push cassette out through hole in VHS VCR. CAMERA © view picture as it is recorded. 2 Turn TV ON and set to open cassette lid. 2 3 Insert the cassette with your...

PVL453 User Guide
Page 22
... on both units to stop copying. CAUTION: Unauthorized exchanging and/or copying of copyrighted recordings may reduce picture quality. Note: • Camcorder will only playback tapes recorded in SP or SLP mode. • Dubbing may be copyright infringement. 22 For assistance, please call :... 1-800-211-PANA(7262) or send e-mail to : consumerproducts@panasonic.com Copying your Tapes (dubbing) Connections 5 2, 4 Source (Playing) Camcorder Audio/ Video Out Monitor with record tab into Camcorder and a blank tape with your TV • Turn TV on and tune to VCR...
... on both units to stop copying. CAUTION: Unauthorized exchanging and/or copying of copyrighted recordings may reduce picture quality. Note: • Camcorder will only playback tapes recorded in SP or SLP mode. • Dubbing may be copyright infringement. 22 For assistance, please call :... 1-800-211-PANA(7262) or send e-mail to : consumerproducts@panasonic.com Copying your Tapes (dubbing) Connections 5 2, 4 Source (Playing) Camcorder Audio/ Video Out Monitor with record tab into Camcorder and a blank tape with your TV • Turn TV on and tune to VCR...
PVL453 User Guide
Page 23
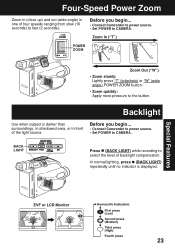
..., press (BACK LIGHT) repeatedly until no indicator is darker than surroundings, in shadowed area, or in one of backlight compensation. Before you begin ... • Connect Camcorder to power source. • Set POWER to the button. BACK LIGHT Press (BACK LIGHT) while recording to select the level of four speeds ranging from... ("W") • Zoom slowly: Lightly press "T" (telephoto) or "W" (wide angle) POWER ZOOM button. • Zoom quickly: Apply more pressure to CAMERA. Before you begin ... • Connect Camcorder to power source. • Set POWER to fast (2 seconds).
..., press (BACK LIGHT) repeatedly until no indicator is darker than surroundings, in shadowed area, or in one of backlight compensation. Before you begin ... • Connect Camcorder to power source. • Set POWER to the button. BACK LIGHT Press (BACK LIGHT) while recording to select the level of four speeds ranging from... ("W") • Zoom slowly: Lightly press "T" (telephoto) or "W" (wide angle) POWER ZOOM button. • Zoom quickly: Apply more pressure to CAMERA. Before you begin ... • Connect Camcorder to power source. • Set POWER to fast (2 seconds).
PVL453 User Guide
Page 24
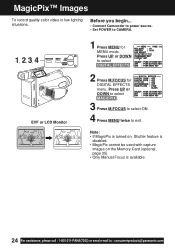
MagicPix™ Images To record quality color video in low lighting situations. Before you begin... • Connect Camcorder to power source. • Set POWER to select DIGITAL EFFECTS . 2 Press M.FOCUS for MENU mode. Press UP or DOWN to CAMERA. 1, 2, 3, 4 EVF or LCD ... 1 Press MENU for DIGITAL EFFECTS menu. Press UP or DOWN to select MAGICPIX . 3 Press M.FOCUS to select ON. 4 Press MENU twice to : consumerproducts@panasonic.com Note: • If MagicPix is turned on, Shutter feature is disabled. • MagicPix cannot be used with capture images on the Memory Card (optional...
MagicPix™ Images To record quality color video in low lighting situations. Before you begin... • Connect Camcorder to power source. • Set POWER to select DIGITAL EFFECTS . 2 Press M.FOCUS for MENU mode. Press UP or DOWN to CAMERA. 1, 2, 3, 4 EVF or LCD ... 1 Press MENU for DIGITAL EFFECTS menu. Press UP or DOWN to select MAGICPIX . 3 Press M.FOCUS to select ON. 4 Press MENU twice to : consumerproducts@panasonic.com Note: • If MagicPix is turned on, Shutter feature is disabled. • MagicPix cannot be used with capture images on the Memory Card (optional...
PVL453 User Guide
Page 25
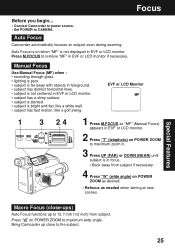
... wall. • subject has fast motion, like a golf swing. Press M.FOCUS to CAMERA. Special Features Macro Focus (close to maximum wide angle. Bring Camcorder up close -ups) Auto Focus functions up to 12.7 mm (1/2 inch) from subject if necessary. 4 Press "W" (wide angle) on POWER ZOOM to ... Focus is on subject even during zooming. Focus Before you begin... • Connect Camcorder to power source. • Set POWER to remove "MF" in EVF or LCD monitor if necessary. Auto Focus Camcorder automatically focuses on when "MF" is not displayed in EVF or LCD monitor. Press...
... wall. • subject has fast motion, like a golf swing. Press M.FOCUS to CAMERA. Special Features Macro Focus (close to maximum wide angle. Bring Camcorder up close -ups) Auto Focus functions up to 12.7 mm (1/2 inch) from subject if necessary. 4 Press "W" (wide angle) on POWER ZOOM to ... Focus is on subject even during zooming. Focus Before you begin... • Connect Camcorder to power source. • Set POWER to remove "MF" in EVF or LCD monitor if necessary. Auto Focus Camcorder automatically focuses on when "MF" is not displayed in EVF or LCD monitor. Press...


