
PVL453 User Guide
Page 6
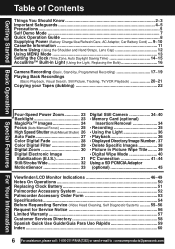
...Auto Daylight Saving Time 14~15 AccuBrite™ Built-in Light (Using the Light, Replacing the Bulb 16 Camera Recording (Basic, Stand-by, Programmed Recording 17~19 Playing Back Recordings (Basic Playback, Visual Search, Still ...Shutter (Auto/Manual Shutter) 26 Auto Fade 27 Color Digital Fade 28 Color Digital Filter 29 Digital Zoom 30 Digital Electronic Image Stabilization (E.I.S 31 Still/Strobe/Wide 32 MotionSensor 33 Digital Still Camera 34~40 • Memory Card (optional) Insertion/Removal ...please call : 1-800-211-PANA(7262) or send e-mail to : consumerproducts@panasonic.com
...Auto Daylight Saving Time 14~15 AccuBrite™ Built-in Light (Using the Light, Replacing the Bulb 16 Camera Recording (Basic, Stand-by, Programmed Recording 17~19 Playing Back Recordings (Basic Playback, Visual Search, Still ...Shutter (Auto/Manual Shutter) 26 Auto Fade 27 Color Digital Fade 28 Color Digital Filter 29 Digital Zoom 30 Digital Electronic Image Stabilization (E.I.S 31 Still/Strobe/Wide 32 MotionSensor 33 Digital Still Camera 34~40 • Memory Card (optional) Insertion/Removal ...please call : 1-800-211-PANA(7262) or send e-mail to : consumerproducts@panasonic.com
PVL453 User Guide
Page 13
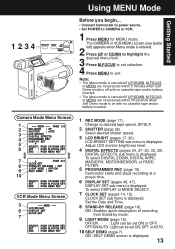
... 3 desired menu item. ON : SELF DEMO screen is displayed. Press M.FOCUS to set ON or OFF. Camcorder starts and stops recording at a preset time. 6 DISPLAY SET (pages 46, 47). CLOCK SET sub menu is displayed. Camera Mode Menu Screen 1 2 3 4 5 6 7 8 9 10 VCR Mode Menu Screen 3 6 7 1 REC MODE (page 17).... 2 SHUTTER (page 26). OFF/ON/AUTO : Light can be set ON, OFF, or AUTO. 10 SELF DEMO (page 7). Adjust LCD monitor brightness level. 4 DIGITAL EFFECTS (pages 24, 27~30, 33, 39). Note: • The Menu mode is canceled if UP/DOWN, M.FOCUS, or MENU are not pressed within 5...
... 3 desired menu item. ON : SELF DEMO screen is displayed. Press M.FOCUS to set ON or OFF. Camcorder starts and stops recording at a preset time. 6 DISPLAY SET (pages 46, 47). CLOCK SET sub menu is displayed. Camera Mode Menu Screen 1 2 3 4 5 6 7 8 9 10 VCR Mode Menu Screen 3 6 7 1 REC MODE (page 17).... 2 SHUTTER (page 26). OFF/ON/AUTO : Light can be set ON, OFF, or AUTO. 10 SELF DEMO (page 7). Adjust LCD monitor brightness level. 4 DIGITAL EFFECTS (pages 24, 27~30, 33, 39). Note: • The Menu mode is canceled if UP/DOWN, M.FOCUS, or MENU are not pressed within 5...
PVL453 User Guide
Page 24
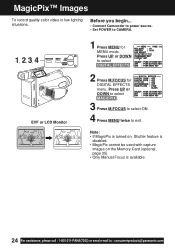
... quality color video in low lighting situations. Before you begin... • Connect Camcorder to power source. • Set POWER to select DIGITAL EFFECTS . 2 Press M.FOCUS for MENU mode. Press UP or DOWN to CAMERA. 1, 2, 3, 4 EVF or LCD Monitor 1 Press MENU for DIGITAL EFFECTS menu. Note: • If MagicPix is turned on, Shutter feature is...-211-PANA(7262) or send e-mail to exit. Press UP or DOWN to select MAGICPIX . 3 Press M.FOCUS to select ON. 4 Press MENU twice to : consumerproducts@panasonic.com
... quality color video in low lighting situations. Before you begin... • Connect Camcorder to power source. • Set POWER to select DIGITAL EFFECTS . 2 Press M.FOCUS for MENU mode. Press UP or DOWN to CAMERA. 1, 2, 3, 4 EVF or LCD Monitor 1 Press MENU for DIGITAL EFFECTS menu. Note: • If MagicPix is turned on, Shutter feature is...-211-PANA(7262) or send e-mail to exit. Press UP or DOWN to select MAGICPIX . 3 Press M.FOCUS to select ON. 4 Press MENU twice to : consumerproducts@panasonic.com
PVL453 User Guide
Page 26
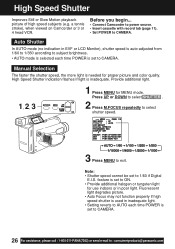
...exit. High Speed Shutter indication flashes if light is set to CAMERA. Note: • Shutter speed cannot be set to CAMERA. 26 For assistance, please call : 1-800-211-PANA(7262... viewed on Camcorder or 3 or 4 head VCR. High Speed Shutter Improves Still or Slow Motion playback picture of high speed subjects (e.g. feature is set to : consumerproducts@panasonic.com Auto... Shutter In AUTO mode (no indication in inadequate light. • Setting reverts to AUTO each time POWER is set to 1/60 if Digital E.I.S. Provide additional ...
...exit. High Speed Shutter indication flashes if light is set to CAMERA. Note: • Shutter speed cannot be set to CAMERA. 26 For assistance, please call : 1-800-211-PANA(7262... viewed on Camcorder or 3 or 4 head VCR. High Speed Shutter Improves Still or Slow Motion playback picture of high speed subjects (e.g. feature is set to : consumerproducts@panasonic.com Auto... Shutter In AUTO mode (no indication in inadequate light. • Setting reverts to AUTO each time POWER is set to 1/60 if Digital E.I.S. Provide additional ...

PVL453 User Guide
Page 27
... and sound gradually fade in EVF or LCD monitor. Press UP or DOWN to CAMERA. 1 Press MENU for MENU mode. FADE 1, 2, 3, 4, 5 RECORD/ PAUSE Fade In WHITE BLACK Fade Out Before you begin... • Connect Camcorder to power source. • Set POWER to select AUTO FADE . 4 Press ... Press UP or DOWN to open and close scenes. Press RECORD/PAUSE. Auto Fade Special Features An interesting way to select DIGITAL EFFECTS . 2 Press M.FOCUS for DIGITAL EFFECTS menu. Press MENU twice to exit. Picture and sound gradually fade out, and recording is pressed accidentally, press again ...
... and sound gradually fade in EVF or LCD monitor. Press UP or DOWN to CAMERA. 1 Press MENU for MENU mode. FADE 1, 2, 3, 4, 5 RECORD/ PAUSE Fade In WHITE BLACK Fade Out Before you begin... • Connect Camcorder to power source. • Set POWER to select AUTO FADE . 4 Press ... Press UP or DOWN to open and close scenes. Press RECORD/PAUSE. Auto Fade Special Features An interesting way to select DIGITAL EFFECTS . 2 Press M.FOCUS for DIGITAL EFFECTS menu. Press MENU twice to exit. Picture and sound gradually fade out, and recording is pressed accidentally, press again ...

PVL453 User Guide
Page 28
...Camcorder to power source. • Set POWER to select FADE/FILTER . 3 Press M.FOCUS for FADE/FILTER menu. Press UP or DOWN to CAMERA. 1 Press MENU for DIGITAL ...FADE menu. Press UP or DOWN to select COLOR . Press UP or DOWN to select DIGITAL FADE ...selected. 5 Press M.FOCUS for DIGITAL EFFECTS menu. Press MENU three times to exit. 7 Start recording (page ...) for about 2 seconds to select DIGITAL EFFECTS . 2 Press M.FOCUS for DIGITAL FADE menu. Press UP or DOWN ...Digital Fade, do steps 1-3 and 6. Press M.FOCUS for TYPE menu. Press...
...Camcorder to power source. • Set POWER to select FADE/FILTER . 3 Press M.FOCUS for FADE/FILTER menu. Press UP or DOWN to CAMERA. 1 Press MENU for DIGITAL ...FADE menu. Press UP or DOWN to select COLOR . Press UP or DOWN to select DIGITAL FADE ...selected. 5 Press M.FOCUS for DIGITAL EFFECTS menu. Press MENU three times to exit. 7 Start recording (page ...) for about 2 seconds to select DIGITAL EFFECTS . 2 Press M.FOCUS for DIGITAL FADE menu. Press UP or DOWN ...Digital Fade, do steps 1-3 and 6. Press M.FOCUS for TYPE menu. Press...
PVL453 User Guide
Page 29
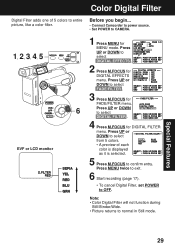
...6 Start recording (page 17). • To cancel Digital Filter, set POWER to normal in Still mode. Before you begin... • Connect Camcorder to power source. • Set POWER to CAMERA. 1, 2, 3, 4, 5 EVF or LCD monitor 1 Press MENU for DIGITAL FILTER menu. Press UP or DOWN to select FADE/FILTER... . 3 Press M.FOCUS for FADE/FILTER menu. 6 Press UP or DOWN to select DIGITAL FILTER . 4 Press ...
...6 Start recording (page 17). • To cancel Digital Filter, set POWER to normal in Still mode. Before you begin... • Connect Camcorder to power source. • Set POWER to CAMERA. 1, 2, 3, 4, 5 EVF or LCD monitor 1 Press MENU for DIGITAL FILTER menu. Press UP or DOWN to select FADE/FILTER... . 3 Press M.FOCUS for FADE/FILTER menu. 6 Press UP or DOWN to select DIGITAL FILTER . 4 Press ...

PVL453 User Guide
Page 30
.... Press UP or DOWN to : consumerproducts@panasonic.com Digital Zoom Power Zoom magnification is digitally increased. 1, 2, 3, 4, 5 Before you begin... • Connect Camcorder to power source. • Set POWER to select D.ZOOM1, D.ZOOM2, or OFF. Press UP or DOWN to select DIGITAL ZOOM . 3 Press M.FOCUS repeatedly to CAMERA. 1 Press MENU for DIGITAL EFFECTS menu. D.ZOOM 1 : 150× maximum...
.... Press UP or DOWN to : consumerproducts@panasonic.com Digital Zoom Power Zoom magnification is digitally increased. 1, 2, 3, 4, 5 Before you begin... • Connect Camcorder to power source. • Set POWER to select D.ZOOM1, D.ZOOM2, or OFF. Press UP or DOWN to select DIGITAL ZOOM . 3 Press M.FOCUS repeatedly to CAMERA. 1 Press MENU for DIGITAL EFFECTS menu. D.ZOOM 1 : 150× maximum...

PVL453 User Guide
Page 31
NORMAL Digital EIS ON Special Features 31 may not function during... • extreme Camcorder movement. • recording of subjects with distinct horizontal or vertical stripes. • low light situations (EIS indicator flashes). • ... enlarged and shutter speed auto-adjusts from 1/80 to 1/350 according to display "EIS" in Before you begin... Digital Electronic Image Stabilization (E.I .S. unstable situations. • Connect Camcorder to power source. • Set POWER to CAMERA. 1, 2 1 Press (EIS) to brightness. • Use High Speed Shutter (page 26) if needed....
NORMAL Digital EIS ON Special Features 31 may not function during... • extreme Camcorder movement. • recording of subjects with distinct horizontal or vertical stripes. • low light situations (EIS indicator flashes). • ... enlarged and shutter speed auto-adjusts from 1/80 to 1/350 according to display "EIS" in Before you begin... Digital Electronic Image Stabilization (E.I .S. unstable situations. • Connect Camcorder to power source. • Set POWER to CAMERA. 1, 2 1 Press (EIS) to brightness. • Use High Speed Shutter (page 26) if needed....
PVL453 User Guide
Page 32
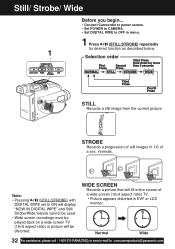
intervals. Still/ Strobe/ Wide Before you begin... • Connect Camcorder to power source. • Set POWER to CAMERA. • Set DIGITAL WIPE to ON will display "NOW IN DIGITAL WIPE" and Still/ Strobe/Wide feature cannot be used. • Wide screen recordings must be played back on a wide ... desired function as described below. 1 Selection order STILL Records a still image from the current picture. Note: • Pressing (STILL/STROBE) with DIGITAL WIPE set to OFF in EVF or LCD monitor. Normal Wide 32 For assistance, please call : 1-800-211-PANA(7262) or send e-mail ...
intervals. Still/ Strobe/ Wide Before you begin... • Connect Camcorder to power source. • Set POWER to CAMERA. • Set DIGITAL WIPE to ON will display "NOW IN DIGITAL WIPE" and Still/ Strobe/Wide feature cannot be used. • Wide screen recordings must be played back on a wide ... desired function as described below. 1 Selection order STILL Records a still image from the current picture. Note: • Pressing (STILL/STROBE) with DIGITAL WIPE set to OFF in EVF or LCD monitor. Normal Wide 32 For assistance, please call : 1-800-211-PANA(7262) or send e-mail ...
PVL453 User Guide
Page 33
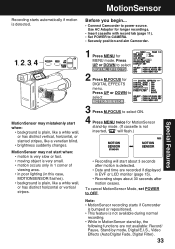
Before you begin... • Connect Camcorder to OFF. Use AC Adaptor for DIGITAL EFFECTS menu. Press UP or DOWN to select DIGITAL EFFECTS . 2 Press M.FOCUS for longer recordings. • Insert cassette with record tab (page 11). • Set POWER to...will flash.) • Recording will start when: • background is detected. Press UP or DOWN to select MOTIONSENSOR . 3 Press M.FOCUS to CAMERA. • Securely position and aim Camcorder. Special Features 1, 2, 3, 4 MotionSensor may not start when: • motion is very slow or fast. • moving object is very ...
Before you begin... • Connect Camcorder to OFF. Use AC Adaptor for DIGITAL EFFECTS menu. Press UP or DOWN to select DIGITAL EFFECTS . 2 Press M.FOCUS for longer recordings. • Insert cassette with record tab (page 11). • Set POWER to...will flash.) • Recording will start when: • background is detected. Press UP or DOWN to select MOTIONSENSOR . 3 Press M.FOCUS to CAMERA. • Securely position and aim Camcorder. Special Features 1, 2, 3, 4 MotionSensor may not start when: • motion is very slow or fast. • moving object is very ...
PVL453 User Guide
Page 34
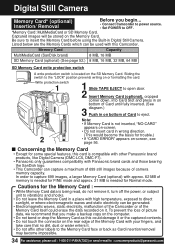
... with other Panasonic brand products, like Digital Camera (DMC-LC5, DMC-F7). • Panasonic only guarantees compatibility with your fingers, and take care that no dirt, dust or water enters it. • Do not affix other labels to the Memory Card face or back as this Camcorder. I Concerning...screen. • Do not insert card in on bottom of Card to : consumerproducts@panasonic.com Cautions for the Memory Card : • While Memory Card data is located on the SD Memory Card. Digital Still Camera Memory Card* (optional) Insertion/ Removal Before you make a backup copy on the ...
... with other Panasonic brand products, like Digital Camera (DMC-LC5, DMC-F7). • Panasonic only guarantees compatibility with your fingers, and take care that no dirt, dust or water enters it. • Do not affix other labels to the Memory Card face or back as this Camcorder. I Concerning...screen. • Do not insert card in on bottom of Card to : consumerproducts@panasonic.com Cautions for the Memory Card : • While Memory Card data is located on the SD Memory Card. Digital Still Camera Memory Card* (optional) Insertion/ Removal Before you make a backup copy on the ...
PVL453 User Guide
Page 35
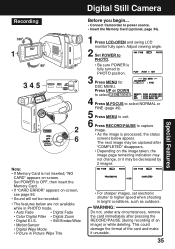
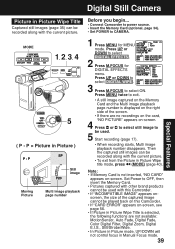
... to power source. • Insert the Memory Card (optional, page 34). 1 Press LCD-OPEN and swing LCD monitor fully open. Digital Still Camera Special Features Recording 1 3, 4, 5 2 6 Note: • If Memory Card is processed, the status screens below are not available... • Auto Fade • Digital Fade • Color Digital Filter • Digital Zoom • Digital E.I.S. • Still/Strobe/Wide • MotionSensor • Digital Wipe Mode • Picture in Picture Wipe Title Before you begin... • Connect Camcorder to higher speed when shooting in bright...
... to power source. • Insert the Memory Card (optional, page 34). 1 Press LCD-OPEN and swing LCD monitor fully open. Digital Still Camera Special Features Recording 1 3, 4, 5 2 6 Note: • If Memory Card is processed, the status screens below are not available... • Auto Fade • Digital Fade • Color Digital Filter • Digital Zoom • Digital E.I.S. • Still/Strobe/Wide • MotionSensor • Digital Wipe Mode • Picture in Picture Wipe Title Before you begin... • Connect Camcorder to higher speed when shooting in bright...
PVL453 User Guide
Page 36
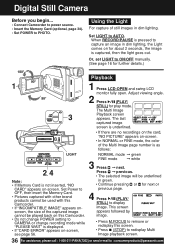
...See page 16 for play mode. Or, set LIGHT to : consumerproducts@panasonic.com This screen appears followed by image. • Press M.FOCUS to remove or redisplay this Camcorder. • Do not change POWER setting to CAMERA or change recording mode while "PLEASE WAIT" is underlined. • ... for next or previous page. 4 Press (PLAY/ STILL) to capture an image in dim lighting. Set LIGHT to PHOTO. Digital Still Camera Before you begin... • Connect Camcorder to power source. • Insert the Memory Card (optional, page 34). • Set POWER to AUTO. NORMAL mode ...
...See page 16 for play mode. Or, set LIGHT to : consumerproducts@panasonic.com This screen appears followed by image. • Press M.FOCUS to remove or redisplay this Camcorder. • Do not change POWER setting to CAMERA or change recording mode while "PLEASE WAIT" is underlined. • ... for next or previous page. 4 Press (PLAY/ STILL) to capture an image in dim lighting. Set LIGHT to PHOTO. Digital Still Camera Before you begin... • Connect Camcorder to power source. • Insert the Memory Card (optional, page 34). • Set POWER to AUTO. NORMAL mode ...
PVL453 User Guide
Page 37
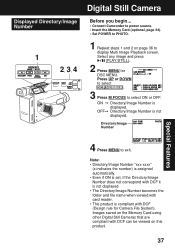
.... OFF© Directory/Image Number is displayed. Images saved on the Memory Card using other Digital Still Cameras that are compliant with DCF (Design rule for DSC MENU. Displayed Directory/Image Number 1 2, 3, 4 Digital Still Camera Before you begin... • Connect Camcorder to power source. • Insert the Memory Card (optional, page 34). • Set POWER...
.... OFF© Directory/Image Number is displayed. Images saved on the Memory Card using other Digital Still Cameras that are compliant with DCF (Design rule for DSC MENU. Displayed Directory/Image Number 1 2, 3, 4 Digital Still Camera Before you begin... • Connect Camcorder to power source. • Insert the Memory Card (optional, page 34). • Set POWER...
PVL453 User Guide
Page 38
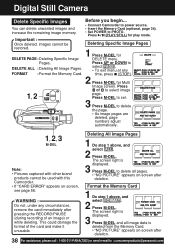
... 2, 3 M-DEL Note: • Pictures captured with this Camcorder. • If "CARD ERROR" appears on -screen after pressing the RECORD/PAUSE (during recording of the card and make it unusable. Digital Still Camera Delete Specific Images You can delete unwanted images and increase the ... Do step 1 above , and select FORMAT . 2 Press M-DEL. Before you begin... • Connect Camcorder to power source. • Insert the Memory Card (optional, page 34). • Set POWER to select image 1, 2 page. Press M-DEL to set. 3 Press M-DEL to : consumerproducts@panasonic.com
... 2, 3 M-DEL Note: • Pictures captured with this Camcorder. • If "CARD ERROR" appears on -screen after pressing the RECORD/PAUSE (during recording of the card and make it unusable. Digital Still Camera Delete Specific Images You can delete unwanted images and increase the ... Do step 1 above , and select FORMAT . 2 Press M-DEL. Before you begin... • Connect Camcorder to power source. • Insert the Memory Card (optional, page 34). • Set POWER to select image 1, 2 page. Press M-DEL to set. 3 Press M-DEL to : consumerproducts@panasonic.com
PVL453 User Guide
Page 39
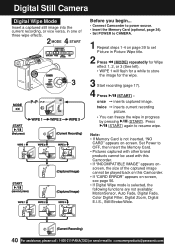
...Before you begin... • Connect Camcorder to power source. • Insert the Memory Card (optional, page 34). • Set POWER to select ON. Press UP or DOWN to select DIGITAL WIPE . 3 Press M.FOCUS to CAMERA. 1 Press MENU for DIGITAL EFFECTS menu. Set Power to OFF,...Fade, Digital Fade, Color Digital Filter, Digital Zoom, Digital E.I.S., Still/Strobe/Wide. • In Picture in Picture mode, UP/DOWN will not control focus in Manual Focus mode. 39 Digital Still Camera Special Features Picture in Picture Wipe Title Captured still images (page 35) can be used with this Camcorder. &#...
...Before you begin... • Connect Camcorder to power source. • Insert the Memory Card (optional, page 34). • Set POWER to select ON. Press UP or DOWN to select DIGITAL WIPE . 3 Press M.FOCUS to CAMERA. 1 Press MENU for DIGITAL EFFECTS menu. Set Power to OFF,...Fade, Digital Fade, Color Digital Filter, Digital Zoom, Digital E.I.S., Still/Strobe/Wide. • In Picture in Picture mode, UP/DOWN will not control focus in Manual Focus mode. 39 Digital Still Camera Special Features Picture in Picture Wipe Title Captured still images (page 35) can be used with this Camcorder. &#...
PVL453 User Guide
Page 40
Press (START) again to : consumerproducts@panasonic.com Note: • If Memory Card is selected, the following functions are not available: MotionSensor, Auto Fade, Digital Fade, Color Digital Filter, Digital Zoom, Digital E.I.S., Still/Strobe/Wide. 40 For assistance, please ...Camera Digital Wipe Mode Insert a captured still image into the current recording, or vice versa, in one of the captured image cannot be played back on this Camcorder. • If "INCOMPATIBLE IMAGE" appears onscreen, the size of three wipe effects. 2 4 MODE START 3 Before you begin... • Connect Camcorder...
Press (START) again to : consumerproducts@panasonic.com Note: • If Memory Card is selected, the following functions are not available: MotionSensor, Auto Fade, Digital Fade, Color Digital Filter, Digital Zoom, Digital E.I.S., Still/Strobe/Wide. 40 For assistance, please ...Camera Digital Wipe Mode Insert a captured still image into the current recording, or vice versa, in one of the captured image cannot be played back on this Camcorder. • If "INCOMPATIBLE IMAGE" appears onscreen, the size of three wipe effects. 2 4 MODE START 3 Before you begin... • Connect Camcorder...
PVL453 User Guide
Page 43
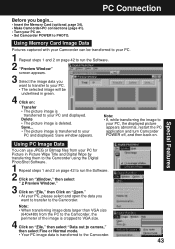
..., while transferring the image to your PC on . Using PC Image Data You can be underlined in Picture Wipe Title and Digital Wipe by transferring them to the Camcorder using the Digital PhotoShot Software. 1 Repeat steps 1 and 2 on page 42 to run the Software. 2 Click on "Window," then select " 2 Preview...from your PC for Picture in green. 4 Click on "File," then select "Data out to camera," then select Fine or Normal mode. • Your PC image data is transferred to the Camcorder. 43 PC Connection Special Features Before you want to transfer to your PC and displayed. Using ...
..., while transferring the image to your PC on . Using PC Image Data You can be underlined in Picture Wipe Title and Digital Wipe by transferring them to the Camcorder using the Digital PhotoShot Software. 1 Repeat steps 1 and 2 on page 42 to run the Software. 2 Click on "Window," then select " 2 Preview...from your PC for Picture in green. 4 Click on "File," then select "Data out to camera," then select Fine or Normal mode. • Your PC image data is transferred to the Camcorder. 43 PC Connection Special Features Before you want to transfer to your PC and displayed. Using ...
PVL453 User Guide
Page 44
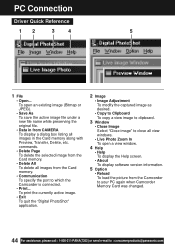
... print the currently active image. • Exit To quit the "Digital PhotoShot" application. 2 Image • Image Adjustment To modify the ..., etc. commands. • Delete Page To delete the selected image from the Camcorder to your PC again when Camcorder Memory Card was changed. 44 For assistance, please call : 1-800-211-PANA(7262) ...• Delete All To delete all images in from CAMERA To display a dialog box listing all images from the Card memory. • Communication To specify the port to : consumerproducts@panasonic.com PC Connection Driver Quick Reference 12 3 4 5...
... print the currently active image. • Exit To quit the "Digital PhotoShot" application. 2 Image • Image Adjustment To modify the ..., etc. commands. • Delete Page To delete the selected image from the Camcorder to your PC again when Camcorder Memory Card was changed. 44 For assistance, please call : 1-800-211-PANA(7262) ...• Delete All To delete all images in from CAMERA To display a dialog box listing all images from the Card memory. • Communication To specify the port to : consumerproducts@panasonic.com PC Connection Driver Quick Reference 12 3 4 5...


