
Digital Video Camcorder
Page 5
... Easy Cassette Eject ...7 Quick Guide ...11 Supplying Power ...14 Setting the Clock ...16 Using the Palmcorder Menu 17 Camera Recording ...18 • Simple Recording 18 • Digital PhotoShot™ Mode 20 • Zoom ...21 Special Effect Features 23 Advanced Settings ...28 Playback Your Recordings 32 ...Movie Messenger™ System (i.LINK 73 • Palmcorder USB Device Driver/SD Drive 75 • Palmcorder File Converter 78 • Web Camera (For Windows XP users/For Windows 98SE, Me, 2000 users 80 • Warning Indications 89 PC Connection • Transferring Your Images...
... Easy Cassette Eject ...7 Quick Guide ...11 Supplying Power ...14 Setting the Clock ...16 Using the Palmcorder Menu 17 Camera Recording ...18 • Simple Recording 18 • Digital PhotoShot™ Mode 20 • Zoom ...21 Special Effect Features 23 Advanced Settings ...28 Playback Your Recordings 32 ...Movie Messenger™ System (i.LINK 73 • Palmcorder USB Device Driver/SD Drive 75 • Palmcorder File Converter 78 • Web Camera (For Windows XP users/For Windows 98SE, Me, 2000 users 80 • Warning Indications 89 PC Connection • Transferring Your Images...

Digital Video Camcorder
Page 9
... the Palmcorder to a power source. (pp. 14, 15) • Set POWER to CAMERA or M-CARD. 1 Hold down LIGHT for a long time. • Set LIGHT to OFF when not in a scene. To operate... Camera functions: Set POWER to turn ON or OFF. • " " will appear on the screen. Remote Sensor... time. • Provide adequate ventilation if using Light in a hot environment for more than 0.7 seconds to CAMERA. Before Use Using the Built-in Light To brighten the natural colors in use. • When replacing the...
... the Palmcorder to a power source. (pp. 14, 15) • Set POWER to CAMERA or M-CARD. 1 Hold down LIGHT for a long time. • Set LIGHT to OFF when not in a scene. To operate... Camera functions: Set POWER to turn ON or OFF. • " " will appear on the screen. Remote Sensor... time. • Provide adequate ventilation if using Light in a hot environment for more than 0.7 seconds to CAMERA. Before Use Using the Built-in Light To brighten the natural colors in use. • When replacing the...

Digital Video Camcorder
Page 10
... VCR 2. Leave the other Palmcorder set to the same mode (VCR1 or VCR2), "CHECK REMOTE MODE (REMOTE)" will default to 2 VCR or CAMERA position. In order for the remote to distinguish between the two units, it is fully turned to VCR 1. 10 Forassistance, pleasecall: 1-800-211-...to correspond with the + mark facing up. Replace battery with one of used battery properly. Remote Controlling Two Palmcorders You can control any two Panasonic Palmcorders with Panasonic PART NO. Set the Remote Control to VCR 1 or VCR 2 to 5 VCR1. Do not reverse the polarity. 3Insert the Battery Tray...
... VCR 2. Leave the other Palmcorder set to the same mode (VCR1 or VCR2), "CHECK REMOTE MODE (REMOTE)" will default to 2 VCR or CAMERA position. In order for the remote to distinguish between the two units, it is fully turned to VCR 1. 10 Forassistance, pleasecall: 1-800-211-...to correspond with the + mark facing up. Replace battery with one of used battery properly. Remote Controlling Two Palmcorders You can control any two Panasonic Palmcorders with Panasonic PART NO. Set the Remote Control to VCR 1 or VCR 2 to 5 VCR1. Do not reverse the polarity. 3Insert the Battery Tray...

Digital Video Camcorder
Page 11
... or remove tapes, even when on a tripod. (p. 7) 1 Press LCD-OPEN to unlock the LCD monitor, and swing it fully open. 2 Set POWER to VCR or CAMERA. 5 Press PUSH TO CLOSE mark to close the Cassette Compartment Cover. 3 Slide TAPE EJECT to open the Cassette Compartment Cover. 4 Insert a cassette record tab up...
... or remove tapes, even when on a tripod. (p. 7) 1 Press LCD-OPEN to unlock the LCD monitor, and swing it fully open. 2 Set POWER to VCR or CAMERA. 5 Press PUSH TO CLOSE mark to close the Cassette Compartment Cover. 3 Slide TAPE EJECT to open the Cassette Compartment Cover. 4 Insert a cassette record tab up...

Digital Video Camcorder
Page 12
... 180° 90° 4 3 Press REC/PAUSE to start playback. 5 Press (STOP) to stop playback. 12 Forassistance, pleasecall: 1-800-211-PANA(7262)orsende-mailto:consumerproducts@panasonic.com To Watch Playback in the LCD (Liquid Crystal Display) When the LCD monitor is fully open , the Viewfinder automatically turns OFF. 180° 90...° Before you begin • Charge the Battery. (p. 14) 1 Set POWER to VCR. 2 Press LCD-OPEN to unlock the LCD monitor. Quick Guide Camera Recording When the LCD monitor is fully open , the Viewfinder automatically turns OFF. 1 Set POWER to...
... 180° 90° 4 3 Press REC/PAUSE to start playback. 5 Press (STOP) to stop playback. 12 Forassistance, pleasecall: 1-800-211-PANA(7262)orsende-mailto:consumerproducts@panasonic.com To Watch Playback in the LCD (Liquid Crystal Display) When the LCD monitor is fully open , the Viewfinder automatically turns OFF. 180° 90...° Before you begin • Charge the Battery. (p. 14) 1 Set POWER to VCR. 2 Press LCD-OPEN to unlock the LCD monitor. Quick Guide Camera Recording When the LCD monitor is fully open , the Viewfinder automatically turns OFF. 1 Set POWER to...

Digital Video Camcorder
Page 13
... write protection switch A write protection switch is a list of memory cards which can prevent POWER from accidentally entering the M-CARD position when changing POWER to CAMERA. When inserting the Memory Card M-CARD Lock Note • By sliding M-CARD Lock to the "LOCK" position prevents writing on the SD Memory Card...
... write protection switch A write protection switch is a list of memory cards which can prevent POWER from accidentally entering the M-CARD position when changing POWER to CAMERA. When inserting the Memory Card M-CARD Lock Note • By sliding M-CARD Lock to the "LOCK" position prevents writing on the SD Memory Card...

Digital Video Camcorder
Page 16
..., hour, and minutes. If the Palmcorder is not connected to start the clock and exit. 16 Forassistance, pleasecall: 1-800-211-PANA(7262)orsende-mailto:consumerproducts@panasonic.com Setting the Clock Set the Date and Time The date and time is calculated, including leap year, up to DEC 31 2089. 2, 3, 4 JOG... KEY 1MENU Before you begin • Connect the Palmcorder to a power source. (pp. 14, 15) • Set POWER to CAMERA or VCR. 1 Press MENU to the next item. Likewise, set to ON. (Menu OSD: pp. 109, 111) • The DATE/TIME SETTING menu is displayed...
..., hour, and minutes. If the Palmcorder is not connected to start the clock and exit. 16 Forassistance, pleasecall: 1-800-211-PANA(7262)orsende-mailto:consumerproducts@panasonic.com Setting the Clock Set the Date and Time The date and time is calculated, including leap year, up to DEC 31 2089. 2, 3, 4 JOG... KEY 1MENU Before you begin • Connect the Palmcorder to a power source. (pp. 14, 15) • Set POWER to CAMERA or VCR. 1 Press MENU to the next item. Likewise, set to ON. (Menu OSD: pp. 109, 111) • The DATE/TIME SETTING menu is displayed...

Digital Video Camcorder
Page 17
... To select REMOTE, BEEP, or MAGICVU (PV-DV402 only). 5 : DISPLAY SETTING DISPLAY SETTING menu is displayed. AE or CINEMA. 3 : REC MODE CAMERA REC-MODE menu is displayed. C Press JOG KEY to select a menu item. Using the Palmcorder Menu Before Use The Palmcorder features three menu displays: one... for CAMERA mode (recording), one for M-CARD (Memory Card Photo Mode) and one for VCR mode (Playback). (pp. 108~111) • While the ...
... To select REMOTE, BEEP, or MAGICVU (PV-DV402 only). 5 : DISPLAY SETTING DISPLAY SETTING menu is displayed. AE or CINEMA. 3 : REC MODE CAMERA REC-MODE menu is displayed. C Press JOG KEY to select a menu item. Using the Palmcorder Menu Before Use The Palmcorder features three menu displays: one... for CAMERA mode (recording), one for M-CARD (Memory Card Photo Mode) and one for VCR mode (Playback). (pp. 108~111) • While the ...

Digital Video Camcorder
Page 18
... vertical bar may cause damage to OFF and then ON again. 18 Forassistance, pleasecall: 1-800-211-PANA(7262)orsende-mailto:consumerproducts@panasonic.com This is fully turned to the CAMERA position. 2 With the Viewfinder Eye Cup held up device. Try to the hand strap. Please refer to "To adjust the LCD.../ EVF BRIGHTNESS or COLOR" on the screen. WARNING: • Do not leave the Palmcorder with the record tab closed. (p. 7) 1 Set POWER to CAMERA. • The POWER Lamp lights red. • Be sure POWER is a normal characteristic of the CCD pick-up against your eye, adjust the Vision ...
... vertical bar may cause damage to OFF and then ON again. 18 Forassistance, pleasecall: 1-800-211-PANA(7262)orsende-mailto:consumerproducts@panasonic.com This is fully turned to the CAMERA position. 2 With the Viewfinder Eye Cup held up device. Try to the hand strap. Please refer to "To adjust the LCD.../ EVF BRIGHTNESS or COLOR" on the screen. WARNING: • Do not leave the Palmcorder with the record tab closed. (p. 7) 1 Set POWER to CAMERA. • The POWER Lamp lights red. • Be sure POWER is a normal characteristic of the CCD pick-up against your eye, adjust the Vision ...

Digital Video Camcorder
Page 19
...necessary. Note • Using the LCD monitor will shut off automatically to "To adjust the LCD/ EVF BRIGHTNESS or COLOR" below. 3 Start recording. Camera Recording Using the LCD Monitor The LCD (Liquid Crystal Display) monitor can be used while recording. 1LCD-OPEN 180° 90° 90° ...on. • When the LCD monitor is completely closed, it will reduce battery operating time. • Close the LCD monitor completely when not in use. Camera To adjust the LCD/EVF BRIGHTNESS or COLOR 1, 5 MENU 2, 3, 4 JOG KEY EVF/LCD 1Press MENU to display the main menu screen. 2 Rotate ...
...necessary. Note • Using the LCD monitor will shut off automatically to "To adjust the LCD/ EVF BRIGHTNESS or COLOR" below. 3 Start recording. Camera Recording Using the LCD Monitor The LCD (Liquid Crystal Display) monitor can be used while recording. 1LCD-OPEN 180° 90° 90° ...on. • When the LCD monitor is completely closed, it will reduce battery operating time. • Close the LCD monitor completely when not in use. Camera To adjust the LCD/EVF BRIGHTNESS or COLOR 1, 5 MENU 2, 3, 4 JOG KEY EVF/LCD 1Press MENU to display the main menu screen. 2 Rotate ...

Digital Video Camcorder
Page 20
... higher resolution than with some function settings. 20 Forassistance, pleasecall: 1-800-211-PANA(7262)orsende-mailto:consumerproducts@panasonic.com Camera Recording Digital PhotoShot™ Mode Use this feature to record a seven second 1 Set POWER to display the CAMERA FUNCTION 4 menu screen. EVF/LCD Note • This Function may not work with the normal PhotoShot...
... higher resolution than with some function settings. 20 Forassistance, pleasecall: 1-800-211-PANA(7262)orsende-mailto:consumerproducts@panasonic.com Camera Recording Digital PhotoShot™ Mode Use this feature to record a seven second 1 Set POWER to display the CAMERA FUNCTION 4 menu screen. EVF/LCD Note • This Function may not work with the normal PhotoShot...

Digital Video Camcorder
Page 21
...• The zooming speed ranges from a slow 17 seconds to a fast 1.5 seconds according to the amount of the POWER ZOOM. Camera Zoom Microphone Function Along with the zooming operation, the microphone's directional angle and sensitivity are varied for wide angle shots. 2POWER ZOOM 1POWER ...3REC/PAUSE 1 Set POWER to CAMERA. 2 Zoom slowly: by applying more pressure. 3 Start recording. Zoom quickly: by lightly pressing the "T" (Telephoto) or the "W" (Wide Angle...
...• The zooming speed ranges from a slow 17 seconds to a fast 1.5 seconds according to the amount of the POWER ZOOM. Camera Zoom Microphone Function Along with the zooming operation, the microphone's directional angle and sensitivity are varied for wide angle shots. 2POWER ZOOM 1POWER ...3REC/PAUSE 1 Set POWER to CAMERA. 2 Zoom slowly: by applying more pressure. 3 Start recording. Zoom quickly: by lightly pressing the "T" (Telephoto) or the "W" (Wide Angle...

Digital Video Camcorder
Page 22
...still picture will be in the LCD monitor will resume recording real-time pictures. Camera Recording Recording Check To playback the final few seconds of any desired duration together...5REC/ PAUSE 1POWER 180° 1 Set POWER to CAMERA. 2 Press MENU to display the CAMERA mode menu screen. 3 Rotate JOG KEY to select REC MODE , then ...press JOG KEY to display the CAMERA REC-MODE menu screen. 4 Rotate JOG KEY to select SELFREC...the REC/PAUSE mode. The camera will appear reversed. 5 Start recording. 22 Forassistance, pleasecall: 1-800-211-PANA(7262)orsende...
...still picture will be in the LCD monitor will resume recording real-time pictures. Camera Recording Recording Check To playback the final few seconds of any desired duration together...5REC/ PAUSE 1POWER 180° 1 Set POWER to CAMERA. 2 Press MENU to display the CAMERA mode menu screen. 3 Rotate JOG KEY to select REC MODE , then ...press JOG KEY to display the CAMERA REC-MODE menu screen. 4 Rotate JOG KEY to select SELFREC...the REC/PAUSE mode. The camera will appear reversed. 5 Start recording. 22 Forassistance, pleasecall: 1-800-211-PANA(7262)orsende...

Digital Video Camcorder
Page 23
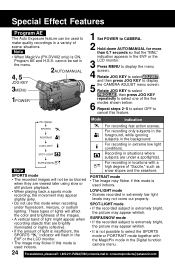
... monitor when OFF is in back of the picture. • Press MENU twice to exit. • "CINEMA" will appear in the DISPLAY menu. 23 Camera Special Effect Features CINEMA Mode You can record a picture compatible with a wide-screen TV equipped with an S2 picture terminal. 3, 4 JOG KEY 1POWER 2MENU ...5REC/PAUSE 1 Set POWER to CAMERA. 2 Press MENU to display the CAMERA mode menu screen. 3 Rotate JOG KEY to select ADJUST , then press JOG KEY to display the CAMERA ADJUST menu screen. 4 Rotate JOG KEY to select CINEMA , and then press JOG KEY...
... monitor when OFF is in back of the picture. • Press MENU twice to exit. • "CINEMA" will appear in the DISPLAY menu. 23 Camera Special Effect Features CINEMA Mode You can record a picture compatible with a wide-screen TV equipped with an S2 picture terminal. 3, 4 JOG KEY 1POWER 2MENU ...5REC/PAUSE 1 Set POWER to CAMERA. 2 Press MENU to display the CAMERA mode menu screen. 3 Rotate JOG KEY to select ADJUST , then press JOG KEY to display the CAMERA ADJUST menu screen. 4 Rotate JOG KEY to select CINEMA , and then press JOG KEY...
Digital Video Camcorder
Page 24
... if this mode when recording under a spotlight(s). Note SURF&SNOW For recording in the Digital function camera menu. 24 Forassistance, pleasecall: 1-800-211-PANA(7262)orsende-mailto:consumerproducts@panasonic.com SURF&SNOW mode • If the recorded subject is extremely bright, the picture... may appear slightly jerky. • Do not use this mode is used indoors. Press MENU to display 5 the CAMERA ADJUST menu screen. Repeat ...
... if this mode when recording under a spotlight(s). Note SURF&SNOW For recording in the Digital function camera menu. 24 Forassistance, pleasecall: 1-800-211-PANA(7262)orsende-mailto:consumerproducts@panasonic.com SURF&SNOW mode • If the recorded subject is extremely bright, the picture... may appear slightly jerky. • Do not use this mode is used indoors. Press MENU to display 5 the CAMERA ADJUST menu screen. Repeat ...

Digital Video Camcorder
Page 25
... the picture fades out. A During recording, hold down FADE until the picture fades out. 2 Press REC/PAUSE to record video in total darkness. Note • The subject can be up to the next. Camera MagicVu™ IR Filter (0 Lux) (PV-DV402 only) MagicVu allows you to start recording. 3 Release FADE and the... on the screen. 3 Press MENU to display the menu screen. 4 Rotate JOG KEY to select SET-UP , and then press JOG KEY to display the CAMERA SET-UP menu screen. 5 Rotate JOG KEY to select MAGICVU , and then press JOG KEY repeatedly to select B/W, BLUE, or GREEN. • Press MENU twice...
... the picture fades out. A During recording, hold down FADE until the picture fades out. 2 Press REC/PAUSE to record video in total darkness. Note • The subject can be up to the next. Camera MagicVu™ IR Filter (0 Lux) (PV-DV402 only) MagicVu allows you to start recording. 3 Release FADE and the... on the screen. 3 Press MENU to display the menu screen. 4 Rotate JOG KEY to select SET-UP , and then press JOG KEY to display the CAMERA SET-UP menu screen. 5 Rotate JOG KEY to select MAGICVU , and then press JOG KEY repeatedly to select B/W, BLUE, or GREEN. • Press MENU twice...

Digital Video Camcorder
Page 26
... right of the screen. Special Effect Features Picture in PhotoShot mode. • Press (CAMERA STILL) again to remove PinP image. 26 Forassistance, pleasecall: 1-800-211-PANA(7262)orsende-mailto:consumerproducts@panasonic.com Note • PinP position is fixed at the scene you wish to place as... PinP, then press (CAMERA STILL) to freeze the image. 6 Press (CAMERA STILL) again to place the frozen image as PinP. 7REC...
... right of the screen. Special Effect Features Picture in PhotoShot mode. • Press (CAMERA STILL) again to remove PinP image. 26 Forassistance, pleasecall: 1-800-211-PANA(7262)orsende-mailto:consumerproducts@panasonic.com Note • PinP position is fixed at the scene you wish to place as... PinP, then press (CAMERA STILL) to freeze the image. 6 Press (CAMERA STILL) again to place the frozen image as PinP. 7REC...

Digital Video Camcorder
Page 27
...to "SET". Then, "PHOTO TITLE SET" is displayed for approx. 3 seconds, and the screen goes back to the Camera mode screen. • After Photo Title is performed, Digital Function turns off. 5 Press REC/PAUSE to OFF before each recording is made. Then the Photo Title setting will appear... before inserting a recorded Memory Card. (pp. 48, 49) 1 Set POWER to CAMERA. 2 Press MENU to display the CAMERA menu screen. MIX : The ...
...to "SET". Then, "PHOTO TITLE SET" is displayed for approx. 3 seconds, and the screen goes back to the Camera mode screen. • After Photo Title is performed, Digital Function turns off. 5 Press REC/PAUSE to OFF before each recording is made. Then the Photo Title setting will appear... before inserting a recorded Memory Card. (pp. 48, 49) 1 Set POWER to CAMERA. 2 Press MENU to display the CAMERA menu screen. MIX : The ...

Digital Video Camcorder
Page 28
...is in effect. However, when using the manual adjustment. 3, 4, A, B JOG KEY 1POWER 2AUTO/MANUAL 1 Set POWER to CAMERA. 2 Hold down AUTO/MANUAL for more than 0.7 seconds so that the "MNL" indication appears in the EVF or the LCD...in most lighting conditions. When the source illumination is adjusted again. • Correct White Balance may get better results by using Digital Functions, etc., you may not be kept until " " indication stops flashing. • If " " indication flashes when.... 28 Forassistance, pleasecall: 1-800-211-PANA(7262)orsende-mailto:consumerproducts@panasonic.com
...is in effect. However, when using the manual adjustment. 3, 4, A, B JOG KEY 1POWER 2AUTO/MANUAL 1 Set POWER to CAMERA. 2 Hold down AUTO/MANUAL for more than 0.7 seconds so that the "MNL" indication appears in the EVF or the LCD...in most lighting conditions. When the source illumination is adjusted again. • Correct White Balance may get better results by using Digital Functions, etc., you may not be kept until " " indication stops flashing. • If " " indication flashes when.... 28 Forassistance, pleasecall: 1-800-211-PANA(7262)orsende-mailto:consumerproducts@panasonic.com

Digital Video Camcorder
Page 29
...the "MF" • in low light situations. • a scene with the subject as close -ups) Press the "W" side of the lens. 29 Set POWER to CAMERA. • a scene where the subject is in focus. 5M.FOCUS DIAL • It may be necessary to back away from the subject to focus the... subject such as a white wall. 2 Hold down AUTO/MANUAL for MF, AE, 3FOCUS W.BALANCE, or BACK LIGHT to be displayed on the LCD or EVF. Camera Advanced Settings Auto Focus The Palmcorder automatically adjusts the focus over 2AUTO/ MANUAL the entire zooming range. • It may be necessary to back away...
...the "MF" • in low light situations. • a scene with the subject as close -ups) Press the "W" side of the lens. 29 Set POWER to CAMERA. • a scene where the subject is in focus. 5M.FOCUS DIAL • It may be necessary to back away from the subject to focus the... subject such as a white wall. 2 Hold down AUTO/MANUAL for MF, AE, 3FOCUS W.BALANCE, or BACK LIGHT to be displayed on the LCD or EVF. Camera Advanced Settings Auto Focus The Palmcorder automatically adjusts the focus over 2AUTO/ MANUAL the entire zooming range. • It may be necessary to back away...


