
Digital Video Camcorder
Page 1
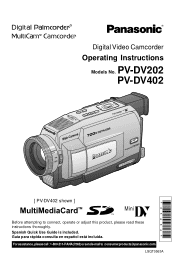
Guía para rápida consulta en español está incluida. R Digital Video Camcorder Operating Instructions Models No. PV-DV202 PV-DV402 [ PV-DV402 shown ] Mini Before attempting to : consumerproducts@panasonic.com LSQT0563A For assistance, please call : 1-800-211-PANA(7262) or send e-mail to connect, operate or adjust this product, please read these instructions thoroughly. Spanish Quick Use Guide is included.
Guía para rápida consulta en español está incluida. R Digital Video Camcorder Operating Instructions Models No. PV-DV202 PV-DV402 [ PV-DV402 shown ] Mini Before attempting to : consumerproducts@panasonic.com LSQT0563A For assistance, please call : 1-800-211-PANA(7262) or send e-mail to connect, operate or adjust this product, please read these instructions thoroughly. Spanish Quick Use Guide is included.
Digital Video Camcorder
Page 2
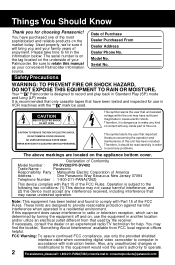
... interface cable when connecting digital video camcorder to record and play back in order to avoid any problems. The above markings are designed to : consumerproducts@panasonic.com It is dangerous to cause electric shock. Therefore, it is recommended that only cassette tapes that have been tested and inspected for use in VCR machines with the Mini mark be read carefully in Standard Play (SP) mode and...
... interface cable when connecting digital video camcorder to record and play back in order to avoid any problems. The above markings are designed to : consumerproducts@panasonic.com It is dangerous to cause electric shock. Therefore, it is recommended that only cassette tapes that have been tested and inspected for use in VCR machines with the Mini mark be read carefully in Standard Play (SP) mode and...
Digital Video Camcorder
Page 3
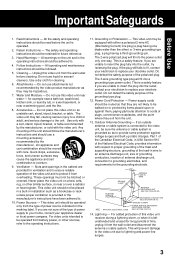
... to cords of the National Electrical Code, provides information with either a polarized 2-wire AC (Alternating Current) line plug (a plug having a third (grounding) pin. Power-Cord Protection - For added protection of time, unplug it is operated. 2. All the safety and operating instructions should be moved with the video unit. Cleaning - for long periods of this video unit on or pinched by the manufacturer. Use only...
... to cords of the National Electrical Code, provides information with either a polarized 2-wire AC (Alternating Current) line plug (a plug having a third (grounding) pin. Power-Cord Protection - For added protection of time, unplug it is operated. 2. All the safety and operating instructions should be moved with the video unit. Cleaning - for long periods of this video unit on or pinched by the manufacturer. Use only...
Digital Video Camcorder
Page 4
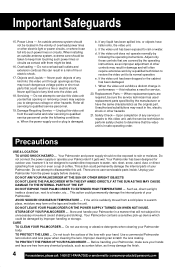
...). This action could permanently damage the internal parts of fire or electric shock. 17. TO PROTECT THE LENS ... Use a commercial Palmcorder lens solution and lens paper when cleaning the lens. When the power-supply cord or plug is suddenly moved from any service or repairs to rain or moisture. Safety Check- Do not attempt to a heater, etc... Improper cleaning can result in the vicinity of...
...). This action could permanently damage the internal parts of fire or electric shock. 17. TO PROTECT THE LENS ... Use a commercial Palmcorder lens solution and lens paper when cleaning the lens. When the power-supply cord or plug is suddenly moved from any service or repairs to rain or moisture. Safety Check- Do not attempt to a heater, etc... Improper cleaning can result in the vicinity of...
Digital Video Camcorder
Page 5
... Should Know 2 Important Safeguards ...3 Precautions ...4 Before Using ...6 • Easy Cassette Eject ...7 Quick Guide ...11 Supplying Power ...14 Setting the Clock ...16 Using the Palmcorder Menu 17 Camera Recording ...18 • Simple Recording 18 • Digital PhotoShot™ Mode 20 • Zoom ...21 Special Effect Features 23 Advanced Settings ...28 Playback Your Recordings 32 Special Effect Features 34 Digital Features ...40 Editing Features ...44 Card Features ...48 PC Connection • Transferring Your Images (Windows 55 •...
... Should Know 2 Important Safeguards ...3 Precautions ...4 Before Using ...6 • Easy Cassette Eject ...7 Quick Guide ...11 Supplying Power ...14 Setting the Clock ...16 Using the Palmcorder Menu 17 Camera Recording ...18 • Simple Recording 18 • Digital PhotoShot™ Mode 20 • Zoom ...21 Special Effect Features 23 Advanced Settings ...28 Playback Your Recordings 32 Special Effect Features 34 Digital Features ...40 Editing Features ...44 Card Features ...48 PC Connection • Transferring Your Images (Windows 55 •...
Digital Video Camcorder
Page 7
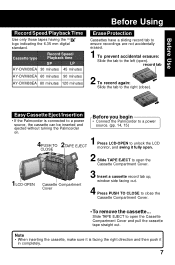
... connected to open ). Before you begin • Connect the Palmcorder to a power source. (pp. 14, 15) 4 2 1 PUSH TO TAPE EJECT CLOSE Press LCD-OPEN to the left (open the Cassette Compartment Cover and pull the cassette tape straight out. Cassette type Record Speed/ Playback time SP LP AY-DVM30EA 30 minutes 45 minutes AY-DVM60EA 60 minutes 90 minutes AY-DVM80EA 80 minutes 120 minutes Erase Protection Cassettes have a sliding record...
... connected to open ). Before you begin • Connect the Palmcorder to a power source. (pp. 14, 15) 4 2 1 PUSH TO TAPE EJECT CLOSE Press LCD-OPEN to the left (open the Cassette Compartment Cover and pull the cassette tape straight out. Cassette type Record Speed/ Playback time SP LP AY-DVM30EA 30 minutes 45 minutes AY-DVM60EA 60 minutes 90 minutes AY-DVM80EA 80 minutes 120 minutes Erase Protection Cassettes have a sliding record...

Digital Video Camcorder
Page 17
...C.RESET, DATE/ TIME, or CLOCK-SET. 6 : LCD/EVF SETTING LCD/EVF SETTING menu is displayed. To select D.FUNCTION, D.ZOOM, or PROGRESSIVE. 2 : ADJUST CAMERA ADJUST menu is displayed. AE or CINEMA. 3 : REC MODE CAMERA REC-MODE menu is displayed. To select LCD BRIGHTNESS, LCD COLOR or EVF BRIGHTNESS. 7 : PHOTO TITLE PHOTO TITLE menu is displayed. To select SPEED. 5 : DISPLAY SETTING DISPLAY SETTING menu is displayed. Setting the MENU Items (EX. C Press JOG KEY to select a menu item. CAMERA Main menu 1 : D. To select PROG. To select REC-SPEED or AUDIO-DUB. 3 : PLAY MODE VCR PLAY...
...C.RESET, DATE/ TIME, or CLOCK-SET. 6 : LCD/EVF SETTING LCD/EVF SETTING menu is displayed. To select D.FUNCTION, D.ZOOM, or PROGRESSIVE. 2 : ADJUST CAMERA ADJUST menu is displayed. AE or CINEMA. 3 : REC MODE CAMERA REC-MODE menu is displayed. To select LCD BRIGHTNESS, LCD COLOR or EVF BRIGHTNESS. 7 : PHOTO TITLE PHOTO TITLE menu is displayed. To select SPEED. 5 : DISPLAY SETTING DISPLAY SETTING menu is displayed. Setting the MENU Items (EX. C Press JOG KEY to select a menu item. CAMERA Main menu 1 : D. To select PROG. To select REC-SPEED or AUDIO-DUB. 3 : PLAY MODE VCR PLAY...
Digital Video Camcorder
Page 24
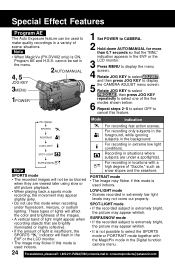
... 1 Set POWER to display 5 the CAMERA ADJUST menu screen. For recording only subjects in the foreground, while ignoring subjects in extreme low light conditions. LOW-LIGHT For recording in the background. Note SURF&SNOW For recording in locations with the MagicPix mode in the EVF or the LCD monitor. • The image may flicker if this mode when recording under a spotlight(s). SPORTS mode • The recorded images will flash in the Digital function camera menu...
... 1 Set POWER to display 5 the CAMERA ADJUST menu screen. For recording only subjects in the foreground, while ignoring subjects in extreme low light conditions. LOW-LIGHT For recording in the background. Note SURF&SNOW For recording in locations with the MagicPix mode in the EVF or the LCD monitor. • The image may flicker if this mode when recording under a spotlight(s). SPORTS mode • The recorded images will flash in the Digital function camera menu...

Digital Video Camcorder
Page 29
... the LCD or EVF. Camera Advanced Settings Auto Focus The Palmcorder automatically adjusts the focus over 2AUTO/ MANUAL the entire zooming range. • It may be required • when your Palmcorder is aimed at a new scene. 4 Press and hold POWER ZOOM, "T" side (Telephoto), until the lens is at 4, 6POWER ZOOM maximum zoom in. 5 Turn M.FOCUS DIAL until the picture is far from the subject to be displayed on...
... the LCD or EVF. Camera Advanced Settings Auto Focus The Palmcorder automatically adjusts the focus over 2AUTO/ MANUAL the entire zooming range. • It may be required • when your Palmcorder is aimed at a new scene. 4 Press and hold POWER ZOOM, "T" side (Telephoto), until the lens is at 4, 6POWER ZOOM maximum zoom in. 5 Turn M.FOCUS DIAL until the picture is far from the subject to be displayed on...
Digital Video Camcorder
Page 31
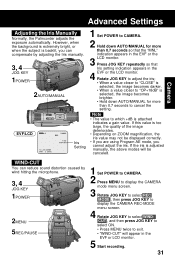
... recording. 31 Advanced Settings Camera Adjusting the Iris Manually Normally, the Palmcorder adjusts the exposure automatically. However, when the background is extremely bright, or when the subject is adjusted manually, the above modes will be displayed correctly. • If you are using Program AE mode, you can reduce sound distortion caused by adjusting the Iris manually. 3, 4 JOG KEY 1POWER 2AUTO/MANUAL EVF/LCD Iris Setting 1 Set POWER to CAMERA. 2 Hold down AUTO/MANUAL...
... recording. 31 Advanced Settings Camera Adjusting the Iris Manually Normally, the Palmcorder adjusts the exposure automatically. However, when the background is extremely bright, or when the subject is adjusted manually, the above modes will be displayed correctly. • If you are using Program AE mode, you can reduce sound distortion caused by adjusting the Iris manually. 3, 4 JOG KEY 1POWER 2AUTO/MANUAL EVF/LCD Iris Setting 1 Set POWER to CAMERA. 2 Hold down AUTO/MANUAL...
Digital Video Camcorder
Page 32
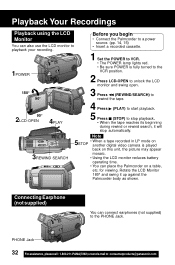
...; Using the LCD monitor reduces battery operating time. • You can place the Palmcorder on a table, etc. PHONE Jack 32 Forassistance, pleasecall: 1-800-211-PANA(7262)orsende-mailto:consumerproducts@panasonic.com Rotate the LCD Monitor 180° and swing it will stop automatically. 3REWIND SEARCH Note 5 • When a tape recorded in LP mode on STOP another digital video camera is fully turned to the VCR position. 2 Press LCD-OPEN...
...; Using the LCD monitor reduces battery operating time. • You can place the Palmcorder on a table, etc. PHONE Jack 32 Forassistance, pleasecall: 1-800-211-PANA(7262)orsende-mailto:consumerproducts@panasonic.com Rotate the LCD Monitor 180° and swing it will stop automatically. 3REWIND SEARCH Note 5 • When a tape recorded in LP mode on STOP another digital video camera is fully turned to the VCR position. 2 Press LCD-OPEN...

Digital Video Camcorder
Page 33
... Repeat Playback mode when the tape reaches its end. • The letter "R " will appear on the screen. 33 Adjusting the Volume 1, 2 VOLUME Built-in Speaker 1 Rotate VOLUME to adjust the volume of tape and start recording exactly where you left off. 3, 4, 5 JOG KEY 2MENU 1POWER EVF/LCD 1Set POWER to VCR. 2 Press MENU to display the VCR mode menu screen. 3 Rotate JOG KEY to select PLAY MODE , then press JOG KEY to display the VCR PLAY MODE menu screen...
... Repeat Playback mode when the tape reaches its end. • The letter "R " will appear on the screen. 33 Adjusting the Volume 1, 2 VOLUME Built-in Speaker 1 Rotate VOLUME to adjust the volume of tape and start recording exactly where you left off. 3, 4, 5 JOG KEY 2MENU 1POWER EVF/LCD 1Set POWER to VCR. 2 Press MENU to display the VCR mode menu screen. 3 Rotate JOG KEY to select PLAY MODE , then press JOG KEY to display the VCR PLAY MODE menu screen...
Digital Video Camcorder
Page 41
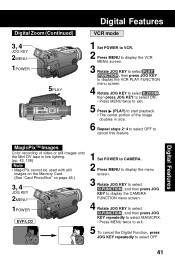
... 1POWER 5PLAY Digital Features VCR mode 1 Set POWER to VCR. 2 Press MENU to display the VCR MENU screen. 3 Rotate JOG KEY to select PLAY FUNCTION , then press JOG KEY to display the VCR PLAY FUNCTION menu screen. 4 Rotate JOG KEY to select D.ZOOM , then press JOG KEY to select ON. • Press MENU twice to exit. 5 Press (PLAY) to start playback. • The center portion of video or still images onto the Mini DV tape in size. 6 Repeat...
... 1POWER 5PLAY Digital Features VCR mode 1 Set POWER to VCR. 2 Press MENU to display the VCR MENU screen. 3 Rotate JOG KEY to select PLAY FUNCTION , then press JOG KEY to display the VCR PLAY FUNCTION menu screen. 4 Rotate JOG KEY to select D.ZOOM , then press JOG KEY to select ON. • Press MENU twice to exit. 5 Press (PLAY) to start playback. • The center portion of video or still images onto the Mini DV tape in size. 6 Repeat...

Digital Video Camcorder
Page 42
... the EIS and Digital Zoom are selected. It can be observed when taping under a great amount of fluorescent light. • Recording a scene with distinct horizontal or vertical stripes. • Recording in both the Recording and Playback (VCR) modes. Note • Other Digital Functions are turned off when not needed . NORMAL 1, A POWER EIS ON CAMERA mode 1 Set POWER to CAMERA. 2 Press EIS to stabilize the picture. • Picture flicker may not function when... •...
... the EIS and Digital Zoom are selected. It can be observed when taping under a great amount of fluorescent light. • Recording a scene with distinct horizontal or vertical stripes. • Recording in both the Recording and Playback (VCR) modes. Note • Other Digital Functions are turned off when not needed . NORMAL 1, A POWER EIS ON CAMERA mode 1 Set POWER to CAMERA. 2 Press EIS to stabilize the picture. • Picture flicker may not function when... •...

Digital Video Camcorder
Page 43
... main menu screen to start recording again. MONO (Monotone) (Only available during playback) The picture is played back in sepia, a brownish color, giving it an antique look. d.Press RECORD/PAUSE to pause the recording. To use the WIPE function a. Digital Features Other Digital Functions Use the following scene during playback) Color recording of video or still images onto the Mini DV in low lighting. (p. 41) • Only Manual Focus is available. In Camera mode, set , WIPE/MIX mode becomes Photo Title...
... main menu screen to start recording again. MONO (Monotone) (Only available during playback) The picture is played back in sepia, a brownish color, giving it an antique look. d.Press RECORD/PAUSE to pause the recording. To use the WIPE function a. Digital Features Other Digital Functions Use the following scene during playback) Color recording of video or still images onto the Mini DV in low lighting. (p. 41) • Only Manual Focus is available. In Camera mode, set , WIPE/MIX mode becomes Photo Title...

Digital Video Camcorder
Page 60
... can transfer Motion images from your Palmcorder tape to Help for information about application operations and Error messages. Note Refer to a PC. MPEG4 Movie Messenger™ System: You can transfer Still images from the C Palmcorder. How to insert the USB Cable or How to remove the USB Cable DV Interface Cable (i.LINK) or DV Interface Cable (i.LINK) A Set Palmcorder POWER to your Palmcorder tape to OFF. Remove the USB Cable or DV Interface Cable (i.LINK...
... can transfer Motion images from your Palmcorder tape to Help for information about application operations and Error messages. Note Refer to a PC. MPEG4 Movie Messenger™ System: You can transfer Still images from the C Palmcorder. How to insert the USB Cable or How to remove the USB Cable DV Interface Cable (i.LINK) or DV Interface Cable (i.LINK) A Set Palmcorder POWER to your Palmcorder tape to OFF. Remove the USB Cable or DV Interface Cable (i.LINK...
Digital Video Camcorder
Page 63
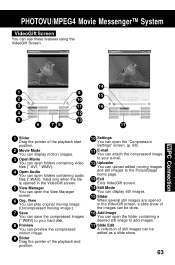
... images can open the View Manager screen. 6 Org. PHOTOVU/MPEG4 Movie Messenger™ System VideoGift Screen You can open folders containing audio files (*.WAV). View You can play original moving image: (Uncompressed moving image.) 7 Save You can save the compressed images (*.WMV) to add images. 17 Slide Edit A collection of the playback start position. 2 Movie Mode You can display motion images. 3 Open Movie You can open folders containing video files (*.AVI, *.WMV). 4 Open Audio You can use these features using the VideoGift Screen...
... images can open the View Manager screen. 6 Org. PHOTOVU/MPEG4 Movie Messenger™ System VideoGift Screen You can open folders containing audio files (*.WAV). View You can play original moving image: (Uncompressed moving image.) 7 Save You can save the compressed images (*.WMV) to add images. 17 Slide Edit A collection of the playback start position. 2 Movie Mode You can display motion images. 3 Open Movie You can open folders containing video files (*.AVI, *.WMV). 4 Open Audio You can use these features using the VideoGift Screen...
Digital Video Camcorder
Page 102
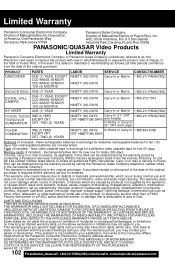
...(7262) DVD/VCR DECK ONE (1) YEAR DIGITAL STILL CAMERA ONE (1) YEAR, EXCEPT CCD IMAGE SENSOR CCD IMAGE SENSOR - New rechargeable batteries in exchange for a defective video cassette tape for ninety (90) days. Or call toll free contact number listed above . Carry-in or mail-in service in the Servicenter Directory. warvid 02/ 12/ 2001 102 Forassistance, pleasecall: 1-800-211-PANA(7262)orsende-mailto:consumerproducts@panasonic.com
...(7262) DVD/VCR DECK ONE (1) YEAR DIGITAL STILL CAMERA ONE (1) YEAR, EXCEPT CCD IMAGE SENSOR CCD IMAGE SENSOR - New rechargeable batteries in exchange for a defective video cassette tape for ninety (90) days. Or call toll free contact number listed above . Carry-in or mail-in service in the Servicenter Directory. warvid 02/ 12/ 2001 102 Forassistance, pleasecall: 1-800-211-PANA(7262)orsende-mailto:consumerproducts@panasonic.com

Digital Video Camcorder
Page 108
... Camera Mode Menu Screen 1 2 3 4 5 6 7 8 9 10 11 12 1 D.FUNCTION (pp. 41, 43) To select one of the 5 Program AE modes. For example, 120 minutes of recording is possible on the LCD Monitor is restarted after a lapse of more than with an S2 picture terminal. 6 REC-SPEED (pp. 7, 18) SP: Normal recording speed mode. Setting to OFF cancels the previously selected digital zoom. 3 PROGRESSIVE (p. 20) When set to ON, the microphone's directional...
... Camera Mode Menu Screen 1 2 3 4 5 6 7 8 9 10 11 12 1 D.FUNCTION (pp. 41, 43) To select one of the 5 Program AE modes. For example, 120 minutes of recording is possible on the LCD Monitor is restarted after a lapse of more than with an S2 picture terminal. 6 REC-SPEED (pp. 7, 18) SP: Normal recording speed mode. Setting to OFF cancels the previously selected digital zoom. 3 PROGRESSIVE (p. 20) When set to ON, the microphone's directional...

Digital Video Camcorder
Page 119
... CD-ROM 6, 56 CINEMA Mode 23 Cleaning Care for Video Heads 97 Clock Battery 99 Clock Set 16 Concerning the Memory Card 94 Connecting Earphone ... 32 Copying from Digital Equipment 47 Copying your Tapes ...... 46 D Date and Time Indication 112 DC Power Cable . 6, 15, 92 Delete All Image Pages ... 52 Delete Specific Images .... 51 DEW Indication 99 Digital E.I.S 42 Digital Functions 43 Digital PhotoShot™ Mode 20 Digital Video Cassette Tape 7 Digital Zoom 40, 41 DV Interface Cable (i.LINK 47, 72, 92 DPOF Setting 54 E Easy Cassette Eject ....... 7 Erase...
... CD-ROM 6, 56 CINEMA Mode 23 Cleaning Care for Video Heads 97 Clock Battery 99 Clock Set 16 Concerning the Memory Card 94 Connecting Earphone ... 32 Copying from Digital Equipment 47 Copying your Tapes ...... 46 D Date and Time Indication 112 DC Power Cable . 6, 15, 92 Delete All Image Pages ... 52 Delete Specific Images .... 51 DEW Indication 99 Digital E.I.S 42 Digital Functions 43 Digital PhotoShot™ Mode 20 Digital Video Cassette Tape 7 Digital Zoom 40, 41 DV Interface Cable (i.LINK 47, 72, 92 DPOF Setting 54 E Easy Cassette Eject ....... 7 Erase...


