
PVDV201 User Guide
Page 1
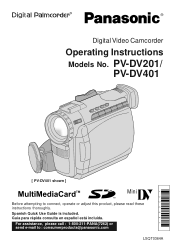
Spanish Quick Use Guide is included. Guía para rápida consulta en español está incluida. R R Digital Video Camcorder Operating Instructions Models No. PV-DV201/ PV-DV401 [ PV-DV401 shown ] Mini *0364A* Before attempting to : consumerproducts@panasonic.com LSQT0364A For assistance, please call : 1-800-211-PANA(7262) or send e-mail to connect, operate or adjust this product, please read these instructions thoroughly.
Spanish Quick Use Guide is included. Guía para rápida consulta en español está incluida. R R Digital Video Camcorder Operating Instructions Models No. PV-DV201/ PV-DV401 [ PV-DV401 shown ] Mini *0364A* Before attempting to : consumerproducts@panasonic.com LSQT0364A For assistance, please call : 1-800-211-PANA(7262) or send e-mail to connect, operate or adjust this product, please read these instructions thoroughly.
PVDV201 User Guide
Page 2
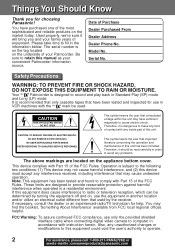
..., DO NOT REMOVE COVER (OR BACK) NO USER-SERVICEABLE PARTS INSIDE REFER SERVICING TO QUALIFIED SERVICE PERSONNEL This symbol warns the user that may have sufficient magnitude to record and play back in the information below. Also, any unauthorized changes or modifications to this manual as your Palmcorder. The serial number is subject to retain this equipment could void the user's authority to operate. 2 For...
..., DO NOT REMOVE COVER (OR BACK) NO USER-SERVICEABLE PARTS INSIDE REFER SERVICING TO QUALIFIED SERVICE PERSONNEL This symbol warns the user that may have sufficient magnitude to record and play back in the information below. Also, any unauthorized changes or modifications to this manual as your Palmcorder. The serial number is subject to retain this equipment could void the user's authority to operate. 2 For...
PVDV201 User Guide
Page 3
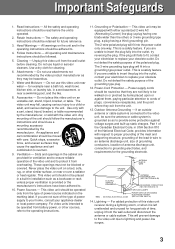
... 3-wire grounding type plug will prevent damage to the video unit due to . 10. Power-Cord Protection - If an outside antenna or cable system is provided or the manufacturer's instructions have been adhered to lightning and power-line surges. 3 Lightning - All the safety and operating instructions should be moved with the video unit. Retain Instructions - The safety and operating instructions should be followed. 5. Use a dry...
... 3-wire grounding type plug will prevent damage to the video unit due to . 10. Power-Cord Protection - If an outside antenna or cable system is provided or the manufacturer's instructions have been adhered to lightning and power-line surges. 3 Lightning - All the safety and operating instructions should be moved with the video unit. Retain Instructions - The safety and operating instructions should be followed. 5. Use a dry...

PVDV201 User Guide
Page 4
... by improper handling or storage. Overloading - Never spill liquid of coffee. Adjust only those controls that are free from a cold place to unnecessary movement (avoid shaking and striking). Do not connect the power supply or operate your hand. CARE TO CLEAN YOUR PALMCORDER ... Important Safeguards 15. c. Replacement Parts - When installing an outside antenna system should not be fatal. 16. Objects and...
... by improper handling or storage. Overloading - Never spill liquid of coffee. Adjust only those controls that are free from a cold place to unnecessary movement (avoid shaking and striking). Do not connect the power supply or operate your hand. CARE TO CLEAN YOUR PALMCORDER ... Important Safeguards 15. c. Replacement Parts - When installing an outside antenna system should not be fatal. 16. Objects and...
PVDV201 User Guide
Page 5
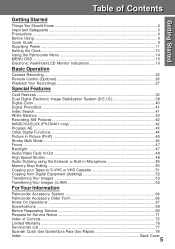
... Things You Should Know 2 Important Safeguards ...3 Precautions ...4 Before Using ...6 Quick Guide ...9 Supplying Power ...11 Setting the Clock ...13 Using the Palmcorder Menu 14 MENU OSD ...15 Electronic Viewfinder/LCD Monitor Indications 19 Basic Operation Camera Recording ...22 Remote Control (Optional 26 Playback Your Recordings 27 Special Features Card Features ...32 Dual Digital Electronic Image Stabilization System (D.E.I.S 39 Digital Zoom ...40 Digital PhotoShot ...41 Index Search ...41 White Balance ...42 Recording Still Pictures 42 MAGICVU/0LUX (PV-DV401...
... Things You Should Know 2 Important Safeguards ...3 Precautions ...4 Before Using ...6 Quick Guide ...9 Supplying Power ...11 Setting the Clock ...13 Using the Palmcorder Menu 14 MENU OSD ...15 Electronic Viewfinder/LCD Monitor Indications 19 Basic Operation Camera Recording ...22 Remote Control (Optional 26 Playback Your Recordings 27 Special Features Card Features ...32 Dual Digital Electronic Image Stabilization System (D.E.I.S 39 Digital Zoom ...40 Digital PhotoShot ...41 Index Search ...41 White Balance ...42 Recording Still Pictures 42 MAGICVU/0LUX (PV-DV401...
PVDV201 User Guide
Page 6
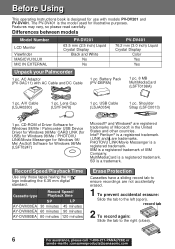
... recordings are trademarks. Battery Pack (PV-DBP8A) 1 pc. 8 MB MultiMediaCard (LSFT0198A) 1 pc. Record Speed/Playback Time Use only those tapes having the Mini logo indicating the 6.35 mm digital standard. Shoulder Strap (LSFC0013) 1 pc. The PV-DV401 is a registered trademark of Microsoft in the United States and other countries. USB Cable (LSJA0354) 1 pc. Features may vary, so please read carefully. Differences between models Model Number LCD...
... recordings are trademarks. Battery Pack (PV-DBP8A) 1 pc. 8 MB MultiMediaCard (LSFT0198A) 1 pc. Record Speed/Playback Time Use only those tapes having the Mini logo indicating the 6.35 mm digital standard. Shoulder Strap (LSFC0013) 1 pc. The PV-DV401 is a registered trademark of Microsoft in the United States and other countries. USB Cable (LSJA0354) 1 pc. Features may vary, so please read carefully. Differences between models Model Number LCD...

PVDV201 User Guide
Page 7
...-in Light Mount. Slide TAPE EJECT to open the 2 Cassette Compartment Cover. Especially advisable when you begin • If the Palmcorder is connected to a power source, the cassette can be replaced, take Light to your nearest authorized servicenter. Using the Light (Optional) To brighten the natural colors in completely. Before you want to start a new recording. Built-in Light Mount Note • Using the light will reduce battery operating time...
...-in Light Mount. Slide TAPE EJECT to open the 2 Cassette Compartment Cover. Especially advisable when you begin • If the Palmcorder is connected to a power source, the cassette can be replaced, take Light to your nearest authorized servicenter. Using the Light (Optional) To brighten the natural colors in completely. Before you want to start a new recording. Built-in Light Mount Note • Using the light will reduce battery operating time...
PVDV201 User Guide
Page 14
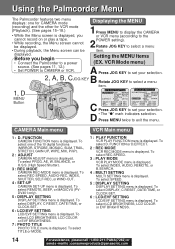
... to a power Setting the MENU Items (EX. CAMERA Main menu VCR Main menu 1 : D. To select DISPLAY, C.RESET, DATE/TIME, or CLOCK-SET. 6 : LCD/EVF SETTING LCD/EVF SETTING menu is displayed. FUNCTION or D.EFFECT. 2 : REC MODE VCR REC MODE menu is displayed. To select DISPLAY, C.RESET, DATE/TIME, or CLOCK-SET. 6 : LCD/EVF SETTING LCD/EVF SETTING menu is displayed. Before you cannot record on or play a tape. • While recording, the Menu screen cannot be item. To select PROG. To select REC-SPEED, AUDIO-REC, INDEX, SHUTTER, SELF-REC, or WIND-CUT. 4 : SET-UP CAMERA SET-UP menu is...
... to a power Setting the MENU Items (EX. CAMERA Main menu VCR Main menu 1 : D. To select DISPLAY, C.RESET, DATE/TIME, or CLOCK-SET. 6 : LCD/EVF SETTING LCD/EVF SETTING menu is displayed. FUNCTION or D.EFFECT. 2 : REC MODE VCR REC MODE menu is displayed. To select DISPLAY, C.RESET, DATE/TIME, or CLOCK-SET. 6 : LCD/EVF SETTING LCD/EVF SETTING menu is displayed. Before you cannot record on or play a tape. • While recording, the Menu screen cannot be item. To select PROG. To select REC-SPEED, AUDIO-REC, INDEX, SHUTTER, SELF-REC, or WIND-CUT. 4 : SET-UP CAMERA SET-UP menu is...

PVDV201 User Guide
Page 19
... will be recorded onto the tape. Time Code Memory Counter M 0:00:00 The Palmcorder will take several seconds for MF, AE, W.BALANCE or BACK LIGHT indications to be displayed on the EVF or LCD Panel when selected. • C.RESET does not work when DISPLAY is set to OFF and T.CODE. 19 IMPORTANT NOTE: • Display must be set to operate after the tape starts moving. LinearTime Counter Memory Counter b Tape Remaining...
... will be recorded onto the tape. Time Code Memory Counter M 0:00:00 The Palmcorder will take several seconds for MF, AE, W.BALANCE or BACK LIGHT indications to be displayed on the EVF or LCD Panel when selected. • C.RESET does not work when DISPLAY is set to OFF and T.CODE. 19 IMPORTANT NOTE: • Display must be set to operate after the tape starts moving. LinearTime Counter Memory Counter b Tape Remaining...
PVDV201 User Guide
Page 21
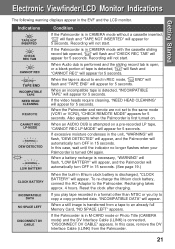
...), "CHECK REMOTE MODE" appears for 5 seconds. When an incompatible tape is first turned on a pre-recorded LP tape, "CANNOT REC LP-MODE" will appear for 5 seconds. If the Palmcorder is in M-CARD mode or Photo Title (CAMERA mode) and the DV Interface Cable (i.LINK) is about to end in CAMERA mode without a cassette inserted, " " will flash and "TAPE NOT INSERTED" will appear for 5 seconds. To re-charge the lithium clock battery, connect the...
...), "CHECK REMOTE MODE" appears for 5 seconds. When an incompatible tape is first turned on a pre-recorded LP tape, "CANNOT REC LP-MODE" will appear for 5 seconds. If the Palmcorder is in M-CARD mode or Photo Title (CAMERA mode) and the DV Interface Cable (i.LINK) is about to end in CAMERA mode without a cassette inserted, " " will flash and "TAPE NOT INSERTED" will appear for 5 seconds. To re-charge the lithium clock battery, connect the...
PVDV201 User Guide
Page 27
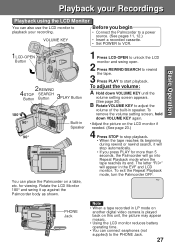
... a recorded cassette. • Set POWER to VCR. 1LCD-OPEN Button 2REWIND 4 3 STOP SEARCH Button Button PLAY Button 180° 90° 90° Built-in LP mode on another digital video camera is played back on a table, etc. To remove the volume setting screen, hold down VOLUME KEY until the volume setting screen appears. (See page 20). VOLUME KEY Before you press PLAY for viewing. The letter "R " will stop playback. • When the tape reaches its end. Playback your Recordings BBaassiicc OOppeerraattiioonn Playback using the LCD...
... a recorded cassette. • Set POWER to VCR. 1LCD-OPEN Button 2REWIND 4 3 STOP SEARCH Button Button PLAY Button 180° 90° 90° Built-in LP mode on another digital video camera is played back on a table, etc. To remove the volume setting screen, hold down VOLUME KEY until the volume setting screen appears. (See page 20). VOLUME KEY Before you press PLAY for viewing. The letter "R " will stop playback. • When the tape reaches its end. Playback your Recordings BBaassiicc OOppeerraattiioonn Playback using the LCD...

PVDV201 User Guide
Page 30
... STOP mode. Playback Your Recordings Special Effect Features During Playback (Continued) Note • Sound is muted during all the way to the beginning. 30 For assistance, please call : 1-800-211-PANA(7262) or send e -mail to : consumerproducts@panasonic.com SPKR VOL + CAMCORDER CAMERA DISPLAY ON TV DATE / TIME PHOTO SHOT COUNTER / A.DUB TC RESET REC REC / PAUSE T W 1Set the POWER to VCR. • The POWER lamp lights red. • Be sure POWER is a slow...
... STOP mode. Playback Your Recordings Special Effect Features During Playback (Continued) Note • Sound is muted during all the way to the beginning. 30 For assistance, please call : 1-800-211-PANA(7262) or send e -mail to : consumerproducts@panasonic.com SPKR VOL + CAMCORDER CAMERA DISPLAY ON TV DATE / TIME PHOTO SHOT COUNTER / A.DUB TC RESET REC REC / PAUSE T W 1Set the POWER to VCR. • The POWER lamp lights red. • Be sure POWER is a slow...

PVDV201 User Guide
Page 38
... to the Camera mode screen. • After Photo Title is set MODE and then TITLE . Note When Photo Title is performed, Digital Function turns off. 5 • There are 12 pre-installed files. Before you begin • Connect the Palmcorder to a power source. (See pages 11, 12.) • Set POWER to OFF before each recording is displayed. 2MENU Button 5REC/PAUSE Button 38 1POWER Switch 4 Rotate and press JOG KEY to display the CAMERA menu screen. effect...
... to the Camera mode screen. • After Photo Title is set MODE and then TITLE . Note When Photo Title is performed, Digital Function turns off. 5 • There are 12 pre-installed files. Before you begin • Connect the Palmcorder to a power source. (See pages 11, 12.) • Set POWER to OFF before each recording is displayed. 2MENU Button 5REC/PAUSE Button 38 1POWER Switch 4 Rotate and press JOG KEY to display the CAMERA menu screen. effect...
PVDV201 User Guide
Page 41
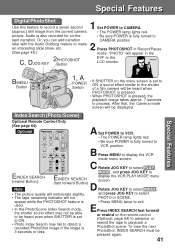
... the LCD monitor. DISPLAY ON TV DATE / TIME PHOTO SHOT REC / PAUSE T • The POWER lamp lights red. • Be sure POWER is also recorded for on the remote control (Optional, page 64) to advance or rewind the tape to select PHOTO or SCENE. RESET W REC B Press MENU to VCR. picture. Index Search (Photo/Scene) Optional Remote Control Only (See page 64) Optional CAMCORDER CAMERA A Set POWER to display the VCR MENU REW / PLAY FF / mode menu screen. "PHOTO" will not and press JOG KEY to playback...
... the LCD monitor. DISPLAY ON TV DATE / TIME PHOTO SHOT REC / PAUSE T • The POWER lamp lights red. • Be sure POWER is also recorded for on the remote control (Optional, page 64) to advance or rewind the tape to select PHOTO or SCENE. RESET W REC B Press MENU to VCR. picture. Index Search (Photo/Scene) Optional Remote Control Only (See page 64) Optional CAMCORDER CAMERA A Set POWER to display the VCR MENU REW / PLAY FF / mode menu screen. "PHOTO" will not and press JOG KEY to playback...

PVDV201 User Guide
Page 50
... NTSC format. 5 Press PAUSE to stop point. - Memory-Stop Editing (Optional Remote Control Only, page 64) You can be stereo regardless of the AUDIO-OUT setting. • If you recorded in a blank section, you cannot use the A.DUB feature. SPKR VOL + Optional DRESET Button AMENU Button CAMCORDER CAMERA DISPLAY ON TV DATE / TIME PHOTO SHOT COUNTER / A.DUB TC RESET REC REC / PAUSE T W MENU REW / PLAY FF / SLOW / PAUSE / SLOW / F.ADV SEL F.ADV INDEX STOP / INDEX SEARCH SET SEARCH A Press MENU to display the VCR menu screen...
... NTSC format. 5 Press PAUSE to stop point. - Memory-Stop Editing (Optional Remote Control Only, page 64) You can be stereo regardless of the AUDIO-OUT setting. • If you recorded in a blank section, you cannot use the A.DUB feature. SPKR VOL + Optional DRESET Button AMENU Button CAMCORDER CAMERA DISPLAY ON TV DATE / TIME PHOTO SHOT COUNTER / A.DUB TC RESET REC REC / PAUSE T W MENU REW / PLAY FF / SLOW / PAUSE / SLOW / F.ADV SEL F.ADV INDEX STOP / INDEX SEARCH SET SEARCH A Press MENU to display the VCR menu screen...
PVDV201 User Guide
Page 51
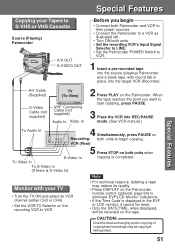
.... • Set the Palmcorder POWER Switch to VCR. 1 Insert a pre-recorded tape into the target VCR (Recorder). To Video In To S-Video In (If there is S-Video In) Note Monitor with record tab in the EVF or LCD monitor, it cannot be reset. • Only the DATE/TIME, when displayed, will be copyright infringement. 51 A/V Cable (Supplied) TV (To View) S-Video Cable (not supplied) VHF Connecting Cable (not supplied) Audio In Video In 2 Press PLAY on...
.... • Set the Palmcorder POWER Switch to VCR. 1 Insert a pre-recorded tape into the target VCR (Recorder). To Video In To S-Video In (If there is S-Video In) Note Monitor with record tab in the EVF or LCD monitor, it cannot be reset. • Only the DATE/TIME, when displayed, will be copyright infringement. 51 A/V Cable (Supplied) TV (To View) S-Video Cable (not supplied) VHF Connecting Cable (not supplied) Audio In Video In 2 Press PLAY on...
PVDV201 User Guide
Page 54
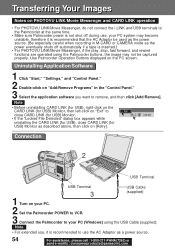
... VCR. 3 Connect the Palmcorder to your PC system may become unstable, therefore it is recommended to use the AC Adaptor as a power source. 54 For assistance, please call : 1-800-211-PANA(7262) or send e -mail to : consumerproducts@panasonic.com Connection 2 USB Terminal USB Terminal USB Cable 1 Turn on "Add/Remove Programs" in M-CARD or CAMERA mode as described above, then click on the PC screen. Use Palmcorder Operation Buttons displayed...
... VCR. 3 Connect the Palmcorder to your PC system may become unstable, therefore it is recommended to use the AC Adaptor as a power source. 54 For assistance, please call : 1-800-211-PANA(7262) or send e -mail to : consumerproducts@panasonic.com Connection 2 USB Terminal USB Terminal USB Cable 1 Turn on "Add/Remove Programs" in M-CARD or CAMERA mode as described above, then click on the PC screen. Use Palmcorder Operation Buttons displayed...

PVDV201 User Guide
Page 65
A great many fun-filed titles (preset titles) have been recorded on the supplied MultiMediaCard. Music play is possible only with the SDMI (Secure Digital Music Initiative) standard. It has a write protect switch to prevent the data writing and card formatting, and it comes with a copyright protection function that complies with an SD Memory Card. • SD Logo is an external memory card with an even...
A great many fun-filed titles (preset titles) have been recorded on the supplied MultiMediaCard. Music play is possible only with the SDMI (Secure Digital Music Initiative) standard. It has a write protect switch to prevent the data writing and card formatting, and it comes with a copyright protection function that complies with an SD Memory Card. • SD Logo is an external memory card with an even...

PVDV201 User Guide
Page 70
... sure the Battery is fully charged. (p. 11) • Make sure all necessary cables are connected correctly and firmly. (p. 12) • Make sure the Lens Cap is removed. (p. 22) • Make sure the Power Source is connected. (pp. 11, 12) • Insert the cassette record tab up, window side facing out. (p. 9) Video cassette cannot be heard... • Make sure the Audio on the VCR MENU is set to...
... sure the Battery is fully charged. (p. 11) • Make sure all necessary cables are connected correctly and firmly. (p. 12) • Make sure the Lens Cap is removed. (p. 22) • Make sure the Power Source is connected. (pp. 11, 12) • Insert the cassette record tab up, window side facing out. (p. 9) Video cassette cannot be heard... • Make sure the Audio on the VCR MENU is set to...
PVDV201 User Guide
Page 80
... Battery Remaining Indication Battery Warning Before Requesting Service Blank Search 47 6, 9, 11, 64 19 21 69, 70 25 C CARD EJECT Switch 10 Camera Recording 22, 23, 24, 25 Cleaning Care for Video Heads 70 Clock Battery 21 Clock Set 13 Color Enhancement Light 7, 64 Copying from Digital Equipment 52 Copying your Tapes 51 D Date and Time Indication 20 DC Power Cable 6, 12, 64 DEW Indication 21 Digital E.I.S. 39 Digital Functions 44 Digital PhotoShot 41 Digital Video Cassette Tape 6 Digital Zoom 40 Dubbing over Audio (Microphone...
... Battery Remaining Indication Battery Warning Before Requesting Service Blank Search 47 6, 9, 11, 64 19 21 69, 70 25 C CARD EJECT Switch 10 Camera Recording 22, 23, 24, 25 Cleaning Care for Video Heads 70 Clock Battery 21 Clock Set 13 Color Enhancement Light 7, 64 Copying from Digital Equipment 52 Copying your Tapes 51 D Date and Time Indication 20 DC Power Cable 6, 12, 64 DEW Indication 21 Digital E.I.S. 39 Digital Functions 44 Digital PhotoShot 41 Digital Video Cassette Tape 6 Digital Zoom 40 Dubbing over Audio (Microphone...


