
PTAX200U User Guide
Page 43
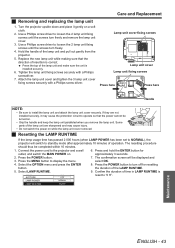
.... Select LAMP RUNTIME. Use a Phillips screw driver to loosen the 2 lamp unit fixing screws until the screws turn freely and remove the lamp unit cover. 3. If they are sharpened and may cause the protection circuit to NORMAL), the projector will be completed within 10 minutes. 1. Some...6. Confirm the duration of the LAMP RUNTIME. 5. Press the POWER button. 7. LAMP POWER NORMAL LAMP RUNTIME 1820H Maintenance ENGLISH - 43 Turn the projector upside down and place it may cause injury. • Do not switch the power on . • Grip the handle and keep the lamp...
.... Select LAMP RUNTIME. Use a Phillips screw driver to loosen the 2 lamp unit fixing screws until the screws turn freely and remove the lamp unit cover. 3. If they are sharpened and may cause the protection circuit to NORMAL), the projector will be completed within 10 minutes. 1. Some...6. Confirm the duration of the LAMP RUNTIME. 5. Press the POWER button. 7. LAMP POWER NORMAL LAMP RUNTIME 1820H Maintenance ENGLISH - 43 Turn the projector upside down and place it may cause injury. • Do not switch the power on . • Grip the handle and keep the lamp...
PTAX200U User Guide
Page 50
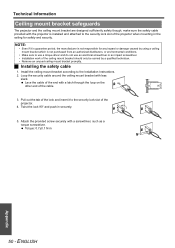
...using a ceiling mount bracket which is not responsible for safety and security. ENGLISH Appendix Technical Information Ceiling mount bracket safeguards The projector and the ceiling mount bracket are designed sufficiently safety though, make sure the safety cable provided with less slack. NOTE: &#.... 5. Attach the provided screw securely with a latch through the loop on the other end of the projector. 4. Install the ceiling mount bracket according to use a torque driver and do not use an electrical screwdriver or an impact screwdriver. • Installation work of the end with...
...using a ceiling mount bracket which is not responsible for safety and security. ENGLISH Appendix Technical Information Ceiling mount bracket safeguards The projector and the ceiling mount bracket are designed sufficiently safety though, make sure the safety cable provided with less slack. NOTE: &#.... 5. Attach the provided screw securely with a latch through the loop on the other end of the projector. 4. Install the ceiling mount bracket according to use a torque driver and do not use an electrical screwdriver or an impact screwdriver. • Installation work of the end with...