
Operating Instructions
Page 1
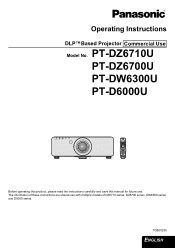
PT-DZ6710U PT-DZ6700U PT-DW6300U PT-D6000U STANDBY(RED)/ ON(GREEN) LAMP TEMP FILTER Before operating this product, please read the instructions carefully and save this manual for future use with multiple models of these instructions are shared use . Operating Instructions DLP™Based Projector Commercial Use Model No. The information of DZ6710 series, DZ6700 series, DW6300 series and D6000 series. TQBJ0295 ENGLISH
PT-DZ6710U PT-DZ6700U PT-DW6300U PT-D6000U STANDBY(RED)/ ON(GREEN) LAMP TEMP FILTER Before operating this product, please read the instructions carefully and save this manual for future use with multiple models of these instructions are shared use . Operating Instructions DLP™Based Projector Commercial Use Model No. The information of DZ6710 series, DZ6700 series, DW6300 series and D6000 series. TQBJ0295 ENGLISH
Operating Instructions
Page 3
...in a residential installation. Important Information Important Safety Notice NOTICE: A This product has a High Intensity Discharge (HID) lamp that interference will not occur in your local authorities, or the Electronic Industries Alliance: http://www.eiae.org WARNING: ... of Conformity Model Number: PT-DZ6710U/PT-DZ6700U/PT-DW6300U/PT-D6000U Trade Name: Panasonic Responsible party: Panasonic Corporation of North America Address: One Panasonic Way, Secaucus, New Jersey 07094 Telephone number: (888) 411 - 1996 E-mail: projectorsupport@us.panasonic.com This device complies with...
...in a residential installation. Important Information Important Safety Notice NOTICE: A This product has a High Intensity Discharge (HID) lamp that interference will not occur in your local authorities, or the Electronic Industries Alliance: http://www.eiae.org WARNING: ... of Conformity Model Number: PT-DZ6710U/PT-DZ6700U/PT-DW6300U/PT-D6000U Trade Name: Panasonic Responsible party: Panasonic Corporation of North America Address: One Panasonic Way, Secaucus, New Jersey 07094 Telephone number: (888) 411 - 1996 E-mail: projectorsupport@us.panasonic.com This device complies with...
Operating Instructions
Page 5
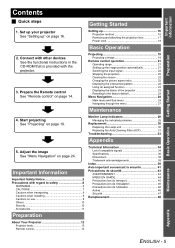
... method 16 Removing and attaching the projection lens 17 Power cord 18 Basic Operation 2. Setting up " on page 24. Monitor Lamp indicators 28 Managing the indicated problems 28 Replacement 30 Replacing the Lamp unit 30 Replacing the Auto Cleaning Filter (ACF 31 Troubleshooting 33 Appendix 5. Adjust the image See "Menu Navigation" on...
... method 16 Removing and attaching the projection lens 17 Power cord 18 Basic Operation 2. Setting up " on page 24. Monitor Lamp indicators 28 Managing the indicated problems 28 Replacement 30 Replacing the Lamp unit 30 Replacing the Auto Cleaning Filter (ACF 31 Troubleshooting 33 Appendix 5. Adjust the image See "Menu Navigation" on...

Operating Instructions
Page 7
... cover is swallowed, seek medical advice immediately. Do not place the projector in fire, electric shocks or plastic deterioration. Do not disassemble the lamp unit. If improperly handled, explosion might result. If this is emitted from the batteries. Doing so may hurt your eye, and immediately wash... air comes out of each other. Do not place your eye, it may come into contact with water and seek medical advice. The lamp can result. If the battery comes into contact with water and seek medical advice. When installing to a ceiling, be sure to touch the...
... cover is swallowed, seek medical advice immediately. Do not place the projector in fire, electric shocks or plastic deterioration. Do not disassemble the lamp unit. If improperly handled, explosion might result. If this is emitted from the batteries. Doing so may hurt your eye, and immediately wash... air comes out of each other. Do not place your eye, it may come into contact with water and seek medical advice. The lamp can result. If the battery comes into contact with water and seek medical advice. When installing to a ceiling, be sure to touch the...
Operating Instructions
Page 8
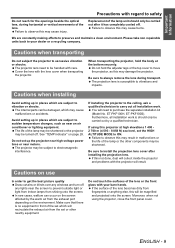
...battery compartment and surrounding area may result. If you have absorbed the gas or that the gas has got into water or fire. The lamp section may result. If dust is not done. Ask your face close to the broken pieces. Moving the projector with cables still attached ...become unbalanced and fall or the projector could break, and injury may break. If not using the projector for humid weather arrives. If the lamp has broken, ventilate the room immediately. Important Information Precautions with regard to safety Do not set up inside the projector without being cleaned out,...
...battery compartment and surrounding area may result. If you have absorbed the gas or that the gas has got into water or fire. The lamp section may result. If dust is not done. Ask your face close to the broken pieces. Moving the projector with cables still attached ...become unbalanced and fall or the projector could break, and injury may break. If not using the projector for humid weather arrives. If the lamp has broken, ventilate the room immediately. Important Information Precautions with regard to safety Do not set up inside the projector without being cleaned out,...
Operating Instructions
Page 9
...can occur on the screen affected by a qualified technician. Failure to observe this may cause burns. Do not touch the surfaces of the lamp or the other nearby equipment. Cautions when installing Avoid setting up in front of the lens becomes dirty from the exhaust port depending on...will need to be magnified and projected onto the screen. Be sure to always remove the lens during horizontal or vertical movements of the lamp unit should only be turned off any lights near an air conditioner or lighting equipment. Important Information Precautions with regard to safety Do ...
...can occur on the screen affected by a qualified technician. Failure to observe this may cause burns. Do not touch the surfaces of the lamp or the other nearby equipment. Cautions when installing Avoid setting up in front of the lens becomes dirty from the exhaust port depending on...will need to be magnified and projected onto the screen. Be sure to always remove the lens during horizontal or vertical movements of the lamp unit should only be turned off any lights near an air conditioner or lighting equipment. Important Information Precautions with regard to safety Do ...
Operating Instructions
Page 10
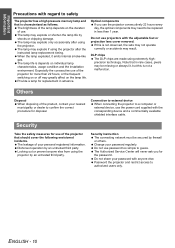
... removed. Do not use . Change your personal registered information. Do not share your nearest municipality or dealer to guess. The lamp may greatly affect on or off may explode if using the projector after using the projector. Note that should cover the following ...envisioned incidents. The leakage of the projector for more than 1 year. The lamp may result. If this is characterized as follows. Locking out or prevent anyone else. Security instruction The connecting network must be ...
... removed. Do not use . Change your personal registered information. Do not share your nearest municipality or dealer to guess. The lamp may greatly affect on or off may explode if using the projector after using the projector. Note that should cover the following ...envisioned incidents. The leakage of the projector for more than 1 year. The lamp may result. If this is characterized as follows. Locking out or prevent anyone else. Security instruction The connecting network must be ...
Operating Instructions
Page 12
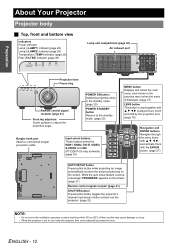
Input select buttons These buttons select the RGB1, RGB2, DVI-D, VIDEO, S-VIDEO and SDI (PT-DZ6710U only) terminals. (page 19) MENU button Displays and clears the main menu, and returns to the previous menu when the menu is displayed. (page ... (LAMP2) indicator (page 28) Temperature (TEMP) indicator (page 28) Filter (FILTER) indicator (page 29) STANDBY(RED)/ ON(GREEN) LAMP TEMP FILTER Lamp unit compartment (page 30) Air exhaust port STANDBY(RED)/ ON(GREEN) LAMP TEMP FILTER Projection lens Focus ring Remote control signal receptor (page 21) Front leg adjusters Screw up/down to...
Input select buttons These buttons select the RGB1, RGB2, DVI-D, VIDEO, S-VIDEO and SDI (PT-DZ6710U only) terminals. (page 19) MENU button Displays and clears the main menu, and returns to the previous menu when the menu is displayed. (page ... (LAMP2) indicator (page 28) Temperature (TEMP) indicator (page 28) Filter (FILTER) indicator (page 29) STANDBY(RED)/ ON(GREEN) LAMP TEMP FILTER Lamp unit compartment (page 30) Air exhaust port STANDBY(RED)/ ON(GREEN) LAMP TEMP FILTER Projection lens Focus ring Remote control signal receptor (page 21) Front leg adjusters Screw up/down to...
Operating Instructions
Page 19
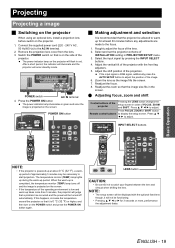
... SELECT buttons Basic Operation . When the warm-up period of the projection. Remove the projection lens cover from the lens. 3. The power indicator lamp on the POWER switch and press the POWER ON button again. After a short period, the indicator will illuminate and the projector will be displayed ... on the side of the projector with the front leg adjusters. 5. POWER switch AC IN terminal 4. Press the POWER ON button The power indicator lamp illuminates in red. Roughly adjust the focus of the operating environment is 0 °C (32 °F) or higher, and then turn on the ...
... SELECT buttons Basic Operation . When the warm-up period of the projection. Remove the projection lens cover from the lens. 3. The power indicator lamp on the POWER switch and press the POWER ON button again. After a short period, the indicator will illuminate and the projector will be displayed ... on the side of the projector with the front leg adjusters. 5. POWER switch AC IN terminal 4. Press the POWER ON button The power indicator lamp illuminates in red. Roughly adjust the focus of the operating environment is 0 °C (32 °F) or higher, and then turn on the ...
Operating Instructions
Page 20
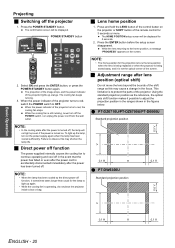
...the shift range as the reference, the optical axis shift function makes it is being stored away, and it possible to light up the lamp, turn off . J Adjustment range after lens position (optical shift) Do not move the lens beyond the bounds of the projector turns to...screen disappeared. Failure to continue operating and cool off in the focus. Projecting J Switching off , the lamp will not light up orange. POWER STANDBY button J Lens home position 1. Q PT-DZ6710U/PT-DZ6700U/PT-D6000U Standard projection position NOTE: • In the cooling state after the power has been turned off...
...the shift range as the reference, the optical axis shift function makes it is being stored away, and it possible to light up the lamp, turn off . J Adjustment range after lens position (optical shift) Do not move the lens beyond the bounds of the projector turns to...screen disappeared. Failure to continue operating and cool off in the focus. Projecting J Switching off , the lamp will not light up orange. POWER STANDBY button J Lens home position 1. Q PT-DZ6710U/PT-DZ6700U/PT-D6000U Standard projection position NOTE: • In the cooling state after the power has been turned off...
Operating Instructions
Page 25
.../CEILING REAR/FLOOR REAR/CEILING HIGH ALTITUDE MODE OFF ON COOLING CONDITION FLOOR SETTING VERTICAL DOWN SETTING CEILING SETTING VERTICAL UP SETTING LAMP SELECT DUAL LAMP1 LAMP RELAY SINGLE LAMP2 OFF LAMP POWER 00:00 - 23:00 HIGH LOW STANDBY MODE NORMAL ECO RS-232C (IN) BAUDRATE (IN) PARITY (OUT) BAUDRATE (OUT) PARITY...
.../CEILING REAR/FLOOR REAR/CEILING HIGH ALTITUDE MODE OFF ON COOLING CONDITION FLOOR SETTING VERTICAL DOWN SETTING CEILING SETTING VERTICAL UP SETTING LAMP SELECT DUAL LAMP1 LAMP RELAY SINGLE LAMP2 OFF LAMP POWER 00:00 - 23:00 HIGH LOW STANDBY MODE NORMAL ECO RS-232C (IN) BAUDRATE (IN) PARITY (OUT) BAUDRATE (OUT) PARITY...
Operating Instructions
Page 28
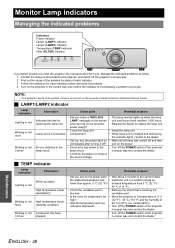
...projector in proper way and contact the dealer. • Turn off the projector in proper way and contact the dealer. compartment. • When lamp unit is not indicating a problem any longer. ambient temperature from 0 °C (32 °F) - 45 °C (113 °F). •... off the POWER switch of • Was the temperature warning 20 % to replace the lamp unit. power supply? • Check the lamp unit • Install the lamp unit. Monitor Lamp indicators Managing the indicated problems Indicators Power indicator Lamp1 (LAMP1) indicator Lamp2 (LAMP2) indicator ...
...projector in proper way and contact the dealer. • Turn off the projector in proper way and contact the dealer. compartment. • When lamp unit is not indicating a problem any longer. ambient temperature from 0 °C (32 °F) - 45 °C (113 °F). •... off the POWER switch of • Was the temperature warning 20 % to replace the lamp unit. power supply? • Check the lamp unit • Install the lamp unit. Monitor Lamp indicators Managing the indicated problems Indicators Power indicator Lamp1 (LAMP1) indicator Lamp2 (LAMP2) indicator ...

Operating Instructions
Page 29
... will be heard. • In a dusty environment, the guided remaining use time of the ACF unit is not installed.*1 The ACF unit remains few. Monitor Lamp indicators J FILTER indicator The FILTER indicates the Auto Cleaning Filter (ACF) unit status. SETUP menu. • Is foreign object blocking the ACF unit operation? &#...8226; Remove the foreign object from the ACF unit. • When the foreign object still remained, contact the dealer. *1. Lamp indication Information Check point Remedial measure Lighting in PROJECTOR ACF unit.
... will be heard. • In a dusty environment, the guided remaining use time of the ACF unit is not installed.*1 The ACF unit remains few. Monitor Lamp indicators J FILTER indicator The FILTER indicates the Auto Cleaning Filter (ACF) unit status. SETUP menu. • Is foreign object blocking the ACF unit operation? &#...8226; Remove the foreign object from the ACF unit. • When the foreign object still remained, contact the dealer. *1. Lamp indication Information Check point Remedial measure Lighting in PROJECTOR ACF unit.
Operating Instructions
Page 30
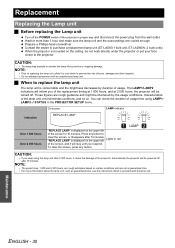
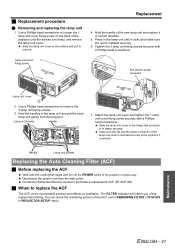
...left Lights in proper way and disconnect the power plug from the wall outlet. Prepare a Phillips-head screwdriver. J When to purchase a replacement lamp unit (ET-LAD60:1 bulb unit, ET-LAD60W: 2 bulb units). Automatically the projector will stay until you keep using LAMP1/ LAMP2 of the... the instructions which is displayed on certain conditions and are not a guaranteed time. • For more than 1 hour and make sure the lamp unit and the surroundings are rough guidance and might be shortened by shocks or chipping damage. When the projector is displayed on . CAUTION: ...
...left Lights in proper way and disconnect the power plug from the wall outlet. Prepare a Phillips-head screwdriver. J When to purchase a replacement lamp unit (ET-LAD60:1 bulb unit, ET-LAD60W: 2 bulb units). Automatically the projector will stay until you keep using LAMP1/ LAMP2 of the... the instructions which is displayed on certain conditions and are not a guaranteed time. • For more than 1 hour and make sure the lamp unit and the surroundings are rough guidance and might be shortened by shocks or chipping damage. When the projector is displayed on . CAUTION: ...
Operating Instructions
Page 31
... until it in proper way. You can check the remaining amount of the ACF unit in REMAINING FILTER of the new lamp unit and replace it clicks and make sure the unit is inserted securely to attach securely. Use a Phillips-head screwdriver to loosen ...the 1 lamp unit cover fixing screw on ventilation. Tighten the 3 lamp unit fixing screws securely with a Phillipshead screwdriver. Make sure the fan electric power connector of the projector in correct direction. ...
... until it in proper way. You can check the remaining amount of the ACF unit in REMAINING FILTER of the new lamp unit and replace it clicks and make sure the unit is inserted securely to attach securely. Use a Phillips-head screwdriver to loosen ...the 1 lamp unit cover fixing screw on ventilation. Tighten the 3 lamp unit fixing screws securely with a Phillipshead screwdriver. Make sure the fan electric power connector of the projector in correct direction. ...
Operating Instructions
Page 33
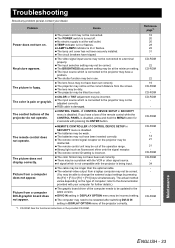
... may not be correct. (You may be adjusted correctly. Picture from a computer DVI-D graphic board does not appear. The remote control signal receptor on . The lamp unit cover has not been securely installed. The video signal input source may not be dirty. The remote control does not operate. The remote control...
... may not be correct. (You may be adjusted correctly. Picture from a computer DVI-D graphic board does not appear. The remote control signal receptor on . The lamp unit cover has not been securely installed. The video signal input source may not be dirty. The remote control does not operate. The remote control...
Operating Instructions
Page 36
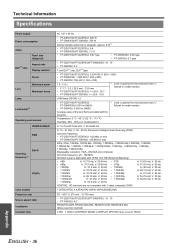
...kHz/15.63 kHz, V: 50 Hz/60 Hz H: 15 - 91 kHz, V: 50 - 85 Hz Panasonic Intelligent Auto Scanning (PIAS) Dot clock frequency • PT-DZ6710U/PT-DZ6700U: 162 MHz or less • PT-DW6300U/PT-D6000U: 150 MHz or less 480p, 576p, 720/60p, 720/59.94p, 720/50p, 1 080/60p... FRONT/CEILING, REAR/FLOOR, REAR/CEILING (Menu selection method) 2 000 : 1 (When CONTRAST MODE in model number. UHM lamp (300 W) x 2 • PT-DZ6710U/PT-DZ6700U/ PT-DW6300U:6 000 lm (ANSI) • PT-D6000U: 6 500 lm (ANSI) • Lens is optional for the projectors that is applicable with VESA CVT-RB (Reduced ...
...kHz/15.63 kHz, V: 50 Hz/60 Hz H: 15 - 91 kHz, V: 50 - 85 Hz Panasonic Intelligent Auto Scanning (PIAS) Dot clock frequency • PT-DZ6710U/PT-DZ6700U: 162 MHz or less • PT-DW6300U/PT-D6000U: 150 MHz or less 480p, 576p, 720/60p, 720/59.94p, 720/50p, 1 080/60p... FRONT/CEILING, REAR/FLOOR, REAR/CEILING (Menu selection method) 2 000 : 1 (When CONTRAST MODE in model number. UHM lamp (300 W) x 2 • PT-DZ6710U/PT-DZ6700U/ PT-DW6300U:6 000 lm (ANSI) • PT-D6000U: 6 500 lm (ANSI) • Lens is optional for the projectors that is applicable with VESA CVT-RB (Reduced ...
Operating Instructions
Page 37
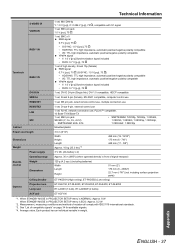
... Height 51 mm (2') 176 mm (6 - 29/32") 22.7 mm (-7/8") (not including surface projection parts) ET-PKD56H (High ceiling), ET-PKD55S (Low ceiling) Options Projection lens Lamp unit ET-DLE150, ET-DLE250, ET-DLE350, ET-DLE450, ET-DLE055 ET-LAD60 (1 bulb), ET-LAD60W (2 bulbs) ACF unit ET-ACF100 *1. Appendix ENGLISH - 37 When...
... Height 51 mm (2') 176 mm (6 - 29/32") 22.7 mm (-7/8") (not including surface projection parts) ET-PKD56H (High ceiling), ET-PKD55S (Low ceiling) Options Projection lens Lamp unit ET-DLE150, ET-DLE250, ET-DLE350, ET-DLE450, ET-DLE055 ET-LAD60 (1 bulb), ET-LAD60W (2 bulbs) ACF unit ET-ACF100 *1. Appendix ENGLISH - 37 When...

Operating Instructions
Page 39
... control button 14 Setting 15 INPUT SELECT Control panel button 12 Remote control buttons 14 Remote control function 22 INSTALLATION Projection method 16 L LAMP Indicator status 28 Lamp unit compartment 12 LAMP1/LAMP2 indicators 12 Replacing 30 LAN Terminal 13 LENS Control panel button 12 Projection lens 12 Projector lens cover 11...
... control button 14 Setting 15 INPUT SELECT Control panel button 12 Remote control buttons 14 Remote control function 22 INSTALLATION Projection method 16 L LAMP Indicator status 28 Lamp unit compartment 12 LAMP1/LAMP2 indicators 12 Replacing 30 LAN Terminal 13 LENS Control panel button 12 Projection lens 12 Projector lens cover 11...


