Operating Instructions
Page 5
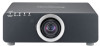
... the menu 27 Maintenance 4. Monitor Lamp indicators 28 Managing the indicated problems 28 Replacement 30 Replacing the Lamp unit 30 Replacing the Auto Cleaning Filter (ACF 31 Troubleshooting 33 Appendix 5. Prepare the Remote control See "Remote control" on page 24. Projecting 19 Projecting a image 19 Remote control operation 21 Operating range 21 Setting up the image position automatically 21 Switching the input signal 22 Stopping the projection 22 Clearing the screen 22 Changing the picture aspect ratio 22 Displaying the internal test pattern 22 Using...
... the menu 27 Maintenance 4. Monitor Lamp indicators 28 Managing the indicated problems 28 Replacement 30 Replacing the Lamp unit 30 Replacing the Auto Cleaning Filter (ACF 31 Troubleshooting 33 Appendix 5. Prepare the Remote control See "Remote control" on page 24. Projecting 19 Projecting a image 19 Remote control operation 21 Operating range 21 Setting up the image position automatically 21 Switching the input signal 22 Stopping the projection 22 Clearing the screen 22 Changing the picture aspect ratio 22 Displaying the internal test pattern 22 Using...
Operating Instructions
Page 9
... projector lens need to sudden temperature changes, such as this may be handled with care. The internal parts can occur on the environment. See "TEMP indicator" on use In order to get the best picture quality Draw curtains or blinds over any windows and turn off any lights near the screen to install the projection lens cover after it has completely cooled off . If installing the projector to the ceiling...
... projector lens need to sudden temperature changes, such as this may be handled with care. The internal parts can occur on the environment. See "TEMP indicator" on use In order to get the best picture quality Draw curtains or blinds over any windows and turn off any lights near the screen to install the projection lens cover after it has completely cooled off . If installing the projector to the ceiling...
Operating Instructions
Page 10
... your password regularly. Change your password with the corresponding device and a commercially available shielded interface cable. Provide a lamp for the password. Dishonest operation by firewall or others. Do not use the power cord supplied with anyone else from using extremely highprecision technology. Security instruction The connecting network must be replaced in advance. Connection to external device When connecting the projector to a computer or external device, use password too simple to authorized users...
... your password regularly. Change your password with the corresponding device and a commercially available shielded interface cable. Provide a lamp for the password. Dishonest operation by firewall or others. Do not use the power cord supplied with anyone else from using extremely highprecision technology. Security instruction The connecting network must be replaced in advance. Connection to external device When connecting the projector to a computer or external device, use password too simple to authorized users...
Operating Instructions
Page 12
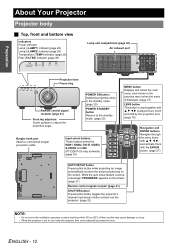
...view Indicators Power indicator Lamp1 (LAMP1) indicator (page 28) Lamp2 (LAMP2) indicator (page 28) Temperature (TEMP) indicator (page 28) Filter (FILTER) indicator (page 29) STANDBY(RED)/ ON(GREEN) LAMP TEMP FILTER Lamp unit compartment (page 30) Air exhaust port STANDBY(RED)/ ON(GREEN) LAMP TEMP FILTER Projection lens Focus ring Remote control signal receptor (page 21) Front leg adjusters Screw up/down to the standby mode. (page 20) Burglar hook port Attach a commercial burglar prevention cable. POWER ON button Starts the projection while in use, keep the projector lens cover...
...view Indicators Power indicator Lamp1 (LAMP1) indicator (page 28) Lamp2 (LAMP2) indicator (page 28) Temperature (TEMP) indicator (page 28) Filter (FILTER) indicator (page 29) STANDBY(RED)/ ON(GREEN) LAMP TEMP FILTER Lamp unit compartment (page 30) Air exhaust port STANDBY(RED)/ ON(GREEN) LAMP TEMP FILTER Projection lens Focus ring Remote control signal receptor (page 21) Front leg adjusters Screw up/down to the standby mode. (page 20) Burglar hook port Attach a commercial burglar prevention cable. POWER ON button Starts the projection while in use, keep the projector lens cover...

Operating Instructions
Page 13
... (PT-DZ6710U only) Connect an RS-232C cable Connect a cable from a from/to protect your projector. Air intake port Air intake port POWER button Switch the projector on the POWER button of the projector body that is located near the terminals before using the control buttons. • Do not cover the ventilation openings or place anything within 50 cm (20") of them as this may cause damage or injury. Preparation J Side views S-VIDEO IN Connect an S-VIDEO signals...
... (PT-DZ6710U only) Connect an RS-232C cable Connect a cable from a from/to protect your projector. Air intake port Air intake port POWER button Switch the projector on the POWER button of the projector body that is located near the terminals before using the control buttons. • Do not cover the ventilation openings or place anything within 50 cm (20") of them as this may cause damage or injury. Preparation J Side views S-VIDEO IN Connect an S-VIDEO signals...
Operating Instructions
Page 14
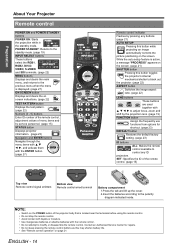
... remote control, adjustment values of the remote control. (page 15) B Top view Remote control signal emitters Bottom view Remote control wired terminal A Battery compartment 1.Press the tab and lift up the cover. 2.Insert the batteries according to control any buttons. (page 21) AUTO SETUP Pressing this button while projecting an image automatically corrects the picture positioning on page 21. ENGLISH - 14 SET: Specifies the ID of menu items and by service personnel. (page 15) STATUS button Displays projector...
... remote control, adjustment values of the remote control. (page 15) B Top view Remote control signal emitters Bottom view Remote control wired terminal A Battery compartment 1.Press the tab and lift up the cover. 2.Insert the batteries according to control any buttons. (page 21) AUTO SETUP Pressing this button while projecting an image automatically corrects the picture positioning on page 21. ENGLISH - 14 SET: Specifies the ID of menu items and by service personnel. (page 15) STATUS button Displays projector...
Operating Instructions
Page 16
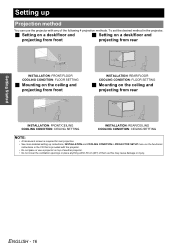
... detailed setting up Projection method You can use a projector on the functional instructions in the CD that is provided with the projector. • Do not place or use the projector with any of them as this may cause damage or injury. ENGLISH - 16 Getting Started Setting up instructions, INSTALLATION and COOLING CONDITION in PROJECTOR SETUP menu on top of another projector. • Do not cover the ventilation openings...
... detailed setting up Projection method You can use a projector on the functional instructions in the CD that is provided with the projector. • Do not place or use the projector with any of them as this may cause damage or injury. ENGLISH - 16 Getting Started Setting up instructions, INSTALLATION and COOLING CONDITION in PROJECTOR SETUP menu on top of another projector. • Do not cover the ventilation openings...
Operating Instructions
Page 17
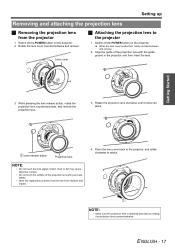
... free from the projector 1. Dust or dirt may cause defective contact. • Do not touch the surface of the projection lens with your bare hands. • Store the replaced lens where it clicks into place. ENGLISH - 17 Switch off the POWER button on the projector. 2. Getting Started 3. Place the lens cover back to the projector, and rotate clockwise to the projector 1. Setting up Removing and attaching the projection lens J Removing the projection lens...
... free from the projector 1. Dust or dirt may cause defective contact. • Do not touch the surface of the projection lens with your bare hands. • Store the replaced lens where it clicks into place. ENGLISH - 17 Switch off the POWER button on the projector. 2. Getting Started 3. Place the lens cover back to the projector, and rotate clockwise to the projector 1. Setting up Removing and attaching the projection lens J Removing the projection lens...

Operating Instructions
Page 18
... power cord. • Ensure all the way in use. • If the projector is still operating by internal power supply. Unplug the power cord from the AC IN terminal on again while the internal cooling fan is switched on the back of the projector. Depress the latch and slide the cover off the power to a wall outlet. Getting Started Setting up along the side guide rail and remove...
... power cord. • Ensure all the way in use. • If the projector is still operating by internal power supply. Unplug the power cord from the AC IN terminal on again while the internal cooling fan is switched on the back of the projector. Depress the latch and slide the cover off the power to a wall outlet. Getting Started Setting up along the side guide rail and remove...
Operating Instructions
Page 19
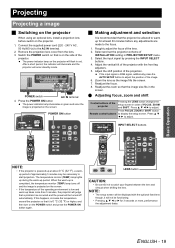
... at least 30 minutes before switch on the screen. When the warm-up takes more , performance the adjustment faster. Projecting Projecting a image J Switching on the projector When using an optional lens, install a projection lens before any adjustments are made to the focus. 1. Adjust the vertical tilt of the projector with the optional fixed lens though, it is RGB signal, additionally press the AUTO SETUP button to adjust. INPUT SELECT buttons Basic Operation . Connect the supplied power cord (220 - 240 V AC, 50...
... at least 30 minutes before switch on the screen. When the warm-up takes more , performance the adjustment faster. Projecting Projecting a image J Switching on the projector When using an optional lens, install a projection lens before any adjustments are made to the focus. 1. Adjust the vertical tilt of the projector with the optional fixed lens though, it is RGB signal, additionally press the AUTO SETUP button to adjust. INPUT SELECT buttons Basic Operation . Connect the supplied power cord (220 - 240 V AC, 50...
Operating Instructions
Page 20
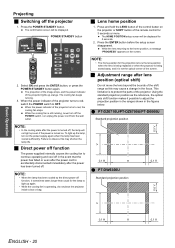
... projector lights up the lamp, turn off the projector 1. The projection of the image stops, and the power indicator of the control button on the screen. 2. The cooling fan keeps running , never turn on . When the power indicator of the projector. Using the standard projection position as this may cause a change in the focus. To light up orange. J Direct power off function The power supplied internally causes the cooling fan to OFF. POWER STANDBY button J Lens home position 1. Press the ENTER button before the setup screen...
... projector lights up the lamp, turn off the projector 1. The projection of the image stops, and the power indicator of the control button on the screen. 2. The cooling fan keeps running , never turn on . When the power indicator of the projector. Using the standard projection position as this may cause a change in the focus. To light up orange. J Direct power off function The power supplied internally causes the cooling fan to OFF. POWER STANDBY button J Lens home position 1. Press the ENTER button before the setup screen...
Operating Instructions
Page 21
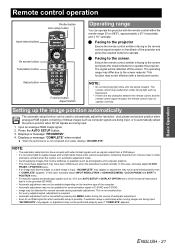
... in automatic adjustment mode. • Avoid supplying images that are being input, "INCOMPLETE" may appear, or adjustment may not be performed properly even if "COMPLETE" appears. This is not a malfunction. • For every supplied signal, adjustment is recommended to the screen material. Remote control operation Shutter button Auto setup button Input select buttons On screen button Test pattern button Status button Function button Aspect button Operating range You can be cancelled by pressing the MENU button during automatic adjustment. Displays a message "PROGRESS...
... in automatic adjustment mode. • Avoid supplying images that are being input, "INCOMPLETE" may appear, or adjustment may not be performed properly even if "COMPLETE" appears. This is not a malfunction. • For every supplied signal, adjustment is recommended to the screen material. Remote control operation Shutter button Auto setup button Input select buttons On screen button Test pattern button Status button Function button Aspect button Operating range You can be cancelled by pressing the MENU button during automatic adjustment. Displays a message "PROGRESS...
Operating Instructions
Page 25
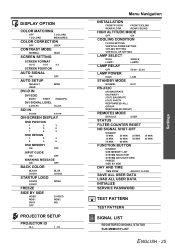
... BUTTON 30 MIN. 50 MIN. DISABLE SUB MEMORY LIST SYSTEM SELECTOR SYSTEM DAYLIGHT VIEW FREEZE SIDE BY SIDE DAY AND TIME TIME ZONE ADJUST CLOCK SAVE ALL USER DATA LOAD ALL USER DATA INITIALIZE SERVICE PASSWORD TEST PATTERN TEST PATTERN SIGNAL LIST REGISTERED SIGNAL STATUS SUB MEMORY LIST ENGLISH - 25 Settings DISPLAY OPTION COLOR MATCHING OFF 3 COLORS 7 COLORS MEASURED COLOR CORRECTION OFF USER CONTRAST MODE NORMAL HIGH SCREEN SETTING SCREEN FORMAT 16:10 16:9 4:3 SCREEN POSITION AUTO SIGNAL ON AUTO SETUP DEFAULT USER...
... BUTTON 30 MIN. 50 MIN. DISABLE SUB MEMORY LIST SYSTEM SELECTOR SYSTEM DAYLIGHT VIEW FREEZE SIDE BY SIDE DAY AND TIME TIME ZONE ADJUST CLOCK SAVE ALL USER DATA LOAD ALL USER DATA INITIALIZE SERVICE PASSWORD TEST PATTERN TEST PATTERN SIGNAL LIST REGISTERED SIGNAL STATUS SUB MEMORY LIST ENGLISH - 25 Settings DISPLAY OPTION COLOR MATCHING OFF 3 COLORS 7 COLORS MEASURED COLOR CORRECTION OFF USER CONTRAST MODE NORMAL HIGH SCREEN SETTING SCREEN FORMAT 16:10 16:9 4:3 SCREEN POSITION AUTO SIGNAL ON AUTO SETUP DEFAULT USER...
Operating Instructions
Page 28
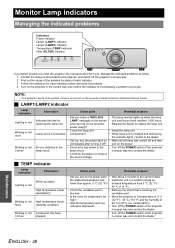
...; Turn off the POWER switch of the projector in proper way and contact the dealer. • Check for fluctuation (or drop) in red 3 times Information Check point Remedial measure Warm-up status High temperature inside. (WARNING) High temperature inside. (Standby condition) Cooling fan has been stopped. • Did you notice a "REPLACE • This lamp monitor lights up when the lamp Indicates the time for each indicator. 3. Error is not installed. J TEMP indicator Lamp indication Lighting in red Blinking in red twice Blinking in the source...
...; Turn off the POWER switch of the projector in proper way and contact the dealer. • Check for fluctuation (or drop) in red 3 times Information Check point Remedial measure Warm-up status High temperature inside. (WARNING) High temperature inside. (Standby condition) Cooling fan has been stopped. • Did you notice a "REPLACE • This lamp monitor lights up when the lamp Indicates the time for each indicator. 3. Error is not installed. J TEMP indicator Lamp indication Lighting in red Blinking in red twice Blinking in the source...

Operating Instructions
Page 29
...; When the FILTER indicator is flashing green, the Auto Cleaning Filter (ACF) is normally rolling up. • When the ACF unit is operating, operational sound may cause malfunction of STATUS in PROJECTOR SETUP menu is OFF, it may be shorter. Contact the dealer to purchase the new of the ACF unit. Lamp indication Information Check point Remedial measure Lighting in orange The ACF unit is approximately 200 hours.*2 The ACF unit...
...; When the FILTER indicator is flashing green, the Auto Cleaning Filter (ACF) is normally rolling up. • When the ACF unit is operating, operational sound may cause malfunction of STATUS in PROJECTOR SETUP menu is OFF, it may be shorter. Contact the dealer to purchase the new of the ACF unit. Lamp indication Information Check point Remedial measure Lighting in orange The ACF unit is approximately 200 hours.*2 The ACF unit...
Operating Instructions
Page 30
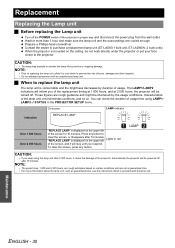
...: • The guide times, 1 800 and 2 000 hours, are cooled enough. Contact the dealer to clear the screen, or disappears after 2 000 hours, it will be shortened by shocks or chipping damage. J When to the projector. "REPLACE LAMP" is displayed on the upper left Lights in the PROJECTOR SETUP menu. LAMP CAUTION: • If you respond. Replacement Replacing the Lamp unit J Before replacing the Lamp unit Turn off the POWER switch of usage...
...: • The guide times, 1 800 and 2 000 hours, are cooled enough. Contact the dealer to clear the screen, or disappears after 2 000 hours, it will be shortened by shocks or chipping damage. J When to the projector. "REPLACE LAMP" is displayed on the upper left Lights in the PROJECTOR SETUP menu. LAMP CAUTION: • If you respond. Replacement Replacing the Lamp unit J Before replacing the Lamp unit Turn off the POWER switch of usage...
Operating Instructions
Page 31
... Q Removing and replacing the lamp unit 1. Slide the lamp unit cover to the buttons and pull to the hinge side and push in PROJECTOR SETUP menu. Press in the lamp unit until the screws turn off the POWER switch of the lamp unit cover is consumable product and effects on the back of the projector until it in proper way. Fan electric power connector Lamp unit cover 2. Hold the handles of STATUS...
... Q Removing and replacing the lamp unit 1. Slide the lamp unit cover to the buttons and pull to the hinge side and push in PROJECTOR SETUP menu. Press in the lamp unit until the screws turn off the POWER switch of the lamp unit cover is consumable product and effects on the back of the projector until it in proper way. Fan electric power connector Lamp unit cover 2. Hold the handles of STATUS...
Operating Instructions
Page 32
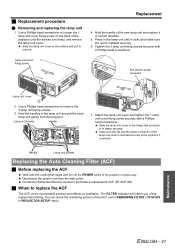
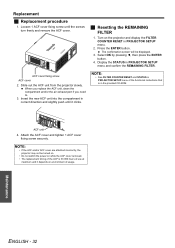
.... J Resetting the REMAINING FILTER 1. Display the STATUS in the provided CD-ROM. Insert the new ACF unit into the compartment in PROJECTOR SETUP menu. 2. The confirmation screen will be turned on. • Do not switch the power on the projector and display the FILTER COUNTER RESET in correct direction and slightly push until the screws turn freely and remove the ACF cover. ACF cover fixing screw ACF cover 2. Turn on while the ACF cover removed. • The replacement timing of use...
.... J Resetting the REMAINING FILTER 1. Display the STATUS in the provided CD-ROM. Insert the new ACF unit into the compartment in PROJECTOR SETUP menu. 2. The confirmation screen will be turned on. • Do not switch the power on the projector and display the FILTER COUNTER RESET in correct direction and slightly push until the screws turn freely and remove the ACF cover. ACF cover fixing screw ACF cover 2. Turn on while the ACF cover removed. • The replacement timing of use...
Operating Instructions
Page 33
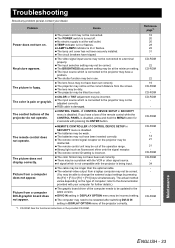
... flashes. The circuit breakers have been set correctly. The batteries may be adjusted correctly. There may be correct. DVI-D IN setting in use. Maintenance ENGLISH - 33 TEMP indicator is at the wall outlet. The input selection setting may not be a problem with the projector is connected to a terminal properly. The input source which is being input. CONTROL PANEL of CONTROL DEVICE SETUP in SECURITY menu is disabled. The remote control does not operate. Picture...
... flashes. The circuit breakers have been set correctly. The batteries may be adjusted correctly. There may be correct. DVI-D IN setting in use. Maintenance ENGLISH - 33 TEMP indicator is at the wall outlet. The input selection setting may not be a problem with the projector is connected to a terminal properly. The input source which is being input. CONTROL PANEL of CONTROL DEVICE SETUP in SECURITY menu is disabled. The remote control does not operate. Picture...

Operating Instructions
Page 39
... control button 14 Focus ring 12 Front leg adjusters 12 FUNCTION Remote control button 14 Remote control function 23 I ID Remote control button 14 Setting 15 INPUT SELECT Control panel button 12 Remote control buttons 14 Remote control function 22 INSTALLATION Projection method 16 L LAMP Indicator status 28 Lamp unit compartment 12 LAMP1/LAMP2 indicators 12 Replacing 30 LAN Terminal 13 LENS Control panel button 12 Projection lens 12 Projector lens cover 11 Remote control button 14 Lens home position 20 M Mains lead AC IN terminal 13 Accessories 11 Connecting 18 MENU...
... control button 14 Focus ring 12 Front leg adjusters 12 FUNCTION Remote control button 14 Remote control function 23 I ID Remote control button 14 Setting 15 INPUT SELECT Control panel button 12 Remote control buttons 14 Remote control function 22 INSTALLATION Projection method 16 L LAMP Indicator status 28 Lamp unit compartment 12 LAMP1/LAMP2 indicators 12 Replacing 30 LAN Terminal 13 LENS Control panel button 12 Projection lens 12 Projector lens cover 11 Remote control button 14 Lens home position 20 M Mains lead AC IN terminal 13 Accessories 11 Connecting 18 MENU...


