Operating Instructions
Page 1
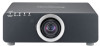
PT-DZ6710U PT-DZ6700U PT-DW6300U PT-D6000U STANDBY(RED)/ ON(GREEN) LAMP TEMP FILTER Before operating this product, please read the instructions carefully and save this manual for future use with multiple models of these instructions are shared use . TQBJ0295 ENGLISH The information of DZ6710 series, DZ6700 series, DW6300 series and D6000 series. Operating Instructions DLP™Based Projector Commercial Use Model No.
PT-DZ6710U PT-DZ6700U PT-DW6300U PT-D6000U STANDBY(RED)/ ON(GREEN) LAMP TEMP FILTER Before operating this product, please read the instructions carefully and save this manual for future use with multiple models of these instructions are shared use . TQBJ0295 ENGLISH The information of DZ6710 series, DZ6700 series, DW6300 series and D6000 series. Operating Instructions DLP™Based Projector Commercial Use Model No.
Operating Instructions
Page 5
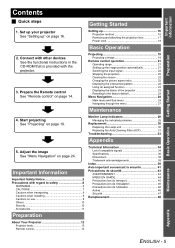
... 9 Cautions when installing 9 Cautions on use 9 Others 10 Security 10 Accessories 11 Preparation Technical Information 34 List of the projector 23 Resetting to the factory default 23 Menu Navigation 24 Main menu and Sub-menu 24 Navigating through the menu 27 Maintenance ...the Lamp unit 30 Replacing the Auto Cleaning Filter (ACF 31 Troubleshooting 33 Appendix 5. Adjust the image See "Menu Navigation" on page 16. Prepare the Remote control See "Remote control" on page 19. Important Information Important Safety Notice 2 Precautions with the projector. ...
... 9 Cautions when installing 9 Cautions on use 9 Others 10 Security 10 Accessories 11 Preparation Technical Information 34 List of the projector 23 Resetting to the factory default 23 Menu Navigation 24 Main menu and Sub-menu 24 Navigating through the menu 27 Maintenance ...the Lamp unit 30 Replacing the Auto Cleaning Filter (ACF 31 Troubleshooting 33 Appendix 5. Adjust the image See "Menu Navigation" on page 16. Prepare the Remote control See "Remote control" on page 19. Important Information Important Safety Notice 2 Precautions with the projector. ...

Operating Instructions
Page 7
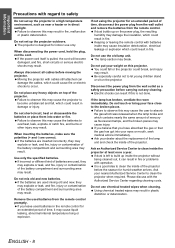
... Heated air comes out of space], otherwise burns or damage could be carried out by suffocation if swallowed. The lamp has high internal pressure. Do not place the projector in your skin. The plastic deterioration may cause blindness or damage. If you look into this is emitted from the... or malfunctions may hurt your eye, it may cause the falling down . Do not look directly into the lens while the projector is being used . If the lamp section breaks, it . Do not place your skin into contact with metallic objects or other . Insulate the battery using it can...
... Heated air comes out of space], otherwise burns or damage could be carried out by suffocation if swallowed. The lamp has high internal pressure. Do not place the projector in your skin. The plastic deterioration may cause blindness or damage. If you look into this is emitted from the... or malfunctions may hurt your eye, it may cause the falling down . Do not look directly into the lens while the projector is being used . If the lamp section breaks, it . Do not place your skin into contact with metallic objects or other . Insulate the battery using it can...
Operating Instructions
Page 8
...gas or that you leave used batteries from the wall outlet as a safety precaution before carrying out any heavy objects on the projector. The lamp section may break. Electric shocks can damage the cables, which could cause fire or electric shocks to occur. Do not touch ...they may explode or leak, and fire, injury or contamination of the projector. If dust builds up the projector in a high temperature environment, such as fluorescent lamps, and the broken pieces may cause injury. If the lamp has broken, ventilate the room immediately. Failure to observe this may cause...
...gas or that you leave used batteries from the wall outlet as a safety precaution before carrying out any heavy objects on the projector. The lamp section may break. Electric shocks can damage the cables, which could cause fire or electric shocks to occur. Do not touch ...they may explode or leak, and fire, injury or contamination of the projector. If dust builds up the projector in a high temperature environment, such as fluorescent lamps, and the broken pieces may cause injury. If the lamp has broken, ventilate the room immediately. Failure to observe this may cause...
Operating Instructions
Page 9
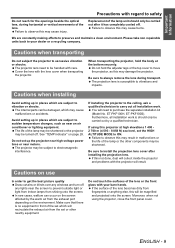
... off any lights near the screen to prevent outside light or light from indoor lamps from the set which may cause burns. Cover the lens with care. See "TEMP indicator" on the environment. If using the projector, close the front panel cover. Cautions on use In order to get the... Avoid setting up in places which are subject to sudden temperature changes, such as this may damage the projector. Do not touch the surfaces of the lamp may be shortened or the projector may result in front of the lens becomes dirty from the exhaust port depending on page 28. The...
... off any lights near the screen to prevent outside light or light from indoor lamps from the set which may cause burns. Cover the lens with care. See "TEMP indicator" on the environment. If using the projector, close the front panel cover. Cautions on use In order to get the... Avoid setting up in places which are subject to sudden temperature changes, such as this may damage the projector. Do not touch the surfaces of the lamp may be shortened or the projector may result in front of the lens becomes dirty from the exhaust port depending on page 28. The...
Operating Instructions
Page 10
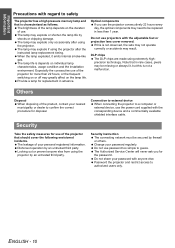
... frequent switching on or off may greatly affect on individual lamp characteristics, usage condition and the installation environment. The lamp may explode if using the projector. Especially the consecutive use of use the projector consecutively 22 hours every day, the optical components may be...correct procedure for replacement in rare cases, pixels may need to safety The projector has a high pressure mercury lamp and that should cover the following envisioned incidents. Password the projector and restrict access to guess. If this is characterized as follows. Others ...
... frequent switching on or off may greatly affect on individual lamp characteristics, usage condition and the installation environment. The lamp may explode if using the projector. Especially the consecutive use of use the projector consecutively 22 hours every day, the optical components may be...correct procedure for replacement in rare cases, pixels may need to safety The projector has a high pressure mercury lamp and that should cover the following envisioned incidents. Password the projector and restrict access to guess. If this is characterized as follows. Others ...
Operating Instructions
Page 12
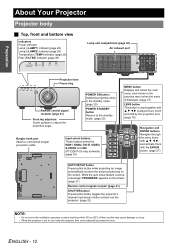
..." appears on the screen. Preparation About Your Projector Projector body J Top, front and bottom view Indicators Power indicator Lamp1 (LAMP1) indicator (page 28) Lamp2 (LAMP2) indicator (page 28) Temperature (TEMP) indicator (page 28) Filter (FILTER) indicator (page 29) STANDBY(RED)/ ON(GREEN) LAMP TEMP FILTER Lamp unit compartment (page 30) Air exhaust port STANDBY...
..." appears on the screen. Preparation About Your Projector Projector body J Top, front and bottom view Indicators Power indicator Lamp1 (LAMP1) indicator (page 28) Lamp2 (LAMP2) indicator (page 28) Temperature (TEMP) indicator (page 28) Filter (FILTER) indicator (page 29) STANDBY(RED)/ ON(GREEN) LAMP TEMP FILTER Lamp unit compartment (page 30) Air exhaust port STANDBY...
Operating Instructions
Page 19
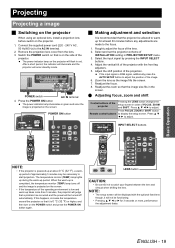
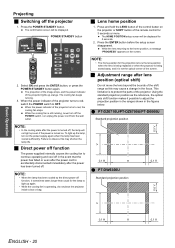
...cover from the lens. 3. The power indicator lamp on the projector will enter standby mode. Adjust the vertical tilt of the projector with the optional fixed lens though, it is completed, the temperature monitor (TEMP) lamp turns off automatically. Q Adjusting focus, zoom and... shift Control buttons of approximately 5 minutes may be functioning. • Pressing F G I or H for 3 seconds or more than 5 minutes, the projector will be allowed to warm up for at ...
...cover from the lens. 3. The power indicator lamp on the projector will enter standby mode. Adjust the vertical tilt of the projector with the optional fixed lens though, it is completed, the temperature monitor (TEMP) lamp turns off automatically. Q Adjusting focus, zoom and... shift Control buttons of approximately 5 minutes may be functioning. • Pressing F G I or H for 3 seconds or more than 5 minutes, the projector will be allowed to warm up for at ...
Operating Instructions
Page 20
... the cooling fan stops. Q PT-DW6300U Standard projection position Basic Operation ENGLISH - 20 The cooling fan keeps running , never turn on the screen. 2. When the power indicator of the projector turns to observe this may shorten the lamp life. Using the standard projection position...more. NOTE: • When the lamp has been cooled by the direct power off in the figures below. Q PT-DZ6710U/PT-DZ6700U/PT-D6000U Standard projection position NOTE: • In the cooling state after the power has been turned off the projector 1. The confirmation screen will not ...
... the cooling fan stops. Q PT-DW6300U Standard projection position Basic Operation ENGLISH - 20 The cooling fan keeps running , never turn on the screen. 2. When the power indicator of the projector turns to observe this may shorten the lamp life. Using the standard projection position...more. NOTE: • When the lamp has been cooled by the direct power off in the figures below. Q PT-DZ6710U/PT-DZ6700U/PT-D6000U Standard projection position NOTE: • In the cooling state after the power has been turned off the projector 1. The confirmation screen will not ...
Operating Instructions
Page 25
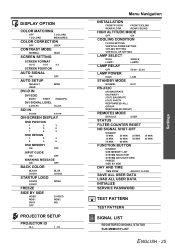
...COLOR BLACK LOGO1 BLUE LOGO2 STARTUP LOGO LOGO2 LOGO1 NONE FREEZE SIDE BY SIDE VIDEO RGB1 DVI-D OFF S-VIDEO RGB2 SDI PROJECTOR SETUP PROJECTOR ID ALL 1 - 64 Menu Navigation INSTALLATION FRONT/FLOOR FRONT/CEILING REAR/FLOOR REAR/CEILING HIGH ALTITUDE MODE OFF ON COOLING... CONDITION FLOOR SETTING VERTICAL DOWN SETTING CEILING SETTING VERTICAL UP SETTING LAMP SELECT DUAL LAMP1 LAMP RELAY SINGLE LAMP2 OFF LAMP POWER 00:00 - ...
...COLOR BLACK LOGO1 BLUE LOGO2 STARTUP LOGO LOGO2 LOGO1 NONE FREEZE SIDE BY SIDE VIDEO RGB1 DVI-D OFF S-VIDEO RGB2 SDI PROJECTOR SETUP PROJECTOR ID ALL 1 - 64 Menu Navigation INSTALLATION FRONT/FLOOR FRONT/CEILING REAR/FLOOR REAR/CEILING HIGH ALTITUDE MODE OFF ON COOLING... CONDITION FLOOR SETTING VERTICAL DOWN SETTING CEILING SETTING VERTICAL UP SETTING LAMP SELECT DUAL LAMP1 LAMP RELAY SINGLE LAMP2 OFF LAMP POWER 00:00 - ...
Operating Instructions
Page 28
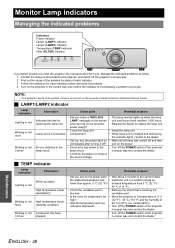
... proper way and contact the dealer. replacing the lamp unit when turning on the power. turn on the projector Request the dealer to replace the lamp unit. Maintenance ENGLISH - 28 Follow the instruction for LAMP" message on the projector. Lamp unit is blocking the blocked. compartment. • When lamp unit is installed and still having an lower...
... proper way and contact the dealer. replacing the lamp unit when turning on the power. turn on the projector Request the dealer to replace the lamp unit. Maintenance ENGLISH - 28 Follow the instruction for LAMP" message on the projector. Lamp unit is blocking the blocked. compartment. • When lamp unit is installed and still having an lower...

Operating Instructions
Page 29
... Request the dealer to purchase the new ACF unit earlier. • If using the projector at high elevations 1 400 - 2 700 m (4 593 - 8 858 ft) sea level and HIGH ALTITUDE MODE in PROJECTOR ACF unit. Blinking in red Lighting in orange Blinking in red • Check the ...operation? • Remove the foreign object from the ACF unit. • When the foreign object still remained, contact the dealer. *1. Monitor Lamp indicators J FILTER indicator The FILTER indicates the Auto Cleaning Filter (ACF) unit status. NOTE: • When the FILTER indicator is flashing green...
... Request the dealer to purchase the new ACF unit earlier. • If using the projector at high elevations 1 400 - 2 700 m (4 593 - 8 858 ft) sea level and HIGH ALTITUDE MODE in PROJECTOR ACF unit. Blinking in red Lighting in orange Blinking in red • Check the ...operation? • Remove the foreign object from the ACF unit. • When the foreign object still remained, contact the dealer. *1. Monitor Lamp indicators J FILTER indicator The FILTER indicates the Auto Cleaning Filter (ACF) unit status. NOTE: • When the FILTER indicator is flashing green...
Operating Instructions
Page 30
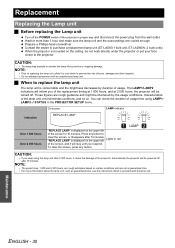
... risk of burns, damage and other hazards. • Do not attempt replacement with the lamp unit. You can check the duration of usage time using the lamp unit after 2 000 hours, it to cool down to the projector. LAMP CAUTION: • If you of the replacement timing at 1 800 hours, and at ...2 000 hours, the projector will be shortened by shocks or chipping damage. NOTE: • Prior to ...
... risk of burns, damage and other hazards. • Do not attempt replacement with the lamp unit. You can check the duration of usage time using the lamp unit after 2 000 hours, it to cool down to the projector. LAMP CAUTION: • If you of the replacement timing at 1 800 hours, and at ...2 000 hours, the projector will be shortened by shocks or chipping damage. NOTE: • Prior to ...
Operating Instructions
Page 31
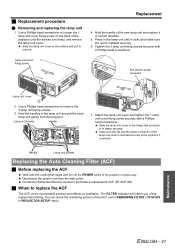
...ACF Wait until the cooling fan stops and turn freely, and remove the lamp unit cover. You can check the remaining amount of the ACF unit in REMAINING FILTER of the projector in the lamp unit until the screws turn off the POWER switch of STATUS in correct ...direction. 5. Fan electric power connector Lamp unit cover 2. Lamp unit cover fixing screw Replacement 4. Disconnect the power cord from the projector. Hold the handles of the lamp unit cover is inserted securely to replace the ACF The ACF unit is installed...
...ACF Wait until the cooling fan stops and turn freely, and remove the lamp unit cover. You can check the remaining amount of the ACF unit in REMAINING FILTER of the projector in the lamp unit until the screws turn off the POWER switch of STATUS in correct ...direction. 5. Fan electric power connector Lamp unit cover 2. Lamp unit cover fixing screw Replacement 4. Disconnect the power cord from the projector. Hold the handles of the lamp unit cover is inserted securely to replace the ACF The ACF unit is installed...
Operating Instructions
Page 33
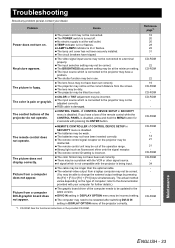
...graphic board does not appear. Picture from a computer does not appear. The cable may be correct. DVI-D IN setting in DISPLAY OPTION menu of the projector correctly. *1. CD-ROM CD-ROM 14 21 21 CD-ROM CD-ROM 34 - - Maintenance ENGLISH - 33 The input source which is at the ... out of the remote control while the CONTROL PANEL is disabled, press and hold the MENU button for 2 seconds with the projector is pale or grayish. The lamp unit cover has not been securely installed. The lens may be restarted after switching DVI-D IN setting in DISPLAY OPTION menu may...
...graphic board does not appear. Picture from a computer does not appear. The cable may be correct. DVI-D IN setting in DISPLAY OPTION menu of the projector correctly. *1. CD-ROM CD-ROM 14 21 21 CD-ROM CD-ROM 34 - - Maintenance ENGLISH - 33 The input source which is at the ... out of the remote control while the CONTROL PANEL is disabled, press and hold the MENU button for 2 seconds with the projector is pale or grayish. The lamp unit cover has not been securely installed. The lens may be restarted after switching DVI-D IN setting in DISPLAY OPTION menu may...
Operating Instructions
Page 36
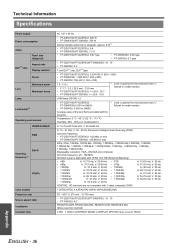
....75 kHz/15.63 kHz, V: 50 Hz/60 Hz H: 15 - 91 kHz, V: 50 - 85 Hz Panasonic Intelligent Auto Scanning (PIAS) Dot clock frequency • PT-DZ6710U/PT-DZ6700U: 162 MHz or less • PT-DW6300U/PT-D6000U: 150 MHz or less 480p, 576p, 720/60p, 720/59.94p, 720/50p, 1 080/60p, ....75 kHz, V: 30 Hz H: 56.25 kHz, V: 50 Hz HD/SYNC, VD terminals are not compliant with the projector. UHM lamp (300 W) x 2 • PT-DZ6710U/PT-DZ6700U/ PT-DW6300U:6 000 lm (ANSI) • PT-D6000U: 6 500 lm (ANSI) • Lens is set to HIGH) Appendix ENGLISH - 36 Technical Information Specifications Power supply...
....75 kHz/15.63 kHz, V: 50 Hz/60 Hz H: 15 - 91 kHz, V: 50 - 85 Hz Panasonic Intelligent Auto Scanning (PIAS) Dot clock frequency • PT-DZ6710U/PT-DZ6700U: 162 MHz or less • PT-DW6300U/PT-D6000U: 150 MHz or less 480p, 576p, 720/60p, 720/59.94p, 720/50p, 1 080/60p, ....75 kHz, V: 30 Hz H: 56.25 kHz, V: 50 Hz HD/SYNC, VD terminals are not compliant with the projector. UHM lamp (300 W) x 2 • PT-DZ6710U/PT-DZ6700U/ PT-DW6300U:6 000 lm (ANSI) • PT-D6000U: 6 500 lm (ANSI) • Lens is set to HIGH) Appendix ENGLISH - 36 Technical Information Specifications Power supply...
Operating Instructions
Page 37
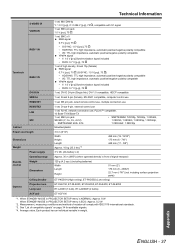
... 176 mm (6 - 29/32") 22.7 mm (-7/8") (not including surface projection parts) ET-PKD56H (High ceiling), ET-PKD55S (Low ceiling) Options Projection lens Lamp unit ET-DLE150, ET-DLE250, ET-DLE350, ET-DLE450, ET-DLE055 ET-LAD60 (1 bulb), ET-LAD60W (2 bulbs) ACF unit ET-ACF100 *1. Average value.... 2 IN DVI-D IN 1 set, Mini DIN 4p Y: 1.0 V [p-p], C: 0.286 V [p-p], 75 Ω, compatible with ISO21118 international standards. *3. When STANDBY MODE in PROJECTOR SETUP menu is NORMAL: Approx. 8 W When STANDBY MODE in PROJECTOR SETUP menu is ECO: Approx. 0.2 W *2. Appendix ENGLISH - 37
... 176 mm (6 - 29/32") 22.7 mm (-7/8") (not including surface projection parts) ET-PKD56H (High ceiling), ET-PKD55S (Low ceiling) Options Projection lens Lamp unit ET-DLE150, ET-DLE250, ET-DLE350, ET-DLE450, ET-DLE055 ET-LAD60 (1 bulb), ET-LAD60W (2 bulbs) ACF unit ET-ACF100 *1. Average value.... 2 IN DVI-D IN 1 set, Mini DIN 4p Y: 1.0 V [p-p], C: 0.286 V [p-p], 75 Ω, compatible with ISO21118 international standards. *3. When STANDBY MODE in PROJECTOR SETUP menu is NORMAL: Approx. 8 W When STANDBY MODE in PROJECTOR SETUP menu is ECO: Approx. 0.2 W *2. Appendix ENGLISH - 37

Operating Instructions
Page 39
...buttons 14 Remote control function 22 INSTALLATION Projection method 16 L LAMP Indicator status 28 Lamp unit compartment 12 LAMP1/LAMP2 indicators 12 Replacing 30 LAN Terminal 13 LENS Control panel button 12 Projection lens 12 Projector lens cover 11 Remote control button 14 Lens home position ...Control panel button 12 Remote control button 14 Switching on/off 19 POWER STANDBY Control panel button 12 Remote control button 14 Projector lens cover Accessories 11 R Remote control 14 Accessories 11 Signal receptor 12 Wired connection 15 REMOTE1 Terminal 13 Wired connection ...
...buttons 14 Remote control function 22 INSTALLATION Projection method 16 L LAMP Indicator status 28 Lamp unit compartment 12 LAMP1/LAMP2 indicators 12 Replacing 30 LAN Terminal 13 LENS Control panel button 12 Projection lens 12 Projector lens cover 11 Remote control button 14 Lens home position ...Control panel button 12 Remote control button 14 Switching on/off 19 POWER STANDBY Control panel button 12 Remote control button 14 Projector lens cover Accessories 11 R Remote control 14 Accessories 11 Signal receptor 12 Wired connection 15 REMOTE1 Terminal 13 Wired connection ...


