

Functional Instructions
Page 28
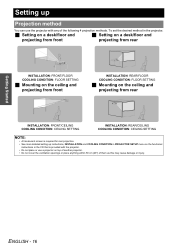
FRONT/FLOOR FRONT/CEILING REAR/FLOOR REAR/CEILING Setting on a desk/floor and projecting from front Mounting on the ceiling and projecting from front Setting on a desk/floor and projecting from rear Mounting on page 15. Press I H to cycle through the menu" on the ceiling and projecting from rear OFF ON The fan...
FRONT/FLOOR FRONT/CEILING REAR/FLOOR REAR/CEILING Setting on a desk/floor and projecting from front Mounting on the ceiling and projecting from front Setting on a desk/floor and projecting from rear Mounting on page 15. Press I H to cycle through the menu" on the ceiling and projecting from rear OFF ON The fan...

Operating Instructions
Page 6
Do not install this projector in a place which are unstable. Continued use other than an authorized ceiling mount bracket. Do not use plugs which are damaged or wall outlets which is not strong enough, it may fall down or tip over , and injury ...
Do not install this projector in a place which are unstable. Continued use other than an authorized ceiling mount bracket. Do not use plugs which are damaged or wall outlets which is not strong enough, it may fall down or tip over , and injury ...
Operating Instructions
Page 7
...used . Do not place your hands or other . Do not place sets directly on top of each other objects close to the ceiling mount bracket) and the eye bolts as closets or bookshelves. Doing so may hurt your skin into the lens while the projector is being ...internal pressure. ENGLISH - 7 Important Information Precautions with water and seek medical advice. If you look into the light beam while the projector is mounted on cloth or papers, as these materials could result. Immediately wash away the liquid with regard to the projector. During a thunderstorm, do not...
...used . Do not place your hands or other . Do not place sets directly on top of each other objects close to the ceiling mount bracket) and the eye bolts as closets or bookshelves. Doing so may hurt your skin into the lens while the projector is being ...internal pressure. ENGLISH - 7 Important Information Precautions with water and seek medical advice. If you look into the light beam while the projector is mounted on cloth or papers, as these materials could result. Immediately wash away the liquid with regard to the projector. During a thunderstorm, do not...
Operating Instructions
Page 16
ENGLISH - 16 To set the desired method in the projector, J Setting on a desk/floor and J Setting on a desk/floor and projecting from front projecting from rear INSTALLATION: FRONT/FLOOR COOLING CONDITION: FLOOR SETTING J Mounting on the ceiling and projecting from front INSTALLATION: REAR/FLOOR COOLING CONDITION: FLOOR SETTING J Mounting on the ceiling and projecting...
ENGLISH - 16 To set the desired method in the projector, J Setting on a desk/floor and J Setting on a desk/floor and projecting from front projecting from rear INSTALLATION: FRONT/FLOOR COOLING CONDITION: FLOOR SETTING J Mounting on the ceiling and projecting from front INSTALLATION: REAR/FLOOR COOLING CONDITION: FLOOR SETTING J Mounting on the ceiling and projecting...
Operating Instructions
Page 30
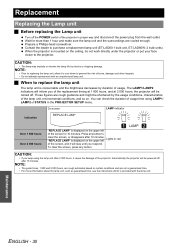
... Indication REPLACE LAMP Over 1 800 hours Over 2 000 hours "REPLACE LAMP" is provided with an unauthorized lamp unit. "REPLACE LAMP" is mounted on the ceiling, do not work directly under the projector or put your face closer to prevent the risk of usage. NOTE: • The...and make sure the lamp unit and the surroundings are rough guidance and might be shortened by the usage conditions, characteristics of the screen for 10 minutes. When the projector is displayed on . The LAMP1/LAMP2 indicators will inform you respond. Press any button. Prepare a Phillips-head screwdriver...
... Indication REPLACE LAMP Over 1 800 hours Over 2 000 hours "REPLACE LAMP" is provided with an unauthorized lamp unit. "REPLACE LAMP" is mounted on the ceiling, do not work directly under the projector or put your face closer to prevent the risk of usage. NOTE: • The...and make sure the lamp unit and the surroundings are rough guidance and might be shortened by the usage conditions, characteristics of the screen for 10 minutes. When the projector is displayed on . The LAMP1/LAMP2 indicators will inform you respond. Press any button. Prepare a Phillips-head screwdriver...
