
Operating Instructions
Page 4
... Making adjustment and selection 22 Powering off the projector 23 Direct power off function 23 How to install and remove the projection lens......24 How to install the projection lens 24 How to remove the projection lens 24 How to adjust the lens 24 How to adjust the FOCUS, ZOOM and SHIFT 24 ...PHASE 30 KEYSTONE 30 How to use ADVANCED MENU 30 DIGITAL CINEMA REALITY 30 BLANKING 30 INPUT RESOLUTION 31 CLAMP POSITION 31 RASTER POSITION 31 XGA MODE 31 SXGA MODE 31 Changing the display language 31 OPTION1 settings 32 COLOR CORRECTION 32 CONTRAST MODE 32 4 AUTO SIGNAL 32 BACK ...
... Making adjustment and selection 22 Powering off the projector 23 Direct power off function 23 How to install and remove the projection lens......24 How to install the projection lens 24 How to remove the projection lens 24 How to adjust the lens 24 How to adjust the FOCUS, ZOOM and SHIFT 24 ...PHASE 30 KEYSTONE 30 How to use ADVANCED MENU 30 DIGITAL CINEMA REALITY 30 BLANKING 30 INPUT RESOLUTION 31 CLAMP POSITION 31 RASTER POSITION 31 XGA MODE 31 SXGA MODE 31 Changing the display language 31 OPTION1 settings 32 COLOR CORRECTION 32 CONTRAST MODE 32 4 AUTO SIGNAL 32 BACK ...

Operating Instructions
Page 5
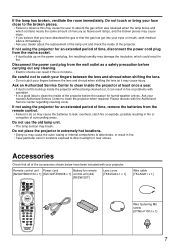
...result in a place which is not strong enough or on top of a surface which are away from the projector. Installation work , please contact an Authorized Service Center. Do not overload the wall outlet. • If the...8226; Do not damage the power cord, make any modifications to let young children look into the lens while the projector is being used while damaged, electric shocks, short-circuits or fire may result. • Ask... cord is used . • Strong light is emitted from the projector's lens. If you look directly into water or let it become wet. • If water spills onto the...
...result in a place which is not strong enough or on top of a surface which are away from the projector. Installation work , please contact an Authorized Service Center. Do not overload the wall outlet. • If the...8226; Do not damage the power cord, make any modifications to let young children look into the lens while the projector is being used while damaged, electric shocks, short-circuits or fire may result. • Ask... cord is used . • Strong light is emitted from the projector's lens. If you look directly into water or let it become wet. • If water spills onto the...
Operating Instructions
Page 7
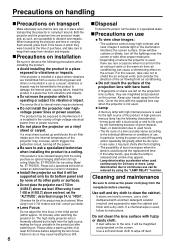
Do not place the projector in extremely hot locations. • Doing so may cause the outer casing or internal components to direct sunlight or near stoves. Ask your fingers between the lens and shroud when shifting the lens. • Do not catch your nearest Authorized Service Center to observe this ... for humid weather arrives. Do not touch or bring your face close to the broken pieces. • Failure to clean the projector when required. Be careful not to catch your fingers between the lens and shroud when shifting the lens as it can result if this is not done.
Do not place the projector in extremely hot locations. • Doing so may cause the outer casing or internal components to direct sunlight or near stoves. Ask your fingers between the lens and shroud when shifting the lens. • Do not catch your nearest Authorized Service Center to observe this ... for humid weather arrives. Do not touch or bring your face close to the broken pieces. • Failure to clean the projector when required. Be careful not to catch your fingers between the lens and shroud when shifting the lens as it can result if this is not done.
Operating Instructions
Page 8
.... Install the product in a car or a vessel, vibrations or impacts may be magnified and projected on the screen. The high clarity projector lens is thermally affected by none of driving power and others or mounted in a place free from vibration and impacts. Cleaning and maintenance Be ...of use can cause a shimmering effect on the screen. Lamp A mercury lamp with the supplied lens cap when the projector is installed in the period just after switching the projector on. Lamp deterioration due to continuous use . If stains are susceptible to vibration and impacts. The...
.... Install the product in a car or a vessel, vibrations or impacts may be magnified and projected on the screen. The high clarity projector lens is thermally affected by none of driving power and others or mounted in a place free from vibration and impacts. Cleaning and maintenance Be ...of use can cause a shimmering effect on the screen. Lamp A mercury lamp with the supplied lens cap when the projector is installed in the period just after switching the projector on. Lamp deterioration due to continuous use . If stains are susceptible to vibration and impacts. The...

Operating Instructions
Page 10
... and the main unit with a single remote control. ID ALL button (page 15) When two or more main units are used to adjust the projection lens. Function 1 (FUNC1) button (page 33) This button can control the functions set in "FUNC1" of the remote control. DEFAULT button (page 27) Press this ...button to control them simultaneously with the M3 stereo mini jack cable available in the market. 10 Name and function of parts Bottom LENS (FOCUS, ZOOM, SHIFT) buttons (page 24) These buttons are used in the system, this button specifies the ID of the "OPTION1" screen from the ...
... and the main unit with a single remote control. ID ALL button (page 15) When two or more main units are used to adjust the projection lens. Function 1 (FUNC1) button (page 33) This button can control the functions set in "FUNC1" of the remote control. DEFAULT button (page 27) Press this ...button to control them simultaneously with the M3 stereo mini jack cable available in the market. 10 Name and function of parts Bottom LENS (FOCUS, ZOOM, SHIFT) buttons (page 24) These buttons are used in the system, this button specifies the ID of the "OPTION1" screen from the ...
Operating Instructions
Page 11
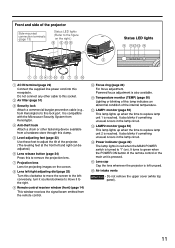
... a hardware store through this lock port. It turns to green when the POWER ON button of the projector. (The leveling feet at the front left and right can be adjusted.) Lens release button (page 24) Press this clockwise to move it counterclockwise to move the screen to the left... remove the upper cover (white top panel). 11 Level-adjusting feet (page 22) Use these feet to the right. Lens left unused. Lens cap Cap the lens whenever the projector is compatible with the Microsaver Security System from Kensington) to this socket. conversely, turn it to adjust the tilt of the...
... a hardware store through this lock port. It turns to green when the POWER ON button of the projector. (The leveling feet at the front left and right can be adjusted.) Lens release button (page 24) Press this clockwise to move it counterclockwise to move the screen to the left... remove the upper cover (white top panel). 11 Level-adjusting feet (page 22) Use these feet to the right. Lens left unused. Lens cap Cap the lens whenever the projector is compatible with the Microsaver Security System from Kensington) to this socket. conversely, turn it to adjust the tilt of the...
Operating Instructions
Page 12
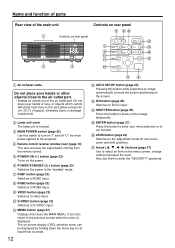
... on "I ) button (page 22) Turns on rear panel Air exhaust vents Do not place your hands or other objects close to this switch to the projector. VIDEO button (page 22) Switches to RGB2 input. SHUTTER button (page 25) Press this button to enter your hands or face, or objects which cannot...) Switches to video input. MENU button (page 27) Displays and clears the MAIN MENU. It can be displayed by holding down the menu key for lens focus, zoom and shift (position). MAIN POWER switch (page 22) Use this port [allow at least three seconds. 12 AUTO SETUP button (page 25) Pressing...
... on "I ) button (page 22) Turns on rear panel Air exhaust vents Do not place your hands or other objects close to this switch to the projector. VIDEO button (page 22) Switches to RGB2 input. SHUTTER button (page 25) Press this button to enter your hands or face, or objects which cannot...) Switches to video input. MENU button (page 27) Displays and clears the MAIN MENU. It can be displayed by holding down the menu key for lens focus, zoom and shift (position). MAIN POWER switch (page 22) Use this port [allow at least three seconds. 12 AUTO SETUP button (page 25) Pressing...

Operating Instructions
Page 16
...; Do not place or use one projector on top of another projection unit. • Leave a clearance of at least 50 cm (19.7") so that the ventilation opening on the rear panel will not be finely adjusted with the powered zoom lens and lens tilt mechanism. REAR Side view Top... 200 (7.9) 100 (3.9) 200 (7.9) of projected image. After the projector is roughly positioned, picture size and vertical picture positioning can be used depending on the next page for reference. Use "OPTION2" menu (chosen from center of lens to the figure below and the information on user's needs or viewing...
...; Do not place or use one projector on top of another projection unit. • Leave a clearance of at least 50 cm (19.7") so that the ventilation opening on the rear panel will not be finely adjusted with the powered zoom lens and lens tilt mechanism. REAR Side view Top... 200 (7.9) 100 (3.9) 200 (7.9) of projected image. After the projector is roughly positioned, picture size and vertical picture positioning can be used depending on the next page for reference. Use "OPTION2" menu (chosen from center of lens to the figure below and the information on user's needs or viewing...

Operating Instructions
Page 17
... ] : foot Lens type Model number of projection lens Throw ratio*1 Projection screen size Standard zoom lens (1.8-2.5:1) Wide-angle fixed-focus lens ET- DLE050 (0.8:1) Optional lens Wide-angle Intermediate-focus Long-focus zoom lens zoom lens zoom lens ET-DLE100 ET-DLE200 ET-DLE300 (1.3-1.8:1) (2.5-4.0:1) (3.7-5.7:1) Projection distance (L) Ultra-long-focus zoom lens ET-DLE400 (5.7-8.0:1) Height... *1 The throw ratio is based on the value during projection onto an 80-inch screen size. *2 Lens shift is not available when using the ET-DLE050, and so the height position (H) is SH/2. 17
... ] : foot Lens type Model number of projection lens Throw ratio*1 Projection screen size Standard zoom lens (1.8-2.5:1) Wide-angle fixed-focus lens ET- DLE050 (0.8:1) Optional lens Wide-angle Intermediate-focus Long-focus zoom lens zoom lens zoom lens ET-DLE100 ET-DLE200 ET-DLE300 (1.3-1.8:1) (2.5-4.0:1) (3.7-5.7:1) Projection distance (L) Ultra-long-focus zoom lens ET-DLE400 (5.7-8.0:1) Height... *1 The throw ratio is based on the value during projection onto an 80-inch screen size. *2 Lens shift is not available when using the ET-DLE050, and so the height position (H) is SH/2. 17

Operating Instructions
Page 18
...[ ] : foot Lens type Model number of projection lens Throw ratio*1 Projection screen size Standard zoom lens (1.8-2.5:1) Wide-angle fixed-focus lens ET- DLE050 (0.8:1) Optional lens Wide-angle Intermediate-focus Long-focus zoom lens zoom lens zoom lens ET-DLE100 ET-DLE200 ET-DLE300 (1.3-1.8:1) (2.5-4.0:1) (3.7-5.7:1) Projection distance (L) Ultra-long-focus zoom lens ET-DLE400 (5.7-8.0:1) Height... The throw ratio is based on the value during projection onto an 80-inch screen size. *2 Lens shift is not available when using the ET-DLE050, and so the height position (H) is SH/2. 18
...[ ] : foot Lens type Model number of projection lens Throw ratio*1 Projection screen size Standard zoom lens (1.8-2.5:1) Wide-angle fixed-focus lens ET- DLE050 (0.8:1) Optional lens Wide-angle Intermediate-focus Long-focus zoom lens zoom lens zoom lens ET-DLE100 ET-DLE200 ET-DLE300 (1.3-1.8:1) (2.5-4.0:1) (3.7-5.7:1) Projection distance (L) Ultra-long-focus zoom lens ET-DLE400 (5.7-8.0:1) Height... The throw ratio is based on the value during projection onto an 80-inch screen size. *2 Lens shift is not available when using the ET-DLE050, and so the height position (H) is SH/2. 18

Operating Instructions
Page 19
... No. : ET-DLE100 Intermediate-focus Model No. : zoom lens ET-DLE200 Long-focus zoom lens Model No. : ET-DLE300 Ultra-long-focus Model No. : zoom lens ET-DLE400 (L, LW, LT : m SD : inch) Aspect ratio Projection distance (L) formula 4:3 Minimum (LW) L=0.0371 x SD-0.0507 Maximum (LT) L=0.0490 x SD-0.0500 16:9 Minimum (LW) L=1.8270 x...the right and left ends of the picture will be blanked and the aspect ratio will be 5:4. • The brightness is different between the wide lens position settings and telephoto lens position settings. 19 Calculation formulas for projection distance by...
... No. : ET-DLE100 Intermediate-focus Model No. : zoom lens ET-DLE200 Long-focus zoom lens Model No. : ET-DLE300 Ultra-long-focus Model No. : zoom lens ET-DLE400 (L, LW, LT : m SD : inch) Aspect ratio Projection distance (L) formula 4:3 Minimum (LW) L=0.0371 x SD-0.0507 Maximum (LT) L=0.0490 x SD-0.0500 16:9 Minimum (LW) L=1.8270 x...the right and left ends of the picture will be blanked and the aspect ratio will be 5:4. • The brightness is different between the wide lens position settings and telephoto lens position settings. 19 Calculation formulas for projection distance by...
Operating Instructions
Page 22
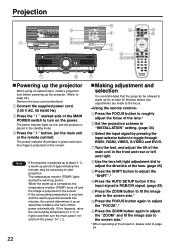
... Making adjustment and selection It is projected on the power. The temperature monitor (TEMP) lights during the warm-up for at the projector, please refer to the focus. Use the lens left and right. Projection R/PR G/Y B/PB SYNC/HD VD VIDEO IN S-VIDEO IN REMOTE 1 IN OUT RGB 1 IN REMOTE... 2 IN IN SE Powering up the projector When using an optional lens, install a projection lens before any adjustments are made to page 24. 22 Press the " I " marked side of the main unit in "INSTALLATION" setting....
... Making adjustment and selection It is projected on the power. The temperature monitor (TEMP) lights during the warm-up for at the projector, please refer to the focus. Use the lens left and right. Projection R/PR G/Y B/PB SYNC/HD VD VIDEO IN S-VIDEO IN REMOTE 1 IN OUT RGB 1 IN REMOTE... 2 IN IN SE Powering up the projector When using an optional lens, install a projection lens before any adjustments are made to page 24. 22 Press the " I " marked side of the main unit in "INSTALLATION" setting....

Operating Instructions
Page 24
...in the initial period (within 30 minutes) after switching on the screen can be adjusted while the projector is used, the lens zoom adjustment menu will go. Press to remove the projection lens Turn the lens counterclockwise as far as it . When the FOCUS button is pressed : The focus is adjusted. ... The focus, zoom and up period of the images projected on . • A warm-up /down position, it clicks into place. At the projector Press LENS on the control panel on the remote control. Pressing the button changes the setup screen in the order of the projection...
...in the initial period (within 30 minutes) after switching on the screen can be adjusted while the projector is used, the lens zoom adjustment menu will go. Press to remove the projection lens Turn the lens counterclockwise as far as it . When the FOCUS button is pressed : The focus is adjusted. ... The focus, zoom and up period of the images projected on . • A warm-up /down position, it clicks into place. At the projector Press LENS on the control panel on the remote control. Pressing the button changes the setup screen in the order of the projection...

Operating Instructions
Page 25
...automatic adjustments. Note • "CLOCK PHASE" may be disturbed for a certain period of the remote control or the main unit. STATUS INPUT PROJECTOR RUNTIME LAMP1 LAMP2 INTAKE-AIR TEMP. TEMP. The image comes back. 25 Automatic adjustment (AUTO SETUP) Automatic adjustment function adjust the resolution, ...not an abnormal error. Press the STATUS button on a break or preparations are input. How to adjust the lens position to the left or right When the lens left/right adjustment dial is turned clockwise, the screen moves toward the left /right adjustment dial to any position...
...automatic adjustments. Note • "CLOCK PHASE" may be disturbed for a certain period of the remote control or the main unit. STATUS INPUT PROJECTOR RUNTIME LAMP1 LAMP2 INTAKE-AIR TEMP. TEMP. The image comes back. 25 Automatic adjustment (AUTO SETUP) Automatic adjustment function adjust the resolution, ...not an abnormal error. Press the STATUS button on a break or preparations are input. How to adjust the lens position to the left or right When the lens left/right adjustment dial is turned clockwise, the screen moves toward the left /right adjustment dial to any position...
Operating Instructions
Page 55
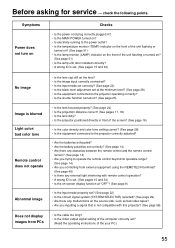
... black level adjustment set at the minimum level? (See page 28) • Is the equipment connected to the projector operating correctly? • Is the shutter function turned on? (See page 25) • Is the lens focused properly? (See page 24) • Is the projection distance correct? (See pages 17, 18) • ...Is the lens dirty? • Is the projector positioned directly in front of the screen? (See page 16) • Is the color density and color tone setting correct? (See page 28) • Is...
... black level adjustment set at the minimum level? (See page 28) • Is the equipment connected to the projector operating correctly? • Is the shutter function turned on? (See page 25) • Is the lens focused properly? (See page 24) • Is the projection distance correct? (See pages 17, 18) • ...Is the lens dirty? • Is the projector positioned directly in front of the screen? (See page 16) • Is the color density and color tone setting correct? (See page 28) • Is...
Operating Instructions
Page 56
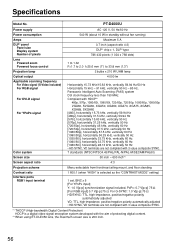
Specifications Model No. PT-D4000U Power supply Power consumption Amps DLP® panel Panel size Display system Number of pixels Lens Powered zoom Powered focus control Projection lamp Optical output Applicable scanning frequency For Video signal (S-Video included) For RGB signal For DVI-D signal...chip x 1, DLP® type 786 432 pixels (1 024 x 768 dots) 1 to 1.32 F=1.7 to 2.0 f=25.6 mm (1") to 33.8 mm (1.3") 2 bulbs x 210 W UHM lamp 4 000 lm Horizontally 15.73 kHz/15.63 kHz, vertically 59.94 Hz/50 Hz Horizontally 15 kHz - 91 kHz, vertically 50 Hz - 85 Hz, Panasonic Intelligent Auto ...
Specifications Model No. PT-D4000U Power supply Power consumption Amps DLP® panel Panel size Display system Number of pixels Lens Powered zoom Powered focus control Projection lamp Optical output Applicable scanning frequency For Video signal (S-Video included) For RGB signal For DVI-D signal...chip x 1, DLP® type 786 432 pixels (1 024 x 768 dots) 1 to 1.32 F=1.7 to 2.0 f=25.6 mm (1") to 33.8 mm (1.3") 2 bulbs x 210 W UHM lamp 4 000 lm Horizontally 15.73 kHz/15.63 kHz, vertically 59.94 Hz/50 Hz Horizontally 15 kHz - 91 kHz, vertically 50 Hz - 85 Hz, Panasonic Intelligent Auto ...
Operating Instructions
Page 57
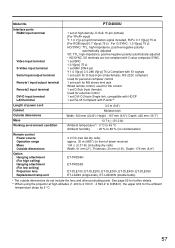
...-DLE050 ET-LAD40 (single bulb), ET-LAD40W (double bulbs) • The outside dimensions do not include the lens and other protruding parts. Model No. PT-D4000U Interface ports RGB2 input terminal Video input terminal S-Video input terminal Serial input/output terminal Remote1 input/output terminal Remote2... set D-Sub 9-pin (female) Used for the ambient temperature drops by 5 °C. 57 See page 59 for further details. *3 When using the projector at high altitudes (1 400 to 2 700 m : 4 593.2' to 80 % (no condensation) Remote control Power source Operation range Mass Outside dimensions ...
...-DLE050 ET-LAD40 (single bulb), ET-LAD40W (double bulbs) • The outside dimensions do not include the lens and other protruding parts. Model No. PT-D4000U Interface ports RGB2 input terminal Video input terminal S-Video input terminal Serial input/output terminal Remote1 input/output terminal Remote2... set D-Sub 9-pin (female) Used for the ambient temperature drops by 5 °C. 57 See page 59 for further details. *3 When using the projector at high altitudes (1 400 to 2 700 m : 4 593.2' to 80 % (no condensation) Remote control Power source Operation range Mass Outside dimensions ...

