Dvc Camcorder
Page 1
Shooting Playback Editing Displays Menus Reference Before operating this product, please read the instructions carefully and save this manual for future use parts Operating Instructions Camera-Recorder Model No. AG- P . Preparation Description of Before use F0805S0 -H ENGLISH VQT0U08
Shooting Playback Editing Displays Menus Reference Before operating this product, please read the instructions carefully and save this manual for future use parts Operating Instructions Camera-Recorder Model No. AG- P . Preparation Description of Before use F0805S0 -H ENGLISH VQT0U08
Dvc Camcorder
Page 4
... will often require extensive work by a qualified technician to restore the video unit to proper grounding of the mast and supporting structure, grounding of fire or electric shock. 17. Power Lines - Overloading - Servicing - Damage Requiring Service - When the power-supply cord or plug is left unattended and unused for service. 20. d. When replacement parts are covered by the operating instructions, as contact with respect...
... will often require extensive work by a qualified technician to restore the video unit to proper grounding of the mast and supporting structure, grounding of fire or electric shock. 17. Power Lines - Overloading - Servicing - Damage Requiring Service - When the power-supply cord or plug is left unattended and unused for service. 20. d. When replacement parts are covered by the operating instructions, as contact with respect...
Dvc Camcorder
Page 5
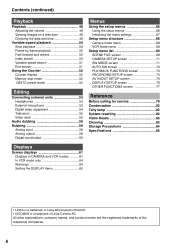
... lens-cap strap 15 Cassette tapes 15 Description of parts Description of parts 16 Camera-recorder 16 Remote control 19 Preparation The remote control 20 Insert the battery 20 Remote control setup 20 The battery 21 Charging 21 Attaching the battery 22 Detaching the battery 22 Viewfinder 23 Using the viewfinder 23 Using the LCD 24 Emphasizing outlines 24 Adjusting the screen display 25 Time data 26 Setting the calendar 26 Recharging the built-in battery 27 Setting user information 27 Setting...
... lens-cap strap 15 Cassette tapes 15 Description of parts Description of parts 16 Camera-recorder 16 Remote control 19 Preparation The remote control 20 Insert the battery 20 Remote control setup 20 The battery 21 Charging 21 Attaching the battery 22 Detaching the battery 22 Viewfinder 23 Using the viewfinder 23 Using the LCD 24 Emphasizing outlines 24 Adjusting the screen display 25 Time data 26 Setting the calendar 26 Recharging the built-in battery 27 Setting user information 27 Setting...
Dvc Camcorder
Page 6
... display 52 Memory stop mode 52 1394TC preset mode 52 Editing Connecting external units 53 Headphones 53 External microphone 53 Digital video equipment 54 Television 55 Video deck 55 Audio dubbing 56 Dubbing 58 Analog input 58 Analog output 59 Digital input/output 60 Menus Using the setup menus 66 Using the setup menus 66 Initializing the menu settings 67 Setup menu structure 68 Camera mode menu 68 VCR mode menu 68 Setup menu list 69 SCENE FILE screen 69 CAMERA SETUP screen 71 SW MODE screen 71 AUTO SW screen 72 PLAYBACK FUNCTIONS screen 73 RECORDING SETUP screen...
... display 52 Memory stop mode 52 1394TC preset mode 52 Editing Connecting external units 53 Headphones 53 External microphone 53 Digital video equipment 54 Television 55 Video deck 55 Audio dubbing 56 Dubbing 58 Analog input 58 Analog output 59 Digital input/output 60 Menus Using the setup menus 66 Using the setup menus 66 Initializing the menu settings 67 Setup menu structure 68 Camera mode menu 68 VCR mode menu 68 Setup menu list 69 SCENE FILE screen 69 CAMERA SETUP screen 71 SW MODE screen 71 AUTO SW screen 72 PLAYBACK FUNCTIONS screen 73 RECORDING SETUP screen...
Dvc Camcorder
Page 7
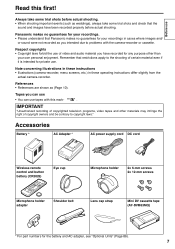
... Microphone holder adapter Shoulder belt Lens cap strap Mini DV cassette tape (AY-DVM63MQ) * For part numbers for your own personal enjoyment. Always take some trial shots and check that restrictions apply to copyright laws." Before use . IMPORTANT "Unauthorized recording of copyrighted television programs, video tapes and other than your recordings in these operating instructions differ slightly from the actual camera-recorder. Note concerning illustrations in these instructions • Illustrations (camera-recorder, menu screens...
... Microphone holder adapter Shoulder belt Lens cap strap Mini DV cassette tape (AY-DVM63MQ) * For part numbers for your own personal enjoyment. Always take some trial shots and check that restrictions apply to copyright laws." Before use . IMPORTANT "Unauthorized recording of copyrighted television programs, video tapes and other than your recordings in these operating instructions differ slightly from the actual camera-recorder. Note concerning illustrations in these instructions • Illustrations (camera-recorder, menu screens...
Dvc Camcorder
Page 8
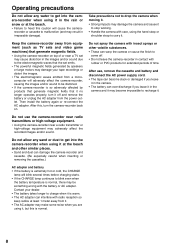
... stop working. • Handle the camera with insect sprays or other similar places. • Sand and dust can damage the camera-recorder and cassette. (Be especially careful when inserting or removing the cassettes.) AC adapter and battery • If the battery is extremely hot or cold, the CHARGE lamp will blink several times before charging starts. • If the CHARGE lamp continues to blink even when the battery...
... stop working. • Handle the camera with insect sprays or other similar places. • Sand and dust can damage the camera-recorder and cassette. (Be especially careful when inserting or removing the cassettes.) AC adapter and battery • If the battery is extremely hot or cold, the CHARGE lamp will blink several times before charging starts. • If the CHARGE lamp continues to blink even when the battery...
Dvc Camcorder
Page 25
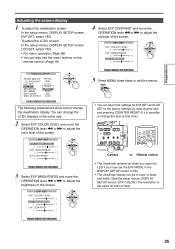
... screen. EVF SET EVF COLOR LEVEL [_] [ + ] EVF BRIGHTNESS [_] [ + ] EVF CONTRAST [_] [ + ] PUSH MENU TO RETURN 4 Select EVF CONTRAST and move the OPERATION lever t or y to adjust the contrast of the screen. OSD START/ DATE/ PHOTO STOP TIME SHOT COUNTER RESET TITLE ZOOM MULTI/ P-IN-P REC A.DUB /REW PLAY FF/ Camera or Remote control • The viewfinder remains on the remote control. (Page 19) DISPLAY SETUP OTHER DISPLAY PARTIAL LCD BACKLIGHT HIGH LCD SET EVF SET ESEVEVFLFFSCMHOOOLDOOERT AYUETSO ON DISPLAY ASPECT AUTO...
... screen. EVF SET EVF COLOR LEVEL [_] [ + ] EVF BRIGHTNESS [_] [ + ] EVF CONTRAST [_] [ + ] PUSH MENU TO RETURN 4 Select EVF CONTRAST and move the OPERATION lever t or y to adjust the contrast of the screen. OSD START/ DATE/ PHOTO STOP TIME SHOT COUNTER RESET TITLE ZOOM MULTI/ P-IN-P REC A.DUB /REW PLAY FF/ Camera or Remote control • The viewfinder remains on the remote control. (Page 19) DISPLAY SETUP OTHER DISPLAY PARTIAL LCD BACKLIGHT HIGH LCD SET EVF SET ESEVEVFLFFSCMHOOOLDOOERT AYUETSO ON DISPLAY ASPECT AUTO...
Dvc Camcorder
Page 36
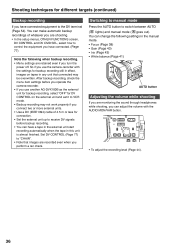
... you operate the camera-recorder. • If you use the camera-recorder with the AUDIO MON/VAR button. • To adjust the recording level (Page 44). 36 You can make automatic backup recordings of 4.5 m or less for connection. • Set the external unit up to the DV terminal (Page 54). Switching to manual mode Press the AUTO button to VCR mode. • Backup recording may be overwritten. So if you use another AG-DVX100B as the external...
... you operate the camera-recorder. • If you use the camera-recorder with the AUDIO MON/VAR button. • To adjust the recording level (Page 44). 36 You can make automatic backup recordings of 4.5 m or less for connection. • Set the external unit up to the DV terminal (Page 54). Switching to manual mode Press the AUTO button to VCR mode. • Backup recording may be overwritten. So if you use another AG-DVX100B as the external...

Dvc Camcorder
Page 37
... going to do your editing on such a system, use the normal 24P method for best results. • There may be extended over different frames which can change the progressive mode in the setup menu, SCENE FILE screen, PROGRESSIVE (Page 70). 30P mode: Shoot 30 frames a second in the progressive mode. For output and recording, the 30-frame-persecond signal is three seconds...
... going to do your editing on such a system, use the normal 24P method for best results. • There may be extended over different frames which can change the progressive mode in the setup menu, SCENE FILE screen, PROGRESSIVE (Page 70). 30P mode: Shoot 30 frames a second in the progressive mode. For output and recording, the 30-frame-persecond signal is three seconds...

Dvc Camcorder
Page 44
... camera. Switching Audio Input You can change the input level to -60 dBu in the setup menus, RECORDING SETUP screen MIC GAIN 1 and MIC GAIN 2 (Page 74). MIC: (another microphone and audio equipment 1 Connect an external microphone or audio equipment to the INPUT 1/2 (XLR 3-pin) terminal. (Page 59) 2 Use the INPUT 1/2 switch to switch the audio input. Adjust the record level of audio signal using this knob, regardless of the settings of MIC ALC items in microphone Rch is recorded to audio channel 1. Using another microphone is connected) Input level is not connected...
... camera. Switching Audio Input You can change the input level to -60 dBu in the setup menus, RECORDING SETUP screen MIC GAIN 1 and MIC GAIN 2 (Page 74). MIC: (another microphone and audio equipment 1 Connect an external microphone or audio equipment to the INPUT 1/2 (XLR 3-pin) terminal. (Page 59) 2 Use the INPUT 1/2 switch to switch the audio input. Adjust the record level of audio signal using this knob, regardless of the settings of MIC ALC items in microphone Rch is recorded to audio channel 1. Using another microphone is connected) Input level is not connected...

Dvc Camcorder
Page 46
... menu mode is released, the operation is switched to the VCR mode or when the power is displayed, so set Space, A to Z, 0 to 9 NAME EDIT SW POSITION F1 10 The following screen appears, so move it y) then move the OPERATION lever e to select YES, then press the OPERATION lever (h). GAMMA KNEE MATRIX SKIN TONE DTL V DETAIL FREQ PROGRESSIVE NAME EDIT SAVE/INIT NORMAL AUTO...
... menu mode is released, the operation is switched to the VCR mode or when the power is displayed, so set Space, A to Z, 0 to 9 NAME EDIT SW POSITION F1 10 The following screen appears, so move it y) then move the OPERATION lever e to select YES, then press the OPERATION lever (h). GAMMA KNEE MATRIX SKIN TONE DTL V DETAIL FREQ PROGRESSIVE NAME EDIT SAVE/INIT NORMAL AUTO...
Dvc Camcorder
Page 47
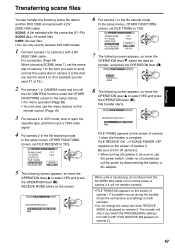
... scene files USER: All user files. • You can only transfer between DVX100B models. 1 Connect camera 1 to F2.) 2 Put camera 1 in the file transfer mode. OTHER FUNCTIONS POWER SAVE H.P MODE USER FILE FILE TRANS FILE RECEIVE HOUR METER OFF TAPE - - - - Check the connections and settings on both cameras. • Do not change the scene dial when RECEIVE MODE is transferring, do not disconnect the DV (IEEE1394) cable or turn off the DV CONTROL function under the OTHER FUNCTIONS screen in VCR mode, stop if you switch the PROGRESSIVE settings from...
... scene files USER: All user files. • You can only transfer between DVX100B models. 1 Connect camera 1 to F2.) 2 Put camera 1 in the file transfer mode. OTHER FUNCTIONS POWER SAVE H.P MODE USER FILE FILE TRANS FILE RECEIVE HOUR METER OFF TAPE - - - - Check the connections and settings on both cameras. • Do not change the scene dial when RECEIVE MODE is transferring, do not disconnect the DV (IEEE1394) cable or turn off the DV CONTROL function under the OTHER FUNCTIONS screen in VCR mode, stop if you switch the PROGRESSIVE settings from...

Dvc Camcorder
Page 60
...'s instruction manual carefully. 1 Connect the digital video equipment to this unit, press the two VCR REC buttons at the same time. If you are using this unit, move the operation lever [g]. • When dubbing through digital input, audio is recorded in the same mode as the playback source irrespective of digital signals by using a DV (IEEE1394) cable to connect this unit to a digital video unit equipped with a high image quality by means of the settings...
...'s instruction manual carefully. 1 Connect the digital video equipment to this unit, press the two VCR REC buttons at the same time. If you are using this unit, move the operation lever [g]. • When dubbing through digital input, audio is recorded in the same mode as the playback source irrespective of digital signals by using a DV (IEEE1394) cable to connect this unit to a digital video unit equipped with a high image quality by means of the settings...
Dvc Camcorder
Page 61
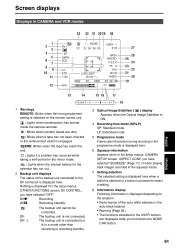
... backup unit is displayed depending on the remote control unit. : Lights when condensation has formed inside the camera-recorder. : Blinks when cylinder heads are displayed while you hold down the MODE CHK button. Screen displays Displays in the squeeze mode. 7 Setting selection The selected setting is displayed here when a switch is selected or a button is pressed to select a setting. 8 Information display Following information is not connected. PAUSE TC 12 : 34 : 56 : 00 USER - 1 Z 78 SP...
... backup unit is displayed depending on the remote control unit. : Lights when condensation has formed inside the camera-recorder. : Blinks when cylinder heads are displayed while you hold down the MODE CHK button. Screen displays Displays in the squeeze mode. 7 Setting selection The selected setting is displayed here when a switch is selected or a button is pressed to select a setting. 8 Information display Following information is not connected. PAUSE TC 12 : 34 : 56 : 00 USER - 1 Z 78 SP...

Dvc Camcorder
Page 62
... : Auto iris control for backlight compensation 11 Shutter speed The shutter speed is not displayed while being used, a display other than may not be different. 62 It is also not displayed during intermittent recording or slow playback. 17 Remaining battery charge As the remaining battery charge drops, the display changes as 0% to 99%. When the ZEBRA button is pressed to display the level meter showing the volume level of the sound that is output from the internal...
... : Auto iris control for backlight compensation 11 Shutter speed The shutter speed is not displayed while being used, a display other than may not be different. 62 It is also not displayed during intermittent recording or slow playback. 17 Remaining battery charge As the remaining battery charge drops, the display changes as 0% to 99%. When the ZEBRA button is pressed to display the level meter showing the volume level of the sound that is output from the internal...

Dvc Camcorder
Page 65
... x 9 Shutter speed display 3 3 3 x 10 Microphone level auto-control display 3 3 x x 11 Audio-sampling frequency display 3 3 x (camera) 3 (VCR) x 13 Audio level meter display 3 - - - 14 Recommended ND filter display 3 3 3 x 15 Remaining tape display 3 - - - 16 Remaining battery display 3 - - - 18 Date and time display 20 ND filter display 21 Gain display 22 IRIS display 23 AWB information display 25 Focus control display 26 Optical Image Stabilizer display 27 Zoom position display 28 Scene file name display 30 Counter display 33 AUTO button operation display...
... x 9 Shutter speed display 3 3 3 x 10 Microphone level auto-control display 3 3 x x 11 Audio-sampling frequency display 3 3 x (camera) 3 (VCR) x 13 Audio level meter display 3 - - - 14 Recommended ND filter display 3 3 3 x 15 Remaining tape display 3 - - - 16 Remaining battery display 3 - - - 18 Date and time display 20 ND filter display 21 Gain display 22 IRIS display 23 AWB information display 25 Focus control display 26 Optical Image Stabilizer display 27 Zoom position display 28 Scene file name display 30 Counter display 33 AUTO button operation display...
Dvc Camcorder
Page 74
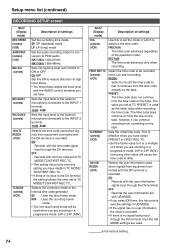
... input level of the external microphone connected to the INPUT 1 terminal. -50dB -60dB Sets the input level of settings Use this ON to the INPUT 2 terminal. -50dB -60dB Selects the time code used when signals from the time code on the tape. NDF : Uses the non-drop frame mode. • The non-drop frame mode will cause the time code to advance the time code. Setup menu list (continued) RECORDING SETUP screen Item/ (Display mode) REC SPEED (camera) (VCR) AUDIO REC (camera) (VCR) MIC ALC (camera) MIC GAIN 1 (camera) MIC GAIN 2 (camera) 1394 TC REGEN (VCR) TC MODE (camera...
... input level of the external microphone connected to the INPUT 1 terminal. -50dB -60dB Sets the input level of settings Use this ON to the INPUT 2 terminal. -50dB -60dB Selects the time code used when signals from the time code on the tape. NDF : Uses the non-drop frame mode. • The non-drop frame mode will cause the time code to advance the time code. Setup menu list (continued) RECORDING SETUP screen Item/ (Display mode) REC SPEED (camera) (VCR) AUDIO REC (camera) (VCR) MIC ALC (camera) MIC GAIN 1 (camera) MIC GAIN 2 (camera) 1394 TC REGEN (VCR) TC MODE (camera...

Dvc Camcorder
Page 77
... a problem has occurred in the camera-recorder Ten beeps • when it is also recorded on the screen. Menus 77 OTHER FUNCTIONS screen Item/ (Display mode) REMOTE (camera) (VCR) DV CONTROL (camera) DV CMD SEL (camera) END SEARCH (camera) (VCR) Description of settings Sets the operations of the supplied remote control unit. (For settings on the remote control (Page 20) VCR1: Accepts commands from a remote control set in the recording stand-by mode automatically starts to record the images. Note that the video camera...
... a problem has occurred in the camera-recorder Ten beeps • when it is also recorded on the screen. Menus 77 OTHER FUNCTIONS screen Item/ (Display mode) REMOTE (camera) (VCR) DV CONTROL (camera) DV CMD SEL (camera) END SEARCH (camera) (VCR) Description of settings Sets the operations of the supplied remote control unit. (For settings on the remote control (Page 20) VCR1: Accepts commands from a remote control set in the recording stand-by mode automatically starts to record the images. Note that the video camera...

Dvc Camcorder
Page 78
... the power. *The camera recorder does not go into power save mode if you are shooting in FILE TRANS mode, only the menu operation buttons will function. LIVE: Current input is output. When in 1-hour increments) of the cylinder head. Setup menu list (continued) OTHER FUNCTIONS screen Item/ (Display mode) POWER SAVE (camera) HP MODE (camera) USER FILE (camera) (VCR) Description of settings Make settings for scene file transfer. (Page 47) SCENE: Transfer the scene file currently selected with the SCENE dial. INITIAL: The user file settings are the factory settings. Use this mode...
... the power. *The camera recorder does not go into power save mode if you are shooting in FILE TRANS mode, only the menu operation buttons will function. LIVE: Current input is output. When in 1-hour increments) of the cylinder head. Setup menu list (continued) OTHER FUNCTIONS screen Item/ (Display mode) POWER SAVE (camera) HP MODE (camera) USER FILE (camera) (VCR) Description of settings Make settings for scene file transfer. (Page 47) SCENE: Transfer the scene file currently selected with the SCENE dial. INITIAL: The user file settings are the factory settings. Use this mode...

Dvc Camcorder
Page 81
... sound in the RECORDING SETUP screen, you perform audio dubbing on a tape that was recorded with new one. • Make sure the remote control setting is closed immediately after sliding EJECT switch to open the cassette holder, check that 32K (12bit) is operated close the cassette holder. • The button battery in the remote control may have selected "MIX" as the AUDIO REC setting in the VCR mode or when the POWER switch is OFF. The remote control does not work...
... sound in the RECORDING SETUP screen, you perform audio dubbing on a tape that was recorded with new one. • Make sure the remote control setting is closed immediately after sliding EJECT switch to open the cassette holder, check that 32K (12bit) is operated close the cassette holder. • The button battery in the remote control may have selected "MIX" as the AUDIO REC setting in the VCR mode or when the POWER switch is OFF. The remote control does not work...


