
User's Manual
Page 1
... Precautions...3 Eye Safety Warnings 5 Introduction 6 Package Overview 6 Product Overview 7 Main Unit...7 Control Panel ...8 Input / Output Connections 9 Remote Control...10 Installation 11 Connecting the Projector 11 Connect to Computer/Notebook 11 Connect to Video Sources 12 Powering On/Off the Projector 13 ...34 Appendices 38 Troubleshooting 38 Image Problems 38 Other Problems 39 Projector Status Indication 40 Remote Control Problems 41 Replacing the Lamp 42 Compatibility Modes 44 Ceiling Mount Installation 46 Optoma Global Offices 47 Regulation & Safety notices 49 1
... Precautions...3 Eye Safety Warnings 5 Introduction 6 Package Overview 6 Product Overview 7 Main Unit...7 Control Panel ...8 Input / Output Connections 9 Remote Control...10 Installation 11 Connecting the Projector 11 Connect to Computer/Notebook 11 Connect to Video Sources 12 Powering On/Off the Projector 13 ...34 Appendices 38 Troubleshooting 38 Image Problems 38 Other Problems 39 Projector Status Indication 40 Remote Control Problems 41 Replacing the Lamp 42 Compatibility Modes 44 Ceiling Mount Installation 46 Optoma Global Offices 47 Regulation & Safety notices 49 1
User's Manual
Page 6
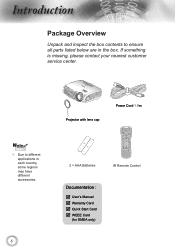
POWER SOURCE Noottee Due to ensure all parts listed below are in each country, some regions may have different accessories. 6 Projector with lens cap Power Cord 1.8m Lamp 2 × AAA Batteries IR Remote Control Documentation : User's Manual Warranty Card Quick Start Card WEEE Card (for EMEA only) If something is missing, please contact your nearest customer service center. ntroduction Package Overview Unpack and inspect the box contents to different applications in the box.
POWER SOURCE Noottee Due to ensure all parts listed below are in each country, some regions may have different accessories. 6 Projector with lens cap Power Cord 1.8m Lamp 2 × AAA Batteries IR Remote Control Documentation : User's Manual Warranty Card Quick Start Card WEEE Card (for EMEA only) If something is missing, please contact your nearest customer service center. ntroduction Package Overview Unpack and inspect the box contents to different applications in the box.
User's Manual
Page 10
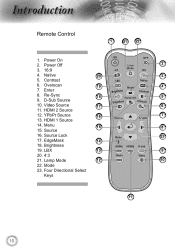
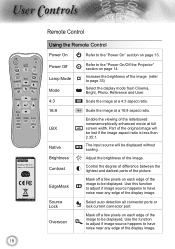
D-Sub Source 10. Menu 15 8 15. LBX 13 9 20. 4:3 21. Four Directional Select Keys 11 10 Power Off Lamp 2 3. 16:9 4. Native 20 3 5. Overscan 19 4 7. Video Source 17 6 11. YPbPr Source 16 7 13. Brightness 19. Lamp Mode 12 10 22. Enter 8. Source 16. Source Lock 23 17. Mode 23. HDMI 2 Source 12. HDMI 1 Source 14. Contrast 6. EdgeMask 14 18. Re-Sync 18 5 9. Power On 2. ntroduction Remote Control 1 21 22 1.
D-Sub Source 10. Menu 15 8 15. LBX 13 9 20. 4:3 21. Four Directional Select Keys 11 10 Power Off Lamp 2 3. 16:9 4. Native 20 3 5. Overscan 19 4 7. Video Source 17 6 11. YPbPr Source 16 7 13. Brightness 19. Lamp Mode 12 10 22. Enter 8. Source 16. Source Lock 23 17. Mode 23. HDMI 2 Source 12. HDMI 1 Source 14. Contrast 6. EdgeMask 14 18. Re-Sync 18 5 9. Power On 2. ntroduction Remote Control 1 21 22 1.
User's Manual
Page 13
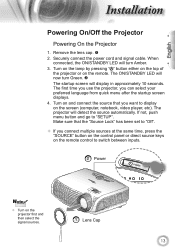
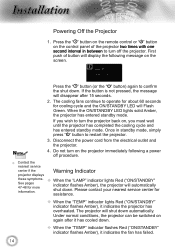
Make sure that you want to display on the remote control to "SETUP". The ON/STANDBY LED will now turn Amber. 3. If not, push menu button and go to switch between inputs. When connected, the ...; If you can select your preferred language from quick menu after the startup screen displays. 4. SOURCE 2 Power POWER POWER SOURCE Noottee Turn on the remote. Securely connect the power cord and signal cable. English nstallation Powering On/Off the Projector Powering On the Projector 1.
Make sure that you want to display on the remote control to "SETUP". The ON/STANDBY LED will now turn Amber. 3. If not, push menu button and go to switch between inputs. When connected, the ...; If you can select your preferred language from quick menu after the startup screen displays. 4. SOURCE 2 Power POWER POWER SOURCE Noottee Turn on the remote. Securely connect the power cord and signal cable. English nstallation Powering On/Off the Projector Powering On the Projector 1.
User's Manual
Page 14
.... Under normal conditions, the projector can be switched on the screen. The projector will disappear after it has cooled down . Press the " " button on the remote control or " " button on , you must wait until the projector has completed the cooling cycle and has entered standby mode. First push of the projector...
.... Under normal conditions, the projector can be switched on the screen. The projector will disappear after it has cooled down . Press the " " button on the remote control or " " button on , you must wait until the projector has completed the cooling cycle and has entered standby mode. First push of the projector...
User's Manual
Page 17
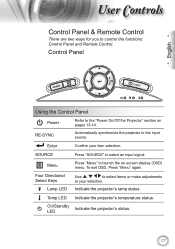
... input source. Indicate the projector's lamp status. Control Panel English SOURCE POWER Using the Control Panel Power Refer to control the functions: Control Panel and Remote Control. ser ontrols Control Panel & Remote Control There are two ways for you to the "Power On/Off the Projector" section on -screen display (OSD) menu.
... input source. Indicate the projector's lamp status. Control Panel English SOURCE POWER Using the Control Panel Power Refer to control the functions: Control Panel and Remote Control. ser ontrols Control Panel & Remote Control There are two ways for you to the "Power On/Off the Projector" section on -screen display (OSD) menu.
User's Manual
Page 18
... noise near any edge of the original image will be lost if the image aspect ratio is less than 2.35:1. ser ontrols Lamp 18 Remote Control Using the Remote Control Power On Refer to the "Power On" section on page 14. Source Lock Overscan Select auto detection all connector ports or lock...
... noise near any edge of the original image will be lost if the image aspect ratio is less than 2.35:1. ser ontrols Lamp 18 Remote Control Using the Remote Control Power On Refer to the "Power On" section on page 14. Source Lock Overscan Select auto detection all connector ports or lock...

User's Manual
Page 19
... the input source. Four Directional Select Keys Use to select items or make adjustments to choose source from VGA/SCART/YPbPr connector. English ser ontrols Remote Control Using the Remote Control Enter Confirm your selection. 19 Press "D-Sub" to your item selection.
... the input source. Four Directional Select Keys Use to select items or make adjustments to choose source from VGA/SCART/YPbPr connector. English ser ontrols Remote Control Using the Remote Control Enter Confirm your selection. 19 Press "D-Sub" to your item selection.

User's Manual
Page 20
... ontrols On-screen Display Menus The Projector has multilingual On-screen Display menus that allow you to enter sub menu. 3. While making a selection on the Remote Control or Projector Keypad. 2 When OSD is displayed, use keys to the main menu. 6. Use using keys to select the desired item and adjust the...
... ontrols On-screen Display Menus The Projector has multilingual On-screen Display menus that allow you to enter sub menu. 3. While making a selection on the Remote Control or Projector Keypad. 2 When OSD is displayed, use keys to the main menu. 6. Use using keys to select the desired item and adjust the...
User's Manual
Page 39
... and may make a loud popping sound. English ppendices Image is reversed Select "SYSTEM Projection" from the screen. Press "Menu" button on the remote control or projector panel, go to "Display Format" and try the different settings. Image is too small or too large Adjust the Zoom...
... and may make a loud popping sound. English ppendices Image is reversed Select "SYSTEM Projection" from the screen. Press "Menu" button on the remote control or projector panel, go to "Display Format" and try the different settings. Image is too small or too large Adjust the Zoom...

User's Manual
Page 41
... does not work Check the operating angle of the remote control is approaching the end of the IR receivers on the projector. Make sure there are exhausted. 41 Move to within ±15° ...: Lamp is within 8 m of the projector. Make sure the batteries are inserted correctly. Replace batteries if they are not any obstructions between the remote control and the projector.
... does not work Check the operating angle of the remote control is approaching the end of the IR receivers on the projector. Make sure there are exhausted. 41 Move to within ±15° ...: Lamp is within 8 m of the projector. Make sure the batteries are inserted correctly. Replace batteries if they are not any obstructions between the remote control and the projector.

Datasheet
Page 1
... HD Experience The Optoma HD180 brings a new level of 6.4 lbs, the Optoma HD180 is perfect for sharing big-...to 301.1" (0.95 to 7.64m) Aspect Ratio 16:9 Native, 4:3 and LBX Compatible Displayable Colors 1.07 Billion Remote Control Backlit Remote Control Offset 116% User Controls Complete On-Screen Menu Adjustments in 21 Languages Computer Compatibility HD, UXGA, WXGA,...STD), NO FILTER REQUIRED Specifications Display Technology Single 0.65" 1080p DMD DLP Technology by connecting the HD180 to 300" screen size for connecting to any home entertainment device with 3500:1 contrast ratio ...
... HD Experience The Optoma HD180 brings a new level of 6.4 lbs, the Optoma HD180 is perfect for sharing big-...to 301.1" (0.95 to 7.64m) Aspect Ratio 16:9 Native, 4:3 and LBX Compatible Displayable Colors 1.07 Billion Remote Control Backlit Remote Control Offset 116% User Controls Complete On-Screen Menu Adjustments in 21 Languages Computer Compatibility HD, UXGA, WXGA,...STD), NO FILTER REQUIRED Specifications Display Technology Single 0.65" 1080p DMD DLP Technology by connecting the HD180 to 300" screen size for connecting to any home entertainment device with 3500:1 contrast ratio ...


