
Owner Manual
Page 1
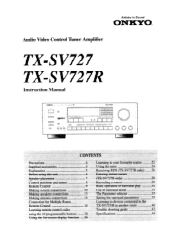
... 4 Explanation 5 Before using this unit 6 Speaker placement 7 Control positions and names 8 Remote Control 9 Making system connections 10 Making speakers connections 13 Making antenna connections 14 Connection for Multiple Room Remote Control 16 Learning remote control codes using the 10 programmable buttons 18 Using the On-screen display... surround parameters 35 Listening to devices connected to the TX-SV727/R in Sound ONKYO Audio Video Control Tuner Amplifier TX-SV727 TX-SV727R Instruction Manual OPJECYCO . ..0 • WA., k+ RI DV CO' CORO'S IIR...
... 4 Explanation 5 Before using this unit 6 Speaker placement 7 Control positions and names 8 Remote Control 9 Making system connections 10 Making speakers connections 13 Making antenna connections 14 Connection for Multiple Room Remote Control 16 Learning remote control codes using the 10 programmable buttons 18 Using the On-screen display... surround parameters 35 Listening to devices connected to the TX-SV727/R in Sound ONKYO Audio Video Control Tuner Amplifier TX-SV727 TX-SV727R Instruction Manual OPJECYCO . ..0 • WA., k+ RI DV CO' CORO'S IIR...
Owner Manual
Page 2
...Onkyo service center has details.) ■ On-screen Displays Easy-to-follow on , the user is connected. • Consult the dealer or an experienced radio/TV technician for help the TX-SV727/R excel at driv- ors make adjusting the surround sound parameters simple. ■ Programmable Universal RI Remote Control... The programmable universal remote gives you command of the building, as close to ...
...Onkyo service center has details.) ■ On-screen Displays Easy-to-follow on , the user is connected. • Consult the dealer or an experienced radio/TV technician for help the TX-SV727/R excel at driv- ors make adjusting the surround sound parameters simple. ■ Programmable Universal RI Remote Control... The programmable universal remote gives you command of the building, as close to ...
Owner Manual
Page 4
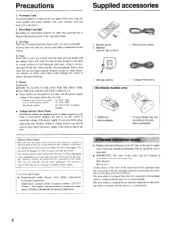
... Card The serial number is marked with the letter L or coloured red. 4 Copy the serial number and model number onto your Onkyo authorized service station. 4. Recording Copyright Recording of copyrighted material for use is illegal without a voltage selector can only be connected to the...of an AC plug on , contact your warranty card and keep it out dry, and wipe off the dirt. Supplied accessories 1 Remote control 2 Batteries (size AA, R6, or UM-3) 1 Remote control cable 1 AM loop antenna 1 T-shaped FM antenna (Worldwide models only) 1 75/300 ohm antenna adaptor O 0 1 CV plug...
... Card The serial number is marked with the letter L or coloured red. 4 Copy the serial number and model number onto your Onkyo authorized service station. 4. Recording Copyright Recording of copyrighted material for use is illegal without a voltage selector can only be connected to the...of an AC plug on , contact your warranty card and keep it out dry, and wipe off the dirt. Supplied accessories 1 Remote control 2 Batteries (size AA, R6, or UM-3) 1 Remote control cable 1 AM loop antenna 1 T-shaped FM antenna (Worldwide models only) 1 75/300 ohm antenna adaptor O 0 1 CV plug...

Owner Manual
Page 5
... 282-00 is the ITRK terminal. The green terminal on the TX-SV727 is being used for optimum sound quality in your nearest Onkyo Service Center with var- The ONKYO HR-10 Remote sensor greatly increases system flexibility. Used with any questions. I 0 (Remote Emitter head) to control more than U.S.A., and Canadian models The following concerns Xantech Corporation...
... 282-00 is the ITRK terminal. The green terminal on the TX-SV727 is being used for optimum sound quality in your nearest Onkyo Service Center with var- The ONKYO HR-10 Remote sensor greatly increases system flexibility. Used with any questions. I 0 (Remote Emitter head) to control more than U.S.A., and Canadian models The following concerns Xantech Corporation...

Owner Manual
Page 6
...or UM-3 Warning • Do not leave an expired battery in the case - driver into the remote control according to the illustration. Please set this unit's remote control may leak or damage the remote control. • Do not use nickel cadmium (rechargeable) batteries. • Replace both batteries at once;... If the preset voltage is placed behind such a door, this may prevent proper remote control operation. • Using other remote controls in your area: 220V or 120V. 2. Slide the switch all the way to the right (120V) or to match the...
...or UM-3 Warning • Do not leave an expired battery in the case - driver into the remote control according to the illustration. Please set this unit's remote control may leak or damage the remote control. • Do not use nickel cadmium (rechargeable) batteries. • Replace both batteries at once;... If the preset voltage is placed behind such a door, this may prevent proper remote control operation. • Using other remote controls in your area: 220V or 120V. 2. Slide the switch all the way to the right (120V) or to match the...

Owner Manual
Page 8
... panel 0 © ® © 0000 CD 0 00 0 ONICY0 AUDIO DEO CONTROL TUN. Tape-2 monitor indicator 1*- FM stereo indicator Audio muting indicator I 7; amPuF ER ...indicators (g) Speaker selector indicators 3D FM muting on/off indicators (,t; Control positions and names For more information about buttons or controls, turn to the page number listed in the brackets after each item.... Tuned indicator I ,6; Memory indicator 8 Sleep indicator ® Selective tone control indicator 1-9; ,,It function display Frequency / input selector / character / Preset station / sleep...
... panel 0 © ® © 0000 CD 0 00 0 ONICY0 AUDIO DEO CONTROL TUN. Tape-2 monitor indicator 1*- FM stereo indicator Audio muting indicator I 7; amPuF ER ...indicators (g) Speaker selector indicators 3D FM muting on/off indicators (,t; Control positions and names For more information about buttons or controls, turn to the page number listed in the brackets after each item.... Tuned indicator I ,6; Memory indicator 8 Sleep indicator ® Selective tone control indicator 1-9; ,,It function display Frequency / input selector / character / Preset station / sleep...
Owner Manual
Page 9
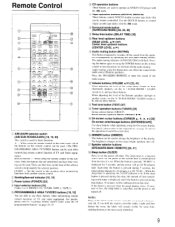
...the timer setting changes by operating this position when memorizing functions from that can be remote controlled. Press the SPEAKERS REMOTE to 4, PHONO. i PPEASET 0 14 13 8 DELA TER OLLIME ING 1 9 ONKYO REMOTE CONTROL eBBM 10 A/B/LEARN selector switch (A/B-SUB ROOM/LEARN) [18, 19, 40] ...the RI mark. (±2)i capc a.pci cativi uuttunS i rinnv A r.,•-• These buttons control ONKYO double cassette tape decks that time. If you hold the remote controller under a light and then darken the room, the labels will remain visible for 5 seconds, and...
...the timer setting changes by operating this position when memorizing functions from that can be remote controlled. Press the SPEAKERS REMOTE to 4, PHONO. i PPEASET 0 14 13 8 DELA TER OLLIME ING 1 9 ONKYO REMOTE CONTROL eBBM 10 A/B/LEARN selector switch (A/B-SUB ROOM/LEARN) [18, 19, 40] ...the RI mark. (±2)i capc a.pci cativi uuttunS i rinnv A r.,•-• These buttons control ONKYO double cassette tape decks that time. If you hold the remote controller under a light and then darken the room, the labels will remain visible for 5 seconds, and...

Owner Manual
Page 11
.... For more details, refer to the model and the area where the unit is turned off by the power buttons on the front panel and remote control. With a powerful power amp, you to connect an external power amplifier. The shape, number and total capacity of PRE OUT terminals which allow you can...Su6WOC E PRE OUT Oo Subwoofer amplifer Center speakers 0 Rear power amplifer Subwoofer speakers L LI R ink INPUT n Multi-source power amplifer Rear speakers (Surround) NPUT O Front Remote speakers (another room) Amplifier connections This unit is equipped with this unit alone.
.... For more details, refer to the model and the area where the unit is turned off by the power buttons on the front panel and remote control. With a powerful power amp, you to connect an external power amplifier. The shape, number and total capacity of PRE OUT terminals which allow you can...Su6WOC E PRE OUT Oo Subwoofer amplifer Center speakers 0 Rear power amplifer Subwoofer speakers L LI R ink INPUT n Multi-source power amplifer Rear speakers (Surround) NPUT O Front Remote speakers (another room) Amplifier connections This unit is equipped with this unit alone.
Owner Manual
Page 12
...switch to VIDEO-1. Connection where IPM will be used to the green or gray jack with the RI mark. TX-SV727/R RI REMOTE CONTROL COMPACT DISC PLAYER RI REMOTE CONTROL O=I I . The IPM system then automatically switches the unit off when the TV is included with a video ... If this interference occurs, place this unit. VIDEO-1 VDP is displayed on , this unit MONITOR OUT jack. Therefore, it to control ONKYO turntables. • An RI remote control cable equipped with a 1/8" (3.5 mm) miniature 2 conductor phone plug is switched off (provided that have an RF converter. NOTES...
...switch to VIDEO-1. Connection where IPM will be used to the green or gray jack with the RI mark. TX-SV727/R RI REMOTE CONTROL COMPACT DISC PLAYER RI REMOTE CONTROL O=I I . The IPM system then automatically switches the unit off when the TV is included with a video ... If this interference occurs, place this unit. VIDEO-1 VDP is displayed on , this unit MONITOR OUT jack. Therefore, it to control ONKYO turntables. • An RI remote control cable equipped with a 1/8" (3.5 mm) miniature 2 conductor phone plug is switched off (provided that have an RF converter. NOTES...
Owner Manual
Page 16
... below . Connecting block 789-40 Remote sensor 480B-00 Remote control 00000 00000 X-SV/2 CASSETTE TAPE DECK Power supply 781C-00 COMPACT DISC I PLAYER coseo In order to use the TX-SV727 to control a CD player and cassette deck, neither displaying ONKYO's R I . • Insert...Onkyo Service Center for Multiple Room Remote Control 1. MAIN Loud sperker se Emitter 282-00 Connecting block 789-40 • O Power supply 7$2-00 Remote sensor 780-10 or 480B-00 MAIN Loud sperker set REMOTE REMOTE Loud sperker set Loud sperker set Remote control Emitter 282-00/ Main room TX-SV727...
... below . Connecting block 789-40 Remote sensor 480B-00 Remote control 00000 00000 X-SV/2 CASSETTE TAPE DECK Power supply 781C-00 COMPACT DISC I PLAYER coseo In order to use the TX-SV727 to control a CD player and cassette deck, neither displaying ONKYO's R I . • Insert...Onkyo Service Center for Multiple Room Remote Control 1. MAIN Loud sperker se Emitter 282-00 Connecting block 789-40 • O Power supply 7$2-00 Remote sensor 780-10 or 480B-00 MAIN Loud sperker set REMOTE REMOTE Loud sperker set Loud sperker set Remote control Emitter 282-00/ Main room TX-SV727...
Owner Manual
Page 17
... but do not have the RI mark, mount an HE50(AC) inside the cabinet so that signals from it to control this unit. Remote control aunts snort HR-10 HE-50 (AC) EX-SV727 R CASSETTE TAPE DECK COMPACT DISC PLAYER connection example using an HE-50(AC), the HE-50(AC) or HE-10... impedance cables. If all the components can not be controlled by the HE-50 (AC) alone because they can be connected to this unit. 17 Refer to the other than U. ONKYO MULT ROOM system (Models other components (see page 11). MAIN Loudspeaker set O TX-SV727/R Main room Rear panel of this unit can be...
... but do not have the RI mark, mount an HE50(AC) inside the cabinet so that signals from it to control this unit. Remote control aunts snort HR-10 HE-50 (AC) EX-SV727 R CASSETTE TAPE DECK COMPACT DISC PLAYER connection example using an HE-50(AC), the HE-50(AC) or HE-10... impedance cables. If all the components can not be controlled by the HE-50 (AC) alone because they can be connected to this unit. 17 Refer to the other than U. ONKYO MULT ROOM system (Models other components (see page 11). MAIN Loudspeaker set O TX-SV727/R Main room Rear panel of this unit can be...
Owner Manual
Page 18
...codes being learnt are unstable and cannot be reprogrammed to the buttons with the RI ONKYO mark are using a product made or when battery power is because this remote control requires highly stable transmission output for identifying codes. To ensure the reception of its...Display indicator (SENDING/LEARNED) This indicator acts as the other remote controls. commands. Replace the batteries of that this remote control. If you can be memorized properly. If the memorized codes are using an ONKYO compact disc player. The programmable buttons The Programmable section consists ...
...codes being learnt are unstable and cannot be reprogrammed to the buttons with the RI ONKYO mark are using a product made or when battery power is because this remote control requires highly stable transmission output for identifying codes. To ensure the reception of its...Display indicator (SENDING/LEARNED) This indicator acts as the other remote controls. commands. Replace the batteries of that this remote control. If you can be memorized properly. If the memorized codes are using an ONKYO compact disc player. The programmable buttons The Programmable section consists ...

Owner Manual
Page 19
... SL[-FP Mr"'MOTE DIMMER Switch to change codes, with the code changing each function individually, one function to memorize on your existing remote control. Light RC 288M 5 to 10 cm (2 to 4 inch) The button you wish to learn " operations for which the system ...indicator is not illuminated when a programmed button is lighted, until the SENDING/LEARNED indicator turns off . 5. tions of this remote control button. • This remote control uses infrared rays. Press the button in the programmable area will not light up. • Please check whether previously memorized...
... SL[-FP Mr"'MOTE DIMMER Switch to change codes, with the code changing each function individually, one function to memorize on your existing remote control. Light RC 288M 5 to 10 cm (2 to 4 inch) The button you wish to learn " operations for which the system ...indicator is not illuminated when a programmed button is lighted, until the SENDING/LEARNED indicator turns off . 5. tions of this remote control button. • This remote control uses infrared rays. Press the button in the programmable area will not light up. • Please check whether previously memorized...
Owner Manual
Page 20
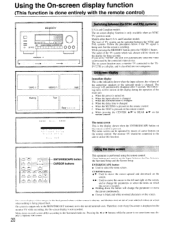
... on the screen. When the power is pressed. b. d. The menu screen This is the display shown when the ENTER/ESCAPE button on the remote control is turned on the monitor TV while recording, the On-screen display is output only to the MONITOR OUT terminal, not to move the cursor... or ► buttons while the cursor is pressed on some items may dis- a. When the delay time is changed . When the TEST is on the remote control. g. CURSOR buttons A •: Used to the record terminal (out). play a separate sub-screen 20 The message will change the parameters or select the ...
... on the screen. When the power is pressed. b. d. The menu screen This is the display shown when the ENTER/ESCAPE button on the remote control is turned on the monitor TV while recording, the On-screen display is output only to the MONITOR OUT terminal, not to move the cursor... or ► buttons while the cursor is pressed on some items may dis- a. When the delay time is changed . When the TEST is on the remote control. g. CURSOR buttons A •: Used to the record terminal (out). play a separate sub-screen 20 The message will change the parameters or select the ...

Owner Manual
Page 22
... can change the input source of the sound. TAPE-2 moni Indicates TAPE-2 MONITOR ON/OFF. Listening to turn on the display. VOLUME POWER Remote control POWER SPEAKERS MAIN REMOTE MAIN Remote control MAIN Remote control .E0 I VIDEO TEO H I APE I TAPE[ TUNER CO VIDEO a I PHONO * * * * 51 p n **** Kcr S p ,• c t ur Su r r p a nd Sr t u p ticrppE S t up . 3. Press the POWER button...
... can change the input source of the sound. TAPE-2 moni Indicates TAPE-2 MONITOR ON/OFF. Listening to turn on the display. VOLUME POWER Remote control POWER SPEAKERS MAIN REMOTE MAIN Remote control MAIN Remote control .E0 I VIDEO TEO H I APE I TAPE[ TUNER CO VIDEO a I PHONO * * * * 51 p n **** Kcr S p ,• c t ur Su r r p a nd Sr t u p ticrppE S t up . 3. Press the POWER button...

Owner Manual
Page 23
... Front, Main, Center, Rear (Surround) speakers. When the speakers are obtained from the remote control. REMOTE button This button turns on , then this knob to the REMOTE terminals. To adjust the volume level while the Surround effects or the multi-source are being... on these speakers when using the MASTER VOLUME knob. 6. Balance control knob (BALANCE) Use the balance control knob to strengthen or weaken treble response. The brightness changes in an outlet. Decrease MAA - EB tAAF Remote control k 1 O BOLJME increase BASS TREBLE BALANCE SELECTIVE TONE 4. Start...
... Front, Main, Center, Rear (Surround) speakers. When the speakers are obtained from the remote control. REMOTE button This button turns on , then this knob to the REMOTE terminals. To adjust the volume level while the Surround effects or the multi-source are being... on these speakers when using the MASTER VOLUME knob. 6. Balance control knob (BALANCE) Use the balance control knob to strengthen or weaken treble response. The brightness changes in an outlet. Decrease MAA - EB tAAF Remote control k 1 O BOLJME increase BASS TREBLE BALANCE SELECTIVE TONE 4. Start...

Owner Manual
Page 25
GROUP SCAN (TX-®R) PRESET SCAN (TX-8V727) Remote control TUNER GROUP PRESET LI ** Tnput Se I t• ctnr ** Pi c ture V I it c t * * P i c t ure VIDEO -1 Sound = TLNER TAPE - THEATER • E(., * * i npu , S e I II) E 0 -- 1 Sound TI:NER TAPE 2 M ...Name), the frequency display will be shown on the display changes in each station). b. Each station stored in the class chosen in any group. Remote control 1. Press the GROUP button and choose the group. 2. On screen I . Move the cursor to select the desired group. Group Indicates the current...
GROUP SCAN (TX-®R) PRESET SCAN (TX-8V727) Remote control TUNER GROUP PRESET LI ** Tnput Se I t• ctnr ** Pi c ture V I it c t * * P i c t ure VIDEO -1 Sound = TLNER TAPE - THEATER • E(., * * i npu , S e I II) E 0 -- 1 Sound TI:NER TAPE 2 M ...Name), the frequency display will be shown on the display changes in each station). b. Each station stored in the class chosen in any group. Remote control 1. Press the GROUP button and choose the group. 2. On screen I . Move the cursor to select the desired group. Group Indicates the current...

Owner Manual
Page 29
..., turn the MR off (the MR OFF indicator will be dis- NOTE: • Never change . When recording a tape while the Multiple Room Remote Control is on this source can only he recorded to VIDEO-3. Press the REC OUT button again while the REC OUT indi- When you are available... , only TAPE-2 can be recorded and if the input selector is flashing. • The chosen source will light) to disable remote control operation from the Menu screen. Start the device selected in a red box. (* ) 3. cator is changed, the TAPE2 MONITOR indicator will not change. b. 1 REC OUT...
..., turn the MR off (the MR OFF indicator will be dis- NOTE: • Never change . When recording a tape while the Multiple Room Remote Control is on this source can only he recorded to VIDEO-3. Press the REC OUT button again while the REC OUT indi- When you are available... , only TAPE-2 can be recorded and if the input selector is flashing. • The chosen source will light) to disable remote control operation from the Menu screen. Start the device selected in a red box. (* ) 3. cator is changed, the TAPE2 MONITOR indicator will not change. b. 1 REC OUT...

Owner Manual
Page 32
...I-II I-I I . Only the audio will be changed. 5. ENTER/ESCAPE CURSOR DOLBY PRO LOGIC 1 DSP MODE SURROUND MODE -0 4- Using the remote control, press the SURROUND MODE button to select a value for VCR recording 1. round mode you can press the PARAMETER SELECTOR button again. • The.... • The adjusted parameter is shown in surround: press the BY-PASS button on the main unit Of press the SURROUND MODE button on the remote control to change depending on screen display. Press the Input Selector button (CD, PHONO, FM, AM, TAPE-1, or TAPE-2) that will provide the audio ...
...I-II I-I I . Only the audio will be changed. 5. ENTER/ESCAPE CURSOR DOLBY PRO LOGIC 1 DSP MODE SURROUND MODE -0 4- Using the remote control, press the SURROUND MODE button to select a value for VCR recording 1. round mode you can press the PARAMETER SELECTOR button again. • The.... • The adjusted parameter is shown in surround: press the BY-PASS button on the main unit Of press the SURROUND MODE button on the remote control to change depending on screen display. Press the Input Selector button (CD, PHONO, FM, AM, TAPE-1, or TAPE-2) that will provide the audio ...

Owner Manual
Page 33
... 1 ) • This item is not available when Center Mode is set to the lower items. Pressing the PARAMETER CONTROLLER button in each Surround mode. Surround mode ( Dolby Pro Logic By using the remote control, press the SURROUND MODE button.) Make your personal preference. This mode is suitable for playback of media recorded with...
... 1 ) • This item is not available when Center Mode is set to the lower items. Pressing the PARAMETER CONTROLLER button in each Surround mode. Surround mode ( Dolby Pro Logic By using the remote control, press the SURROUND MODE button.) Make your personal preference. This mode is suitable for playback of media recorded with...


