
Owner Manual
Page 1
... Control Tuner Amplifier TX-SV535 Instruction Manual RI OSP I= 0 O 133:7,±7,1 Co= CI .1t CONTENTS Features 2 important Safeguards 3 Precautions 4 Supplied accessories 4 Before using this unit 5 Explanation 6 Speaker placement. 7 Audio equipment connections 8 Video equipment con4ctions 9 Speaker connections 10 Optional power amplifier connections ....11 Antenna connections 12 Connection for Multiple-Room Remote Control 14 Control...
... Control Tuner Amplifier TX-SV535 Instruction Manual RI OSP I= 0 O 133:7,±7,1 Co= CI .1t CONTENTS Features 2 important Safeguards 3 Precautions 4 Supplied accessories 4 Before using this unit 5 Explanation 6 Speaker placement. 7 Audio equipment connections 8 Video equipment con4ctions 9 Speaker connections 10 Optional power amplifier connections ....11 Antenna connections 12 Connection for Multiple-Room Remote Control 14 Control...

Owner Manual
Page 2
...receiver is encouraged to try to correct the interference by turning the equipment off and on the TX-SV535 and automatically selects Video-1 when you a choice of the Onkyo A/ V Tuner Amplifier. which provides guidelines for your purchase of four ambience-producing DSP surround modes...you to obtain optimum performance and listening enjoyment from your new A/V Tuner Amplifier. your TX-SV535 gives you turn on area where sold. Your authorized Onkyo service center has details.) ■ R I Compatible Remote Control ■ Useful Extras You'll Enjoy • 3 Video and 6 audio Inputs...
...receiver is encouraged to try to correct the interference by turning the equipment off and on the TX-SV535 and automatically selects Video-1 when you a choice of the Onkyo A/ V Tuner Amplifier. which provides guidelines for your purchase of four ambience-producing DSP surround modes...you to obtain optimum performance and listening enjoyment from your new A/V Tuner Amplifier. your TX-SV535 gives you turn on area where sold. Your authorized Onkyo service center has details.) ■ R I Compatible Remote Control ■ Useful Extras You'll Enjoy • 3 Video and 6 audio Inputs...

Owner Manual
Page 4
... and Canada • Manufactured under Canadian number 1,037.877. "Pro Logic''. Copy the serial number and model number onto your Onkyo authorized service station. 1 Remote control 2 Batteries (size AA, R6, or UM-3) 1 Remote control cable 4. AC Fuse The fuse is located inside the chassis and is marked with a clean cloth. Ore memory preset...
... and Canada • Manufactured under Canadian number 1,037.877. "Pro Logic''. Copy the serial number and model number onto your Onkyo authorized service station. 1 Remote control 2 Batteries (size AA, R6, or UM-3) 1 Remote control cable 4. AC Fuse The fuse is located inside the chassis and is marked with a clean cloth. Ore memory preset...
Owner Manual
Page 5
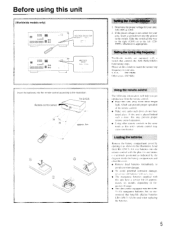
... correct for your area. this may cause interference. Before using this unit have tinted glass. depending on frequency of approximately six months. TX-SV535 Remote control sensor 0 30 approx. 5m 0 rirrr the Voltage selector 1. Please set this unit away from direct bright light, which can ...long-life alkaline batteries LR6 (AM -3) AA be used when replacing the batteries. 5 Load three Rh (UM-3) AA size batteries into the remote control according to avoid corrosion damage. • To avoid potential corrosion damage, nese!' mix old batteries with new ones. • The ...
... correct for your area. this may cause interference. Before using this unit have tinted glass. depending on frequency of approximately six months. TX-SV535 Remote control sensor 0 30 approx. 5m 0 rirrr the Voltage selector 1. Please set this unit away from direct bright light, which can ...long-life alkaline batteries LR6 (AM -3) AA be used when replacing the batteries. 5 Load three Rh (UM-3) AA size batteries into the remote control according to avoid corrosion damage. • To avoid potential corrosion damage, nese!' mix old batteries with new ones. • The ...

Owner Manual
Page 6
...Onkyo: * Remote Emitter: Model No. This mode is equipped with the increased channel separation it gives a tar greater sense of a concert hall can he produced. The atmosphere of "movement- Live Surround Reproduces the feeling of media recorded in the Dolby Surround format. Since the TX-SV535... "Dolby Stereo" sound. Dolby Pro Logic Surround is available in your nearest Onkyo Service Center with a Xantech Multi-Room System. Theater. Secondary Remote Control For Multi-Room Remote System: Model No. The motion picture masters are necessary for creating a theater...
...Onkyo: * Remote Emitter: Model No. This mode is equipped with the increased channel separation it gives a tar greater sense of a concert hall can he produced. The atmosphere of "movement- Live Surround Reproduces the feeling of media recorded in the Dolby Surround format. Since the TX-SV535... "Dolby Stereo" sound. Dolby Pro Logic Surround is available in your nearest Onkyo Service Center with a Xantech Multi-Room System. Theater. Secondary Remote Control For Multi-Room Remote System: Model No. The motion picture masters are necessary for creating a theater...
Owner Manual
Page 8
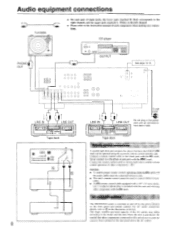
... as shown right side to this unit do not exceed the capacity that other components connected to enable remote control operation of the AC outlets may differ according to control ONKYO turn- Audio equipment connections Turntable O 0 PHONO OUT lHH ZH • On each component when making... any other components. ( ) NOTES: • To enable proper remote control operation, both the R I t=i0Q oo 0 Tape ...
... as shown right side to this unit do not exceed the capacity that other components connected to enable remote control operation of the AC outlets may differ according to control ONKYO turn- Audio equipment connections Turntable O 0 PHONO OUT lHH ZH • On each component when making... any other components. ( ) NOTES: • To enable proper remote control operation, both the R I t=i0Q oo 0 Tape ...

Owner Manual
Page 10
... (4-) and negative (-) speaker wires. NOTE: To prevent damage to pages 14, 15) Front L (A) F ont R (A) ■ Speaker impedance FRONT MAIN: 6 ohms min./speaker CENTER, REAR, FRONT REMOTE: 8 ohms min./speaker 10 NO Connecting the front and rear (surround) speakers Connecting of center speaker and subwoofer If you want to use Surround effects...
... (4-) and negative (-) speaker wires. NOTE: To prevent damage to pages 14, 15) Front L (A) F ont R (A) ■ Speaker impedance FRONT MAIN: 6 ohms min./speaker CENTER, REAR, FRONT REMOTE: 8 ohms min./speaker 10 NO Connecting the front and rear (surround) speakers Connecting of center speaker and subwoofer If you want to use Surround effects...
Owner Manual
Page 11
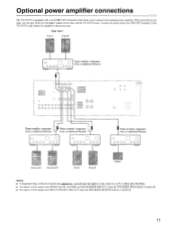
... equipped with the TX-SV535 alone. a a Power amplifier, Integrated Amp. With a powerful power amp, you can play music at even higher volume levels than with a set of PRE OUT terminals which allow you will be output from MULTI SOURCE PRE OUT when the SPEAKERS REMOTE button is turned off. • ...No signals will have the benefit of the TX-SV535, and connect the speakers to connect each external power amplifier. Connect the power amp to the PRE ...
... equipped with the TX-SV535 alone. a a Power amplifier, Integrated Amp. With a powerful power amp, you can play music at even higher volume levels than with a set of PRE OUT terminals which allow you will be output from MULTI SOURCE PRE OUT when the SPEAKERS REMOTE button is turned off. • ...No signals will have the benefit of the TX-SV535, and connect the speakers to connect each external power amplifier. Connect the power amp to the PRE ...
Owner Manual
Page 14
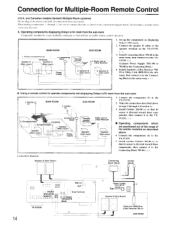
... through 4 of the emitter installed as described above in the main room, then connect it to enable remote control operation. Onkyo components (a) Speaker A (Main room) TX-SV535 Speaker A (Main room) 3. Connecting block - Make the connections described above 4. Install another Emitter 282-...components. Speaker B I (Sub room) \\, 2. Connect the components (b) to the speaker terminal on the TX-SV535. ( 3. Using a remote control to operate components not displaying Onkyo's RI mark from the sub-room Components mounted in a rack should he sure to connect the units ...
... through 4 of the emitter installed as described above in the main room, then connect it to enable remote control operation. Onkyo components (a) Speaker A (Main room) TX-SV535 Speaker A (Main room) 3. Connecting block - Make the connections described above 4. Install another Emitter 282-...components. Speaker B I (Sub room) \\, 2. Connect the components (b) to the speaker terminal on the TX-SV535. ( 3. Using a remote control to operate components not displaying Onkyo's RI mark from the sub-room Components mounted in a rack should he sure to connect the units ...

Owner Manual
Page 15
... (Main room) Speaker (Sub room) Speaker (Sub room) Connection diagram 1. Do not make a mistake when connecting the units. Onkyo components (a) Speaker A (Main room) TX-SV535 Speaker ' (Main room) 'N N \ \'' SUB ROOM Remote \r= control 3. SPEAKERS MAIN T AC adapter 0 . and Canadian models (Onkyo Multi-Room Systems) Do not plug in the sub-room, then connect it to enable...
... (Main room) Speaker (Sub room) Speaker (Sub room) Connection diagram 1. Do not make a mistake when connecting the units. Onkyo components (a) Speaker A (Main room) TX-SV535 Speaker ' (Main room) 'N N \ \'' SUB ROOM Remote \r= control 3. SPEAKERS MAIN T AC adapter 0 . and Canadian models (Onkyo Multi-Room Systems) Do not plug in the sub-room, then connect it to enable...
Owner Manual
Page 16
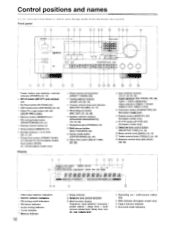
...I, 1,1,i, -, I .; Volume control knob and indicator (MASTER VOLUME) [18, 19] 15, Recording out button (REC OUT) [27, 28, 29] 16', Speaker selector buttons (SPEAKERS MAIN/REMOTE) [18, 19, 30] 17',; IMO i g51ElirE6r:71 I 13 4 I STE, us, I RDS afi! I i t L., TAFF t 7 SLEE , 10 1 Video input selector indicators... button [25, 26] (DOLBY PRO LOGIC) 6 Memory button (MEMORY) [21] 7 FM muting/mode button (FM MUTE/MODE) [20, 21] 8 Remote control sensor [5] 9 Group button (GROUP) [21] 13 Number buttons (1 to the page number listed in the brackets after each item. Dell CON HUL LINEN...
...I, 1,1,i, -, I .; Volume control knob and indicator (MASTER VOLUME) [18, 19] 15, Recording out button (REC OUT) [27, 28, 29] 16', Speaker selector buttons (SPEAKERS MAIN/REMOTE) [18, 19, 30] 17',; IMO i g51ElirE6r:71 I 13 4 I STE, us, I RDS afi! I i t L., TAFF t 7 SLEE , 10 1 Video input selector indicators... button [25, 26] (DOLBY PRO LOGIC) 6 Memory button (MEMORY) [21] 7 FM muting/mode button (FM MUTE/MODE) [20, 21] 8 Remote control sensor [5] 9 Group button (GROUP) [21] 13 Number buttons (1 to the page number listed in the brackets after each item. Dell CON HUL LINEN...
Owner Manual
Page 17
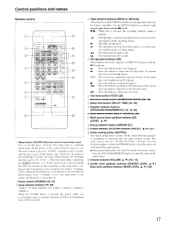
... to play the CD player. 11 : Press this is recalled. MA- : Press this button to operate an ONKYO CD player with the R I A VOL = SURROUND DELAY MODE 1' E ONKYO (RI REMOTE C, ROE RC 29 16. 1 Sleep button (SLEEP) (Remote control transmitter only) Press to mute the sound of AM or FM should he done on will...
... to play the CD player. 11 : Press this is recalled. MA- : Press this button to operate an ONKYO CD player with the R I A VOL = SURROUND DELAY MODE 1' E ONKYO (RI REMOTE C, ROE RC 29 16. 1 Sleep button (SLEEP) (Remote control transmitter only) Press to mute the sound of AM or FM should he done on will...
Owner Manual
Page 18
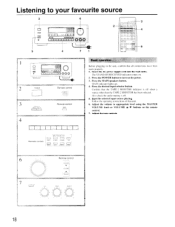
... VOLUME 7 TREBLE . • BALANCE 18 Listening to appropriate level using the MASTER VOLUME knob or VOLUME A/V buttons on the remote control. 7. Also check the audio muting is off . 5. Adjust the tone controls Remote control I I 1 1 1 [ INPUT SELECTOR TAPE ' TLNEP RHCNO CD [ .1 I 0 0 0 0 °. Start the selected input source playing. Press the POWER button to...
... VOLUME 7 TREBLE . • BALANCE 18 Listening to appropriate level using the MASTER VOLUME knob or VOLUME A/V buttons on the remote control. 7. Also check the audio muting is off . 5. Adjust the tone controls Remote control I I 1 1 1 [ INPUT SELECTOR TAPE ' TLNEP RHCNO CD [ .1 I 0 0 0 0 °. Start the selected input source playing. Press the POWER button to...
Owner Manual
Page 19
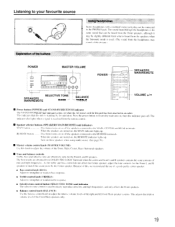
...8226; • Power button (POWER) and STAND-BY/RECEIVED indicator The STAND-BY/RECEIVED indicator comes on or off the speakers connected to the MAIN. REMOTE button This button turns on these speakers when using multi source. (See page 30. ) • Master volume control knob (MASTER VOLUME( Use this ...the speakers connected to match the sound given by for this , we recommend the use of this unit has been inserted in an outlet. the REMOTE indicator lights up . and R speakers contain the same amounts of the Front Main speakers only. 19 CENTER and REAR terminals. As die treble ...
...8226; • Power button (POWER) and STAND-BY/RECEIVED indicator The STAND-BY/RECEIVED indicator comes on or off the speakers connected to the MAIN. REMOTE button This button turns on these speakers when using multi source. (See page 30. ) • Master volume control knob (MASTER VOLUME( Use this ...the speakers connected to match the sound given by for this , we recommend the use of this unit has been inserted in an outlet. the REMOTE indicator lights up . and R speakers contain the same amounts of the Front Main speakers only. 19 CENTER and REAR terminals. As die treble ...
Owner Manual
Page 21
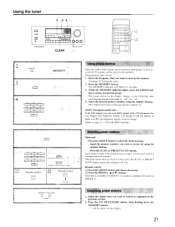
... the group chosen in step I STIT SCAN European model only PRESET SCAN Except for the Earopean model Remote control TUNER GROUP Remote control PRESET V Using preset stations Since ten AM or FM stations can be received for 5 seconds ... o o o oo = o o ro = o o 2 MEMORY O 3 GRCUs MEMORY o 4 ABC DES INNO TAR 1 6' a STT VWX I )1 (I 55 GROUP ABC DES 1 JK NINC TOR I I I will be stored in the memory. Remote control El Press the GROUP button and choose the group. ton to select the desired group. MEMORY FM MUTEMODE O L CI FAR Cancelling preset stations 1. Programming...
... the group chosen in step I STIT SCAN European model only PRESET SCAN Except for the Earopean model Remote control TUNER GROUP Remote control PRESET V Using preset stations Since ten AM or FM stations can be received for 5 seconds ... o o o oo = o o ro = o o 2 MEMORY O 3 GRCUs MEMORY o 4 ABC DES INNO TAR 1 6' a STT VWX I )1 (I 55 GROUP ABC DES 1 JK NINC TOR I I I will be stored in the memory. Remote control El Press the GROUP button and choose the group. ton to select the desired group. MEMORY FM MUTEMODE O L CI FAR Cancelling preset stations 1. Programming...

Owner Manual
Page 25
... o o o CI 0 00 0 0 00 0 ON CENTER MODE DELAY TIME DELAY TIME Explanation 1: Surround mode Dolby Pro Logic By using the delay time button of the remote control. • When you press the DEL.A,Y TIME button, DELAY and the delay time will be shown for it, depending on the display. • For...effect is applied in turn. Dolby Surround delay time is specified at 20 msec. DSP MODE button or BYPASS button. (When using the remote control, press the SURROUND MODE button.) Make your listening room can he performed using video tape and laser discs with the input selector source...
... o o o CI 0 00 0 0 00 0 ON CENTER MODE DELAY TIME DELAY TIME Explanation 1: Surround mode Dolby Pro Logic By using the delay time button of the remote control. • When you press the DEL.A,Y TIME button, DELAY and the delay time will be shown for it, depending on the display. • For...effect is applied in turn. Dolby Surround delay time is specified at 20 msec. DSP MODE button or BYPASS button. (When using the remote control, press the SURROUND MODE button.) Make your listening room can he performed using video tape and laser discs with the input selector source...
Owner Manual
Page 26
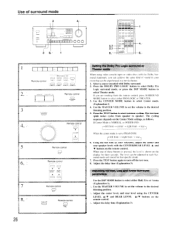
...button to select Dolbv Pro Logic surround mode, or press the DSP MODE button to start test-tone cycling. The cycling sequence depends on the remote control. Adjust the center level, and rear level using video cassette tapes or video discs with the CENTER/REAR LEVEL A and • buttons... U. Use the MASTER VOLUME to set the volume to select either PRO LOGIC or THEATER. 3. The test tone (pink noise) cycles from the remote control, press SURROUND MODE button to the desired listening position. 5. The level can be adjusted in each Surround mode and stored for three seconds. ...
...button to select Dolbv Pro Logic surround mode, or press the DSP MODE button to start test-tone cycling. The cycling sequence depends on the remote control. Adjust the center level, and rear level using video cassette tapes or video discs with the CENTER/REAR LEVEL A and • buttons... U. Use the MASTER VOLUME to set the volume to select either PRO LOGIC or THEATER. 3. The test tone (pink noise) cycles from the remote control, press SURROUND MODE button to the desired listening position. 5. The level can be adjusted in each Surround mode and stored for three seconds. ...
Owner Manual
Page 27
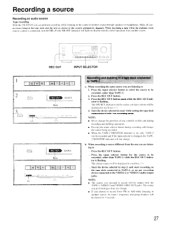
... OUT button again while the REC OUT indicator is connected, turn the MR off (the MR OFF indicator will light) to disable remote control operation from FM or AM while listening to another source, the tuner's frequency and group displays will be shown for the source...button for 3 seconds. 27 When recording a tape while the multiple room remote control is flashing. NOTE: • Never change . Press the REC OUT button. 3. Recording a source Recording an audio source Tape recording With the TX-SV535 you selected to record will be output form the TAPE-I, VIDEO-2 and VIDEO...
... OUT button again while the REC OUT indicator is connected, turn the MR off (the MR OFF indicator will light) to disable remote control operation from FM or AM while listening to another source, the tuner's frequency and group displays will be shown for the source...button for 3 seconds. 27 When recording a tape while the multiple room remote control is flashing. NOTE: • Never change . Press the REC OUT button. 3. Recording a source Recording an audio source Tape recording With the TX-SV535 you selected to record will be output form the TAPE-I, VIDEO-2 and VIDEO...
Owner Manual
Page 30
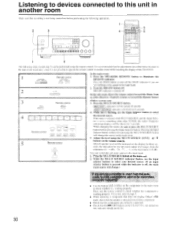
... or 1 -Box Receiver (Xantech system) or toward the Remote Sensor (Onkyo system) and: 3. Turn the MR OFF button off . Press the SPEAKERS REMOTE button to illuminate the REMOTE indicator. Listening to devices connected to this unit in another room while watching the display of the TX-SV535. 1 Remote control EEEAKERS SPEAKERS MArN REMOTE MAIN REMOTE In the main room: 1.
... or 1 -Box Receiver (Xantech system) or toward the Remote Sensor (Onkyo system) and: 3. Turn the MR OFF button off . Press the SPEAKERS REMOTE button to illuminate the REMOTE indicator. Listening to devices connected to this unit in another room while watching the display of the TX-SV535. 1 Remote control EEEAKERS SPEAKERS MArN REMOTE MAIN REMOTE In the main room: 1.
Owner Manual
Page 31
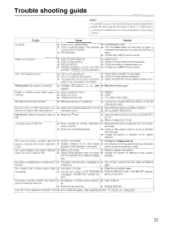
... protection circuitry has been • Contact your ONKYO service center. No station is recalled when a preset key is too strong. • Change to T-shaped antenna. a long time. lamp on the TX-SV535 • Press the MR OFF button. (The MR OFF indicator is external noise in remote control transmit- • Insert batteries. cast. together...
... protection circuitry has been • Contact your ONKYO service center. No station is recalled when a preset key is too strong. • Change to T-shaped antenna. a long time. lamp on the TX-SV535 • Press the MR OFF button. (The MR OFF indicator is external noise in remote control transmit- • Insert batteries. cast. together...


