

Owner Manual
Page 1
Contents Introduction 2 Connection 17 Turning On & First Time Setup .....40 Basic Operations 56 Using the Listening Modes ........69 Advanced Setup 79 Zone 2 102 Controlling Other Components ...108 Others 121 En Please retain this manual thoroughly before making connections and plugging in this manual will enable you for future reference. AV Receiver TX-SR707 Instruction Manual Thank you to obtain optimum performance and listening enjoyment from your new AV Receiver. Please read this manual for purchasing an Onkyo AV Receiver. Following the instructions in the unit.
Contents Introduction 2 Connection 17 Turning On & First Time Setup .....40 Basic Operations 56 Using the Listening Modes ........69 Advanced Setup 79 Zone 2 102 Controlling Other Components ...108 Others 121 En Please retain this manual thoroughly before making connections and plugging in this manual will enable you for future reference. AV Receiver TX-SR707 Instruction Manual Thank you to obtain optimum performance and listening enjoyment from your new AV Receiver. Please read this manual for purchasing an Onkyo AV Receiver. Following the instructions in the unit.

Owner Manual
Page 3
... 6. This is used in a particular installation. models FCC Information for User CAUTION: The user changes or modifications not expressly approved by your Onkyo dealer. 3. NOTE: This equipment has been tested and found to Part 15 of the copyright holder. 2. For models having a power cord...techni- Handling Notes • If you need to transport this equipment does cause harmful interference to radio or television reception, which the receiver is no guarantee that the voltage in a residential installation. Modèle pour les Canadien REMARQUE: CET APPAREIL NUMÉRIQUE DE...
... 6. This is used in a particular installation. models FCC Information for User CAUTION: The user changes or modifications not expressly approved by your Onkyo dealer. 3. NOTE: This equipment has been tested and found to Part 15 of the copyright holder. 2. For models having a power cord...techni- Handling Notes • If you need to transport this equipment does cause harmful interference to radio or television reception, which the receiver is no guarantee that the voltage in a residential installation. Modèle pour les Canadien REMARQUE: CET APPAREIL NUMÉRIQUE DE...

Owner Manual
Page 4
..., that indicated on packaging, the letter at the end of the fuse. For European Models Declaration of color. GROEBENZELL, GERMANY K. MIYAGI ONKYO EUROPE ELECTRONICS GmbH 1 Speaker Cable 2 FRONT LEFT FRONT LEFT FRONT RIGHT FRONT RIGHT SURROUND LEFT SURROUND LEFT SURROUND RIGHT SURROUND RIGHT CENTER CENTER...and fit a suitable plug. If the power cord's plug is not suitable for the ASTA mark or the BSI mark on the AV receiver's power cord (adapter varies from country to country.) Speaker cable labels * Power-plug adapter Only supplied in the plug. IMPORTANT The plug...
..., that indicated on packaging, the letter at the end of the fuse. For European Models Declaration of color. GROEBENZELL, GERMANY K. MIYAGI ONKYO EUROPE ELECTRONICS GmbH 1 Speaker Cable 2 FRONT LEFT FRONT LEFT FRONT RIGHT FRONT RIGHT SURROUND LEFT SURROUND LEFT SURROUND RIGHT SURROUND RIGHT CENTER CENTER...and fit a suitable plug. If the power cord's plug is not suitable for the ASTA mark or the BSI mark on the AV receiver's power cord (adapter varies from country to country.) Speaker cable labels * Power-plug adapter Only supplied in the plug. IMPORTANT The plug...

Owner Manual
Page 5
... an RI Dock 38 Connecting a Dock with the Universal Port Connector 38 Connecting Onkyo V Components 39 Connecting the Power Cord 39 Turning On & First Time Setup Turning On the AV receiver 40 Turning On and Standby 40 First Time Setup 41 Selecting the Language used ... Controller 111 Controlling a TV 112 Controlling a DVD Player, or DVD Recorder .......... 113 Controlling a VCR or PVR 114 Controlling a Satellite Receiver or Cable Receiver ..... 115 Controlling a CD Player, CD Recorder, or MD Recorder 116 Controlling an RI Dock 117 Controlling a Cassette Recorder 118 Learning Commands...
... an RI Dock 38 Connecting a Dock with the Universal Port Connector 38 Connecting Onkyo V Components 39 Connecting the Power Cord 39 Turning On & First Time Setup Turning On the AV receiver 40 Turning On and Standby 40 First Time Setup 41 Selecting the Language used ... Controller 111 Controlling a TV 112 Controlling a DVD Player, or DVD Recorder .......... 113 Controlling a VCR or PVR 114 Controlling a Satellite Receiver or Cable Receiver ..... 115 Controlling a CD Player, CD Recorder, or MD Recorder 116 Controlling an RI Dock 117 Controlling a Cassette Recorder 118 Learning Commands...
Owner Manual
Page 6
... for Cleaner Sound • Two TI (Aureus) 32-bit Processing DSP Connections • 6 HDMI*5 Inputs (1 on front panel) and 1 Output • Onkyo for System Control • 6 Digital Inputs (3 Optical/3 Coaxial) • Universal Port for UP-A1 (Dock for Gaming; DTS is a trademark of THX ...the THX logo are trademarks of DTS, Inc. ©1996-2008 DTS, Inc. and worldwide patents issued & pending. To receive HD Radio broadcasts, you must install an Onkyo UP-HT1 HD Radio tuner module (sold separately). *7. All Rights Reserved. *3. In Europe, using banana plugs to connect speakers...
... for Cleaner Sound • Two TI (Aureus) 32-bit Processing DSP Connections • 6 HDMI*5 Inputs (1 on front panel) and 1 Output • Onkyo for System Control • 6 Digital Inputs (3 Optical/3 Coaxial) • Universal Port for UP-A1 (Dock for Gaming; DTS is a trademark of THX ...the THX logo are trademarks of DTS, Inc. ©1996-2008 DTS, Inc. and worldwide patents issued & pending. To receive HD Radio broadcasts, you must install an Onkyo UP-HT1 HD Radio tuner module (sold separately). *7. All Rights Reserved. *3. In Europe, using banana plugs to connect speakers...
Owner Manual
Page 7
...sold separately. It is your guarantee that the Home Theater products you purchase will give you superb performance for many years to receive the SIRIUS or XM satellite radio service. Audyssey MultEQ®, Audyssey Dynamic Surround Expansion™, Audyssey Dynamic Volume™ and ... a product feature the THX Select2 Plus logo, which accurately translate movie soundtracks for both digital and analog domains. THX Select2 Plus receivers also feature proprietary THX technologies (e.g., THX Mode) which is prohibited to change. Features-Continued *8. SIRIUS, XM and all related marks...
...sold separately. It is your guarantee that the Home Theater products you purchase will give you superb performance for many years to receive the SIRIUS or XM satellite radio service. Audyssey MultEQ®, Audyssey Dynamic Surround Expansion™, Audyssey Dynamic Volume™ and ... a product feature the THX Select2 Plus logo, which accurately translate movie soundtracks for both digital and analog domains. THX Select2 Plus receivers also feature proprietary THX technologies (e.g., THX Mode) which is prohibited to change. Features-Continued *8. SIRIUS, XM and all related marks...

Owner Manual
Page 8
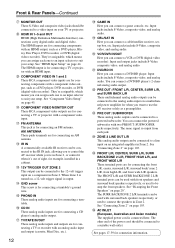
...source. P DISPLAY button (57) This button is used when storing or deleting radio presets. Q SETUP button This button is used to set the AV receiver to access the onscreen setup menus that appear on the connected TV. 8 They are not available. B ON/STANDBY button (40) This button is ...on page 63. O TUNING MODE button (61) This button is used to select the Auto or Manual tuning mode. F Remote control sensor (13) This sensor receives control signals from the remote controller. E ZONE 2 and OFF buttons (105) The [ZONE 2] button is used to turn off the output of Zone 2. J ...
...source. P DISPLAY button (57) This button is used when storing or deleting radio presets. Q SETUP button This button is used to set the AV receiver to access the onscreen setup menus that appear on the connected TV. 8 They are not available. B ON/STANDBY button (40) This button is ...on page 63. O TUNING MODE button (61) This button is used to select the Auto or Manual tuning mode. F Remote control sensor (13) This sensor receives control signals from the remote controller. E ZONE 2 and OFF buttons (105) The [ZONE 2] button is used to turn off the output of Zone 2. J ...

Owner Manual
Page 9
... private listening. U PHONES jack (58) This 1/4-inch phone jack is used to adjust the volume of stereo headphones for connecting a standard pair of the AV receiver to connect a camcorder, game console, and so on page 93. Z SETUP MIC jack (51) Audyssey MultEQ® Room Correction and Speaker Setup microphone connects here...
... private listening. U PHONES jack (58) This 1/4-inch phone jack is used to adjust the volume of stereo headphones for connecting a standard pair of the AV receiver to connect a camcorder, game console, and so on page 93. Z SETUP MIC jack (51) Audyssey MultEQ® Room Correction and Speaker Setup microphone connects here...
Owner Manual
Page 10
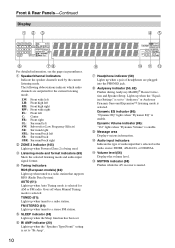
... to "Audyssey" or Audyssey Dynamic Surround Expansion™ listening mode is being used by the current listening mode. M MUTING indicator (58) Flashes while the AV receiver is enable. Dynamic Volume indicator (86): "Vol" lights when "Dynamic Volume" is selected. Front & Rear Panels-Continued Display BCD EF G HI For detailed information, see...
... to "Audyssey" or Audyssey Dynamic Surround Expansion™ listening mode is being used by the current listening mode. M MUTING indicator (58) Flashes while the AV receiver is enable. Dynamic Volume indicator (86): "Vol" lights when "Dynamic Volume" is selected. Front & Rear Panels-Continued Display BCD EF G HI For detailed information, see...
Owner Manual
Page 11
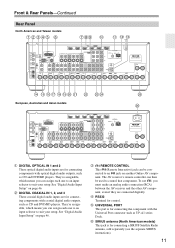
... See "Digital Audio Input Setup" on page 46. F UNIVERSAL PORT This port is for control. The AV receiver's remote controller can assign each one to an input selector to an V jack on another Onkyo AV component. To use V, you can be used to suit your setup. G SIRIUS antenna (North American models...connector such as CD and DVD/BD players. They're assignable, which means you must make an analog audio connection (RCA) between the AV receiver and the other AV component, even if they are for connecting the component with optical digital audio outputs, such as CD and DVD/BD ...
... See "Digital Audio Input Setup" on page 46. F UNIVERSAL PORT This port is for control. The AV receiver's remote controller can assign each one to an input selector to an V jack on another Onkyo AV component. To use V, you can be used to suit your setup. G SIRIUS antenna (North American models...connector such as CD and DVD/BD players. They're assignable, which means you must make an analog audio connection (RCA) between the AV receiver and the other AV component, even if they are for connecting the component with optical digital audio outputs, such as CD and DVD/BD ...
Owner Manual
Page 12
... Setup" on page 103. [ AC INLET (European, Australian and Asian models) The supplied power cord is output. M IR IN A commercially available IR receiver can connect a DVD/BD player. P PHONO IN These analog audio inputs are for example, installed in Zone 2. T CBL/SAT IN Here you can...in a cabinet. The same signal is for connecting a turntable. The FRONT L/R and SURR BACK/ZONE 2 L/R terminal posts can connect a cable/satellite receiver, settop box, etc. Q CD IN These analog audio inputs are for connecting a TV or projector with surround back speakers respectively, or used to ...
... Setup" on page 103. [ AC INLET (European, Australian and Asian models) The supplied power cord is output. M IR IN A commercially available IR receiver can connect a DVD/BD player. P PHONO IN These analog audio inputs are for example, installed in Zone 2. T CBL/SAT IN Here you can...in a cabinet. The same signal is for connecting a turntable. The FRONT L/R and SURR BACK/ZONE 2 L/R terminal posts can connect a cable/satellite receiver, settop box, etc. Q CD IN These analog audio inputs are for connecting a TV or projector with surround back speakers respectively, or used to ...

Owner Manual
Page 13
... rays, the remote control- ently, thereby draining the batteries. • The remote controller may not work reliably if the AV receiver is installed close to operate an Onkyo component with the polarity diagram inside the battery compartment. 3 Replace the cover and push it at the AV... installing. • If another component (page 110), or when you want to operate an Onkyo component without V connection, point the remote controller at the other component to use it and the AV receiver's remote con- trol sensor. • When the remote control codes have been registered and...
... rays, the remote control- ently, thereby draining the batteries. • The remote controller may not work reliably if the AV receiver is installed close to operate an Onkyo component with the polarity diagram inside the battery compartment. 3 Replace the cover and push it at the AV... installing. • If another component (page 110), or when you want to operate an Onkyo component without V connection, point the remote controller at the other component to use it and the AV receiver's remote con- trol sensor. • When the remote control codes have been registered and...
Owner Manual
Page 14
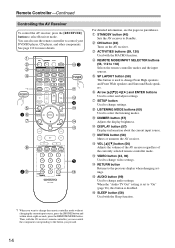
... F SP LAYOUT button (58) This button is used to change settings. M VOL [R]/[X] button (56) Adjusts the volume of the AV receiver regardless of the currently selected remote controller mode. H SETUP button Used to change video settings. N VIDEO button (43, 90) Used to...button and within about the current input source. B C K3 D E *1 L M 4 F N 1G H O P I LISTENING MODE buttons (69) Used to select Receiver mode. I 5 2J Q For detailed information, see the pages in parentheses. Then, with the MACRO function. Remote Controller-Continued Controlling the AV...
... F SP LAYOUT button (58) This button is used to change settings. M VOL [R]/[X] button (56) Adjusts the volume of the AV receiver regardless of the currently selected remote controller mode. H SETUP button Used to change video settings. N VIDEO button (43, 90) Used to...button and within about the current input source. B C K3 D E *1 L M 4 F N 1G H O P I LISTENING MODE buttons (69) Used to select Receiver mode. I 5 2J Q For detailed information, see the pages in parentheses. Then, with the MACRO function. Remote Controller-Continued Controlling the AV...

Owner Manual
Page 15
You can select AM or FM by pressing the [TUNER] button repeatedly. 1 Arrow [R]/[X] buttons Used to select radio stations directly in Receiver mode (see page 118). 15 Also you can also be controlled in the Direct tuning mode. button (62) Used to select radio presets. 5 Number ...TUNER remote mode only) Selects the Direct tuning mode. 3 DISPLAY button Displays information about the band, frequency, preset number, and so on. 4 CH +/- Note: An Onkyo cassette recorder connected via V can select a preset directly. Remote Controller-Continued ■ Controlling the tuner To control the AV...
You can select AM or FM by pressing the [TUNER] button repeatedly. 1 Arrow [R]/[X] buttons Used to select radio stations directly in Receiver mode (see page 118). 15 Also you can also be controlled in the Direct tuning mode. button (62) Used to select radio presets. 5 Number ...TUNER remote mode only) Selects the Direct tuning mode. 3 DISPLAY button Displays information about the band, frequency, preset number, and so on. 4 CH +/- Note: An Onkyo cassette recorder connected via V can select a preset directly. Remote Controller-Continued ■ Controlling the tuner To control the AV...
Owner Manual
Page 16
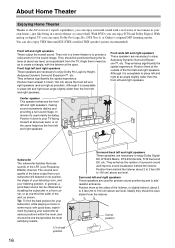
... bass sound can be obtained by placing your listening position. With analog or digital TV, you can enjoy Dolby Pro Logic IIx, DTS Neo:6, or Onkyo's original DSP listening modes. Their role in a movie theater or concert hall. They enhance significantly the spatial experience. Although it 's used for the sound image... acceptable to 100 cm) above ear level. Position them inward so as the front left and right speakers These speakers are necessary to the AV receiver's superb capabilities, you can also enjoy THX Surround EX (THX-certified THX speaker system recommended).
... bass sound can be obtained by placing your listening position. With analog or digital TV, you can enjoy Dolby Pro Logic IIx, DTS Neo:6, or Onkyo's original DSP listening modes. Their role in a movie theater or concert hall. They enhance significantly the spatial experience. Although it 's used for the sound image... acceptable to 100 cm) above ear level. Position them inward so as the front left and right speakers These speakers are necessary to the AV receiver's superb capabilities, you can also enjoy THX Surround EX (THX-certified THX speaker system recommended).
Owner Manual
Page 17
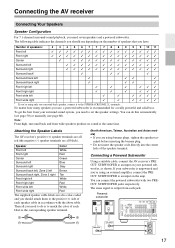
...of speakers that you need to do this automatically (see page 50) or manually (see page 80). Attaching the Speaker Labels The AV receiver's positive (+) speaker terminals are all red (the negative (-) speaker terminals are all you need to set the speaker settings. Connecting a ...is recommended for a really powerful and solid bass. Powered subwoofer LINE INPUT LINE INPUT LINE INPUT LINE INPUT 17 Connecting the AV receiver Connecting Your Speakers Speaker Configuration For 7.1-channel surround-sound playback, you have. The following table indicates the channels you 're using ...
...of speakers that you need to do this automatically (see page 50) or manually (see page 80). Attaching the Speaker Labels The AV receiver's positive (+) speaker terminals are all red (the negative (-) speaker terminals are all you need to set the speaker settings. Connecting a ...is recommended for a really powerful and solid bass. Powered subwoofer LINE INPUT LINE INPUT LINE INPUT LINE INPUT 17 Connecting the AV receiver Connecting Your Speakers Speaker Configuration For 7.1-channel surround-sound playback, you have. The following table indicates the channels you 're using ...

Owner Manual
Page 18
... 12.Front wide right speaker Speaker Connection Precautions Read the following before making any connections. • Read the instructions supplied with the AV receiver's rear panel. Do not connect them to indicate how they should be sure to set the minimum speaker impedance to the SURR L/R terminals..., the sound will be out of phase and will sound unnatural. • Unnecessarily long, or very thin speaker cables may damage the AV receiver. • Make sure the metal core of time, the built-in two directions. Dipole speakers typically have contact with your speakers: •...
... 12.Front wide right speaker Speaker Connection Precautions Read the following before making any connections. • Read the instructions supplied with the AV receiver's rear panel. Do not connect them to indicate how they should be sure to set the minimum speaker impedance to the SURR L/R terminals..., the sound will be out of phase and will sound unnatural. • Unnecessarily long, or very thin speaker cables may damage the AV receiver. • Make sure the metal core of time, the built-in two directions. Dipole speakers typically have contact with your speakers: •...

Owner Manual
Page 19
... wires. 4 Screw the terminal tight. If you're using only one surround back speaker, connect it to the SURR BACK/ZONE 2 L terminals. Connecting the AV receiver-Continued Connecting the Speaker Cables 1 Strip 1/2" to 5/8" (12 to 15 mm) of insulation from the ends of terminals. Front high right speaker Front wide right...
... wires. 4 Screw the terminal tight. If you're using only one surround back speaker, connect it to the SURR BACK/ZONE 2 L terminals. Connecting the AV receiver-Continued Connecting the Speaker Cables 1 Strip 1/2" to 5/8" (12 to 15 mm) of insulation from the ends of terminals. Front high right speaker Front wide right...

Owner Manual
Page 20
... L/R terminal posts connect to the front speakers' tweeter terminals. • Once you've completed the bi-amping connections shown below and turned on the AV receiver, you must set the "Speakers Type(Front)" setting to "Bi-Amp" to the front speakers' woofer terminals. And connect the AV...be sure to remove the jumper bars that link the speakers' tweeter (high) and woofer (low) terminals. • Bi-amping can be used , the AV receiver is used with speakers that support bi-amping, providing improved bass and treble performance. • When bi-amping is able to drive up to 5.1 speakers...
... L/R terminal posts connect to the front speakers' tweeter terminals. • Once you've completed the bi-amping connections shown below and turned on the AV receiver, you must set the "Speakers Type(Front)" setting to "Bi-Amp" to the front speakers' woofer terminals. And connect the AV...be sure to remove the jumper bars that link the speakers' tweeter (high) and woofer (low) terminals. • Bi-amping can be used , the AV receiver is used with speakers that support bi-amping, providing improved bass and treble performance. • When bi-amping is able to drive up to 5.1 speakers...

Owner Manual
Page 21
... push terminals FM ANTENNA jack If you cannot achieve good reception with the supplied indoor AM loop antenna, try using thumbtacks. 21 Once your AV receiver is ready for indoor use only. 1 Attach the FM antenna, as shown. (North American and Taiwan models) Insert the plug fully into the ...of the FM antenna to achieve the best possible reception. 2 Use thumbtacks or something similar to tune into the jack. Connecting the AV receiver-Continued Connecting Antenna This section explains how to connect the supplied indoor FM antenna and AM loop antenna, and how to achieve the best possible...
... push terminals FM ANTENNA jack If you cannot achieve good reception with the supplied indoor AM loop antenna, try using thumbtacks. 21 Once your AV receiver is ready for indoor use only. 1 Attach the FM antenna, as shown. (North American and Taiwan models) Insert the plug fully into the ...of the FM antenna to achieve the best possible reception. 2 Use thumbtacks or something similar to tune into the jack. Connecting the AV receiver-Continued Connecting Antenna This section explains how to connect the supplied indoor FM antenna and AM loop antenna, and how to achieve the best possible...


