Owner Manual
Page 4
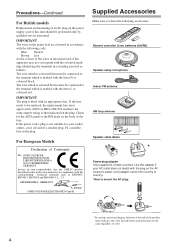
...64257;t a suitable plug. Specifications and operations are coloured in accordance with the following accessories: Remote controller & two batteries (AA/R6) Speaker setup microphone Indoor FM antenna AM loop antenna 1 2 3 Speaker...2 Right Supplied Accessories Make sure you have the same ampere rating as that the ONKYO product described in certain countries. Precautions-Continued For British models Replacement and mounting of an... this adapter if your AC outlet does not match with the plug on the AV receiver's power cord (adapter varies from country to country). *How to mount the AC ...
...64257;t a suitable plug. Specifications and operations are coloured in accordance with the following accessories: Remote controller & two batteries (AA/R6) Speaker setup microphone Indoor FM antenna AM loop antenna 1 2 3 Speaker...2 Right Supplied Accessories Make sure you have the same ampere rating as that the ONKYO product described in certain countries. Precautions-Continued For British models Replacement and mounting of an... this adapter if your AC outlet does not match with the plug on the AV receiver's power cord (adapter varies from country to country). *How to mount the AC ...

Owner Manual
Page 5
... of Dolby Laboratories. *2. Apple and iPod are registered trademarks of Onkyo Corporation. patents and other countries. "Dolby", "Pro Logic" and...is intended for use with other AV components TX-SR674/674E and TX-SR8467 Only • 95 watts per channel into 8 ohms, 20 Hz to 20 kHz...• 7-channel amplifier • Optimum Gain Volume Circuitry • Zone 2 capability • 24-bit/192 kHz D/A converters • ...problems • Easy-to-use onscreen setup menus • Preprogrammed remote controller for home and other trademarks are the property of HDMI Licensing,...
... of Dolby Laboratories. *2. Apple and iPod are registered trademarks of Onkyo Corporation. patents and other countries. "Dolby", "Pro Logic" and...is intended for use with other AV components TX-SR674/674E and TX-SR8467 Only • 95 watts per channel into 8 ohms, 20 Hz to 20 kHz...• 7-channel amplifier • Optimum Gain Volume Circuitry • Zone 2 capability • 24-bit/192 kHz D/A converters • ...problems • Easy-to-use onscreen setup menus • Preprogrammed remote controller for home and other trademarks are the property of HDMI Licensing,...
Owner Manual
Page 6
...50 Setting the Display Brightness 51 Muting the AV Receiver 51 Using the Sleep Timer 51 Using Headphones 51 Using the Tuner 52 Presetting AM/FM Stations & XM Channels....53 Using RDS (European models only 54 6 ...Receiver's ID 76 HDMI Audio Out 76 Lock Setup 77 Digital Input Signal Formats 77 Correcting Sound and Picture Sync 78 Changing the Remote Controller's ID ......... 78 Zone 2 Connecting Zone 2 79 Setting the Powered Zone 2 80 Using Zone 2 81 Using the Remote Control in Zone 2 82 Controlling Other Components Entering Remote Control Codes 83 Remote Control Codes for Onkyo...
...50 Setting the Display Brightness 51 Muting the AV Receiver 51 Using the Sleep Timer 51 Using Headphones 51 Using the Tuner 52 Presetting AM/FM Stations & XM Channels....53 Using RDS (European models only 54 6 ...Receiver's ID 76 HDMI Audio Out 76 Lock Setup 77 Digital Input Signal Formats 77 Correcting Sound and Picture Sync 78 Changing the Remote Controller's ID ......... 78 Zone 2 Connecting Zone 2 79 Setting the Powered Zone 2 80 Using Zone 2 81 Using the Remote Control in Zone 2 82 Controlling Other Components Entering Remote Control Codes 83 Remote Control Codes for Onkyo...
Owner Manual
Page 7
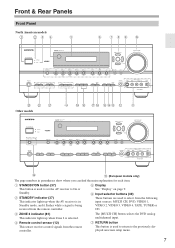
...4, TAPE, TUNER or CD. F Input selector buttons (49) These buttons are used to select from the remote controller. C ZONE 2 indicator (81) This indicator lights up when the AV receiver is in parentheses show where you can find the main explanation for each item. The [MULTI CH] ...button selects the DVD analog multichannel input. B STANDBY indicator (37) This indicator lights up when Zone 2 is being received from the remote controller. G RETURN button This button is used to return to On or Standby. Front & Rear Panels Front Panel North American models 1 23 4 ...
...4, TAPE, TUNER or CD. F Input selector buttons (49) These buttons are used to select from the remote controller. C ZONE 2 indicator (81) This indicator lights up when the AV receiver is in parentheses show where you can find the main explanation for each item. The [MULTI CH] ...button selects the DVD analog multichannel input. B STANDBY indicator (37) This indicator lights up when Zone 2 is being received from the remote controller. G RETURN button This button is used to return to On or Standby. Front & Rear Panels Front Panel North American models 1 23 4 ...
Owner Manual
Page 10
...digital video. The HDMI output is for connecting speakers in which you purchased your TV or projector. The type of sight between the AV receiver and the remote controller is output. N PRE OUT SUBWOOFER (19) The SUBWOOFER jack is for connecting an AM antenna. Front & Rear Panels-Continued Rear Panel ... an optical digital input. When Zone 2 is turned on a power amplifier in parentheses show where you want to use the remote controller to connect CD and DVD players, and other digital recorder with a coaxial digital audio output. The optical output can be used to supply...
...digital video. The HDMI output is for connecting speakers in which you purchased your TV or projector. The type of sight between the AV receiver and the remote controller is output. N PRE OUT SUBWOOFER (19) The SUBWOOFER jack is for connecting an AM antenna. Front & Rear Panels-Continued Rear Panel ... an optical digital input. When Zone 2 is turned on a power amplifier in parentheses show where you want to use the remote controller to connect CD and DVD players, and other digital recorder with a coaxial digital audio output. The optical output can be used to supply...
Owner Manual
Page 11
... DVD players. S VIDEO 3 IN Here you can connect a VCR. The AV receiver's remote controller can connect a DVD player. Q VIDEO 1 IN/OUT Here you can then be used to a line input on another Onkyo AV component. V COMPONENT VIDEO OUT This component video output can connect a VCR. ... an integrated amplifier in Zone 2. See pages 18-36 for connection information. 11 X REMOTE CONTROL This (Remote Interactive) jack can connect a DVD player's 2-channel analog audio output or 7.1-channel analog audio output. Input jacks include S-Video, composite video, and analog audio.
... DVD players. S VIDEO 3 IN Here you can connect a VCR. The AV receiver's remote controller can connect a DVD player. Q VIDEO 1 IN/OUT Here you can then be used to a line input on another Onkyo AV component. V COMPONENT VIDEO OUT This component video output can connect a VCR. ... an integrated amplifier in Zone 2. See pages 18-36 for connection information. 11 X REMOTE CONTROL This (Remote Interactive) jack can connect a DVD player's 2-channel analog audio output or 7.1-channel analog audio output. Input jacks include S-Video, composite video, and analog audio.
Owner Manual
Page 12
... doors. Keep this in the same room, or the AV receiver is subjected to use the remote controller, point it at the AV receiver's remote control sensor, as shown below. Approx. 16 ft. (5 m) Notes: • The remote controller may not work reliably, try replacing the batteries. • Don... this in accordance with the polarity diagram inside the battery compartment. 3 Put the cover onto the remote controller and slide it and the AV receiver's remote control sensor. 12 Remote Controller Installing the Batteries 1 To open the battery compartment, press the small hollow and slide off the ...
... doors. Keep this in the same room, or the AV receiver is subjected to use the remote controller, point it at the AV receiver's remote control sensor, as shown below. Approx. 16 ft. (5 m) Notes: • The remote controller may not work reliably, try replacing the batteries. • Don... this in accordance with the polarity diagram inside the battery compartment. 3 Put the cover onto the remote controller and slide it and the AV receiver's remote control sensor. 12 Remote Controller Installing the Batteries 1 To open the battery compartment, press the small hollow and slide off the ...

Owner Manual
Page 13
... can control RECEIVER the AV receiver and an Onkyo cassette TAPE recorder connected via . 1 2 3 4 1 5 2 36 7 4 8 9 J ON/STANDBY ZONE2 REMOTE MODE RECEIVER TAPE INPUT SELECTOR 1 2 3 V1 V2 V3 DVD M D/CDR CD HDD 4 5 6 TV V4 MULTI CH DVD 7 8 9 VCR TAPE TUNER 10 11 +10 0 CD 12 CABLE CLR SAT D TUN --/--- By entering the appropriate remote control code, you can control Onkyo components...
... can control RECEIVER the AV receiver and an Onkyo cassette TAPE recorder connected via . 1 2 3 4 1 5 2 36 7 4 8 9 J ON/STANDBY ZONE2 REMOTE MODE RECEIVER TAPE INPUT SELECTOR 1 2 3 V1 V2 V3 DVD M D/CDR CD HDD 4 5 6 TV V4 MULTI CH DVD 7 8 9 VCR TAPE TUNER 10 11 +10 0 CD 12 CABLE CLR SAT D TUN --/--- By entering the appropriate remote control code, you can control Onkyo components...
Owner Manual
Page 14
...[ ]/[ ] buttons are used to select AM and FM radio stations and XM radio channels directly. 2 CH +/- The Left and Right [ ]/[ ] buttons are used when the TAPE input is pressed, the REMOTE MODE button for the currently selected mode lights up. I TEST TONE, CH SEL, ...) Used to select the input sources. O SETUP button Used to adjust the level of the currently selected remote controller mode. When a remote controller button is selected To select your Cassette deck as the input source, press: RECEIVER 8 TUNER 1 Number, D TUN, and ENT buttons (52, 58) Used to change the search mode...
...[ ]/[ ] buttons are used to select AM and FM radio stations and XM radio channels directly. 2 CH +/- The Left and Right [ ]/[ ] buttons are used when the TAPE input is pressed, the REMOTE MODE button for the currently selected mode lights up. I TEST TONE, CH SEL, ...) Used to select the input sources. O SETUP button Used to adjust the level of the currently selected remote controller mode. When a remote controller button is selected To select your Cassette deck as the input source, press: RECEIVER 8 TUNER 1 Number, D TUN, and ENT buttons (52, 58) Used to change the search mode...
Owner Manual
Page 15
B Number buttons Used to control an Onkyo DVD player. K CLR button Cancels functions and clears entered numbers. Remote Controller-Continued DVD Mode By default, the remote controller is set to enter title, chapter, and track numbers and times for locating specific points. To select your DVD player as the input source, press: RECEIVER 6 DVD or 5 MULTI CH...
B Number buttons Used to control an Onkyo DVD player. K CLR button Cancels functions and clears entered numbers. Remote Controller-Continued DVD Mode By default, the remote controller is set to enter title, chapter, and track numbers and times for locating specific points. To select your DVD player as the input source, press: RECEIVER 6 DVD or 5 MULTI CH...

Owner Manual
Page 16
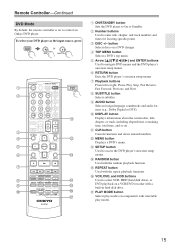
... By default, the remote controller is set to navigate menus on an HDDcompatible component. K REPEAT button Used with the random/shuffle playback function. J RANDOM button Used with the repeat playback functions. C DISC/ALBUM +/- D Arrow [ ]/[ ] and ENTER buttons Used to control an Onkyo CD player. I ...* If you're using an MD, CDR, or HDD component, you must change the input display (see page 47). 1 2 3 4 E F ON/STANDBY ZONE2 REMOTE MODE RECEIVER TAPE INPUT SELECTOR 1 2 3 V1 V2 V3 DVD M D/CDR C D HDD 4 5 6 TV V4 MULTI CH DVD 7 8 9 VCR TAPE TUNER 10 11 ...
... By default, the remote controller is set to navigate menus on an HDDcompatible component. K REPEAT button Used with the random/shuffle playback function. J RANDOM button Used with the repeat playback functions. C DISC/ALBUM +/- D Arrow [ ]/[ ] and ENTER buttons Used to control an Onkyo CD player. I ...* If you're using an MD, CDR, or HDD component, you must change the input display (see page 47). 1 2 3 4 E F ON/STANDBY ZONE2 REMOTE MODE RECEIVER TAPE INPUT SELECTOR 1 2 3 V1 V2 V3 DVD M D/CDR C D HDD 4 5 6 TV V4 MULTI CH DVD 7 8 9 VCR TAPE TUNER 10 11 ...
Owner Manual
Page 36
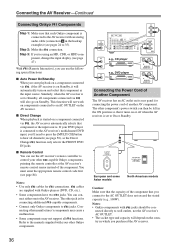
... When you 'll need to press the [MULTI CH] button to hear all channels (see pages 24 to On or Standby. Step 2: Make the connection. The other -capable Onkyo components, pointing the remote controller at the AV receiver's remote control sensor instead of Another Component The AV receiver has an AC outlet on a component connected via , the AV...
... When you 'll need to press the [MULTI CH] button to hear all channels (see pages 24 to On or Standby. Step 2: Make the connection. The other -capable Onkyo components, pointing the remote controller at the AV receiver's remote control sensor instead of Another Component The AV receiver has an AC outlet on a component connected via , the AV...
Owner Manual
Page 37
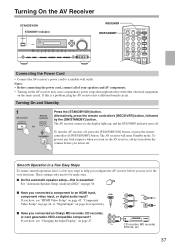
... "Digital Input" on page 47. The AV receiver will enter Standby mode. Turning On and Standby 1 AV receiver Remote controller STANDBY/ON RECEIVER or ON/STANDBY Press the [STANDBY/ON] button. I Have you connected a component to help you configure the AV receiver before you connected an Onkyo MD recorder, CD recorder, OUT IN or next...
... "Digital Input" on page 47. The AV receiver will enter Standby mode. Turning On and Standby 1 AV receiver Remote controller STANDBY/ON RECEIVER or ON/STANDBY Press the [STANDBY/ON] button. I Have you connected a component to help you configure the AV receiver before you connected an Onkyo MD recorder, CD recorder, OUT IN or next...
Owner Manual
Page 49
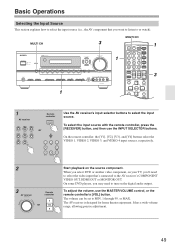
... the remote controller, press the [RECEIVER] button, and then use the MASTER VOLUME control, or the remote controller's [VOL] button. On the remote controller, the [V1], [V2], [V3], and [V4] buttons select the VIDEO 1, VIDEO 2, VIDEO 3, and VIDEO 4 input sources, respectively. 2 3 AV receiver Remote controller or... MUTING PLAYLIST/CAT RETURN SETUP 1 3 1 AV receiver DVD VIDEO 1 VIDEO 2 VIDEO 3 VCR 1 VIDEO 4 VCR 2 TAPE TUNER CD Remote controller RECEIVER or 1 V1 4 V4 7 TAPE 2 V2 8 TUNER 3 V3 6 DVD 9 C D Use the AV receiver's input selector buttons to MIN, 1 through 99,...
... the remote controller, press the [RECEIVER] button, and then use the MASTER VOLUME control, or the remote controller's [VOL] button. On the remote controller, the [V1], [V2], [V3], and [V4] buttons select the VIDEO 1, VIDEO 2, VIDEO 3, and VIDEO 4 input sources, respectively. 2 3 AV receiver Remote controller or... MUTING PLAYLIST/CAT RETURN SETUP 1 3 1 AV receiver DVD VIDEO 1 VIDEO 2 VIDEO 3 VCR 1 VIDEO 4 VCR 2 TAPE TUNER CD Remote controller RECEIVER or 1 V1 4 V4 7 TAPE 2 V2 8 TUNER 3 V3 6 DVD 9 C D Use the AV receiver's input selector buttons to MIN, 1 through 99,...

Owner Manual
Page 51
.... • Dimmer+VOLUME light off ). • When you connect a pair of stereo headphones (1/4-inch phone plug) to Standby. Basic Operations-Continued DIMMER ON/STANDBY ZONE2 REMOTE MODE RECEIVER TAPE INPUT SELECTOR 1 2 3 V1 V2 V3 DVD M D/CDR C D HDD 4 5 6 TV V4 MULTI CH DVD 7 8 9 VCR TAPE TUNER 10 11 ..., only the front left and right audio can be set . The SLEEP indicator appears on the remote controller, and then press the [LEVEL +]/[LEVEL -] buttons. Muting the AV Receiver You can adjust the level between -12 dB and +12 dB. 51 You can temporarily mute ...
.... • Dimmer+VOLUME light off ). • When you connect a pair of stereo headphones (1/4-inch phone plug) to Standby. Basic Operations-Continued DIMMER ON/STANDBY ZONE2 REMOTE MODE RECEIVER TAPE INPUT SELECTOR 1 2 3 V1 V2 V3 DVD M D/CDR C D HDD 4 5 6 TV V4 MULTI CH DVD 7 8 9 VCR TAPE TUNER 10 11 ..., only the front left and right audio can be set . The SLEEP indicator appears on the remote controller, and then press the [LEVEL +]/[LEVEL -] buttons. Muting the AV Receiver You can adjust the level between -12 dB and +12 dB. 51 You can temporarily mute ...

Owner Manual
Page 52
... I Tuning into Stations by Frequency You can tune into AM and FM stations directly by entering the appropriate frequency. 1 RECEIVER Press the [RECEIVER] button, followed by using the remote controller. When tuned into Radio Stations I Auto Tuning Mode 1 TUNING MODE Press the [TUNING MODE] button so that the... Up or Down [ ]/[ ] button. Within 8 seconds, use the number buttons to change FM frequency in mono. Note: While the [RECEIVER] button is found. You can enjoy AM and FM radio stations. Listening to the Radio TUNER Use the [TUNER] input selector button to the...
... I Tuning into Stations by Frequency You can tune into AM and FM stations directly by entering the appropriate frequency. 1 RECEIVER Press the [RECEIVER] button, followed by using the remote controller. When tuned into Radio Stations I Auto Tuning Mode 1 TUNING MODE Press the [TUNING MODE] button so that the... Up or Down [ ]/[ ] button. Within 8 seconds, use the number buttons to change FM frequency in mono. Note: While the [RECEIVER] button is found. You can enjoy AM and FM radio stations. Listening to the Radio TUNER Use the [TUNER] input selector button to the...

Owner Manual
Page 53
...that you want to store as presets. 1 Tune into the AM/FM station or XM channel that you want to delete. SET [ ]/[ ] buttons, or the remote controller's CH [+/-] but- The station or channel is displayed (about 8 seconds), use the PRE- ENTER 3 TUNING PRESET While the ...procedure for all of your favorite AM/FM radio stations and XM channels. See page 58 to store the station or channel. The MEMORY indicator appears and the preset number flashes. Selecting Presets PRESET ON/STANDBY ZONE2 REMOTE MODE RECEIVER TAPE INPUT SELECTOR 1 2 3 V1 V2 V3 DVD M D/...
...that you want to store as presets. 1 Tune into the AM/FM station or XM channel that you want to delete. SET [ ]/[ ] buttons, or the remote controller's CH [+/-] but- The station or channel is displayed (about 8 seconds), use the PRE- ENTER 3 TUNING PRESET While the ...procedure for all of your favorite AM/FM radio stations and XM channels. See page 58 to store the station or channel. The MEMORY indicator appears and the preset number flashes. Selecting Presets PRESET ON/STANDBY ZONE2 REMOTE MODE RECEIVER TAPE INPUT SELECTOR 1 2 3 V1 V2 V3 DVD M D/...

Owner Manual
Page 58
... cannot be changed by using the remote controller. 2 Use the Up and Down [ ]/[ ] buttons to select a channel. ber buttons to enter the channel 1 2 3 number. Channel number Channel name You can select an XM radio channel directly by entering its number. 1 D TUN Press the [RECEIVER] button, followed by the [ENTER] button to select "Channel Search" mode. ENT DIMMER SLEEP TV...
... cannot be changed by using the remote controller. 2 Use the Up and Down [ ]/[ ] buttons to select a channel. ber buttons to enter the channel 1 2 3 number. Channel number Channel name You can select an XM radio channel directly by entering its number. 1 D TUN Press the [RECEIVER] button, followed by the [ENTER] button to select "Channel Search" mode. ENT DIMMER SLEEP TV...

Owner Manual
Page 59
...Up and Down [ ]/[ ] buttons to select a category. Remote controller DISPLAY The following information can only select channels from the Front Panel: 1 TUNING MODE Press the [TUNING MODE] button to select "Channel Search" or "Category Search" mode. Listening to the Radio... channel, press the [RETURN] button. Selecting the Previous Channel: AV receiver RETURN To listen to cycle through the available information. 2 Press the [ENTER] button repeat- In Channel Search mode, you can be displayed: Channel name Channel number & preset number Category Artist Remote controller ...
...Up and Down [ ]/[ ] buttons to select a category. Remote controller DISPLAY The following information can only select channels from the Front Panel: 1 TUNING MODE Press the [TUNING MODE] button to select "Channel Search" or "Category Search" mode. Listening to the Radio... channel, press the [RETURN] button. Selecting the Previous Channel: AV receiver RETURN To listen to cycle through the available information. 2 Press the [ENTER] button repeat- In Channel Search mode, you can be displayed: Channel name Channel number & preset number Category Artist Remote controller ...

Owner Manual
Page 61
...L NIGHT VCR DVD CINE FLTR HDD RC-651M LISTENING MODE / Selecting on the format of the listening modes that can be used with the Remote Controller STEREO SURROUND LISTENING MODE STEREO SURROUND AUDIO SUBTITLE RANDOM REPEAT TEST TONE CH SEL LEVEL- I LISTENING MODE [ ]/[ ] buttons Pressing these buttons ... modes that can be used with a digital audio connection (coaxial or optical). • Listening mode availability depends on the AV Receiver PURE AUDIO STEREO LISTENING MODE I [PURE AUDIO] button (not North American models) This button selects the Pure Audio listening mode.
...L NIGHT VCR DVD CINE FLTR HDD RC-651M LISTENING MODE / Selecting on the format of the listening modes that can be used with the Remote Controller STEREO SURROUND LISTENING MODE STEREO SURROUND AUDIO SUBTITLE RANDOM REPEAT TEST TONE CH SEL LEVEL- I LISTENING MODE [ ]/[ ] buttons Pressing these buttons ... modes that can be used with a digital audio connection (coaxial or optical). • Listening mode availability depends on the AV Receiver PURE AUDIO STEREO LISTENING MODE I [PURE AUDIO] button (not North American models) This button selects the Pure Audio listening mode.


