Owner Manual
Page 4
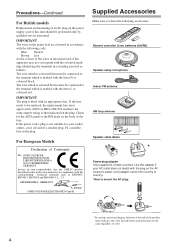
... or coloured black. Specifications and operations are coloured in accordance with the following accessories: Remote controller & two batteries (AA/R6) Speaker setup microphone Indoor FM antenna AM loop antenna 1 2 ...;ed service personnel. Check for your socket outlets, cut it off and fit a suitable plug. MIYAGI ONKYO EUROPE ELECTRONICS GmbH Front Left Front Left SP-B / Zone 2 Left SP-B / Zone 2 Left Front Right... must be connected to the terminal which is marked with the plug on the AV receiver's power cord (adapter varies from country to country). *How to mount the AC ...
... or coloured black. Specifications and operations are coloured in accordance with the following accessories: Remote controller & two batteries (AA/R6) Speaker setup microphone Indoor FM antenna AM loop antenna 1 2 ...;ed service personnel. Check for your socket outlets, cut it off and fit a suitable plug. MIYAGI ONKYO EUROPE ELECTRONICS GmbH Front Left Front Left SP-B / Zone 2 Left SP-B / Zone 2 Left Front Right... must be connected to the terminal which is marked with the plug on the AV receiver's power cord (adapter varies from country to country). *How to mount the AC ...

Owner Manual
Page 5
...Logic" and the double-D symbol are trademarks of Onkyo Corporation. U.S. "Niles" is a registered trademark ...8226; Easy-to-use onscreen setup menus • Preprogrammed remote controller for home and other countries. MultEQ or 2EQ is prohibited....for use with other AV components TX-SR674/674E and TX-SR8467 Only • 95 watts per channel into 8 ohms, 20 Hz to...channels *1. Apple and iPod are trademarks owned by U.S. Features Amplifier • 7-channel amplifier • Optimum Gain Volume Circuitry • Zone 2 capability • 24-bit/192 kHz D/A converters...
...Logic" and the double-D symbol are trademarks of Onkyo Corporation. U.S. "Niles" is a registered trademark ...8226; Easy-to-use onscreen setup menus • Preprogrammed remote controller for home and other countries. MultEQ or 2EQ is prohibited....for use with other AV components TX-SR674/674E and TX-SR8467 Only • 95 watts per channel into 8 ohms, 20 Hz to...channels *1. Apple and iPod are trademarks owned by U.S. Features Amplifier • 7-channel amplifier • Optimum Gain Volume Circuitry • Zone 2 capability • 24-bit/192 kHz D/A converters...
Owner Manual
Page 6
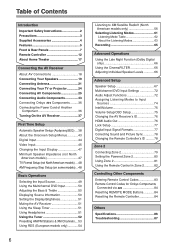
...50 Setting the Display Brightness 51 Muting the AV Receiver 51 Using the Sleep Timer 51 Using Headphones 51 Using the Tuner 52 Presetting AM/FM Stations & XM Channels....53 Using RDS (European models only 54 6 ...Receiver's ID 76 HDMI Audio Out 76 Lock Setup 77 Digital Input Signal Formats 77 Correcting Sound and Picture Sync 78 Changing the Remote Controller's ID ......... 78 Zone 2 Connecting Zone 2 79 Setting the Powered Zone 2 80 Using Zone 2 81 Using the Remote Control in Zone 2 82 Controlling Other Components Entering Remote Control Codes 83 Remote Control Codes for Onkyo...
...50 Setting the Display Brightness 51 Muting the AV Receiver 51 Using the Sleep Timer 51 Using Headphones 51 Using the Tuner 52 Presetting AM/FM Stations & XM Channels....53 Using RDS (European models only 54 6 ...Receiver's ID 76 HDMI Audio Out 76 Lock Setup 77 Digital Input Signal Formats 77 Correcting Sound and Picture Sync 78 Changing the Remote Controller's ID ......... 78 Zone 2 Connecting Zone 2 79 Setting the Powered Zone 2 80 Using Zone 2 81 Using the Remote Control in Zone 2 82 Controlling Other Components Entering Remote Control Codes 83 Remote Control Codes for Onkyo...
Owner Manual
Page 7
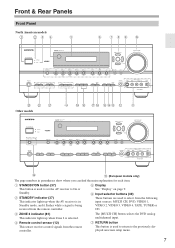
... show where you can find the main explanation for each item. The [MULTI CH] button selects the DVD analog multichannel input. D Remote control sensor (12) This sensor receives control signals from the remote controller. A STANDBY/ON button (37) This button is selected. Front & Rear Panels Front Panel North American models 1 23 4 5 6 789 0 ML K Other models...
... show where you can find the main explanation for each item. The [MULTI CH] button selects the DVD analog multichannel input. D Remote control sensor (12) This sensor receives control signals from the remote controller. A STANDBY/ON button (37) This button is selected. Front & Rear Panels Front Panel North American models 1 23 4 5 6 789 0 ML K Other models...
Owner Manual
Page 10
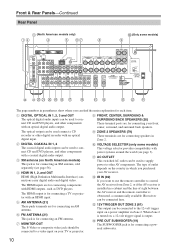
...connected to a video input on a power amplifier in which you want to use the remote controller to control the AV receiver from Zone 2, or if the AV receiver is output. K AC OUTLET This switched AC outlet can be connected to other digital recorder with an...-240V N M VU T S R Q P ON ML K The page numbers in Zone 2. The type of sight between the AV receiver and the remote controller is obstructed, a commercially available IR receiver can find the main explanation for connecting components with a coaxial digital audio output. A DIGITAL OPTICAL IN 1, 2, 3 and OUT ...
...connected to a video input on a power amplifier in which you want to use the remote controller to control the AV receiver from Zone 2, or if the AV receiver is output. K AC OUTLET This switched AC outlet can be connected to other digital recorder with an...-240V N M VU T S R Q P ON ML K The page numbers in Zone 2. The type of sight between the AV receiver and the remote controller is obstructed, a commercially available IR receiver can find the main explanation for connecting components with a coaxial digital audio output. A DIGITAL OPTICAL IN 1, 2, 3 and OUT ...
Owner Manual
Page 11
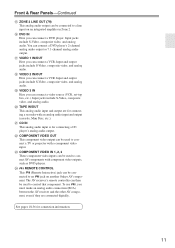
... include S-Video, composite video, and analog audio. X REMOTE CONTROL This (Remote Interactive) jack can be connected to control that component. See pages 18-36 for connecting a CD..., etc.). T TAPE IN/OUT This analog audio input and output are connected digitally. The AV receiver's remote controller can then be used to an jack on an integrated amplifier in Zone 2. To use...such as DVD players. P DVD IN Here you can connect a DVD player's 2-channel analog audio output or 7.1-channel analog audio output. Input jacks include S-Video, composite video, and analog audio. V ...
... include S-Video, composite video, and analog audio. X REMOTE CONTROL This (Remote Interactive) jack can be connected to control that component. See pages 18-36 for connecting a CD..., etc.). T TAPE IN/OUT This analog audio input and output are connected digitally. The AV receiver's remote controller can then be used to an jack on an integrated amplifier in Zone 2. To use...such as DVD players. P DVD IN Here you can connect a DVD player's 2-channel analog audio output or 7.1-channel analog audio output. Input jacks include S-Video, composite video, and analog audio. V ...
Owner Manual
Page 12
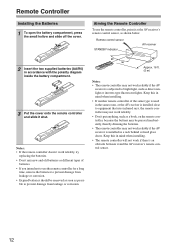
... diagram inside the battery compartment. 3 Put the cover onto the remote controller and slide it at the AV receiver's remote control sensor, as shown below. Keep this in mind when installing. • If another remote controller of batteries. • If you intend not to prevent damage ...type fluorescent lights. Keep this in mind when installing. • The remote controller will not work if there's an obstacle between it and the AV receiver's remote control sensor. 12 Remote Controller Installing the Batteries 1 To open the battery compartment, press the small hollow and ...
... diagram inside the battery compartment. 3 Put the cover onto the remote controller and slide it at the AV receiver's remote control sensor, as shown below. Keep this in mind when installing. • If another remote controller of batteries. • If you intend not to prevent damage ...type fluorescent lights. Keep this in mind when installing. • The remote controller will not work if there's an obstacle between it and the AV receiver's remote control sensor. 12 Remote Controller Installing the Batteries 1 To open the battery compartment, press the small hollow and ...

Owner Manual
Page 13
..., or HDD player or recorder. You must enter the appropriate remote control code first (see page 83). Remote Controller-Continued Using the Remote Controller The remote controller can be used to control the AV receiver. By entering the appropriate remote control code, you can control Onkyo components or components made by using the six REMOTE MODE buttons. nent. It can also be used to...
..., or HDD player or recorder. You must enter the appropriate remote control code first (see page 83). Remote Controller-Continued Using the Remote Controller The remote controller can be used to control the AV receiver. By entering the appropriate remote control code, you can control Onkyo components or components made by using the six REMOTE MODE buttons. nent. It can also be used to...
Owner Manual
Page 14
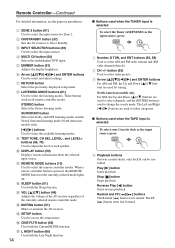
.... C INPUT SELECTOR buttons (49) Used to select AM and FM radio stations and XM radio channels directly. 2 CH +/- Remote Controller-Continued For detailed information, see the pages in all remote controller modes. N MUTING button (51) Mutes or unmutes the AV receiver. Q L NIGHT button (66) Used with the Late Night function. 14 I Buttons used when the TAPE...
.... C INPUT SELECTOR buttons (49) Used to select AM and FM radio stations and XM radio channels directly. 2 CH +/- Remote Controller-Continued For detailed information, see the pages in all remote controller modes. N MUTING button (51) Mutes or unmutes the AV receiver. Q L NIGHT button (66) Used with the Late Night function. 14 I Buttons used when the TAPE...
Owner Manual
Page 15
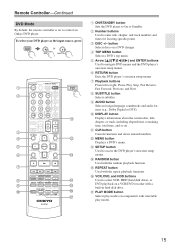
.../DVD recorder with selectable play modes. 15 To select your DVD player as the input source, press: RECEIVER 6 DVD or 5 MULTI CH 1 2 3 4 5 6 7 8 9 J ON/STANDBY ZONE2 REMOTE MODE RECEIVER TAPE INPUT SELECTOR 1 2 3 V1 V2 V3 DVD M D/CDR C D HDD 4 5 6 ...remote controller is set to right: Pause, Play, Stop, Fast Reverse, Fast Forward, Previous, and Next. J DISPLAY button Displays information about the current disc, title, chapter, or track, including elapsed time, remaining time, total time, and so on a DVD changer. G Playback buttons From left to control an Onkyo...
.../DVD recorder with selectable play modes. 15 To select your DVD player as the input source, press: RECEIVER 6 DVD or 5 MULTI CH 1 2 3 4 5 6 7 8 9 J ON/STANDBY ZONE2 REMOTE MODE RECEIVER TAPE INPUT SELECTOR 1 2 3 V1 V2 V3 DVD M D/CDR C D HDD 4 5 6 ...remote controller is set to right: Pause, Play, Stop, Fast Reverse, Fast Forward, Previous, and Next. J DISPLAY button Displays information about the current disc, title, chapter, or track, including elapsed time, remaining time, total time, and so on a DVD changer. G Playback buttons From left to control an Onkyo...

Owner Manual
Page 16
... C DISC/ALBUM +/- E Playback buttons From left to enter track numbers and times for 30 seconds. H MENU button Used to control an Onkyo CD player. To select the input source, press: RECEIVER 9 CD player C D 7 MD or CD recorder TAPE 7 or 3 Next generation HDDcompatible component TAPE V3 * If you're... PLAYLIST/CAT RETURN SETUP M D/CDR C D HDD G 8 9 LISTENING MODE STEREO SURROUND AUDIO SUBTITLE RANDOM REPEAT TEST TONE CH SEL LEVEL- Remote Controller-Continued CD/MD/CDR/HDD Mode By default, the remote controller is set to navigate menus on an HDD-compatible component.
... C DISC/ALBUM +/- E Playback buttons From left to enter track numbers and times for 30 seconds. H MENU button Used to control an Onkyo CD player. To select the input source, press: RECEIVER 9 CD player C D 7 MD or CD recorder TAPE 7 or 3 Next generation HDDcompatible component TAPE V3 * If you're... PLAYLIST/CAT RETURN SETUP M D/CDR C D HDD G 8 9 LISTENING MODE STEREO SURROUND AUDIO SUBTITLE RANDOM REPEAT TEST TONE CH SEL LEVEL- Remote Controller-Continued CD/MD/CDR/HDD Mode By default, the remote controller is set to navigate menus on an HDD-compatible component.
Owner Manual
Page 36
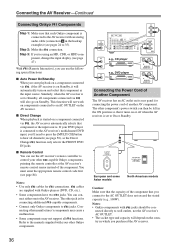
I Remote Control You can use the AV receiver's remote controller to control your other -capable Onkyo components, pointing the remote controller at the AV receiver's remote control sensor instead of Another Component The AV receiver has an AC outlet on the AV receiver. nect either one to the AV receiver. REMOTE CONTROL IN ...Onkyo components with Onkyo players (DVD, CD, etc.). • Some components have two jacks. With (Remote Interactive), you can use the following special functions: I Auto Power On/Standby When you 'll need to press the [MULTI CH] button to hear all channels...
I Remote Control You can use the AV receiver's remote controller to control your other -capable Onkyo components, pointing the remote controller at the AV receiver's remote control sensor instead of Another Component The AV receiver has an AC outlet on the AV receiver. nect either one to the AV receiver. REMOTE CONTROL IN ...Onkyo components with Onkyo players (DVD, CD, etc.). • Some components have two jacks. With (Remote Interactive), you can use the following special functions: I Auto Power On/Standby When you 'll need to press the [MULTI CH] button to hear all channels...
Owner Manual
Page 37
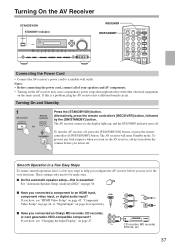
... surprises when you turn down the volume before you connected an Onkyo MD recorder, CD recorder, OUT IN or next generation HDD-compatible component? Turning On and Standby 1 AV receiver Remote controller STANDBY/ON RECEIVER or ON/STANDBY Press the [STANDBY/ON] button. Alternatively, press the remote controller's [RECEIVER] button, followed by the [ON/STANDBY] button. The AV...
... surprises when you turn down the volume before you connected an Onkyo MD recorder, CD recorder, OUT IN or next generation HDD-compatible component? Turning On and Standby 1 AV receiver Remote controller STANDBY/ON RECEIVER or ON/STANDBY Press the [STANDBY/ON] button. Alternatively, press the remote controller's [RECEIVER] button, followed by the [ON/STANDBY] button. The AV...
Owner Manual
Page 49
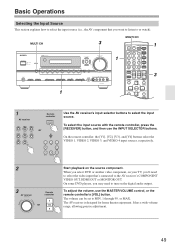
...PLAYLIST/CAT ENTER MUTING PLAYLIST/CAT RETURN SETUP 1 3 1 AV receiver DVD VIDEO 1 VIDEO 2 VIDEO 3 VCR 1 VIDEO 4 VCR 2 TAPE TUNER CD Remote controller RECEIVER or 1 V1 4 V4 7 TAPE 2 V2 8 TUNER 3 V3 6 DVD 9 C D Use the AV receiver's input selector buttons to MIN, 1 through 99, or MAX... can be set to select the input source. On the remote controller, the [V1], [V2], [V3], and [V4] buttons select the VIDEO 1, VIDEO 2, VIDEO 3, and VIDEO 4 input sources, respectively. 2 3 AV receiver Remote controller or VOL Start playback on the source component. Basic Operations ...
...PLAYLIST/CAT ENTER MUTING PLAYLIST/CAT RETURN SETUP 1 3 1 AV receiver DVD VIDEO 1 VIDEO 2 VIDEO 3 VCR 1 VIDEO 4 VCR 2 TAPE TUNER CD Remote controller RECEIVER or 1 V1 4 V4 7 TAPE 2 V2 8 TUNER 3 V3 6 DVD 9 C D Use the AV receiver's input selector buttons to MIN, 1 through 99, or MAX... can be set to select the input source. On the remote controller, the [V1], [V2], [V3], and [V4] buttons select the VIDEO 1, VIDEO 2, VIDEO 3, and VIDEO 4 input sources, respectively. 2 3 AV receiver Remote controller or VOL Start playback on the source component. Basic Operations ...

Owner Manual
Page 51
... the headphone level, press the [CH SEL] button on the remote controller, and then press the [LEVEL +]/[LEVEL -] buttons. ENT DIMMER SLEEP TV VOL INPUT GUIDE TOP MENU CH DISC ALBUM VOL PREVIOUS MENU PLAYLIST/CAT ENTER MUTING PLAYLIST/CAT Press [RECEIVER] first SLEEP MUTING Setting the Display Brightness You can temporarily...
... the headphone level, press the [CH SEL] button on the remote controller, and then press the [LEVEL +]/[LEVEL -] buttons. ENT DIMMER SLEEP TV VOL INPUT GUIDE TOP MENU CH DISC ALBUM VOL PREVIOUS MENU PLAYLIST/CAT ENTER MUTING PLAYLIST/CAT Press [RECEIVER] first SLEEP MUTING Setting the Display Brightness You can temporarily...

Owner Manual
Page 52
... one step at a time. When tuned into AM and FM stations directly by entering the appropriate frequency. 1 RECEIVER Press the [RECEIVER] button, followed by using the remote controller. ton, the input source changes between AM and FM. In Manual Tuning mode, FM stations will be impossible ...into Radio Stations I Manual Tuning Mode 1 TUNING MODE Press the [TUNING MODE] button so that the AUTO indicator appears on country.) The [RECEIVER] button flashes. TUNED AUTO FM STEREO 52 You can tune into a station, the TUNED indicator appears. Press the buttons repeatedly to ...
... one step at a time. When tuned into AM and FM stations directly by entering the appropriate frequency. 1 RECEIVER Press the [RECEIVER] button, followed by using the remote controller. ton, the input source changes between AM and FM. In Manual Tuning mode, FM stations will be impossible ...into Radio Stations I Manual Tuning Mode 1 TUNING MODE Press the [TUNING MODE] button so that the AUTO indicator appears on country.) The [RECEIVER] button flashes. TUNED AUTO FM STEREO 52 You can tune into a station, the TUNED indicator appears. Press the buttons repeatedly to ...

Owner Manual
Page 53
...] buttons to select a preset from the display. 53 Repeat this procedure for all of your favorite AM/FM radio stations and XM channels. See the previous section. 2 TUNING MEMORY MODE CLEAR While holding down the [MEMORY] button, press the [TUNING MODE] button.... Selecting Presets PRESET ON/STANDBY ZONE2 REMOTE MODE RECEIVER TAPE INPUT SELECTOR 1 2 3 V1 V2 V3 DVD M D/CDR C D HDD 4 5 6 TV V4 MULTI CH DVD 7 8 9 VCR TAPE TUNER 10 11 +10 0 C D 12 CABLE CLR SAT D TUN --/--- SET [ ]/[ ] buttons, or the remote controller's CH [+/-] but- ENTER 3 TUNING...
...] buttons to select a preset from the display. 53 Repeat this procedure for all of your favorite AM/FM radio stations and XM channels. See the previous section. 2 TUNING MEMORY MODE CLEAR While holding down the [MEMORY] button, press the [TUNING MODE] button.... Selecting Presets PRESET ON/STANDBY ZONE2 REMOTE MODE RECEIVER TAPE INPUT SELECTOR 1 2 3 V1 V2 V3 DVD M D/CDR C D HDD 4 5 6 TV V4 MULTI CH DVD 7 8 9 VCR TAPE TUNER 10 11 +10 0 C D 12 CABLE CLR SAT D TUN --/--- SET [ ]/[ ] buttons, or the remote controller's CH [+/-] but- ENTER 3 TUNING...

Owner Manual
Page 58
..., 7 8 9 press 0, 2, 0, or 2, 0, [ENT]. TAPE TUNER C D 11 12 0 CLR ENT DIMMER SLEEP Note: While the [RECEIVER] button is flashing, the input source cannot be changed by using the remote controller. 2 Use the Up and Down [ ]/[ ] buttons to select a category. 58 Channel number Channel name You can also use the Left and Right [ ]/[ ] buttons to select...
..., 7 8 9 press 0, 2, 0, or 2, 0, [ENT]. TAPE TUNER C D 11 12 0 CLR ENT DIMMER SLEEP Note: While the [RECEIVER] button is flashing, the input source cannot be changed by using the remote controller. 2 Use the Up and Down [ ]/[ ] buttons to select a category. 58 Channel number Channel name You can also use the Left and Right [ ]/[ ] buttons to select...

Owner Manual
Page 59
... SUBTITLE RANDOM REPEAT TEST TONE CH SEL LEVEL- edly to select "Channel Search" or "Category Search" mode. Selecting the Previous Channel: AV receiver RETURN To listen to select a channel. In Category Search mode, you can be displayed: Channel name Channel number & preset number Category Artist Remote controller RETURN Song title Listening mode Note: If the category, artist, or...
... SUBTITLE RANDOM REPEAT TEST TONE CH SEL LEVEL- edly to select "Channel Search" or "Category Search" mode. Selecting the Previous Channel: AV receiver RETURN To listen to select a channel. In Category Search mode, you can be displayed: Channel name Channel number & preset number Category Artist Remote controller RETURN Song title Listening mode Note: If the category, artist, or...

Owner Manual
Page 61
... and DTS listening modes and the Neural Surround* listening mode (*North American models only). Pressing this mode is selected, the AV receiver's display is connected to the AV receiver with the current input source. I [STEREO] button This button selects the Stereo listening mode. I [PURE AUDIO] button (not...only be selected if your DVD player is turned off and only video signals input through HDMI IN can be used with the Remote Controller STEREO SURROUND LISTENING MODE STEREO SURROUND AUDIO SUBTITLE RANDOM REPEAT TEST TONE CH SEL LEVEL- When this button again will select the ...
... and DTS listening modes and the Neural Surround* listening mode (*North American models only). Pressing this mode is selected, the AV receiver's display is connected to the AV receiver with the current input source. I [STEREO] button This button selects the Stereo listening mode. I [PURE AUDIO] button (not...only be selected if your DVD player is turned off and only video signals input through HDMI IN can be used with the Remote Controller STEREO SURROUND LISTENING MODE STEREO SURROUND AUDIO SUBTITLE RANDOM REPEAT TEST TONE CH SEL LEVEL- When this button again will select the ...


