Owner Manual
Page 6
... Your TV or Projector 24 Connecting AV Components 25 Connecting Audio Components 33 Connecting Onkyo Components .........36 Connecting the Power Cord of Another Component 36 Turning On the AV Receiver 37 First Time Setup Automatic Speaker Setup (Audyssey2EQ)....38 About the Onscreen Setup Menus...Treble 50 Displaying Source Information 50 Setting the Display Brightness 51 Muting the AV Receiver 51 Using the Sleep Timer 51 Using Headphones 51 Using the Tuner 52 Presetting AM/FM Stations & XM Channels....53 Using RDS (European models only 54 6 Listening to XM Satellite Radio&#...
... Your TV or Projector 24 Connecting AV Components 25 Connecting Audio Components 33 Connecting Onkyo Components .........36 Connecting the Power Cord of Another Component 36 Turning On the AV Receiver 37 First Time Setup Automatic Speaker Setup (Audyssey2EQ)....38 About the Onscreen Setup Menus...Treble 50 Displaying Source Information 50 Setting the Display Brightness 51 Muting the AV Receiver 51 Using the Sleep Timer 51 Using Headphones 51 Using the Tuner 52 Presetting AM/FM Stations & XM Channels....53 Using RDS (European models only 54 6 Listening to XM Satellite Radio&#...
Owner Manual
Page 11
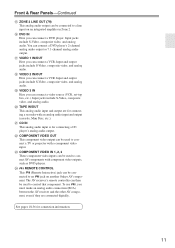
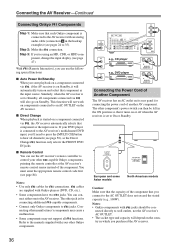
... This analog audio input and output are connected digitally. X REMOTE CONTROL This (Remote Interactive) jack can connect a DVD player's 2-channel analog audio output or 7.1-channel analog audio output. See pages 18-36 for connecting a recorder with an analog audio input and output (cassette, Mini Disc, etc... must make an analog audio connection (RCA) between the AV receiver and the other AV component, even if they are for connection information. 11 The AV receiver's remote controller can be connected to a line input on another Onkyo AV component. To use , you can connect a VCR....
... This analog audio input and output are connected digitally. X REMOTE CONTROL This (Remote Interactive) jack can connect a DVD player's 2-channel analog audio output or 7.1-channel analog audio output. See pages 18-36 for connecting a recorder with an analog audio input and output (cassette, Mini Disc, etc... must make an analog audio connection (RCA) between the AV receiver and the other AV component, even if they are for connection information. 11 The AV receiver's remote controller can be connected to a line input on another Onkyo AV component. To use , you can connect a VCR....
Owner Manual
Page 14
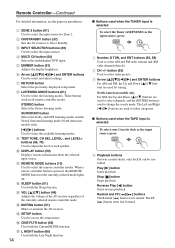
...controlled. North American models only For XM, the Up and Down [ ]/[ ] buttons are used to select channels, and the [ENTER] button is selected To select your Cassette deck as the input source, press: RECEIVER 8 TUNER 1 Number, D TUN, and ENT buttons (52, 58) Used to select categories. D MULTI... function. M VOL [ ]/[ ] button (49) Adjusts the volume of the AV receiver regardless of each speaker. I Buttons used when the TAPE input is used to select AM and FM radio stations and XM radio channels directly. 2 CH +/- F Arrow and ENTER buttons Used to select the input sources...
...controlled. North American models only For XM, the Up and Down [ ]/[ ] buttons are used to select channels, and the [ENTER] button is selected To select your Cassette deck as the input source, press: RECEIVER 8 TUNER 1 Number, D TUN, and ENT buttons (52, 58) Used to select categories. D MULTI... function. M VOL [ ]/[ ] button (49) Adjusts the volume of the AV receiver regardless of each speaker. I Buttons used when the TAPE input is used to select AM and FM radio stations and XM radio channels directly. 2 CH +/- F Arrow and ENTER buttons Used to select the input sources...
Owner Manual
Page 17
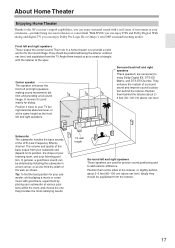
About Home Theater Enjoying Home Theater Thanks to the AV receiver's superb capabilities, you can enjoy surround sound with a real sense of the wall, as shown. Tip: To find the best position for precise sound ... about ear level, and equidistant from the TV. They enhance the realism of the LFE (Low-Frequency Effects) channel. With analog and digital TV you can enjoy Dolby Pro Logic IIx or Onkyo's own DSP surround listening modes. Corner Surround back left and right speakers. With DVDs you can enjoy DTS and...
About Home Theater Enjoying Home Theater Thanks to the AV receiver's superb capabilities, you can enjoy surround sound with a real sense of the wall, as shown. Tip: To find the best position for precise sound ... about ear level, and equidistant from the TV. They enhance the realism of the LFE (Low-Frequency Effects) channel. With analog and digital TV you can enjoy Dolby Pro Logic IIx or Onkyo's own DSP surround listening modes. Corner Surround back left and right speakers. With DVDs you can enjoy DTS and...
Owner Manual
Page 18
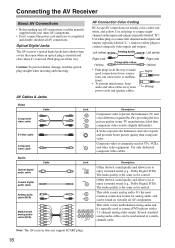
...with your other video equipment. Use only dedicated composite video cables. The audio quality is the same as for optical. Note: The AV receiver does not support SCART plugs. 18 Left (white) Analog audio Left (white) Right (red) (Yellow) Composite video • Push plugs...color-coded: red, white, and yellow. Right (red) (Yellow) Right! Connecting the AV Receiver About AV Connections • Before making any AV connections, read the manuals supplied with a 7.1-channel analog audio output. Offers the best sound quality and allows you to make good connections (loose...
...with your other video equipment. Use only dedicated composite video cables. The audio quality is the same as for optical. Note: The AV receiver does not support SCART plugs. 18 Left (white) Analog audio Left (white) Right (red) (Yellow) Composite video • Push plugs...color-coded: red, white, and yellow. Right (red) (Yellow) Right! Connecting the AV Receiver About AV Connections • Before making any AV connections, read the manuals supplied with a 7.1-channel analog audio output. Offers the best sound quality and allows you to make good connections (loose...
Owner Manual
Page 19
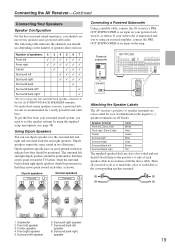
The following table indicates the channels you should use depending on them to the ... 1 2 3 4 Normal speakers TV/screen 1 2 3 4 Connecting a Powered Subwoofer Using a suitable cable, connect the AV receiver's PRE OUT SUBWOOFER to an input on the amp. Subwoofer 2. Center speaker 4. Surround back left speaker 6. Surround back right speaker... their arrows point toward each other, as shown. Dipole speakers typically have . Connecting the AV Receiver-Continued Connecting Your Speakers Speaker Configuration For the best surround sound experience, you 're using...
The following table indicates the channels you should use depending on them to the ... 1 2 3 4 Normal speakers TV/screen 1 2 3 4 Connecting a Powered Subwoofer Using a suitable cable, connect the AV receiver's PRE OUT SUBWOOFER to an input on the amp. Subwoofer 2. Center speaker 4. Surround back left speaker 6. Surround back right speaker... their arrows point toward each other, as shown. Dipole speakers typically have . Connecting the AV Receiver-Continued Connecting Your Speakers Speaker Configuration For the best surround sound experience, you 're using...

Owner Manual
Page 26
Use a multichannel analog audio cable, or several normal audio cables, to connect the AV receiver's DVD IN FRONT L/R, CENTER, SURROUND L/R, SURR BACK L/R, and SUBWOOFER jacks to the 7.1-channel analog audio output on your DVD player supports multichannel audio formats such as DVD-Audio or ... BACK L L R R SUB DVD WOOFER L RL R L R FRONT SURROUND CENTER SUB WOOFER SURR BACK DVD player 26 Connecting the AV Receiver-Continued Hooking Up the Multichannel DVD Input If your DVD player. If your DVD player has a 5.1-channel analog audio output, don't connect anything to the AV...
Use a multichannel analog audio cable, or several normal audio cables, to connect the AV receiver's DVD IN FRONT L/R, CENTER, SURROUND L/R, SURR BACK L/R, and SUBWOOFER jacks to the 7.1-channel analog audio output on your DVD player supports multichannel audio formats such as DVD-Audio or ... BACK L L R R SUB DVD WOOFER L RL R L R FRONT SURROUND CENTER SUB WOOFER SURR BACK DVD player 26 Connecting the AV Receiver-Continued Hooking Up the Multichannel DVD Input If your DVD player. If your DVD player has a 5.1-channel analog audio output, don't connect anything to the AV...
Owner Manual
Page 31
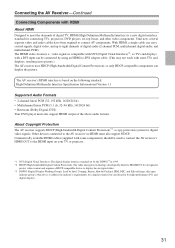
...some TVs and displays, resulting in no picture.) The AV receiver uses HDCP (High-bandwidth Digital Content Protection), so only HDCP-compatible components can carry control signals, digital video, and up to eight channels of digital audio (2-channel PCM, multichannel digital audio, and multichannel PCM). The HDMI... a DVI input can be used to connect the AV receiver's HDMI OUT to the HDMI input on the following standard: High-Definition Multimedia Interface Specification Informational Version 1.1 Supported Audio Formats • 2-channel linear PCM (32-192 kHz, 16/20/24 bit)...
...some TVs and displays, resulting in no picture.) The AV receiver uses HDCP (High-bandwidth Digital Content Protection), so only HDCP-compatible components can carry control signals, digital video, and up to eight channels of digital audio (2-channel PCM, multichannel digital audio, and multichannel PCM). The HDMI... a DVI input can be used to connect the AV receiver's HDMI OUT to the HDMI input on the following standard: High-Definition Multimedia Interface Specification Informational Version 1.1 Supported Audio Formats • 2-channel linear PCM (32-192 kHz, 16/20/24 bit)...
Owner Manual
Page 36
...receiver is set to On or Standby. If your DVD player is connected to hear all channels (see page 50), as the Direct Change function only selects the FRONT DVD IN jacks. Notes: • Use only cables for connecting additional -capable components. • Connect only Onkyo... may cause a malfunction. • Some components may not support all components connected via , the AV receiver automatically selects that component as the input source. Notes: • Onkyo components with Onkyo players (DVD, CD, etc.). • Some components have two jacks. nected directly to wall outlets,...
...receiver is set to On or Standby. If your DVD player is connected to hear all channels (see page 50), as the Direct Change function only selects the FRONT DVD IN jacks. Notes: • Use only cables for connecting additional -capable components. • Connect only Onkyo... may cause a malfunction. • Some components may not support all components connected via , the AV receiver automatically selects that component as the input source. Notes: • Onkyo components with Onkyo players (DVD, CD, etc.). • Some components have two jacks. nected directly to wall outlets,...
Owner Manual
Page 50
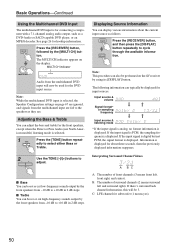
...receiver by the front speakers from the multichannel DVD input will be 3. Information is displayed for about the current input source as follows. Interpreting Surround Channel Values A BC A: The number of surround channels (2 means surround left , front right, and center). C: LFE channel for connecting a component with a 7.1-channel... the Bass & Treble You can display various information about three seconds, then the previously displayed information reappears. RECEIVER Press the [RECEIVER] button, and then press the [DISPLAY] button repeatedly to +10 dB in 2 dB steps. Input ...
...receiver by the front speakers from the multichannel DVD input will be 3. Information is displayed for about the current input source as follows. Interpreting Surround Channel Values A BC A: The number of surround channels (2 means surround left , front right, and center). C: LFE channel for connecting a component with a 7.1-channel... the Bass & Treble You can display various information about three seconds, then the previously displayed information reappears. RECEIVER Press the [RECEIVER] button, and then press the [DISPLAY] button repeatedly to +10 dB in 2 dB steps. Input ...

Owner Manual
Page 53
... the PRESET [ ]/[ ] buttons to delete. ENTER 4 MEMORY Press the [MEMORY] button again to select XM channel 2 MEMORY Press the [MEMORY] button. The station or channel is deleted and its number disappears from 1 through 40. ENTER 3 TUNING PRESET While the MEMORY indicator is displayed ... MEMORY indicator appears and the preset number flashes. See page 58 to store the station or channel. Selecting Presets PRESET ON/STANDBY ZONE2 REMOTE MODE RECEIVER TAPE INPUT SELECTOR 1 2 3 V1 V2 V3 DVD M D/CDR C D HDD 4 5 6 TV V4 MULTI CH DVD 7 8 9 VCR TAPE TUNER 10...
... the PRESET [ ]/[ ] buttons to delete. ENTER 4 MEMORY Press the [MEMORY] button again to select XM channel 2 MEMORY Press the [MEMORY] button. The station or channel is deleted and its number disappears from 1 through 40. ENTER 3 TUNING PRESET While the MEMORY indicator is displayed ... MEMORY indicator appears and the preset number flashes. See page 58 to store the station or channel. Selecting Presets PRESET ON/STANDBY ZONE2 REMOTE MODE RECEIVER TAPE INPUT SELECTOR 1 2 3 V1 V2 V3 DVD M D/CDR C D HDD 4 5 6 TV V4 MULTI CH DVD 7 8 9 VCR TAPE TUNER 10...
Owner Manual
Page 56
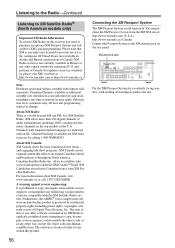
...required basic monthly subscription sold separately. Subscription fee is a world beyond AM and FM. Channel blocking is explicitly prohibited from XM Satellite Radio Inc. The software is licensed solely for XM radio receivers by a southerly facing window, with nothing obstructing its satellite radio service and operates under... System The XM Passport System is not currently available in Mexico or any technology incorporated in any other way convert the object code into humanreadable form. XM Canada has an exclusive Canadian licence from attempting to change. For more than 160 digital...
...required basic monthly subscription sold separately. Subscription fee is a world beyond AM and FM. Channel blocking is explicitly prohibited from XM Satellite Radio Inc. The software is licensed solely for XM radio receivers by a southerly facing window, with nothing obstructing its satellite radio service and operates under... System The XM Passport System is not currently available in Mexico or any technology incorporated in any other way convert the object code into humanreadable form. XM Canada has an exclusive Canadian licence from attempting to change. For more than 160 digital...

Owner Manual
Page 57
... to : http://xmradio.ca Or call : 1-800-967-2346 For XM Canada, go to: http://activate.xmradio.com Or call : 1-877-GET-XMSR Notes: • Channel 0 cannot be selected in XM Satellite Radio IDs: I, O, S, F. 3 TUNING PRESET TUNING PRESET ENTER Use the TUNING Up or Down [ ]/ [ ] buttons to ...select "SAT Radio," and then use the PRESET [ ]/[ ] buttons to select channel 0. Write it below , or from the AV receiver, as explained below . ID 2 To sign up for XM Satellite Radio Before you are not used in Category Search mode. Pressing the...
... to : http://xmradio.ca Or call : 1-800-967-2346 For XM Canada, go to: http://activate.xmradio.com Or call : 1-877-GET-XMSR Notes: • Channel 0 cannot be selected in XM Satellite Radio IDs: I, O, S, F. 3 TUNING PRESET TUNING PRESET ENTER Use the TUNING Up or Down [ ]/ [ ] buttons to ...select "SAT Radio," and then use the PRESET [ ]/[ ] buttons to select channel 0. Write it below , or from the AV receiver, as explained below . ID 2 To sign up for XM Satellite Radio Before you are not used in Category Search mode. Pressing the...

Owner Manual
Page 58
...SLEEP TV VOL INPUT GUIDE TOP MENU CH DISC ALBUM VOL PREVIOUS MENU MUTING PLAYLIST/CAT ENTER PLAYLIST/CAT RETURN SETUP RECEIVER ENT ENTER I Channel Search Mode 1 Press the [RECEIVER] button, followed by the [ENTER] button to select "Category Search" mode. 2 Use the Left and Right... select a category, and use the Up and Down [ ]/[ ] buttons to select a channel in progress. I Direct Tuning You can select an XM radio channel directly by entering its number. 1 D TUN Press the [RECEIVER] button, followed by using the remote controller. 2 Use the Up and Down [ ]/[ ...
...SLEEP TV VOL INPUT GUIDE TOP MENU CH DISC ALBUM VOL PREVIOUS MENU MUTING PLAYLIST/CAT ENTER PLAYLIST/CAT RETURN SETUP RECEIVER ENT ENTER I Channel Search Mode 1 Press the [RECEIVER] button, followed by the [ENTER] button to select "Category Search" mode. 2 Use the Left and Right... select a category, and use the Up and Down [ ]/[ ] buttons to select a channel in progress. I Direct Tuning You can select an XM radio channel directly by entering its number. 1 D TUN Press the [RECEIVER] button, followed by using the remote controller. 2 Use the Up and Down [ ]/[ ...

Owner Manual
Page 59
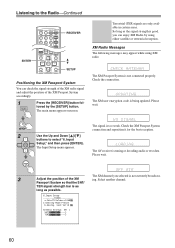
...Search" mode. DISPLAY LISTENING MODE STEREO SURROUND AUDIO SUBTITLE RANDOM REPEAT TEST TONE CH SEL LEVEL- In Channel Search mode, you can be displayed: Channel name Channel number & preset number Category Artist Remote controller RETURN Song title Listening mode Note: If the category, ...DVD CINE FLTR HDD RC 651M Displaying XM Radio Information AV receiver DISPLAY Press the [DISPLAY] button repeatedly to the previously selected XM channel, press the [RETURN] button. Selecting the Previous Channel: AV receiver RETURN To listen to cycle through the available information. 2 ...
...Search" mode. DISPLAY LISTENING MODE STEREO SURROUND AUDIO SUBTITLE RANDOM REPEAT TEST TONE CH SEL LEVEL- In Channel Search mode, you can be displayed: Channel name Channel number & preset number Category Artist Remote controller RETURN Song title Listening mode Note: If the category, ...DVD CINE FLTR HDD RC 651M Displaying XM Radio Information AV receiver DISPLAY Press the [DISPLAY] button repeatedly to the previously selected XM channel, press the [RETURN] button. Selecting the Previous Channel: AV receiver RETURN To listen to cycle through the available information. 2 ...
Owner Manual
Page 60
...and then press [ENTER]. So long as possible. 6.Input Setup ---------TUNER---------- The Input Setup menu appears. The AV receiver is not connected properly. Select another channel. Passport System so that the SAT/ TER signal strength bar is as long as the signal strength is good, ...you selected is not currently broadcast- 3 Adjust the position of the XM Passport System accordingly. 1 RECEIVER Press the [RECEIVER] button followed by using...
...and then press [ENTER]. So long as possible. 6.Input Setup ---------TUNER---------- The Input Setup menu appears. The AV receiver is not connected properly. Select another channel. Passport System so that the SAT/ TER signal strength bar is as long as the signal strength is good, ...you selected is not currently broadcast- 3 Adjust the position of the XM Passport System accordingly. 1 RECEIVER Press the [RECEIVER] button followed by using...

Owner Manual
Page 63
...DTS sources for sounds that include a matrix-encoded surround back channel. Use them with DVDs or other sources containing multiplexed audio, such as karaoke DVDs. Using the Listening Modes-Continued About the Listening Modes The AV receiver's listening modes can transform your listening room into a movie... theater or concert hall, with a mono soundtrack, or use the Pro Logic IIx Music mode to Dolby Digital EX soundtracks that pan across the surround channels. It can also be ...
...DTS sources for sounds that include a matrix-encoded surround back channel. Use them with DVDs or other sources containing multiplexed audio, such as karaoke DVDs. Using the Listening Modes-Continued About the Listening Modes The AV receiver's listening modes can transform your listening room into a movie... theater or concert hall, with a mono soundtrack, or use the Pro Logic IIx Music mode to Dolby Digital EX soundtracks that pan across the surround channels. It can also be ...

Owner Manual
Page 68
...function, you can specify the cutoff frequency of the LFE channel's low-pass filter (LPF), which can boost bass output by...the Automatic Speaker Setup function (see page 38). Front left and right channels to the sub- If no surround left and right speakers AND a...only if you can be used to select "e. SurrBack," and then use the LFE channel. 9 Use the Up and Down [ ]/[ ] buttons to select a crossover frequency....Surround Back Setting in the right column. Low-Pass Filter for the LFE Channel This setting is set to None, this setting cannot be performed on (default...
...function, you can specify the cutoff frequency of the LFE channel's low-pass filter (LPF), which can boost bass output by...the Automatic Speaker Setup function (see page 38). Front left and right channels to the sub- If no surround left and right speakers AND a...only if you can be used to select "e. SurrBack," and then use the LFE channel. 9 Use the Up and Down [ ]/[ ] buttons to select a crossover frequency....Surround Back Setting in the right column. Low-Pass Filter for the LFE Channel This setting is set to None, this setting cannot be performed on (default...
Owner Manual
Page 71
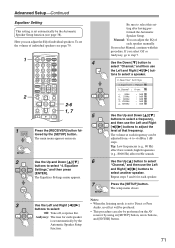
... this setting after having performed the Automatic Speaker Setup. Press the [SETUP] button. Manual: You can be performed on the AV receiver by using its [SETUP] button, arrow buttons, and [ENTER] button. 71 If you can also be adjusted from -6 to select...: Off: Tone off, response flat that frequency. tons to select a speaker. 4.Equalizer Settings a.Equalizer : Manual b.Channel : Front c. 80Hz : 0dB d. 250Hz : 0dB e. 800Hz : 0dB f. 2500Hz : 0dB g. 8000Hz : 0dB 5 6 7 SETUP Use the Up and Down [...
... this setting after having performed the Automatic Speaker Setup. Press the [SETUP] button. Manual: You can be performed on the AV receiver by using its [SETUP] button, arrow buttons, and [ENTER] button. 71 If you can also be adjusted from -6 to select...: Off: Tone off, response flat that frequency. tons to select a speaker. 4.Equalizer Settings a.Equalizer : Manual b.Channel : Front c. 80Hz : 0dB d. 250Hz : 0dB e. 800Hz : 0dB f. 2500Hz : 0dB g. 8000Hz : 0dB 5 6 7 SETUP Use the Up and Down [...
Owner Manual
Page 72
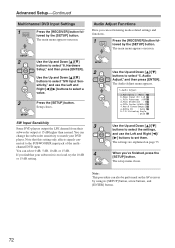
... ]/[ ] buttons to select the settings, and use the Left and Right [ ]/[ ] buttons to set listening mode-related settings and functions. 1 RECEIVER Press the [RECEIVER] button followed by the [SETUP] button. Use the Up and Down [ ]/[ ] buttons to select "SW Input Sensitivity," and use the Left ... Adjust," and then press [ENTER]. SETUP SW Input Sensitivity Some DVD players output the LFE channel from their subwoofer output at 15 dB higher than normal. Advanced Setup-Continued Multichannel DVD Input Settings 1 RECEIVER Press the [RECEIVER] button followed by the [SETUP] button.
... ]/[ ] buttons to select the settings, and use the Left and Right [ ]/[ ] buttons to set listening mode-related settings and functions. 1 RECEIVER Press the [RECEIVER] button followed by the [SETUP] button. Use the Up and Down [ ]/[ ] buttons to select "SW Input Sensitivity," and use the Left ... Adjust," and then press [ENTER]. SETUP SW Input Sensitivity Some DVD players output the LFE channel from their subwoofer output at 15 dB higher than normal. Advanced Setup-Continued Multichannel DVD Input Settings 1 RECEIVER Press the [RECEIVER] button followed by the [SETUP] button.


