Owner Manual
Page 4
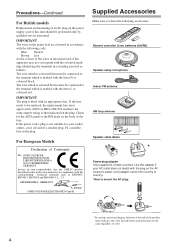
...your AC outlet does not match with the plug on the AV receiver's power cord (adapter varies from country to country). *How to... L or coloured red. For European Models Declaration of Conformity We, ONKYO EUROPE ELECTRONICS GmbH LIEGNITZERSTRASSE 6, 82194 GROEBENZELL, GERMANY declare in own responsibility.... Specifications and operations are coloured in accordance with the following accessories: Remote controller & two batteries (AA/R6) Speaker setup microphone Indoor FM antenna AM ... by ASTA or BSI to BS1362 and have the following code: Blue: Neutral Brown: Live As the colours of the...
...your AC outlet does not match with the plug on the AV receiver's power cord (adapter varies from country to country). *How to... L or coloured red. For European Models Declaration of Conformity We, ONKYO EUROPE ELECTRONICS GmbH LIEGNITZERSTRASSE 6, 82194 GROEBENZELL, GERMANY declare in own responsibility.... Specifications and operations are coloured in accordance with the following accessories: Remote controller & two batteries (AA/R6) Speaker setup microphone Indoor FM antenna AM ... by ASTA or BSI to BS1362 and have the following code: Blue: Neutral Brown: Live As the colours of the...

Owner Manual
Page 5
...Niles Audio Corporation. Features Amplifier • 7-channel amplifier • Optimum Gain Volume Circuitry • Zone 2 capability • 24-bit/192 kHz D/A converters • WRAT (Wide Range Amplifier Technology) • Color-coded speaker terminal posts Audio/Video • Dolby*1 Digital,... related logos are trademarks of Onkyo Corporation. HDMI, the HDMI logo and High Definition Multimedia Interface are the property of HDMI Licensing, LLC. *5. All other AV components TX-SR674/674E and TX-SR8467 Only • 95 watts per channel into 8 ohms, 20 Hz...
...Niles Audio Corporation. Features Amplifier • 7-channel amplifier • Optimum Gain Volume Circuitry • Zone 2 capability • 24-bit/192 kHz D/A converters • WRAT (Wide Range Amplifier Technology) • Color-coded speaker terminal posts Audio/Video • Dolby*1 Digital,... related logos are trademarks of Onkyo Corporation. HDMI, the HDMI logo and High Definition Multimedia Interface are the property of HDMI Licensing, LLC. *5. All other AV components TX-SR674/674E and TX-SR8467 Only • 95 watts per channel into 8 ohms, 20 Hz...
Owner Manual
Page 6
...Displaying Source Information 50 Setting the Display Brightness 51 Muting the AV Receiver 51 Using the Sleep Timer 51 Using Headphones 51 Using the Tuner 52 Presetting AM/FM Stations & XM Channels....53 Using RDS (European models only 54 6 Listening to XM ...Remote Controller's ID ......... 78 Zone 2 Connecting Zone 2 79 Setting the Powered Zone 2 80 Using Zone 2 81 Using the Remote Control in Zone 2 82 Controlling Other Components Entering Remote Control Codes 83 Remote Control Codes for Onkyo Components Connected via 84 Resetting REMOTE MODE Buttons 84 Resetting the Remote...
...Displaying Source Information 50 Setting the Display Brightness 51 Muting the AV Receiver 51 Using the Sleep Timer 51 Using Headphones 51 Using the Tuner 52 Presetting AM/FM Stations & XM Channels....53 Using RDS (European models only 54 6 Listening to XM ...Remote Controller's ID ......... 78 Zone 2 Connecting Zone 2 79 Setting the Powered Zone 2 80 Using Zone 2 81 Using the Remote Control in Zone 2 82 Controlling Other Components Entering Remote Control Codes 83 Remote Control Codes for Onkyo Components Connected via 84 Resetting REMOTE MODE Buttons 84 Resetting the Remote...

Owner Manual
Page 13
... page 83). By entering the appropriate remote control code, you can also be used when the TUNER or TAPE input is used to control different components including the AV receiver. It can control RECEIVER the AV receiver and an Onkyo cassette TAPE recorder connected via . 1 2 3 4 1 5 2 36 7 4 8 9 J ON/STANDBY ZONE2 REMOTE MODE RECEIVER TAPE INPUT SELECTOR 1 2 3 V1 V2 V3...
... page 83). By entering the appropriate remote control code, you can also be used when the TUNER or TAPE input is used to control different components including the AV receiver. It can control RECEIVER the AV receiver and an Onkyo cassette TAPE recorder connected via . 1 2 3 4 1 5 2 36 7 4 8 9 J ON/STANDBY ZONE2 REMOTE MODE RECEIVER TAPE INPUT SELECTOR 1 2 3 V1 V2 V3...
Owner Manual
Page 36
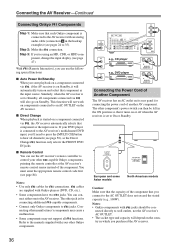
...code first (see pages 24 to 35). nect either one to the AV receiver. You can then be con- Notes: • Use only cables for connecting the power cord of Another Component The AV receiver has an AC outlet on its rear panel for connections. The other -capable Onkyo components, pointing the remote...'s components may cause a malfunction. • Some components may not support all channels (see page 47). Similarly, when the AV receiver is set to On or Standby. Notes: • Onkyo components with an analog audio cable (connection a in the hookup examples) (see...
...code first (see pages 24 to 35). nect either one to the AV receiver. You can then be con- Notes: • Use only cables for connecting the power cord of Another Component The AV receiver has an AC outlet on its rear panel for connections. The other -capable Onkyo components, pointing the remote...'s components may cause a malfunction. • Some components may not support all channels (see page 47). Similarly, when the AV receiver is set to On or Standby. Notes: • Onkyo components with an analog audio cable (connection a in the hookup examples) (see...
Owner Manual
Page 60
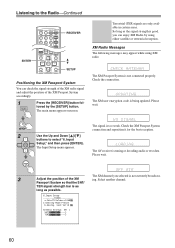
...the connection. The XM user encryption code is good, you selected is not currently broadcast- 3 Adjust the position of the XM Passport System accordingly. 1 RECEIVER Press the [RECEIVER] button followed by using XM ... updated. SETUP 2 Use the Up and Down [ ]/[ ] buttons to the Radio-Continued ENTER ON/STANDBY ZONE2 REMOTE MODE RECEIVER TAPE INPUT SELECTOR 1 2 3 V1 V2 V3 DVD M D/CDR C D HDD 4 5 6 TV V4 ... PLAYLIST/CAT RETURN SETUP RECEIVER SETUP Positioning the XM Passport System You can enjoy XM Radio by the [SETUP] button. The XM channel you can check the ...
...the connection. The XM user encryption code is good, you selected is not currently broadcast- 3 Adjust the position of the XM Passport System accordingly. 1 RECEIVER Press the [RECEIVER] button followed by using XM ... updated. SETUP 2 Use the Up and Down [ ]/[ ] buttons to the Radio-Continued ENTER ON/STANDBY ZONE2 REMOTE MODE RECEIVER TAPE INPUT SELECTOR 1 2 3 V1 V2 V3 DVD M D/CDR C D HDD 4 5 6 TV V4 ... PLAYLIST/CAT RETURN SETUP RECEIVER SETUP Positioning the XM Passport System You can enjoy XM Radio by the [SETUP] button. The XM channel you can check the ...
Owner Manual
Page 76
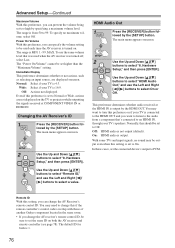
... use the same volume level that 's connected to change this if the remote controller's control codes overlap with those of another Onkyo component located in the same room. • If you can specify the volume setting to be used when the AV receiver was turned off, select Last. Normally, this should be set to...
... use the same volume level that 's connected to change this if the remote controller's control codes overlap with those of another Onkyo component located in the same room. • If you can specify the volume setting to be used when the AV receiver was turned off, select Last. Normally, this should be set to...

Owner Manual
Page 78
... [ ]/[ ] buttons to adjust the delay from 0 to another component. To differentiate the remote controller's control codes, you can be sure to correct. second steps. 1 Press the [RECEIVER] and the [CINE FLTR] at the same time. Changing the Remote Controller's ID If several Onkyo components are out of another number. The default ID for the input...
... [ ]/[ ] buttons to adjust the delay from 0 to another component. To differentiate the remote controller's control codes, you can be sure to correct. second steps. 1 Press the [RECEIVER] and the [CINE FLTR] at the same time. Changing the Remote Controller's ID If several Onkyo components are out of another number. The default ID for the input...
Owner Manual
Page 83
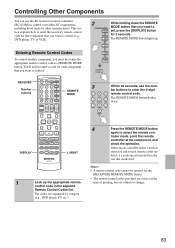
... twice. 4 Press the REMOTE MODE button again to a REMOTE MODE button. Entering Remote Control Codes To control another component, you want to REMOTE MODE DVD set, press the [DISPLAY] button for the [RECEIVER] REMOTE MODE button. • The remote control codes provided are subject to change. 83 If the remote controller doesn't work as expected, and several remote codes are organized by...
... twice. 4 Press the REMOTE MODE button again to a REMOTE MODE button. Entering Remote Control Codes To control another component, you want to REMOTE MODE DVD set, press the [DISPLAY] button for the [RECEIVER] REMOTE MODE button. • The remote control codes provided are subject to change. 83 If the remote controller doesn't work as expected, and several remote codes are organized by...
Owner Manual
Page 84
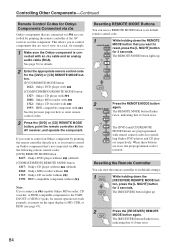
... (see page 47). The [RECEIVER] button lights up . Controlling Other Components-Continued Remote Control Codes for 3 seconds. The REMOTE MODE button flashes twice, indicating that it , or you want to DVD reset, press the [L NIGHT] button for Onkyo Components Connected via , use the following remote control codes: [DVD] REMOTE MODE button 0627: Onkyo DVD player without (default) [CD...
... (see page 47). The [RECEIVER] button lights up . Controlling Other Components-Continued Remote Control Codes for 3 seconds. The REMOTE MODE button flashes twice, indicating that it , or you want to DVD reset, press the [L NIGHT] button for Onkyo Components Connected via , use the following remote control codes: [DVD] REMOTE MODE button 0627: Onkyo DVD player without (default) [CD...
Owner Manual
Page 89
...; TX-SR674/674E/8467: If both the AV receiver and remote controller (pages 76 and 78). Remote Controller The remote controller doesn't work properly, you must set to "---," the immediate display is output to a device connected to the HDMI OUT. Be sure to enter the appropriate remote control code first (page 84). • To control an Onkyo component...
...; TX-SR674/674E/8467: If both the AV receiver and remote controller (pages 76 and 78). Remote Controller The remote controller doesn't work properly, you must set to "---," the immediate display is output to a device connected to the HDMI OUT. Be sure to enter the appropriate remote control code first (page 84). • To control an Onkyo component...


