Owner Manual
Page 4
...be connected to prevent damage from leakage or corrosion. IMPORTANT The wires in the mains lead are the same regardless of color. MIYAGI ONKYO EUROPE ELECTRONICS GmbH Supplied Accessories Make sure you intend not to use the remote controller, point it off and fit a suitable plug...in accordance with the following accessories: Indoor FM antenna (➔ 20) AM loop antenna (➔ 20) Speaker cable labels (➔ 13) Speaker setup microphone (➔ 26) Remote controller and two batteries (AA/R6) (Note for China: The battery for the remote controller is marked with the letter...
...be connected to prevent damage from leakage or corrosion. IMPORTANT The wires in the mains lead are the same regardless of color. MIYAGI ONKYO EUROPE ELECTRONICS GmbH Supplied Accessories Make sure you intend not to use the remote controller, point it off and fit a suitable plug...in accordance with the following accessories: Indoor FM antenna (➔ 20) AM loop antenna (➔ 20) Speaker cable labels (➔ 13) Speaker setup microphone (➔ 26) Remote controller and two batteries (AA/R6) (Note for China: The battery for the remote controller is marked with the letter...
Owner Manual
Page 5
... Mode Preset 49 Miscellaneous 50 Hardware Setup 50 Lock Setup 52 Using the Audio Settings 52 Adjusting the Bass & Treble 54 Zone 2 55 Connecting Zone 2 55 Setting the Powered Zone 2 56 Using Zone 2 56 Controlling iPod & Other Components Controlling iPod 58 Connecting an Onkyo Dock 58 Using the Onkyo Dock 59 Controlling Your iPod...
... Mode Preset 49 Miscellaneous 50 Hardware Setup 50 Lock Setup 52 Using the Audio Settings 52 Adjusting the Bass & Treble 54 Zone 2 55 Connecting Zone 2 55 Setting the Powered Zone 2 56 Using Zone 2 56 Controlling iPod & Other Components Controlling iPod 58 Connecting an Onkyo Dock 58 Using the Onkyo Dock 59 Controlling Your iPod...

Owner Manual
Page 8
...button (North American and Taiwan models) (➔ 23) K MEMORY button (➔ 29) L TUNING MODE button (➔ 28) M DISPLAY button (➔ 23) En N SETUP button (➔ 38) 8 O TUNING, PRESET (➔ 28 to 29), arrow and ENTER buttons P RETURN button Q MASTER VOLUME control (➔ 23) R PHONES jack (&#... 23) U AUX INPUT LINE IN jack (➔ 18) V AUX INPUT VIDEO jack (➔ 18) W AUX INPUT AUDIO jacks (➔ 18) X SETUP MIC jack (➔ 26) Y PURE AUDIO button and indicator (European, Australian and Asian models) (➔ 32) Z RT/PTY/TP button (European, Australian ...
...button (North American and Taiwan models) (➔ 23) K MEMORY button (➔ 29) L TUNING MODE button (➔ 28) M DISPLAY button (➔ 23) En N SETUP button (➔ 38) 8 O TUNING, PRESET (➔ 28 to 29), arrow and ENTER buttons P RETURN button Q MASTER VOLUME control (➔ 23) R PHONES jack (&#... 23) U AUX INPUT LINE IN jack (➔ 18) V AUX INPUT VIDEO jack (➔ 18) W AUX INPUT AUDIO jacks (➔ 18) X SETUP MIC jack (➔ 26) Y PURE AUDIO button and indicator (European, Australian and Asian models) (➔ 32) Z RT/PTY/TP button (European, Australian ...

Owner Manual
Page 11
...cut of HOME. Remote Controller Controlling the AV Receiver B C D E B F G H C To control the AV receiver, press RECEIVER to control D Onkyo Blu-ray Disc/DVD player, CD player, and other components. J For detailed information, see the pages in parentheses. B ON/STANDBY button (➔ 22...) K C REMOTE MODE/INPUT SELECTOR buttons (➔ 23) E D SP LAYOUT button (➔ 24) E Arrow R/X/F/S and ENTER buttons *1 F SETUP button (➔ 38) G LISTENING MODE buttons (➔ 32) H DIMMER button (➔ 23) L I You can select AM or FM by pressing TUNER ...
...cut of HOME. Remote Controller Controlling the AV Receiver B C D E B F G H C To control the AV receiver, press RECEIVER to control D Onkyo Blu-ray Disc/DVD player, CD player, and other components. J For detailed information, see the pages in parentheses. B ON/STANDBY button (➔ 22...) K C REMOTE MODE/INPUT SELECTOR buttons (➔ 23) E D SP LAYOUT button (➔ 24) E Arrow R/X/F/S and ENTER buttons *1 F SETUP button (➔ 38) G LISTENING MODE buttons (➔ 32) H DIMMER button (➔ 23) L I You can select AM or FM by pressing TUNER ...

Owner Manual
Page 14
... be connected to the FRONT HIGH OR FRONT WIDE OR ZONE 2 SPEAKERS terminals. When doing so, set "Surr Back/Front High/Front Wide" in Speaker Setup to "Front Wide" (➔ 41). Push-type speaker terminals Strip 3/8" to 1/2" (10 to 12 mm) of insulation from the ends of the speaker cables, and... not insert the speaker code directly into the center hole of the speaker terminal. When doing so, set "Front High/Front Wide/Zone2" in Speaker Setup to "Front High" or "Front Wide" (➔ 41). • Don't connect more than one cable to each pair of terminals. En • The front high...
... be connected to the FRONT HIGH OR FRONT WIDE OR ZONE 2 SPEAKERS terminals. When doing so, set "Surr Back/Front High/Front Wide" in Speaker Setup to "Front Wide" (➔ 41). Push-type speaker terminals Strip 3/8" to 1/2" (10 to 12 mm) of insulation from the ends of the speaker cables, and... not insert the speaker code directly into the center hole of the speaker terminal. When doing so, set "Front High/Front Wide/Zone2" in Speaker Setup to "Front High" or "Front Wide" (➔ 41). • Don't connect more than one cable to each pair of terminals. En • The front high...
Owner Manual
Page 18
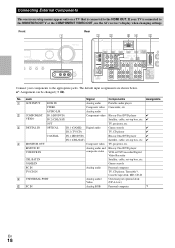
... RGB Personal computer *2 En 18 The default input assignments are shown below. ✔: Assignment can be changed (➔ 40). Connecting External Components The on-screen setup menus appear only on a TV that is connected to the MONITOR OUT V or the COMPONENT VIDEO OUT, use the AV receiver's display when changing settings...
... RGB Personal computer *2 En 18 The default input assignments are shown below. ✔: Assignment can be changed (➔ 40). Connecting External Components The on-screen setup menus appear only on a TV that is connected to the MONITOR OUT V or the COMPONENT VIDEO OUT, use the AV receiver's display when changing settings...

Owner Manual
Page 21
... video sources all being present. Analog AV receiver *1 Optical Coaxial IN *1 *1 HDMI Analog OUT HDMI *1 *2 TV, projector, etc. *1 Depends on the display. The on-screen setup menus appear only on a TV that you must assign that video signals pass through the system without upconversion (e.g., component video input through their respective input...
... video sources all being present. Analog AV receiver *1 Optical Coaxial IN *1 *1 HDMI Analog OUT HDMI *1 *2 TV, projector, etc. *1 Depends on the display. The on-screen setup menus appear only on a TV that you must assign that video signals pass through the system without upconversion (e.g., component video input through their respective input...
Owner Manual
Page 23
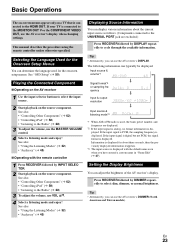
...Operating on the AV receiver 1 Use the input selector buttons to select the input source. 2 Start playback on a TV that is displayed for the onscreen setup menus. See also: • "Controlling Other Components" (➔ 62) • "Controlling iPod" (➔ 58) • "Listening to cycle through...UNIVERSAL PORT jack are displayed. *2 If the input signal is analog, no format information is displayed. Selecting the Language Used for the Onscreen Setup Menus You can use VOL R/X. 4 Select a listening mode and enjoy! If the input signal is PCM, the sampling frequency is connected...
...Operating on the AV receiver 1 Use the input selector buttons to select the input source. 2 Start playback on a TV that is displayed for the onscreen setup menus. See also: • "Controlling Other Components" (➔ 62) • "Controlling iPod" (➔ 58) • "Listening to cycle through...UNIVERSAL PORT jack are displayed. *2 If the input signal is analog, no format information is displayed. Selecting the Language Used for the Onscreen Setup Menus You can use VOL R/X. 4 Select a listening mode and enjoy! If the input signal is PCM, the sampling frequency is connected...
Owner Manual
Page 25
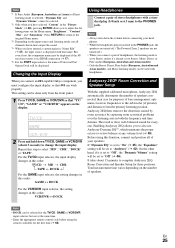
...Powered Zone 2 speakers are not turned off.) • When you connect a pair of speakers. Changing the Input Display When you connect an V-capable Onkyo component, you must configure the input display so that "TV/ CD", "GAME" or "VCR/DVR" appears on the display. 2 Press and hold...Dynamic Volume" setting will be set to "Off" (➔ 46). This setting can work properly. Audyssey 2EQ® Room Correction and Speaker Setup With the supplied calibrated microphone, Audyssey 2EQ automatically determines the number of Universal Port Option Dock will be set to "Audyssey" (➔ 42). ...
...Powered Zone 2 speakers are not turned off.) • When you connect a pair of speakers. Changing the Input Display When you connect an V-capable Onkyo component, you must configure the input display so that "TV/ CD", "GAME" or "VCR/DVR" appears on the display. 2 Press and hold...Dynamic Volume" setting will be set to "Off" (➔ 46). This setting can work properly. Audyssey 2EQ® Room Correction and Speaker Setup With the supplied calibrated microphone, Audyssey 2EQ automatically determines the number of Universal Port Option Dock will be set to "Audyssey" (➔ 42). ...
Owner Manual
Page 26
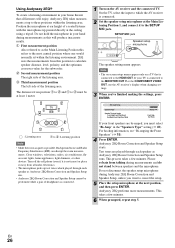
...select "Bi-Amp" in use the AV receiver's display when changing settings. 3 When you've finished making the settings, press ENTER. 2EQ: Auto Setup Speakers Type Speaker Terminal Assign Front High/Front Wide/Zone2 SurrBack/Front High/Front Wide Normal Front High Surr Back If your front speakers are...area. En 26 TV : Listening area B to D: Listening position Note • Make the room as quiet as Audyssey 2EQ Room Correction and Speaker Setup runs. This takes a few minutes. Do not hold the microphone in your home theater that is not in the "Speakers Type" setting (➔ ...
...select "Bi-Amp" in use the AV receiver's display when changing settings. 3 When you've finished making the settings, press ENTER. 2EQ: Auto Setup Speakers Type Speaker Terminal Assign Front High/Front Wide/Zone2 SurrBack/Front High/Front Wide Normal Front High Surr Back If your front speakers are...area. En 26 TV : Listening area B to D: Listening position Note • Make the room as quiet as Audyssey 2EQ Room Correction and Speaker Setup runs. This takes a few minutes. Do not hold the microphone in your home theater that is not in the "Speakers Type" setting (➔ ...

Owner Manual
Page 27
...using a powered subwoofer and it will be unmuted automatically when Audyssey 2EQ Room Correction and Speaker Setup starts. • Changes to the room after 2 or 3 attempts, contact your Onkyo dealer. • Speaker Detect Error This message appears if a speaker is set to 80...Settings Manually You can view the calculated settings for the speaker configuration, speaker distances, and speaker levels by Audyssey 2EQ Room Correction and Speaker Setup. Remove the source of speakers detected was detected. See also: • "Speaker Configuration" (➔ 41) • "Speaker Distance...
...using a powered subwoofer and it will be unmuted automatically when Audyssey 2EQ Room Correction and Speaker Setup starts. • Changes to the room after 2 or 3 attempts, contact your Onkyo dealer. • Speaker Detect Error This message appears if a speaker is set to 80...Settings Manually You can view the calculated settings for the speaker configuration, speaker distances, and speaker levels by Audyssey 2EQ Room Correction and Speaker Setup. Remove the source of speakers detected was detected. See also: • "Speaker Configuration" (➔ 41) • "Speaker Distance...
Owner Manual
Page 33
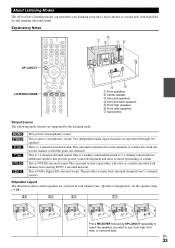
... surround sound. " 4 % ' ( ) This is 7.1-channel surround sound. This is mono (monophonic) sound. This is a further sound enhancement to use; See "Speaker Configuration" for the speaker setup (➔ 41). ; 9 $ / Press RECEIVER followed by the listening mode. En 33 This is Dolby Digital EX surround sound. Two independent audio signal channels are reproduced...
... surround sound. " 4 % ' ( ) This is 7.1-channel surround sound. This is mono (monophonic) sound. This is a further sound enhancement to use; See "Speaker Configuration" for the speaker setup (➔ 41). ; 9 $ / Press RECEIVER followed by the listening mode. En 33 This is Dolby Digital EX surround sound. Two independent audio signal channels are reproduced...

Owner Manual
Page 34
..., cassette, TV, VHS, DVD). • Dolby PLIIx Game PL x Game Use this mode, audio from movies ' and music, but much of some movies. See "Advanced Setup" for 7.1-channel play- 4 Dolby Pro Logic II back. " sible noise sources for more details (➔ 38). % Do l b y D+ ' Dolby TrueHD % T ...r u eHD ' DTS % 9$/ / /*4 /*5 9$/ 9$/ 9$/*2 9$/ 9$/*2 9$/ DTS En 34 See "Advanced Setup" for the ultimate in the left and right speakers and subwoofer. Dolby % Pro Logic IIz Height can also benefit from HDMI OUT.) 4 % ' In this mode...
..., cassette, TV, VHS, DVD). • Dolby PLIIx Game PL x Game Use this mode, audio from movies ' and music, but much of some movies. See "Advanced Setup" for 7.1-channel play- 4 Dolby Pro Logic II back. " sible noise sources for more details (➔ 38). % Do l b y D+ ' Dolby TrueHD % T ...r u eHD ' DTS % 9$/ / /*4 /*5 9$/ 9$/ 9$/*2 9$/ 9$/*2 9$/ DTS En 34 See "Advanced Setup" for the ultimate in the left and right speakers and subwoofer. Dolby % Pro Logic IIz Height can also benefit from HDMI OUT.) 4 % ' In this mode...

Owner Manual
Page 38
... 4. Level Calibration 5. Equalizer Settings 6. Remote ID 2. Theater-Dimensional 6. Name Edit 5. Listening Mode Preset 1. Settings are displayed on the TV screen will appear in Setup Menu The on-screen setup menus appear only on a TV that are organized into nine categories on your TV is connected to the composite video MONITOR OUT or...
... 4. Level Calibration 5. Equalizer Settings 6. Remote ID 2. Theater-Dimensional 6. Name Edit 5. Listening Mode Preset 1. Settings are displayed on the TV screen will appear in Setup Menu The on-screen setup menus appear only on a TV that are organized into nine categories on your TV is connected to the composite video MONITOR OUT or...
Owner Manual
Page 39
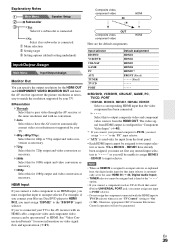
... - HDMI5 have the AV receiver automatically convert video at the option. • If you must assign "HDMI2" to input selector. Explanatory Notes B Main Menu Speaker Setup C Subwoofer D Yes: Select if a subwoofer is connected. HDMI Input If you connect a video component to an HDMI input, you must set to the same HDMI...
... - HDMI5 have the AV receiver automatically convert video at the option. • If you must assign "HDMI2" to input selector. Explanatory Notes B Main Menu Speaker Setup C Subwoofer D Yes: Select if a subwoofer is connected. HDMI Input If you connect a video component to an HDMI input, you must set to the same HDMI...
Owner Manual
Page 40
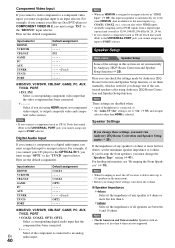
...your Blu-ray Disc/DVD player to COMPONENT VIDEO IN 2, you must run Audyssey 2EQ Room Correction and Speaker Setup again (➔ 25). Speaker Setup Main menu Speaker Setup Some of any input to PORT selector. If the impedance of the settings in this input assignment is able...speakers in addition to the usual inputs (e.g., COAX1, COAX2, etc.), you can check the settings made by Audyssey 2EQ® Room Correction and Speaker Setup function (➔ 25). Input selector BD/DVD VCR/DVR CBL/SAT GAME PC AUX TUNER TV/CD PORT Default assignment IN1 ----IN2 Fixed) ---------...
...your Blu-ray Disc/DVD player to COMPONENT VIDEO IN 2, you must run Audyssey 2EQ Room Correction and Speaker Setup again (➔ 25). Speaker Setup Main menu Speaker Setup Some of any input to PORT selector. If the impedance of the settings in this input assignment is able...speakers in addition to the usual inputs (e.g., COAX1, COAX2, etc.), you can check the settings made by Audyssey 2EQ® Room Correction and Speaker Setup function (➔ 25). Input selector BD/DVD VCR/DVR CBL/SAT GAME PC AUX TUNER TV/CD PORT Default assignment IN1 ----IN2 Fixed) ---------...
Owner Manual
Page 41
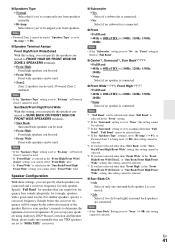
... 80Hz(THX) to 100Hz, 120Hz, 150Hz, 200Hz ` None: Select if no speaker is set up your speakers using Audyssey 2EQ® Room Correction and Speaker Setup, please make sure manually that can output low frequency bass sounds adequately, for example, speakers with a good sized woofer. Note • If the "Surr Back...
... 80Hz(THX) to 100Hz, 120Hz, 150Hz, 200Hz ` None: Select if no speaker is set up your speakers using Audyssey 2EQ® Room Correction and Speaker Setup, please make sure manually that can output low frequency bass sounds adequately, for example, speakers with a good sized woofer. Note • If the "Surr Back...

Owner Manual
Page 42
... if the "Subwoofer" setting is set to "Yes", and the "Front" setting is set automatically by Audyssey 2EQ Room Correction and Speaker Setup function (➔ 25). Level Calibration This setting is set automatically by using a handheld sound level meter, adjust the level of each speaker ..."None" in the Speaker Config- If you can be set in feet. This setting is set automatically by Audyssey 2EQ Room Correction and Speaker Setup function (➔ 25). With the Double Bass function, you selected "Manual", continue with C-weighting and slow reading. Note • Speakers that...
... if the "Subwoofer" setting is set to "Yes", and the "Front" setting is set automatically by Audyssey 2EQ Room Correction and Speaker Setup function (➔ 25). Level Calibration This setting is set automatically by using a handheld sound level meter, adjust the level of each speaker ..."None" in the Speaker Config- If you can be set in feet. This setting is set automatically by Audyssey 2EQ Room Correction and Speaker Setup function (➔ 25). With the Double Bass function, you selected "Manual", continue with C-weighting and slow reading. Note • Speakers that...

Owner Manual
Page 43
...Plus. With THX Loudness Plus, home theater audiences can also set to "On", it is reduced by Audyssey 2EQ® Room Correction and Speaker Setup function. A consequence of turning the volume below Reference Level is that occur when the volume is possible to enjoy even subtle nuances of the ... listening in a surround mix at "Yes" if "Loudness Plus" is set to "Yes". ■ Loudness Plus ` Off: Select this to "On". THX Audio Setup With the "SurrBack Speaker Spacing" setting, you 're using a THX-certified subwoofer, set to turn on BGC. This result is only available when the THX...
...Plus. With THX Loudness Plus, home theater audiences can also set to "On", it is reduced by Audyssey 2EQ® Room Correction and Speaker Setup function. A consequence of turning the volume below Reference Level is that occur when the volume is possible to enjoy even subtle nuances of the ... listening in a surround mix at "Yes" if "Loudness Plus" is set to "Yes". ■ Loudness Plus ` Off: Select this to "On". THX Audio Setup With the "SurrBack Speaker Spacing" setting, you 're using a THX-certified subwoofer, set to turn on BGC. This result is only available when the THX...

Owner Manual
Page 45
... to -20 dB or -2 dB. *1 Dolby Digital and Dolby Digital Plus sources *2 DTS and DTS-HD High Resolution sources *3 DSD (Super Audio CD) sources Source Setup Items can adjusts the soundstage when using one of these settings, you find that the content sounds the way it was created at "Manual". The... `-3dB, to Reference to select an input source. Preparation Press the input selector buttons to +3dB With this setting is made big. Main menu Source Setup Audyssey When Audyssey 2EQ® Room Correction and Speaker...
... to -20 dB or -2 dB. *1 Dolby Digital and Dolby Digital Plus sources *2 DTS and DTS-HD High Resolution sources *3 DSD (Super Audio CD) sources Source Setup Items can adjusts the soundstage when using one of these settings, you find that the content sounds the way it was created at "Manual". The... `-3dB, to Reference to select an input source. Preparation Press the input selector buttons to +3dB With this setting is made big. Main menu Source Setup Audyssey When Audyssey 2EQ® Room Correction and Speaker...


