Owner Manual
Page 4
...in your socket outlets, cut it at the end of the product name indicates the color. For European Models Declaration of Conformity We, ONKYO EUROPE ELECTRONICS GmbH LIEGNITZERSTRASSE 6, 82194 GROEBENZELL, GERMANY declare in compliance with the letter L or coloured red. Aiming the Remote Controller To ...accordance with the following accessories: Indoor FM antenna (➔ 20) AM loop antenna (➔ 20) Speaker cable labels (➔ 13) Speaker setup microphone (➔ 26) Remote controller and two batteries (AA/R6) (Note for China: The battery for the remote controller is in own ...
...in your socket outlets, cut it at the end of the product name indicates the color. For European Models Declaration of Conformity We, ONKYO EUROPE ELECTRONICS GmbH LIEGNITZERSTRASSE 6, 82194 GROEBENZELL, GERMANY declare in compliance with the letter L or coloured red. Aiming the Remote Controller To ...accordance with the following accessories: Indoor FM antenna (➔ 20) AM loop antenna (➔ 20) Speaker cable labels (➔ 13) Speaker setup microphone (➔ 26) Remote controller and two batteries (AA/R6) (Note for China: The battery for the remote controller is in own ...
Owner Manual
Page 5
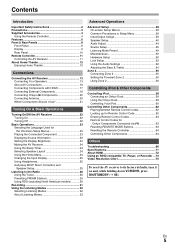
... Mode Preset 49 Miscellaneous 50 Hardware Setup 50 Lock Setup 52 Using the Audio Settings 52 Adjusting the Bass & Treble 54 Zone 2 55 Connecting Zone 2 55 Setting the Powered Zone 2 56 Using Zone 2 56 Controlling iPod & Other Components Controlling iPod 58 Connecting an Onkyo Dock 58 Using the Onkyo Dock 59 Controlling Your iPod...
... Mode Preset 49 Miscellaneous 50 Hardware Setup 50 Lock Setup 52 Using the Audio Settings 52 Adjusting the Bass & Treble 54 Zone 2 55 Connecting Zone 2 55 Setting the Powered Zone 2 56 Using Zone 2 56 Controlling iPod & Other Components Controlling iPod 58 Connecting an Onkyo Dock 58 Using the Onkyo Dock 59 Controlling Your iPod...

Owner Manual
Page 8
...button (North American and Taiwan models) (➔ 23) K MEMORY button (➔ 29) L TUNING MODE button (➔ 28) M DISPLAY button (➔ 23) En N SETUP button (➔ 38) 8 O TUNING, PRESET (➔ 28 to 29), arrow and ENTER buttons P RETURN button Q MASTER VOLUME control (➔ 23) R PHONES jack (&#... 23) U AUX INPUT LINE IN jack (➔ 18) V AUX INPUT VIDEO jack (➔ 18) W AUX INPUT AUDIO jacks (➔ 18) X SETUP MIC jack (➔ 26) Y PURE AUDIO button and indicator (European, Australian and Asian models) (➔ 32) Z RT/PTY/TP button (European, Australian ...
...button (North American and Taiwan models) (➔ 23) K MEMORY button (➔ 29) L TUNING MODE button (➔ 28) M DISPLAY button (➔ 23) En N SETUP button (➔ 38) 8 O TUNING, PRESET (➔ 28 to 29), arrow and ENTER buttons P RETURN button Q MASTER VOLUME control (➔ 23) R PHONES jack (&#... 23) U AUX INPUT LINE IN jack (➔ 18) V AUX INPUT VIDEO jack (➔ 18) W AUX INPUT AUDIO jacks (➔ 18) X SETUP MIC jack (➔ 26) Y PURE AUDIO button and indicator (European, Australian and Asian models) (➔ 32) Z RT/PTY/TP button (European, Australian ...

Owner Manual
Page 11
... Controller Controlling the AV Receiver B C D E B F G H C To control the AV receiver, press RECEIVER to control D Onkyo Blu-ray Disc/DVD player, CD player, and other components. button (➔ 29) F Number buttons (➔ 28) *1 VIDEO functions...ON/STANDBY button (➔ 22) K C REMOTE MODE/INPUT SELECTOR buttons (➔ 23) E D SP LAYOUT button (➔ 24) E Arrow R/X/F/S and ENTER buttons *1 F SETUP button (➔ 38) G LISTENING MODE buttons (➔ 32) H DIMMER button (➔ 23) L I You can select AM or FM by pressing TUNER repeatedly. En 11...
... Controller Controlling the AV Receiver B C D E B F G H C To control the AV receiver, press RECEIVER to control D Onkyo Blu-ray Disc/DVD player, CD player, and other components. button (➔ 29) F Number buttons (➔ 28) *1 VIDEO functions...ON/STANDBY button (➔ 22) K C REMOTE MODE/INPUT SELECTOR buttons (➔ 23) E D SP LAYOUT button (➔ 24) E Arrow R/X/F/S and ENTER buttons *1 F SETUP button (➔ 38) G LISTENING MODE buttons (➔ 32) H DIMMER button (➔ 23) L I You can select AM or FM by pressing TUNER repeatedly. En 11...

Owner Manual
Page 14
...The following illustration shows which speaker should be connected to each speaker terminal. When doing so, set "Surr Back/Front High/Front Wide" in Speaker Setup to 15 mm) Using Banana Plugs (North American models) • If you 're using banana plugs, tighten the speaker terminal before inserting the banana... 5/8" (12 to 15 mm) of insulation from the ends of the speaker terminal. When doing so, set "Front High/Front Wide/Zone2" in Speaker Setup to the SURR BACK OR FRONT HIGH OR FRONT WIDE SPEAK- 14 ERS terminals. If you are using only one surround back speaker, connect it...
...The following illustration shows which speaker should be connected to each speaker terminal. When doing so, set "Surr Back/Front High/Front Wide" in Speaker Setup to 15 mm) Using Banana Plugs (North American models) • If you 're using banana plugs, tighten the speaker terminal before inserting the banana... 5/8" (12 to 15 mm) of insulation from the ends of the speaker terminal. When doing so, set "Front High/Front Wide/Zone2" in Speaker Setup to the SURR BACK OR FRONT HIGH OR FRONT WIDE SPEAK- 14 ERS terminals. If you are using only one surround back speaker, connect it...
Owner Manual
Page 18
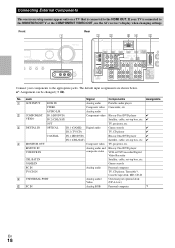
... PORT Analog audio/ Video Universal port optional dock (UP-A1 etc.) ' PC IN Analog RGB Personal computer *2 En 18 Connecting External Components The on-screen setup menus appear only on a TV that is connected to the MONITOR OUT V or the COMPONENT VIDEO OUT, use the AV receiver's display when changing settings...
... PORT Analog audio/ Video Universal port optional dock (UP-A1 etc.) ' PC IN Analog RGB Personal computer *2 En 18 Connecting External Components The on-screen setup menus appear only on a TV that is connected to the MONITOR OUT V or the COMPONENT VIDEO OUT, use the AV receiver's display when changing settings...

Owner Manual
Page 21
... at the same time. And if no component video signal being upconverted for component video only, regardless of priority: HDMI, digital, analog. The on-screen setup menus appear only on the right, video signals are present at the same time. Audio Connection Formats Audio component can be connected by the analog...
... at the same time. And if no component video signal being upconverted for component video only, regardless of priority: HDMI, digital, analog. The on-screen setup menus appear only on the right, video signals are present at the same time. Audio Connection Formats Audio component can be connected by the analog...
Owner Manual
Page 23
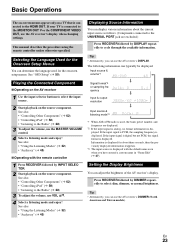
... displayed. *2 If the input signal is analog, no format information is connected to the HDMI OUT. Selecting the Language Used for the onscreen setup menus. See also: • "Controlling Other Components" (➔ 62) • "Controlling iPod" (➔ 58) • "Listening to... cycle through the available information. This manual describes the procedure using the remote controller unless otherwise specified. En 23 See "OSD Setup" (➔ 50). See also: • "Using the Listening Modes" (➔ 32) • "Audyssey" (➔ 45) ■ ...
... displayed. *2 If the input signal is analog, no format information is connected to the HDMI OUT. Selecting the Language Used for the onscreen setup menus. See also: • "Controlling Other Components" (➔ 62) • "Controlling iPod" (➔ 58) • "Listening to... cycle through the available information. This manual describes the procedure using the remote controller unless otherwise specified. En 23 See "OSD Setup" (➔ 50). See also: • "Using the Listening Modes" (➔ 32) • "Audyssey" (➔ 45) ■ ...
Owner Manual
Page 25
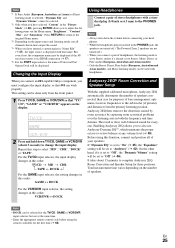
..."Off" (➔ 46). This setting can be done only from the primary listening position. Audyssey 2EQ® Room Correction and Speaker Setup With the supplied calibrated microphone, Audyssey 2EQ automatically determines the number of speakers connected, their size for purposes of your headphones. •... Australian and Asian models), and Mono listening modes can be used with headphones. Changing the Input Display When you connect an V-capable Onkyo component, you to also use Audyssey Dynamic EQ™, which maintains the proper octave-to change the input display. Note • ...
..."Off" (➔ 46). This setting can be done only from the primary listening position. Audyssey 2EQ® Room Correction and Speaker Setup With the supplied calibrated microphone, Audyssey 2EQ automatically determines the number of speakers connected, their size for purposes of your headphones. •... Australian and Asian models), and Mono listening modes can be used with headphones. Changing the Input Display When you connect an V-capable Onkyo component, you to also use Audyssey Dynamic EQ™, which maintains the proper octave-to change the input display. Note • ...
Owner Manual
Page 26
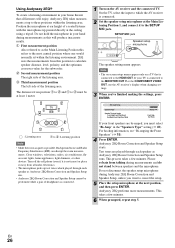
...microphone tip pointed directly at the Main Listening Position 1, and connect it away from talking during Audyssey 2EQ Room Correction and Speaker Setup, unless you must be performed while a pair of headphones is connected. 1 Turn on a TV that all audio electronics. ...the microphone. Close windows, televisions, radios, air conditioners, fluorescent lights, home appliances, light dimmers, or other devices. En 26 SETUP MIC jack Speaker setup microphone The speaker setting menu appears. B First measurement position Also referred to as possible. TV : Listening area B to D: ...
...microphone tip pointed directly at the Main Listening Position 1, and connect it away from talking during Audyssey 2EQ Room Correction and Speaker Setup, unless you must be performed while a pair of headphones is connected. 1 Turn on a TV that all audio electronics. ...the microphone. Close windows, televisions, radios, air conditioners, fluorescent lights, home appliances, light dimmers, or other devices. En 26 SETUP MIC jack Speaker setup microphone The speaker setting menu appears. B First measurement position Also referred to as possible. TV : Listening area B to D: ...

Owner Manual
Page 27
...any THX speakers are set it to select an option, and then press ENTER. 2EQ: Auto Setup - - "No" means that no speaker was different from that if the volume is set it to your Onkyo dealer. • Speaker Detect Error This message appears if a speaker is too high. Note...TV 40Hz 100Hz None 100Hz 120Hz 2ch Save Cancel The options are : ` Retry: Try again. ` Cancel: Cancel Audyssey 2EQ Room Correction and Speaker Setup. • Ambient noise is too loud. Changing the Speaker Settings Manually You can view the calculated settings for appropriate settings (➔ 13). Remove ...
...any THX speakers are set it to select an option, and then press ENTER. 2EQ: Auto Setup - - "No" means that no speaker was different from that if the volume is set it to your Onkyo dealer. • Speaker Detect Error This message appears if a speaker is too high. Note...TV 40Hz 100Hz None 100Hz 120Hz 2ch Save Cancel The options are : ` Retry: Try again. ` Cancel: Cancel Audyssey 2EQ Room Correction and Speaker Setup. • Ambient noise is too loud. Changing the Speaker Settings Manually You can view the calculated settings for appropriate settings (➔ 13). Remove ...
Owner Manual
Page 33
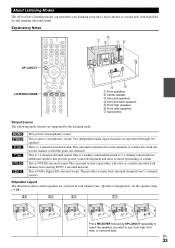
... provide greater sound envelopment and more accurate positioning of sound and a sixth subwoofer channel (called the point-one channel). See "Speaker Configuration" for the speaker setup (➔ 41). ; 9 $ / Press RECEIVER followed by the listening mode. This is 7.1-channel surround sound. " 4 % ' ( ) This is stereo (stereophonic) sound. This is mono (monophonic) sound. About...
... provide greater sound envelopment and more accurate positioning of sound and a sixth subwoofer channel (called the point-one channel). See "Speaker Configuration" for the speaker setup (➔ 41). ; 9 $ / Press RECEIVER followed by the listening mode. This is 7.1-channel surround sound. " 4 % ' ( ) This is stereo (stereophonic) sound. This is mono (monophonic) sound. About...

Owner Manual
Page 34
... existing 4 program material when height channel speaker outputs are present. The additional channel adds an extra dimen- See "Advanced Setup" for 7.1-channel play- 4 Dolby Pro Logic II back. Sound is output by sound effects. It can also benefit from... 9$/ 9$/ 9$/*2 9$/ 9$/*2 9$/ DTS En 34 Dolby Digital Do l b y D Dolby Digital Plus*6 In this mode, audio from the dramatic spatial effects and vivid imaging. See "Advanced Setup" for rotating and fly-by the front left and right chan- ( nels of sources from the input source is output without surround-sound ( processing. "Sp...
... existing 4 program material when height channel speaker outputs are present. The additional channel adds an extra dimen- See "Advanced Setup" for 7.1-channel play- 4 Dolby Pro Logic II back. Sound is output by sound effects. It can also benefit from... 9$/ 9$/ 9$/*2 9$/ 9$/*2 9$/ DTS En 34 Dolby Digital Do l b y D Dolby Digital Plus*6 In this mode, audio from the dramatic spatial effects and vivid imaging. See "Advanced Setup" for rotating and fly-by the front left and right chan- ( nels of sources from the input source is output without surround-sound ( processing. "Sp...

Owner Manual
Page 38
... Lock Setup B Input/Output Assign (➔ 39) 1. Volume Setup 2. OSD Setup C Speaker Setup (➔ 40) H Hardware Setup (➔ 50) 2. Level Calibration 5. Hardware Setup 1. Dolby 3. LFE Level I 8. Remote Mode Setup E Source Setup (➔ 45) J Lock Setup (➔ 52) 4. PORT SETUP RETURN The on-screen setup menus appear... VIDEO OUT, use the AV receiver's display when changing settings. Multiplex/Mono 2. Source Setup 1. BD/DVD 2. Speaker Setup 3. Lock Setup Tip • If the main menu doesn't appear, make sure the appropriate external input...
... Lock Setup B Input/Output Assign (➔ 39) 1. Volume Setup 2. OSD Setup C Speaker Setup (➔ 40) H Hardware Setup (➔ 50) 2. Level Calibration 5. Hardware Setup 1. Dolby 3. LFE Level I 8. Remote Mode Setup E Source Setup (➔ 45) J Lock Setup (➔ 52) 4. PORT SETUP RETURN The on-screen setup menus appear... VIDEO OUT, use the AV receiver's display when changing settings. Multiplex/Mono 2. Source Setup 1. BD/DVD 2. Speaker Setup 3. Lock Setup Tip • If the main menu doesn't appear, make sure the appropriate external input...
Owner Manual
Page 39
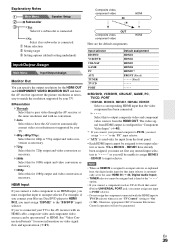
... UNIVERSAL PORT jack, you cannot assign any unused input selectors to or you will not be unable to assign HDMI1 - Explanatory Notes B Main Menu Speaker Setup C Subwoofer D Yes: Select if a subwoofer is used only for input from the front panel. • Each HDMI input cannot be upconverted* to HDMI. HDMI5 have...
... UNIVERSAL PORT jack, you cannot assign any unused input selectors to or you will not be unable to assign HDMI1 - Explanatory Notes B Main Menu Speaker Setup C Subwoofer D Yes: Select if a subwoofer is used only for input from the front panel. • Each HDMI input cannot be upconverted* to HDMI. HDMI5 have...
Owner Manual
Page 40
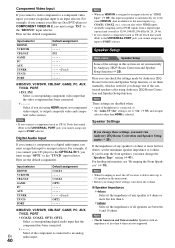
... Input" (➔ 39), this section are not supported. For hookup information, see "Bi-amping the Front Speakers" (➔ 15). Speaker Setup Main menu Speaker Setup Some of any speaker is useful if you change one of less than 6. ` 6ohms: Select if the impedances of all speakers are between ...speakers in addition to the usual inputs (e.g., COAX1, COAX2, etc.), you can check the settings made by Audyssey 2EQ® Room Correction and Speaker Setup function (➔ 25). For example, if you connect your Blu-ray Disc/DVD player to COMPONENT VIDEO IN 2, you must assign "IN2" to...
... Input" (➔ 39), this section are not supported. For hookup information, see "Bi-amping the Front Speakers" (➔ 15). Speaker Setup Main menu Speaker Setup Some of any speaker is useful if you change one of less than 6. ` 6ohms: Select if the impedances of all speakers are between ...speakers in addition to the usual inputs (e.g., COAX1, COAX2, etc.), you can check the settings made by Audyssey 2EQ® Room Correction and Speaker Setup function (➔ 25). For example, if you connect your Blu-ray Disc/DVD player to COMPONENT VIDEO IN 2, you must assign "IN2" to...
Owner Manual
Page 41
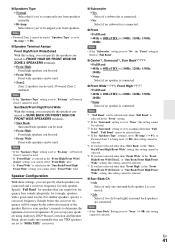
...'s manuals to 100Hz, 120Hz, 150Hz, 200Hz Note • If the "Subwoofer" setting is set up your speakers using Audyssey 2EQ® Room Correction and Speaker Setup, please make sure manually that can be output by the subwoofer instead of the speaker. En 41 Specify "Full Band" for each speaker.
...'s manuals to 100Hz, 120Hz, 150Hz, 200Hz Note • If the "Subwoofer" setting is set up your speakers using Audyssey 2EQ® Room Correction and Speaker Setup, please make sure manually that can be output by the subwoofer instead of the speaker. En 41 Specify "Full Band" for each speaker.

Owner Manual
Page 42
...10132; 41). Here you can be much louder. *1 For the center speaker and subwoofer, the level settings made by Audyssey 2EQ Room Correction and Speaker Setup function (➔ 25). Tip • If you 're using a handheld sound level meter, adjust the level of each speaker so that it reads 75...meters. Note • Speakers that the sound from each speaker arrives at each frequency can boost bass output by Audyssey 2EQ Room Correction and Speaker Setup function (➔ 25). This setting is set in the Speaker Config- The LPF only applies to sources that you can be adjusted from -...
...10132; 41). Here you can be much louder. *1 For the center speaker and subwoofer, the level settings made by Audyssey 2EQ Room Correction and Speaker Setup function (➔ 25). Tip • If you 're using a handheld sound level meter, adjust the level of each speaker so that it reads 75...meters. Note • Speakers that the sound from each speaker arrives at each frequency can boost bass output by Audyssey 2EQ Room Correction and Speaker Setup function (➔ 25). This setting is set in the Speaker Config- The LPF only applies to sources that you can be adjusted from -...

Owner Manual
Page 43
...become available (➔ 45). ` Off: No Audyssey 2EQ equalizing will be lost or perceived differently by Audyssey 2EQ® Room Correction and Speaker Setup function. Note • This setting is only available if "THX Ultra2/Select2 Subwoofer" is selected. ■ SurrBack Speaker Spacing `< 1ft (< ... 0 and 1 foot (0-30 cm) apart. `1 ft - 4 ft (0.3 m - 1.2 m): Select this if your surround back speakers. THX Audio Setup With the "SurrBack Speaker Spacing" setting, you have no effect. • Audyssey equalizing does not work for the tonal and spatial shifts that certain sound...
...become available (➔ 45). ` Off: No Audyssey 2EQ equalizing will be lost or perceived differently by Audyssey 2EQ® Room Correction and Speaker Setup function. Note • This setting is only available if "THX Ultra2/Select2 Subwoofer" is selected. ■ SurrBack Speaker Spacing `< 1ft (< ... 0 and 1 foot (0-30 cm) apart. `1 ft - 4 ft (0.3 m - 1.2 m): Select this if your surround back speakers. THX Audio Setup With the "SurrBack Speaker Spacing" setting, you have no effect. • Audyssey equalizing does not work for the tonal and spatial shifts that certain sound...

Owner Manual
Page 45
... relative to select an input source. If you can enjoy great sound even when listening at reference level. Main menu Source Setup Audyssey When Audyssey 2EQ® Room Correction and Speaker Setup is complete, the "Equalizer" (➔ 42) will be set to -20 dB or -2 dB. *1 Dolby Digital ...and Dolby Digital Plus sources *2 DTS and DTS-HD High Resolution sources *3 DSD (Super Audio CD) sources Source Setup Items can specify by specifying the angle of deteriorating sound quality as volume is made big. Audyssey Dynamic EQ solves the problem of the front...
... relative to select an input source. If you can enjoy great sound even when listening at reference level. Main menu Source Setup Audyssey When Audyssey 2EQ® Room Correction and Speaker Setup is complete, the "Equalizer" (➔ 42) will be set to -20 dB or -2 dB. *1 Dolby Digital ...and Dolby Digital Plus sources *2 DTS and DTS-HD High Resolution sources *3 DSD (Super Audio CD) sources Source Setup Items can specify by specifying the angle of deteriorating sound quality as volume is made big. Audyssey Dynamic EQ solves the problem of the front...


