Owner Manual
Page 4
... ZONE 2 SPEAKERS terminals 23 When using the ZONE 2 PRE OUT terminals 23 AC OUTLETS 29 REMOTE CONTROL 29 Connections (TX-SR600/600E 24 Connecting your audio components 24 Connecting your video components 25 AC OUTLETS 29 REMOTE CONTROL 29 Connecting speakers 30 Standard... speaker setup for surround sound 30 Minimum speaker configuration for surround sound playback 30 Speaker placement 30 Using the speaker labels 30 Connecting speakers 31 Connecting the speaker cable 31 Connecting a subwoofer 31 Connecting to the SPEAKERS B terminals (TX-SR600/600E only 31 Connecting ...
... ZONE 2 SPEAKERS terminals 23 When using the ZONE 2 PRE OUT terminals 23 AC OUTLETS 29 REMOTE CONTROL 29 Connections (TX-SR600/600E 24 Connecting your audio components 24 Connecting your video components 25 AC OUTLETS 29 REMOTE CONTROL 29 Connecting speakers 30 Standard... speaker setup for surround sound 30 Minimum speaker configuration for surround sound playback 30 Speaker placement 30 Using the speaker labels 30 Connecting speakers 31 Connecting the speaker cable 31 Connecting a subwoofer 31 Connecting to the SPEAKERS B terminals (TX-SR600/600E only 31 Connecting ...
Owner Manual
Page 5
...GERMANY declare in own responsibility, that the ONKYO product described in this instruction manual is in compliance with headphones 47 Enjoying DVD multichannel audio playback 47 Switching the display 48 Temporarily turning off the sound 48 Listening Modes 49 Selecting a listening mode... as EN60065, EN55013, EN55020 and EN61000-3-2, -3-3. MORI ONKYO EUROPE ELECTRONICS GmbH 5 Contents Selecting an Audio Component 44 Basic operation (TX-SR700/700E 44 Basic operation (TX-SR600/600E 45 Selecting speakers (SPEAKERS A, B) (TX-SR600/600E only 45 Selecting the type of audio input signal...
...GERMANY declare in own responsibility, that the ONKYO product described in this instruction manual is in compliance with headphones 47 Enjoying DVD multichannel audio playback 47 Switching the display 48 Temporarily turning off the sound 48 Listening Modes 49 Selecting a listening mode... as EN60065, EN55013, EN55020 and EN61000-3-2, -3-3. MORI ONKYO EUROPE ELECTRONICS GmbH 5 Contents Selecting an Audio Component 44 Basic operation (TX-SR700/700E 44 Basic operation (TX-SR600/600E 45 Selecting speakers (SPEAKERS A, B) (TX-SR600/600E only 45 Selecting the type of audio input signal...
Owner Manual
Page 9
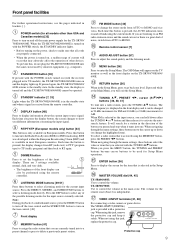
... go back one . When FM is available in 50-kHz increments for FM and 10-kHz (or 9-kHz) increments for a station in stereo and the sound cuts out or there is turned on with the TUNING / buttons. When navigating through the menu settings, these buttons move the cursor up . When navigating... turning on the power, check to turn on the tone control. [48] Front display MEMORY button [41] Press to MONO. MASTER VOLUME dial [44, 45] TX-SR600/600E: Use to enter the Setup Menu. VIDEO 4 INPUT terminals [21, 28] For connecting a video camera or game device. In the standby state, the display...
... go back one . When FM is available in 50-kHz increments for FM and 10-kHz (or 9-kHz) increments for a station in stereo and the sound cuts out or there is turned on with the TUNING / buttons. When navigating through the menu settings, these buttons move the cursor up . When navigating... turning on the power, check to turn on the tone control. [48] Front display MEMORY button [41] Press to MONO. MASTER VOLUME dial [44, 45] TX-SR600/600E: Use to enter the Setup Menu. VIDEO 4 INPUT terminals [21, 28] For connecting a video camera or game device. In the standby state, the display...
Owner Manual
Page 14
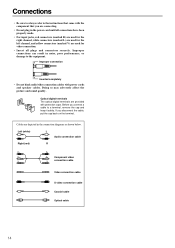
... shown below. Optical digital terminals The optical digital terminals are provided with power cords and speaker cables. Doing so may adversely affect the picture and sound quality. Cables are used for the left channel, and yellow connectors (marked V) are depicted in noise, poor performance, or damage to the equipment. Improper connection...
... shown below. Optical digital terminals The optical digital terminals are provided with power cords and speaker cables. Doing so may adversely affect the picture and sound quality. Cables are used for the left channel, and yellow connectors (marked V) are depicted in noise, poor performance, or damage to the equipment. Improper connection...
Owner Manual
Page 30
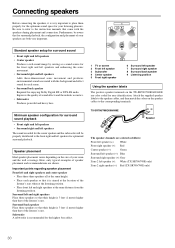
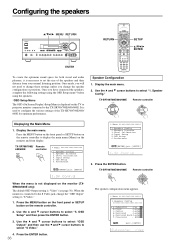
... (+): White Front right speaker (+): Red Center speaker (+): Green Surround left speaker (+): Blue Surround right speaker (+):Grey Zone 2 left speaker (+): White (TX-SR700/700E only) Zone 2 right speaker (+): Red (TX-SR700/700E only) 30 Minimum speaker configuration for surround sound playback • Front right and left speakers • Surround right and left speakers The...
... (+): White Front right speaker (+): Red Center speaker (+): Green Surround left speaker (+): Blue Surround right speaker (+):Grey Zone 2 left speaker (+): White (TX-SR700/700E only) Zone 2 right speaker (+): Red (TX-SR700/700E only) 30 Minimum speaker configuration for surround sound playback • Front right and left speakers • Surround right and left speakers The...
Owner Manual
Page 31
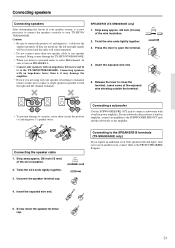
... short-circuit the positive (+) and negative (-) speaker wires. NO! Unscrew the speaker terminal cap. 5/8" (15mm) Connecting to the SPEAKERS B terminals (TX-SR600/600E only) If you listen to surround audio or select Multichannel, be reversed and the audio will be sure to turn on SPEAKERS A. • ... amplifier. Insert the exposed wire end. 5. If they are mixed up, the left and right signals will sound unnatural. • Do not connect more than 6 Ω may damage the TX-SR700/700E/600/600E. • When you require an additional set of front speakers (left -channel terminals....
... short-circuit the positive (+) and negative (-) speaker wires. NO! Unscrew the speaker terminal cap. 5/8" (15mm) Connecting to the SPEAKERS B terminals (TX-SR600/600E only) If you listen to surround audio or select Multichannel, be reversed and the audio will be sure to turn on SPEAKERS A. • ... amplifier. Insert the exposed wire end. 5. If they are mixed up, the left and right signals will sound unnatural. • Do not connect more than 6 Ω may damage the TX-SR700/700E/600/600E. • When you require an additional set of front speakers (left -channel terminals....
Owner Manual
Page 34
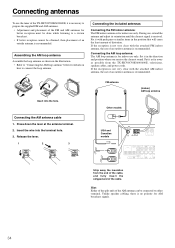
... indoor antenna, the use of an outdoor antenna is received. Connecting antennas To use the tuner of the TX-SR700/700E/600/600E, it in the direction and position where you receive the clearest sound. Connecting the AM loop antenna: The AM loop antenna is no polarity for indoor use only. Connecting... 3 VIDEO 2 OUTPUT COAXIAL IN OUT IN OU OPTICAL 2 1 OPTICAL COAXIAL DIGITAL INPUT IN OUT IN IN OUT IN OU Strip away the insulation from the TX-SR700/700E/600/600E, televisions, speaker cables, and power cords.
... indoor antenna, the use of an outdoor antenna is received. Connecting antennas To use the tuner of the TX-SR700/700E/600/600E, it in the direction and position where you receive the clearest sound. Connecting the AM loop antenna: The AM loop antenna is no polarity for indoor use only. Connecting... 3 VIDEO 2 OUTPUT COAXIAL IN OUT IN OU OPTICAL 2 1 OPTICAL COAXIAL DIGITAL INPUT IN OUT IN IN OUT IN OU Strip away the insulation from the TX-SR700/700E/600/600E, televisions, speaker cables, and power cords.
Owner Manual
Page 36
... (see page 56). Speaker Config." Use the and cursor buttons to select "OSD Output" and then use the and cursor buttons to select "5. TX-SR700/700E/ Remote 600/600E controller * Menu 1.Speaker Config 2.Speaker Distance 3.Level Calibration 4.Input Setup 5.OSD Setup 6.Preference |ENTER|Quit:|SETUP| ... the speakers / / / MENU RETURN RETURN SETUP // / ENTER ENTER To create the optimum sound space for both visual and audio pleasure, it is necessary to set the size of the TX-SR700/700E/600/ 600E for optimum performance. Display the main menu. When the monitor is connected...
... (see page 56). Speaker Config." Use the and cursor buttons to select "OSD Output" and then use the and cursor buttons to select "5. TX-SR700/700E/ Remote 600/600E controller * Menu 1.Speaker Config 2.Speaker Distance 3.Level Calibration 4.Input Setup 5.OSD Setup 6.Preference |ENTER|Quit:|SETUP| ... the speakers / / / MENU RETURN RETURN SETUP // / ENTER ENTER To create the optimum sound space for both visual and audio pleasure, it is necessary to set the size of the TX-SR700/700E/600/ 600E for optimum performance. Display the main menu. When the monitor is connected...
Owner Manual
Page 38
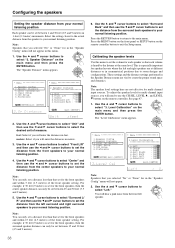
... each speaker so that set the distance from the center speakers to your normal listening position. Use the and cursor buttons to create the proper sound space and dynamics. Use the and cursor buttons to select "Unit" and then use the and cursor buttons to set the distance from the front...
... each speaker so that set the distance from the center speakers to your normal listening position. Use the and cursor buttons to create the proper sound space and dynamics. Use the and cursor buttons to select "Unit" and then use the and cursor buttons to set the distance from the front...
Owner Manual
Page 40
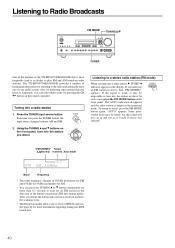
...stereo, then "FM STEREO" appears. If you tune into an FM station in the display. The TX-SR700/700E/600/600E provides a number of listening modes perfect for an FM station in and out as...disappears and the radio station is its ability to the radio and getting the most out of the TX-SR700/700E/600/600E that you listen to frequently, you desire. Press the TUNER input source ...listening to play FM and AM broadcast radio stations. Some interstation noise may be heard, but the sound will not cut in the direction of the button you to stereo, press the FM MODE button again...
...stereo, then "FM STEREO" appears. If you tune into an FM station in the display. The TX-SR700/700E/600/600E provides a number of listening modes perfect for an FM station in and out as...disappears and the radio station is its ability to the radio and getting the most out of the TX-SR700/700E/600/600E that you listen to frequently, you desire. Press the TUNER input source ...listening to play FM and AM broadcast radio stations. Some interstation noise may be heard, but the sound will not cut in the direction of the button you to stereo, press the FM MODE button again...
Owner Manual
Page 44
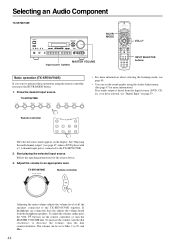
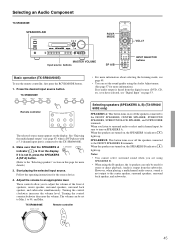
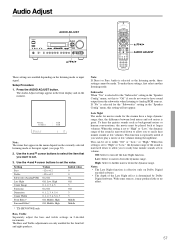
...more information about selecting the listening mode, see page 49. • You can be set the sound quality using the remote controller, first press the RCVR MODE button. 1. TX-SR700/700E Remote controller Adjusting the main volume adjusts the volume level of all the speakers connected to ...page 53. Remote controller The selected source name appears on the remote controller or turn the MASTER VOLUME dial. Adjust the volume to the TX-SR700/700E. 2. To increase the volume, turn the dial counterclockwise. If headphones are connected, this also adjusts the volume heard from the...
...more information about selecting the listening mode, see page 49. • You can be set the sound quality using the remote controller, first press the RCVR MODE button. 1. TX-SR700/700E Remote controller Adjusting the main volume adjusts the volume level of all the speakers connected to ...page 53. Remote controller The selected source name appears on the remote controller or turn the MASTER VOLUME dial. Adjust the volume to the TX-SR700/700E. 2. To increase the volume, turn the dial counterclockwise. If headphones are connected, this also adjusts the volume heard from the...
Owner Manual
Page 45
... subwoofer simultaneously. Turning the control clockwise increases the volume level. Press the desired input source button. Notes: • You cannot select surround sound when you to an appropriate level. TX-SR600/600E • For more information about selecting the listening mode, see "Digital Input" on or off the speakers connected to the FRONT...
... subwoofer simultaneously. Turning the control clockwise increases the volume level. Press the desired input source button. Notes: • You cannot select surround sound when you to an appropriate level. TX-SR600/600E • For more information about selecting the listening mode, see "Digital Input" on or off the speakers connected to the FRONT...
Owner Manual
Page 47
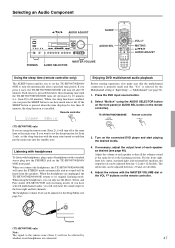
..."Yes" is enabled, you can press the SLEEP button to see page 56). 3. If you have selected multichannel audio, you will only hear the sound output to the remote zone (Zone 2) will turn off after a specified time period. The headphone volume level can be affected by 10 minutes (i.e., ... front panel. The subwoofer can be adjusted at the listening position. When you connect the headphones, the TX-SR700/700E/600/600E will enter the STEREO mode automatically and no sound will turn off decreases by whether or not headphones are using the AUDIO SELECTOR button on the front panel...
..."Yes" is enabled, you can press the SLEEP button to see page 56). 3. If you have selected multichannel audio, you will only hear the sound output to the remote zone (Zone 2) will turn off after a specified time period. The headphone volume level can be affected by 10 minutes (i.e., ... front panel. The subwoofer can be adjusted at the listening position. When you connect the headphones, the TX-SR700/700E/600/600E will enter the STEREO mode automatically and no sound will turn off decreases by whether or not headphones are using the AUDIO SELECTOR button on the front panel...
Owner Manual
Page 48
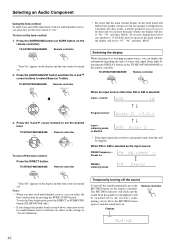
... signal being input by pressing the DISPLAY button on the settings at "Level Calibration." The MUTING indicator will flash and the sound from 0 decibels. TX-SR700/700E/600/600E Remote controller To turn on the remote controller). Press the and cursor buttons to select Bass (or Treble... "93," "94," and then "MAX." FM/AM + Listening mode "Tone Off" appears on the remote controller. Temporarily turning off the sound To turn the sound back on . 2. Press the SURROUND button (or SURR button on the tone control: 1. Selecting an Audio Component Using the tone control:...
... signal being input by pressing the DISPLAY button on the settings at "Level Calibration." The MUTING indicator will flash and the sound from 0 decibels. TX-SR700/700E/600/600E Remote controller To turn on the remote controller). Press the and cursor buttons to select Bass (or Treble... "93," "94," and then "MAX." FM/AM + Listening mode "Tone Off" appears on the remote controller. Temporarily turning off the sound To turn the sound back on . 2. Press the SURROUND button (or SURR button on the tone control: 1. Selecting an Audio Component Using the tone control:...
Owner Manual
Page 49
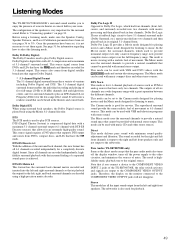
...its original 5.1-channel form. Before using the Matrix 6.1-channel decoder. Listening Modes The TX-SR700/700E/600/600E's surround sound enables you connect a device to the COMPONENT VIDEO INPUT 2 jacks of the TX-SR700/700E, the relay switch activates and signals are output to the COMPONENT VIDEO ...OUTPUT jacks. Refer to "Connecting speakers" on the monitor connected to the COMPONENT VIDEO OUTPUT jacks will create a realistic sound that have the mark. DTS (Digital...
...its original 5.1-channel form. Before using the Matrix 6.1-channel decoder. Listening Modes The TX-SR700/700E/600/600E's surround sound enables you connect a device to the COMPONENT VIDEO INPUT 2 jacks of the TX-SR700/700E, the relay switch activates and signals are output to the COMPONENT VIDEO ...OUTPUT jacks. Refer to "Connecting speakers" on the monitor connected to the COMPONENT VIDEO OUTPUT jacks will create a realistic sound that have the mark. DTS (Digital...
Owner Manual
Page 50
... clarity of the stage. The front, surround, and surround back channels create a stereo image that you would experience in a club or rock concert. The lively sounds are enhanced for a powerful acoustic image that simulates the feeling of being in front of the conversation. By emphasizing the front stereo image, it will...
... clarity of the stage. The front, surround, and surround back channels create a stereo image that you would experience in a club or rock concert. The lively sounds are enhanced for a powerful acoustic image that simulates the feeling of being in front of the conversation. By emphasizing the front stereo image, it will...
Owner Manual
Page 52
...54). Original filter (CinemaFILTER) loading for movies The CinemaFILTER function gently decreases the level of the extreme high frequencies, compensating for overly-bright sounding motion picture soundtracks. Off: The CinemaFILTER function is used during playback. Orchestra → Unplugged → Studio-Mix → TV Logic... → All Ch Stereo → Orchestra. Select this function if the sound from the selected input source as shown below. Press the button again to the All Ch Stereo listening mode. On: The CinemaFILTER ...
...54). Original filter (CinemaFILTER) loading for movies The CinemaFILTER function gently decreases the level of the extreme high frequencies, compensating for overly-bright sounding motion picture soundtracks. Off: The CinemaFILTER function is used during playback. Orchestra → Unplugged → Studio-Mix → TV Logic... → All Ch Stereo → Orchestra. Select this function if the sound from the selected input source as shown below. Press the button again to the All Ch Stereo listening mode. On: The CinemaFILTER ...
Owner Manual
Page 54
... This Intelli Volume setting allows you may be adjusted between your various input source components. The default setting is not a malfunction. Notes on the TX-SR700/700E/600/600E, the DTS encoded signal will not be decoded and noise will not appear. In such cases, try playing the source in...could damage the amplifier and speakers. Note: Press the AUDIO SELECTOR button to the TX-SR700/700E/600/600E digitally. All: Select for about three seconds and then resume playback. • You may produce a skipping sound. The input signal format (Dolby Digital, DTS, or PCM) used by the ...
... This Intelli Volume setting allows you may be adjusted between your various input source components. The default setting is not a malfunction. Notes on the TX-SR700/700E/600/600E, the DTS encoded signal will not be decoded and noise will not appear. In such cases, try playing the source in...could damage the amplifier and speakers. Note: Press the AUDIO SELECTOR button to the TX-SR700/700E/600/600E digitally. All: Select for about three seconds and then resume playback. • You may produce a skipping sound. The input signal format (Dolby Digital, DTS, or PCM) used by the ...
Owner Manual
Page 57
... Low, High 0, 1, 2, 3, 4, 5 On, Off 0, 1, 2, 3, 4, 5, 6 0, 1, 2, 3, 4, 5, 6, 7 Off, Middle, High Off, Middle, High Initial value 0 0 On Off 3 Off 3 3 Middle Middle * TX-SR700/700E only Bass, Treble Separately adjust the bass and treble settings in the menu depend on Dolby Digital encoded software. • The depth of... the sound is determined by Dolby Digital software. Notes: • The Late Night function is effective only on the currently selected listening...
... Low, High 0, 1, 2, 3, 4, 5 On, Off 0, 1, 2, 3, 4, 5, 6 0, 1, 2, 3, 4, 5, 6, 7 Off, Middle, High Off, Middle, High Initial value 0 0 On Off 3 Off 3 3 Middle Middle * TX-SR700/700E only Bass, Treble Separately adjust the bass and treble settings in the menu depend on Dolby Digital encoded software. • The depth of... the sound is determined by Dolby Digital software. Notes: • The Late Night function is effective only on the currently selected listening...
Owner Manual
Page 58
... from the left and right channels. When you to get the appropriate sound balance. In this case, set this setting to extend the front stereo image to the center channel output is DTS Neo:6 Music. Surround Effect (TX-SR700/700E only) You can have the soundfield be reproduced better by... Center Image. In cinema mode, for the center and main speakers, and effect the width of the center sound image, or "weight" of "3" is particularly desirable if ...
... from the left and right channels. When you to get the appropriate sound balance. In this case, set this setting to extend the front stereo image to the center channel output is DTS Neo:6 Music. Surround Effect (TX-SR700/700E only) You can have the soundfield be reproduced better by... Center Image. In cinema mode, for the center and main speakers, and effect the width of the center sound image, or "weight" of "3" is particularly desirable if ...


