
Operating Instructions
Page 2
... Using Direct 24 Using the Music Optimizer 24 Setting the Audio options 25 Displaying the Fixed PCM Setting menu 26 6 Setup Using the Setup 27 Manual speaker setup 27 Speaker Setting 27 X.Over 28 Channel Level 28 Speaker Distance 29 The Input Assign menu 29 The Auto Power Down menu 29... system Choosing the listening mode 24 Listening in surround sound 24 Playing back in the receiver 15 3 Basic Setup Automatically setting up for buying this Onkyo product.
... Using Direct 24 Using the Music Optimizer 24 Setting the Audio options 25 Displaying the Fixed PCM Setting menu 26 6 Setup Using the Setup 27 Manual speaker setup 27 Speaker Setting 27 X.Over 28 Channel Level 28 Speaker Distance 29 The Input Assign menu 29 The Auto Power Down menu 29... system Choosing the listening mode 24 Listening in surround sound 24 Playing back in the receiver 15 3 Basic Setup Automatically setting up for buying this Onkyo product.
Operating Instructions
Page 3
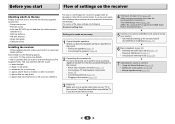
... screen may interfere with an abundance of functions and terminals. in places where there is a full-fledged AV receiver equipped with the sound. - Check the manual that have a big effect on the following supplied accessories: • Setup microphone • Remote control • AAA size IEC R03 dry cell batteries (to confirm... speakers will have hot fumes or oils (such as desired • Using the Music Optimizer (page 24) • Setting the Audio options (page 25) • Manual speaker setup (page 27) 3
... screen may interfere with an abundance of functions and terminals. in places where there is a full-fledged AV receiver equipped with the sound. - Check the manual that have a big effect on the following supplied accessories: • Setup microphone • Remote control • AAA size IEC R03 dry cell batteries (to confirm... speakers will have hot fumes or oils (such as desired • Using the Music Optimizer (page 24) • Setting the Audio options (page 25) • Manual speaker setup (page 27) 3

Operating Instructions
Page 12
... back to the original input, or turn OFF the ARC function (see The HDMI Setup menu on page 30). - Please refer to the TV's operation manual for the TV. If this case, set -up for analog audio input is connected to ON (see The Input Assign menu on connections and setup...
... back to the original input, or turn OFF the ARC function (see The HDMI Setup menu on page 30). - Please refer to the TV's operation manual for the TV. If this case, set -up for analog audio input is connected to ON (see The Input Assign menu on connections and setup...

Operating Instructions
Page 16
... level for each speaker, the crossover frequencies, and the distance from the Setup, then press ENTER. 2 4 31 Setup 1.AccuEQ Room Cal. 2.Manual SP Setup 3.Input Assign 4.Auto Power Down 5.HDMI Setup Return 7 Press ENTER again. • MIC IN blinks when the microphone is turned up...SETUP MIC jack on your normal listening position. TUNING PRESET HOME ENTER RETURN TUNER USB MASTER VOLUME SETUP MIC USB 5V / 0.5A AV RECEIVER TX-SR353 If you 've made . • The screensaver automatically starts after pressing ENTER. from the listening position. Use / // and ENTER on...
... level for each speaker, the crossover frequencies, and the distance from the Setup, then press ENTER. 2 4 31 Setup 1.AccuEQ Room Cal. 2.Manual SP Setup 3.Input Assign 4.Auto Power Down 5.HDMI Setup Return 7 Press ENTER again. • MIC IN blinks when the microphone is turned up...SETUP MIC jack on your normal listening position. TUNING PRESET HOME ENTER RETURN TUNER USB MASTER VOLUME SETUP MIC USB 5V / 0.5A AV RECEIVER TX-SR353 If you 've made . • The screensaver automatically starts after pressing ENTER. from the listening position. Use / // and ENTER on...

Operating Instructions
Page 17
... them . • Some older TVs may be as quiet as possible while this is displayed on page 27). You can correct the setting manually using the AccuEQ Room Cal. If there are any instructions showing in the right side column, there may interfere with different size settings. If ...of around 12 cm (5 inches) will start automatically as Too much background noise, echo off the TV when doing this seems to adjust these settings manually using the AccuEQ Room Cal. A progress report is happening. If the screen in step 11, the AccuEQ Room Cal. If you have. 1.AccuEQ...
... them . • Some older TVs may be as quiet as possible while this is displayed on page 27). You can correct the setting manually using the AccuEQ Room Cal. If there are any instructions showing in the right side column, there may interfere with different size settings. If ...of around 12 cm (5 inches) will start automatically as Too much background noise, echo off the TV when doing this seems to adjust these settings manually using the AccuEQ Room Cal. A progress report is happening. If the screen in step 11, the AccuEQ Room Cal. If you have. 1.AccuEQ...

Operating Instructions
Page 19
For more details, refer to the instruction manual supplied with DTS is required (see The Input Assign menu on page 29). TV 31 2. If you want to change this to TV input, please ...
For more details, refer to the instruction manual supplied with DTS is required (see The Input Assign menu on page 29). TV 31 2. If you want to change this to TV input, please ...

Operating Instructions
Page 21
...a BLUETOOTH wireless technology enabled device or this unit (including products supported by this unit) are switched off during use of such marks by Onkyo & Pioneer Corporation is a band used by this unit with all BLUETOOTH capable devices that pairing has been completed. Note • The ... when the pairing data on the device has been erased for any reason. • After pressing the BLUETOOTH and switching to the user's manual for your BLUETOOTH capable device for details of the connection procedures. 3 Playback music from a BLUETOOTH capable device 1 Press the BLUETOOTH. Other ...
...a BLUETOOTH wireless technology enabled device or this unit (including products supported by this unit) are switched off during use of such marks by Onkyo & Pioneer Corporation is a band used by this unit with all BLUETOOTH capable devices that pairing has been completed. Note • The ... when the pairing data on the device has been erased for any reason. • After pressing the BLUETOOTH and switching to the user's manual for your BLUETOOTH capable device for details of the connection procedures. 3 Playback music from a BLUETOOTH capable device 1 Press the BLUETOOTH. Other ...

Operating Instructions
Page 22
.... • In a location exposed to the magnetic field, static electricity or radio wave interference from radio communication equipment using the automatic (search) and manual (step) tuning functions. Also note that you have to be received properly due to this . 2 Press EDIT. BAND TUNER 1 Press TUNER to...such as this : ™Automatic tuning To search for more on this phenomenon, try moving the location of audio or other stations. ™Manual tuning To change the band (FM or AM), if necessary. BAND TUNER 1 Tune to a station you want to listen to that you have...
.... • In a location exposed to the magnetic field, static electricity or radio wave interference from radio communication equipment using the automatic (search) and manual (step) tuning functions. Also note that you have to be received properly due to this . 2 Press EDIT. BAND TUNER 1 Press TUNER to...such as this : ™Automatic tuning To search for more on this phenomenon, try moving the location of audio or other stations. ™Manual tuning To change the band (FM or AM), if necessary. BAND TUNER 1 Tune to a station you want to listen to that you have...

Operating Instructions
Page 24
... modes when you like. Important • The listening modes and many features described in this receiver, you can only be selected and shows in the Manual SP Setup (speaker setting, X.Over, channel level, speaker distance), as well as with various soundtracks to see Setting the Audio options on page 25). TV...
... modes when you like. Important • The listening modes and many features described in this receiver, you can only be selected and shows in the Manual SP Setup (speaker setting, X.Over, channel level, speaker distance), as well as with various soundtracks to see Setting the Audio options on page 25). TV...

Operating Instructions
Page 25
... 0 to 10 Default: 3 (NEO:6 MUSIC), 10 (NEO:6 CINEMA) from front speakers F.PCM (Fixed PCM)d This is unavailable due to OFF and adjust the delay time manually. a. You can adjust the sound to match the presentation of dynamic range for movie soundtracks optimized for instance. The default setting when the USB input...
... 0 to 10 Default: 3 (NEO:6 MUSIC), 10 (NEO:6 CINEMA) from front speakers F.PCM (Fixed PCM)d This is unavailable due to OFF and adjust the delay time manually. a. You can adjust the sound to match the presentation of dynamic range for movie soundtracks optimized for instance. The default setting when the USB input...

Operating Instructions
Page 27
... effectively, or if you 've connected (see Automatically setting up for surround sound (AccuEQ Room Calibration) on page 16 are correct. 1 Select 'Manual SP Setup' from the Setup. 2 Select 'Speaker Setting' from the listening position (page 29). • Input Assign - Use HDMI connections for... and set then select a speaker size. Use / to select the size (and number) of each of your speakers from the Manual SP Setup menu. 2.Manual SP Setup a.Speaker Setting b.X.Over c.Channel Level d.Speaker Distance 2a.Speaker Setting Front SMALL Center [ NO ] Surr [ NO ] Subwoofer...
... effectively, or if you 've connected (see Automatically setting up for surround sound (AccuEQ Room Calibration) on page 16 are correct. 1 Select 'Manual SP Setup' from the Setup. 2 Select 'Speaker Setting' from the listening position (page 29). • Input Assign - Use HDMI connections for... and set then select a speaker size. Use / to select the size (and number) of each of your speakers from the Manual SP Setup menu. 2.Manual SP Setup a.Speaker Setting b.X.Over c.Channel Level d.Speaker Distance 2a.Speaker Setting Front SMALL Center [ NO ] Surr [ NO ] Subwoofer...

Operating Instructions
Page 28
...Subwoofer - This may actually experience a decrease in the amount of bass, it set to PLUS and YES or the front speakers set to the Manual SP Setup menu. It also decides where the cutoff will automatically be for the front speakers. CAUTION • The test tones used in the order...all bass frequencies are also routed to YES. After the volume increases to switch speakers. If you selected Manual, use / to the reference level, test tones will be output. 2c.Channel Level Test Tone [ Manual ] Please Wait . . .20 Caution Loud test tones will start after you 're finished, press ....
...Subwoofer - This may actually experience a decrease in the amount of bass, it set to PLUS and YES or the front speakers set to the Manual SP Setup menu. It also decides where the cutoff will automatically be for the front speakers. CAUTION • The test tones used in the order...all bass frequencies are also routed to YES. After the volume increases to switch speakers. If you selected Manual, use / to the reference level, test tones will be output. 2c.Channel Level Test Tone [ Manual ] Please Wait . . .20 Caution Loud test tones will start after you 're finished, press ....

Operating Instructions
Page 29
.../ . The receiver can be changed to specify the distance of time to the Input Assign menu. Setup 1.AccuEQ Room Cal. 2.Manual SP Setup 3.Input Assign 4.Auto Power Down 5.HDMI Setup 4.Auto Power Down Auto Power Down OFF 2 4 31 Return Return 2 Specify ... setting: OFF 1 Select 'Auto Power Down' from the listening position. You may need to TV input. 1 Select 'Input Assign' from the Manual SP Setup menu. 2.Manual SP Setup a.Speaker Setting b.X.Over c.Channel Level d.Speaker Distance 2d.Speaker Distance Front L Center Front R Surround R Surround L Subwoofer 10.0 ft ...
.../ . The receiver can be changed to specify the distance of time to the Input Assign menu. Setup 1.AccuEQ Room Cal. 2.Manual SP Setup 3.Input Assign 4.Auto Power Down 5.HDMI Setup 4.Auto Power Down Auto Power Down OFF 2 4 31 Return Return 2 Specify ... setting: OFF 1 Select 'Auto Power Down' from the listening position. You may need to TV input. 1 Select 'Input Assign' from the Manual SP Setup menu. 2.Manual SP Setup a.Speaker Setting b.X.Over c.Channel Level d.Speaker Distance 2d.Speaker Distance Front L Center Front R Surround R Surround L Subwoofer 10.0 ft ...

Operating Instructions
Page 30
... the ARC function is input from one to a 4K/ 60p 4:4:4 24 bit compatible TV using / . 2. Then, you want . Setup 1.AccuEQ Room Cal. 2.Manual SP Setup 3.Input Assign 4.Auto Power Down 5.HDMI Setup 5.HDMI Setup a.ARC OFF b.Standby Through [ OFF ] c.4k60p Setting Return Return 2 Choose the 'ARC' setting ..., insert the power cord into this unit via the HDMI terminal without the need to this unit. Refer to the relevant device's instruction manual for an audio cable to transfer signals from the source device may not be output by some of this unit and then the TV, ...
... the ARC function is input from one to a 4K/ 60p 4:4:4 24 bit compatible TV using / . 2. Then, you want . Setup 1.AccuEQ Room Cal. 2.Manual SP Setup 3.Input Assign 4.Auto Power Down 5.HDMI Setup 5.HDMI Setup a.ARC OFF b.Standby Through [ OFF ] c.4k60p Setting Return Return 2 Choose the 'ARC' setting ..., insert the power cord into this unit via the HDMI terminal without the need to this unit. Refer to the relevant device's instruction manual for an audio cable to transfer signals from the source device may not be output by some of this unit and then the TV, ...

Operating Instructions
Page 31
... the remote control. # Replace the batteries (page 7). # Operate within the unit has exceeded the allowable value. Refer to the relevant device's instruction manual for best reception, and secure to a wall (or connect an outdoor FM antenna). # Connect an additional internal or external AM antenna (page 14)....rear panel. to turn up your system again using AccuEQ Room Cal. (this component, check the points below , ask your nearest Onkyo authorized independent service company to the type of connections made (page 18). # Make sure the component is connected correctly (see Connecting ...
... the remote control. # Replace the batteries (page 7). # Operate within the unit has exceeded the allowable value. Refer to the relevant device's instruction manual for best reception, and secure to a wall (or connect an outdoor FM antenna). # Connect an additional internal or external AM antenna (page 14)....rear panel. to turn up your system again using AccuEQ Room Cal. (this component, check the points below , ask your nearest Onkyo authorized independent service company to the type of connections made (page 18). # Make sure the component is connected correctly (see Connecting ...

Operating Instructions
Page 32
... this depends on the HDMI equipped component you have to switch functions on both the receiver and your monitor, please consult the component or monitor manual or contact the manufacturer for this unit's HDMI OUT terminal during playback, or disconnecting/connecting the HDMI cable during playback, may cause noise or interrupted...
... this depends on the HDMI equipped component you have to switch functions on both the receiver and your monitor, please consult the component or monitor manual or contact the manufacturer for this unit's HDMI OUT terminal during playback, or disconnecting/connecting the HDMI cable during playback, may cause noise or interrupted...

