Owner Manual
Page 31
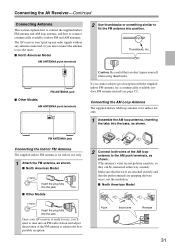
...Connecting the Indoor FM Antenna The supplied indoor FM antenna is for indoor use , you don't injure yourself when using thumbtacks. Connecting the AV Receiver-Continued Connecting Antenna This section explains how to connect the supplied indoor FM antenna and AM loop antenna, and how to use only. 1 ... of the FM antenna to achieve the best possible reception. 2 Connect both wires of the AM loop antenna to fix the FM antenna into the jack. The AV receiver won't pick up any radio signals without any antenna connected, so you cannot achieve good reception with the supplied indoor...
...Connecting the Indoor FM Antenna The supplied indoor FM antenna is for indoor use , you don't injure yourself when using thumbtacks. Connecting the AV Receiver-Continued Connecting Antenna This section explains how to connect the supplied indoor FM antenna and AM loop antenna, and how to use only. 1 ... of the FM antenna to achieve the best possible reception. 2 Connect both wires of the AM loop antenna to fix the FM antenna into the jack. The AV receiver won't pick up any radio signals without any antenna connected, so you cannot achieve good reception with the supplied indoor...
Owner Manual
Page 57
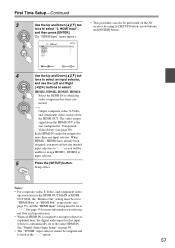
... you must be set to which the video component has been connected. - - -: Output composite video, S-Video, and component video sources from the HDMI OUT is fixed at the "- - -" option. 57 The "HDMI Input" menu appears. 1-2. HDMI Input DVD - - - AUX1 - - - HDMI4 to select "2. HDMI Input", and then ...press [ENTER]. CBL/SAT - - - The video output signal from the HDMI OUT. See page 34 for more information on the AV receiver by using its [SETUP] button, arrow buttons, and [ENTER] button. AUX2 - - - • This procedure can also be assigned and is the...
... you must be set to which the video component has been connected. - - -: Output composite video, S-Video, and component video sources from the HDMI OUT is fixed at the "- - -" option. 57 The "HDMI Input" menu appears. 1-2. HDMI Input DVD - - - AUX1 - - - HDMI4 to select "2. HDMI Input", and then ...press [ENTER]. CBL/SAT - - - The video output signal from the HDMI OUT. See page 34 for more information on the AV receiver by using its [SETUP] button, arrow buttons, and [ENTER] button. AUX2 - - - • This procedure can also be assigned and is the...
Owner Manual
Page 58
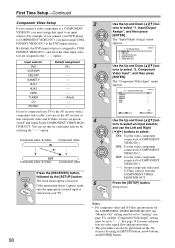
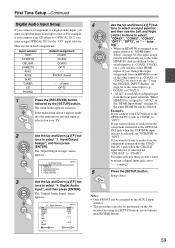
...The main menu appears onscreen. Digital Audio Input 5. For example, if you connect your DVD player to COMPONENT VIDEO IN 1. TUNER - - - (Fixed) CD --- The "Input/Output Assign" menu appears. 1. Input/Output Assign 1. Analog Audio Input Use the Up and Down [R]/[X] buttons to the DVD...--- PHONO --- You can set this for more information on video signal flow and upconversion. • This procedure can set the AV receiver so that input to the "- - -" option. The "Component Video Input" menu appears. 1-3. AUX1 - - - IN2: Use the video component ...
...The main menu appears onscreen. Digital Audio Input 5. For example, if you connect your DVD player to COMPONENT VIDEO IN 1. TUNER - - - (Fixed) CD --- The "Input/Output Assign" menu appears. 1. Input/Output Assign 1. Analog Audio Input Use the Up and Down [R]/[X] buttons to the DVD...--- PHONO --- You can set this for more information on video signal flow and upconversion. • This procedure can set the AV receiver so that input to the "- - -" option. The "Component Video Input" menu appears. 1-3. AUX1 - - - IN2: Use the video component ...
Owner Manual
Page 59
...COAX2 COAX3 OPT1 --- The main menu appears onscreen. If the main menu doesn't appear, make sure the appropriate external input is selected on the AV receiver by the [SETUP] button. Input/Output Assign", and then press [ENTER]. Input/Output Assign 1. HDMI Input 3. tons to select: "COAX1...inputs (e.g., COAX1, COAX2, etc.), you connect your DVD player to the OPTICAL IN 1 jack, set "DVD" to "OPT1". FRONT (Fixed) --- - - - (Fixed) OPT2 --- 1 Press the [RECEIVER] button, followed by using its [SETUP] button, arrow buttons, and [ENTER] button. 59 The "Input/Output Assign" menu appears. ...
...COAX2 COAX3 OPT1 --- The main menu appears onscreen. If the main menu doesn't appear, make sure the appropriate external input is selected on the AV receiver by the [SETUP] button. Input/Output Assign", and then press [ENTER]. Input/Output Assign 1. HDMI Input 3. tons to select: "COAX1...inputs (e.g., COAX1, COAX2, etc.), you connect your DVD player to the OPTICAL IN 1 jack, set "DVD" to "OPT1". FRONT (Fixed) --- - - - (Fixed) OPT2 --- 1 Press the [RECEIVER] button, followed by using its [SETUP] button, arrow buttons, and [ENTER] button. 59 The "Input/Output Assign" menu appears. ...
Owner Manual
Page 96
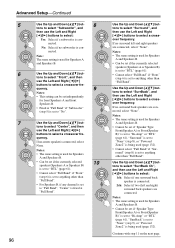
...if "Front" (step 6) is set to anything other than "Full Band". • For Speakers B, if any channel is set to "Full Band", "Center" is fixed at "Full Band" if "Subwoofer" (step 5) is set to select: Yes: Select if a subwoofer is connected, select None. quency. 9 Notes: • This ... 9), or "Powered Zone2" is being used (page 132). Notes: • The same setting is used for front Speakers A and front Speakers B. • Fixed at "Full Band". 96 Use the Up and Down [R]/[X] buttons to select "Surround", and then use the Left and Right [F]/[S] buttons to select: 1ch: Select...
...if "Front" (step 6) is set to anything other than "Full Band". • For Speakers B, if any channel is set to "Full Band", "Center" is fixed at "Full Band" if "Subwoofer" (step 5) is set to select: Yes: Select if a subwoofer is connected, select None. quency. 9 Notes: • This ... 9), or "Powered Zone2" is being used (page 132). Notes: • The same setting is used for front Speakers A and front Speakers B. • Fixed at "Full Band". 96 Use the Up and Down [R]/[X] buttons to select "Surround", and then use the Left and Right [F]/[S] buttons to select: 1ch: Select...

Owner Manual
Page 98
Advanced Setup-Continued Setting Speakers A and Speakers B (TX-NR906 only) 15 These settings are not set to use the surr back speakers with Speakers A or Speakers B. tons to select "Subwoofer", and then use the ... [R]/[X] buttons to select "Surround", and then use the Left and Right [F]/[S] buttons to select: Not Use: Select if you don't want to "None". Note: • Fixed at "Not Use" if "Surround" (step 16) is set to "Not Use". • Cannot be set if the "Center" (step 7) is set to use the...
Advanced Setup-Continued Setting Speakers A and Speakers B (TX-NR906 only) 15 These settings are not set to use the surr back speakers with Speakers A or Speakers B. tons to select "Subwoofer", and then use the ... [R]/[X] buttons to select "Surround", and then use the Left and Right [F]/[S] buttons to select: Not Use: Select if you don't want to "None". Note: • Fixed at "Not Use" if "Surround" (step 16) is set to "Not Use". • Cannot be set if the "Center" (step 7) is set to use the...
Owner Manual
Page 132
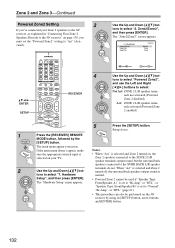
... external input is selected and Zone 2 turned off, the surround back speakers output sound as explained in "Connecting Your Zone 2 Speakers Directly to the AV receiver" on your Zone 2 speakers to select: Not Act: ZONE 2 L/R speaker termi- The "Hardware Setup" menu appears. Setup closes. The "Zone2...terminals do not. Act: ZONE 2 L/R speaker termi- Use the Up and Down [R]/[X] buttons to select "7. Zone2/Zone3 Powered Zone2 Zone2 Out Zone3 Out Not Act Fixed Fixed ENTER SETUP 1 2 ON STANDBY TV INPUT DVD 1 VCR/DVR CBL/SAT 2 3 GAME/TV AUX1 AUX2 4 5 6 + TV CH - TUN TV VOL...
... external input is selected and Zone 2 turned off, the surround back speakers output sound as explained in "Connecting Your Zone 2 Speakers Directly to the AV receiver" on your Zone 2 speakers to select: Not Act: ZONE 2 L/R speaker termi- The "Hardware Setup" menu appears. Setup closes. The "Zone2...terminals do not. Act: ZONE 2 L/R speaker termi- Use the Up and Down [R]/[X] buttons to select "7. Zone2/Zone3 Powered Zone2 Zone2 Out Zone3 Out Not Act Fixed Fixed ENTER SETUP 1 2 ON STANDBY TV INPUT DVD 1 VCR/DVR CBL/SAT 2 3 GAME/TV AUX1 AUX2 4 5 6 + TV CH - TUN TV VOL...

Owner Manual
Page 133
...VCR/DVR CBL/SAT 1 2 3 + 7-2. PREV CH DISPLAY TOP MENU MENU ENTER GUIDE SETUP EXIT RETURN VOL MUTING MUTING Fixed: The Zone 2 or Zone 3 volume must be performed on the AV receiver by the [SETUP] button. The main menu appears onscreen. tons to select "7. STANDBY ON ON STANDBY TV INPUT The ..."Zone2/Zone3" screen appears. Variable: The Zone 2 or Zone 3 volume can also be set on the AV receiver. If the main menu doesn't appear, make sure the appropriate external input is selected on your Zone 2 or Zone 3 speakers to an amp ...
...VCR/DVR CBL/SAT 1 2 3 + 7-2. PREV CH DISPLAY TOP MENU MENU ENTER GUIDE SETUP EXIT RETURN VOL MUTING MUTING Fixed: The Zone 2 or Zone 3 volume must be performed on the AV receiver by the [SETUP] button. The main menu appears onscreen. tons to select "7. STANDBY ON ON STANDBY TV INPUT The ..."Zone2/Zone3" screen appears. Variable: The Zone 2 or Zone 3 volume can also be set on the AV receiver. If the main menu doesn't appear, make sure the appropriate external input is selected on your Zone 2 or Zone 3 speakers to an amp ...
Owner Manual
Page 135
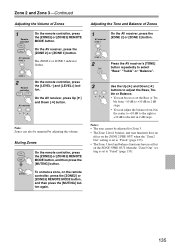
...MUTING] button again. 3 Use the Up [S] and Down [F] buttons to adjust the Bass, Tre- AV receiver On the AV receiver, press the [ZONE 2] or [ZONE 3] button. AV receiver On the AV receiver, press Up [S] and Down [F] button. ble or Balance. • You can adjust the balance ...Fixed" (page 133). 135 Muting Zones On the remote controller, press the [ZONE2] or [ZONE3] REMOTE MODE button, and then press the [MUTING] button. Zone 2 and Zone 3-Continued Adjusting the Volume of Zones 1 AV receiver On the AV receiver, press the [ZONE 2] or [ZONE 3] button. 2 Press the AV receiver...
...MUTING] button again. 3 Use the Up [S] and Down [F] buttons to adjust the Bass, Tre- AV receiver On the AV receiver, press the [ZONE 2] or [ZONE 3] button. AV receiver On the AV receiver, press Up [S] and Down [F] button. ble or Balance. • You can adjust the balance ...Fixed" (page 133). 135 Muting Zones On the remote controller, press the [ZONE2] or [ZONE3] REMOTE MODE button, and then press the [MUTING] button. Zone 2 and Zone 3-Continued Adjusting the Volume of Zones 1 AV receiver On the AV receiver, press the [ZONE 2] or [ZONE 3] button. 2 Press the AV receiver...

