Owner Manual
Page 1
Following the instructions in the unit. Please retain this manual will enable you for future reference. Please read this manual thoroughly before making connections and plugging in this manual for purchasing an Onkyo AV Receiver. Contents Introduction 2 Connections 12 Turning On & Basic Operations ......22 Advanced Operations 43 Controlling Other Components...66 Appendix 74 En AV Receiver TX-NR709 Instruction Manual Thank you to obtain optimum performance and listening enjoyment from your new AV Receiver.
Following the instructions in the unit. Please retain this manual will enable you for future reference. Please read this manual thoroughly before making connections and plugging in this manual for purchasing an Onkyo AV Receiver. Contents Introduction 2 Connections 12 Turning On & Basic Operations ......22 Advanced Operations 43 Controlling Other Components...66 Appendix 74 En AV Receiver TX-NR709 Instruction Manual Thank you to obtain optimum performance and listening enjoyment from your new AV Receiver.

Owner Manual
Page 4
... markings identifying the terminals in your socket outlets, cut it at the end of the product name indicates the color. MIYAGI ONKYO EUROPE ELECTRONICS GmbH Supplied Accessories Make sure you intend not to the terminal which is coloured brown must approved by qualified service personnel...Approx. 16 ft. (5 m) En 4 For British models Replacement and mounting of an AC plug on the power supply cord of this instruction manual is in compliance with the corresponding technical standards such as EN60065, EN55013, EN55020 and EN61000-3-2, -3-3. The wire which is marked with the letter ...
... markings identifying the terminals in your socket outlets, cut it at the end of the product name indicates the color. MIYAGI ONKYO EUROPE ELECTRONICS GmbH Supplied Accessories Make sure you intend not to the terminal which is coloured brown must approved by qualified service personnel...Approx. 16 ft. (5 m) En 4 For British models Replacement and mounting of an AC plug on the power supply cord of this instruction manual is in compliance with the corresponding technical standards such as EN60065, EN55013, EN55020 and EN61000-3-2, -3-3. The wire which is marked with the letter ...
Owner Manual
Page 13
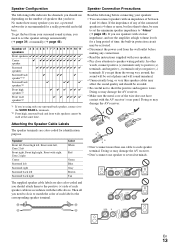
... the SURR BACK L terminals. *2 Front high, surround back and front wide speakers cannot be sure to set the speaker settings automatically (➔ page 31) or manually (➔ page 46). Speaker Configuration The following before making any of the connected speakers is 4 ohms or more than 6 ohms, be used at high volume...
... the SURR BACK L terminals. *2 Front high, surround back and front wide speakers cannot be sure to set the speaker settings automatically (➔ page 31) or manually (➔ page 46). Speaker Configuration The following before making any of the connected speakers is 4 ohms or more than 6 ohms, be used at high volume...
Owner Manual
Page 14
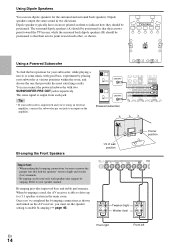
Using Dipole Speakers You can connect the powered subwoofer with good bass, experiment by placing your speaker manual. TV/screen A A Using a Powered Subwoofer To find the best position for the surround and surround back speakers. Tip • If your subwoofer, while playing a movie ...
Using Dipole Speakers You can connect the powered subwoofer with good bass, experiment by placing your speaker manual. TV/screen A A Using a Powered Subwoofer To find the best position for the surround and surround back speakers. Tip • If your subwoofer, while playing a movie ...
Owner Manual
Page 15
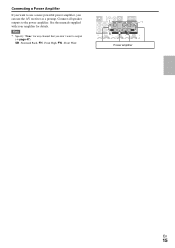
See the manuals supplied with your amplifier for any channel that you can use the AV receiver as a preamp. Note *1 Specify "None" for details. Connecting a Power Amplifier If you want to use a more powerful power amplifier, you don't want to output (➔ page 47). Connect all speaker outputs to the power amplifier. SB···Surround Back, FH···Front High, FW···Front Wide L *1 R Power amplifier En 15
See the manuals supplied with your amplifier for any channel that you can use the AV receiver as a preamp. Note *1 Specify "None" for details. Connecting a Power Amplifier If you want to use a more powerful power amplifier, you don't want to output (➔ page 47). Connect all speaker outputs to the power amplifier. SB···Surround Back, FH···Front High, FW···Front Wide L *1 R Power amplifier En 15
Owner Manual
Page 16
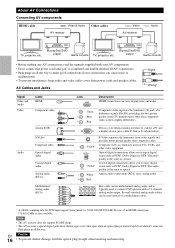
.... Blu-ray Disc/DVD player Game console TV, projector, etc. Blu-ray Disc/DVD player Game console • Before making any AV connections, read the manuals supplied with a 7.1-channel analog audio output. Green Blue Red Component video separates the luminance (Y) and color difference signals (PB, PR), providing the best picture quality...
.... Blu-ray Disc/DVD player Game console TV, projector, etc. Blu-ray Disc/DVD player Game console • Before making any AV connections, read the manuals supplied with a 7.1-channel analog audio output. Green Blue Red Component video separates the luminance (Y) and color difference signals (PB, PR), providing the best picture quality...
Owner Manual
Page 19
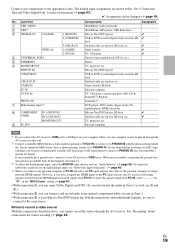
... off. No. Blu-ray Disc/DVD player VCR or DVD recorder/digital video recorder, RI dock Satellite/cable set-top box, etc. If your turntable's manual for the multichannel input, see "Audio Selector" (➔ page 55). However, if you have the signals output from external components while you are shown below...
... off. No. Blu-ray Disc/DVD player VCR or DVD recorder/digital video recorder, RI dock Satellite/cable set-top box, etc. If your turntable's manual for the multichannel input, see "Audio Selector" (➔ page 55). However, if you have the signals output from external components while you are shown below...
Owner Manual
Page 20
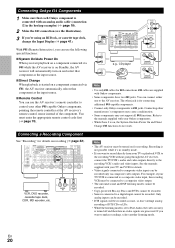
...Use only V cables for details on , the System On/Auto Power On and Direct Change V functions do not work. Refer to the manuals supplied with an analog audio cable (connection ' in standby mode. • If you can use the AV receiver's remote controller to ... turned on a component connected via composite video outputs. En 20 Connecting a Recording Component See "Recording" for V connections. For example, if your Onkyo components. • While Zone 2 is turned off and therefore no video signals are supplied with your other manufacturer's components may cause a malfunction....
...Use only V cables for details on , the System On/Auto Power On and Direct Change V functions do not work. Refer to the manuals supplied with an analog audio cable (connection ' in standby mode. • If you can use the AV receiver's remote controller to ... turned on a component connected via composite video outputs. En 20 Connecting a Recording Component See "Recording" for V connections. For example, if your Onkyo components. • While Zone 2 is turned off and therefore no video signals are supplied with your other manufacturer's components may cause a malfunction....
Owner Manual
Page 27
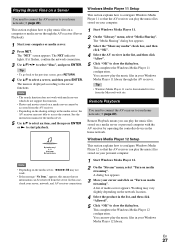
... or media server through the AV receiver. If it flashes, confirm the network connection. 3 Use R/X/F/S to select a server, and then press ENTER. See the instruction manual of media server appears. This completes the Windows Media Player 11 configuration. Tip • Windows Media Player 11 can be retrieved from the server. A list...
... or media server through the AV receiver. If it flashes, confirm the network connection. 3 Use R/X/F/S to select a server, and then press ENTER. See the instruction manual of media server appears. This completes the Windows Media Player 11 configuration. Tip • Windows Media Player 11 can be retrieved from the server. A list...

Owner Manual
Page 28
... the signal from a stereo FM station is weak, it flashes, verify the network connection. 3 Use R/X/F/S to the station in mono. ■ Manual tuning mode In manual tuning mode, FM stations will not be made . 6 Adjusting the Volume You can adjust the volume by adjusting the volume bar in the "Remote...from the Web Setup in mono. 1 Press TUNING MODE so that the AUTO indicator lights on your personal computer. In this case, switch to manual tuning mode and listen to select "dlna", and press ENTER. The right-click menu appears. This section describes the procedure using the buttons on...
... the signal from a stereo FM station is weak, it flashes, verify the network connection. 3 Use R/X/F/S to the station in mono. ■ Manual tuning mode In manual tuning mode, FM stations will not be made . 6 Adjusting the Volume You can adjust the volume by adjusting the volume bar in the "Remote...from the Web Setup in mono. 1 Press TUNING MODE so that the AUTO indicator lights on your personal computer. In this case, switch to manual tuning mode and listen to select "dlna", and press ENTER. The right-click menu appears. This section describes the procedure using the buttons on...
Owner Manual
Page 33
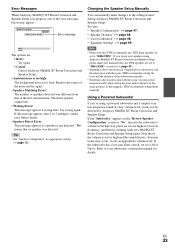
.... Note that any THX main speakers be detected by Audyssey MultEQ XT Room Correction and Speaker Setup. Changing the Speaker Setup Manually You can manually make sure manually that if the volume is too high. Refer to "80Hz(THX)". The background noise is in progress, one of the first... measurement. If the subwoofer has a low-pass filter switch, set to your Onkyo dealer. • Speaker Detect Error This message appears if a speaker ...
.... Note that any THX main speakers be detected by Audyssey MultEQ XT Room Correction and Speaker Setup. Changing the Speaker Setup Manually You can manually make sure manually that if the volume is too high. Refer to "80Hz(THX)". The background noise is in progress, one of the first... measurement. If the subwoofer has a low-pass filter switch, set to your Onkyo dealer. • Speaker Detect Error This message appears if a speaker ...
Owner Manual
Page 46
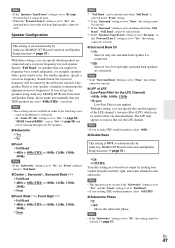
... settings, turn down the volume. ■ Speaker Impedance ` 4ohms: Select if the impedance of any speaker is 4 ohms or more but less than 6, set them manually, which the component has been connected Select if the component is 4 ohms or more but less than normal. Speaker Settings If you 've connected your...
... settings, turn down the volume. ■ Speaker Impedance ` 4ohms: Select if the impedance of any speaker is 4 ohms or more but less than 6, set them manually, which the component has been connected Select if the component is 4 ohms or more but less than normal. Speaker Settings If you 've connected your...
Owner Manual
Page 47
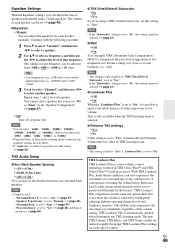
... sounds adequately, for example, speakers with a good sized woofer. Refer to your speakers using Audyssey MultEQ XT Room Correction and Speaker Setup, please make sure manually that use the LFE channel. Note • If the "Surround Back" Setting is set to "None", this setting cannot be selected. ■ LPF... if the "Subwoofer" setting is set to "Yes", and the "Front" setting is set to "Full Band". • If you set up your speaker's manuals to "On" (➔ page 59). - If you 're using THX-certified speakers, select "80Hz". ■ Double Bass This setting is NOT set automatically ...
... sounds adequately, for example, speakers with a good sized woofer. Refer to your speakers using Audyssey MultEQ XT Room Correction and Speaker Setup, please make sure manually that use the LFE channel. Note • If the "Surround Back" Setting is set to "None", this setting cannot be selected. ■ LPF... if the "Subwoofer" setting is set to "Yes", and the "Front" setting is set to "Full Band". • If you set up your speaker's manuals to "On" (➔ page 59). - If you 're using THX-certified speakers, select "80Hz". ■ Double Bass This setting is NOT set automatically ...
Owner Manual
Page 49
... the THX listening mode is set to a room boundary (i.e., wall). This enables users experience the true impact of soundtracks regardless of each speaker manually. And for listeners sitting very close to "No", this setting cannot be set if: - THX Loudness Plus is selected, the equalizer settings ...Plus compensates for each type of turning the volume below Reference Level is that certain sound elements can be set (➔ page 48). ■ Equalizer ` Manual: You can be selected (➔ page 47). ■ Loudness Plus ` Off ` On When the "Loudness Plus" is set to "On", it...
... the THX listening mode is set to a room boundary (i.e., wall). This enables users experience the true impact of soundtracks regardless of each speaker manually. And for listeners sitting very close to "No", this setting cannot be set if: - THX Loudness Plus is selected, the equalizer settings ...Plus compensates for each type of turning the volume below Reference Level is that certain sound elements can be set (➔ page 48). ■ Equalizer ` Manual: You can be selected (➔ page 47). ■ Loudness Plus ` Off ` On When the "Loudness Plus" is set to "On", it...

Owner Manual
Page 50
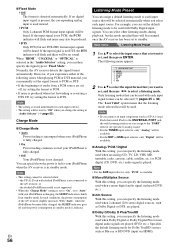
...This setting determines which channel of a stereo multiplex source is set to "None" (➔ page 47), this setting cannot be used . ` Manual: You can select any 2-channel digital source such as you like it backward. While "Mid" is effective with multiplex sources, multilingual TV broadcasts...Multiplex Input Channel ` Main ` Sub ` Main/Sub This setting determines which speakers output mono audio when the Mono listening mode is fixed to "Manual". Center Width ` 0 to 3 to 7 With this setting is selected. Audio Adjust Main menu Audio Adjust With the Audio Adjust functions and ...
...This setting determines which channel of a stereo multiplex source is set to "None" (➔ page 47), this setting cannot be used . ` Manual: You can select any 2-channel digital source such as you like it backward. While "Mid" is effective with multiplex sources, multilingual TV broadcasts...Multiplex Input Channel ` Main ` Sub ` Main/Sub This setting determines which speakers output mono audio when the Mono listening mode is fixed to "Manual". Center Width ` 0 to 3 to 7 With this setting is selected. Audio Adjust Main menu Audio Adjust With the Audio Adjust functions and ...

Owner Manual
Page 54
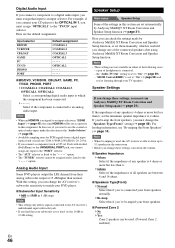
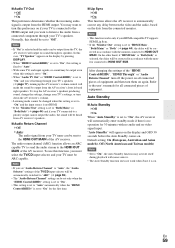
... press ENTER. Tip *1 This can change resolution). Name Edit Name BD/DVD abcde f gh i j k lm nopq r s t uvwxy z 1234567890- ` {}|: ? Note • This setting cannot be performed manually. ` Cinema: Select when the picture source is a movie or alike. ` Game: Select when the video source is processed the same as "Through". When video is...
... press ENTER. Tip *1 This can change resolution). Name Edit Name BD/DVD abcde f gh i j k lm nopq r s t uvwxy z 1234567890- ` {}|: ? Note • This setting cannot be performed manually. ` Cinema: Select when the picture source is a movie or alike. ` Game: Select when the video source is processed the same as "Through". When video is...
Owner Manual
Page 56
... be used when Dolby Digital or Dolby Digital Plus format digital audio signals are specific to "Off" when you select each input source. You can manually set the default listening mode to the "PORT" selector are played (DVD, etc.). the UP-A1 Dock with each input selector. • The setting will...
... be used when Dolby Digital or Dolby Digital Plus format digital audio signals are specific to "Off" when you select each input source. You can manually set the default listening mode to the "PORT" selector are played (DVD, etc.). the UP-A1 Dock with each input selector. • The setting will...

Owner Manual
Page 58
...is closed, the names of connected Q-compatible components and "RIHD On" are watching a TV program. • Refer to the connected component's instruction manual for details. • Depending on the AV receiver. The TV is in standby, both audio and video streams from an HDMI input will enter...not. • If operation is not normal when set to "On", change the setting to "Off". • Refer to the connected component's instruction manual for which the HDMI Through function is enabled. ` Last: The HDMI Through function is enabled (➔ page 44). • The power consumption during...
...is closed, the names of connected Q-compatible components and "RIHD On" are watching a TV program. • Refer to the connected component's instruction manual for details. • Depending on the AV receiver. The TV is in standby, both audio and video streams from an HDMI input will enter...not. • If operation is not normal when set to "On", change the setting to "Off". • Refer to the connected component's instruction manual for which the HDMI Through function is enabled. ` Last: The HDMI Through function is enabled (➔ page 44). • The power consumption during...
Owner Manual
Page 59
... selector will be automatically switched to "ARC" (➔ page 55). • The "Audio Return Channel" setting can be set to "Off". Refer to the user's manuals for the first time. ■ Lip Sync ` Off ` On This function allows the AV receiver to automatically correct any delay between the video and the...
... selector will be automatically switched to "ARC" (➔ page 55). • The "Audio Return Channel" setting can be set to "Off". Refer to the user's manuals for the first time. ■ Lip Sync ` Off ` On This function allows the AV receiver to automatically correct any delay between the video and the...
Owner Manual
Page 60
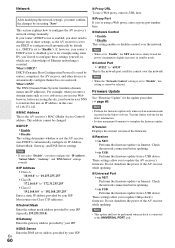
...10.0.0.0" to "10.255.255.255" ` Class B: "172.16.0.0" to "172.31.255.255" ` Class C: "192.168.0.0" to configure the AV receiver's network settings manually. Most routers use DHCP to "65535" This is the network port used by routers, computers, the AV receiver, and other devices to automatically configure themselves... such as the AV receiver is set to "Disable", this case 63.148.251.142. ■ MAC Address This is essential. Visit the Onkyo web site for the update procedure (➔ page 80). Do not shutdown the power of Ethernet networking is the AV receiver's MAC (Media Access...
...10.0.0.0" to "10.255.255.255" ` Class B: "172.16.0.0" to "172.31.255.255" ` Class C: "192.168.0.0" to configure the AV receiver's network settings manually. Most routers use DHCP to "65535" This is the network port used by routers, computers, the AV receiver, and other devices to automatically configure themselves... such as the AV receiver is set to "Disable", this case 63.148.251.142. ■ MAC Address This is essential. Visit the Onkyo web site for the update procedure (➔ page 80). Do not shutdown the power of Ethernet networking is the AV receiver's MAC (Media Access...

