
Owner Manual
Page 4
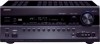
...AM loop antenna (➔ 21) Power cord (European, Australian and Asian models) (➔ 21) Speaker cable labels (➔ 13) Speaker setup microphone (➔ 29) Remote controller and two batteries (AA/R6) (Note for China: The battery for the remote controller is not suitable ...or coloured black. IMPORTANT The plug is fitted with the letter L or coloured red. For European Models Declaration of Conformity We, ONKYO EUROPE ELECTRONICS GmbH LIEGNITZERSTRASSE 6, 82194 GROEBENZELL, GERMANY declare in own responsibility, that indicated on the plug. For British models Replacement ...
...AM loop antenna (➔ 21) Power cord (European, Australian and Asian models) (➔ 21) Speaker cable labels (➔ 13) Speaker setup microphone (➔ 29) Remote controller and two batteries (AA/R6) (Note for China: The battery for the remote controller is not suitable ...or coloured black. IMPORTANT The plug is fitted with the letter L or coloured red. For European Models Declaration of Conformity We, ONKYO EUROPE ELECTRONICS GmbH LIEGNITZERSTRASSE 6, 82194 GROEBENZELL, GERMANY declare in own responsibility, that indicated on the plug. For British models Replacement ...

Owner Manual
Page 5
...Connecting the AV Receiver 13 Connecting Your Speakers 13 About AV Connections 17 Connecting Your Components with HDMI 18 Connecting Your Components 19 Connecting Onkyo V Components 20 Connecting Antenna 21 Connecting the Power Cord (European, Australian and Asian models 21 Which Connections Should I Use 22 ... On/Off the AV Receiver 24 Turning On 24 Turning Off 24 Basic Operations 25 Selecting the Language Used for the Onscreen Setup Menus 25 Playing the Connected Component 25 Displaying Source Information 25 Setting the Display Brightness 25 Muting the AV Receiver 26 Using...
...Connecting the AV Receiver 13 Connecting Your Speakers 13 About AV Connections 17 Connecting Your Components with HDMI 18 Connecting Your Components 19 Connecting Onkyo V Components 20 Connecting Antenna 21 Connecting the Power Cord (European, Australian and Asian models 21 Which Connections Should I Use 22 ... On/Off the AV Receiver 24 Turning On 24 Turning Off 24 Basic Operations 25 Selecting the Language Used for the Onscreen Setup Menus 25 Playing the Connected Component 25 Displaying Source Information 25 Setting the Display Brightness 25 Muting the AV Receiver 26 Using...

Owner Manual
Page 6
...*1 Certified • HDMI Video Upscaling (to 1080p Compatible) with Faroudja DCDi Cinema Enhancement • HDMI (Ver.1.4a with onscreen display setup) RI-Com- New Surround Format (fronthigh) • Audyssey DSX™*4 for New Surround Channels (frontwide/front-high) • 4...® and Audyssey Dynamic EQ® are registered trademarks and trademarks of Audyssey Laboratories. *5 Music Optimizer™ is a trademark of Onkyo Corporation. *6 "HDMI, the HDMI Logo, and High-Definition Multimedia Interface are trademarks of Dolby Laboratories. *4 Manufactured under U.S. U.S. patible...
...*1 Certified • HDMI Video Upscaling (to 1080p Compatible) with Faroudja DCDi Cinema Enhancement • HDMI (Ver.1.4a with onscreen display setup) RI-Com- New Surround Format (fronthigh) • Audyssey DSX™*4 for New Surround Channels (frontwide/front-high) • 4...® and Audyssey Dynamic EQ® are registered trademarks and trademarks of Audyssey Laboratories. *5 Music Optimizer™ is a trademark of Onkyo Corporation. *6 "HDMI, the HDMI Logo, and High-Definition Multimedia Interface are trademarks of Dolby Laboratories. *4 Manufactured under U.S. U.S. patible...

Owner Manual
Page 8
... 67) W AUX INPUT LINE IN jack (➔ 19) X AUX INPUT VIDEO jack (➔ 19) Y AUX INPUT AUDIO jacks (➔ 19) Z SETUP MIC jack (➔ 29) [ RT/PTY/TP button (European, Australian and Asian models) (➔ 33) They are not shown here for each item. ...36) J DIMMER button (North American and Taiwan models) (➔ 25) K MEMORY button (➔ 33) L TUNING MODE button (➔ 32) M DISPLAY button (➔ 25) En N SETUP button (➔ 42) 8 O TUNING, PRESET (➔ 32 to 71) H Display (➔ 9) I JKLMN O P Q R ST (European, Australian and Asian models) U [ V ...
... 67) W AUX INPUT LINE IN jack (➔ 19) X AUX INPUT VIDEO jack (➔ 19) Y AUX INPUT AUDIO jacks (➔ 19) Z SETUP MIC jack (➔ 29) [ RT/PTY/TP button (European, Australian and Asian models) (➔ 33) They are not shown here for each item. ...36) J DIMMER button (North American and Taiwan models) (➔ 25) K MEMORY button (➔ 33) L TUNING MODE button (➔ 32) M DISPLAY button (➔ 25) En N SETUP button (➔ 42) 8 O TUNING, PRESET (➔ 32 to 71) H Display (➔ 9) I JKLMN O P Q R ST (European, Australian and Asian models) U [ V ...

Owner Manual
Page 11
..., TUNER, TV/CD, PHONO, PORT and NET/USB) (➔ 25) F SP LAYOUT button (➔ 26) G Arrow R/X/F/S and ENTER buttons H SETUP button (➔ 42) I E J C P To control the AV receiver, press RECEIVER to control Onkyo Blu-ray Disc/DVD player, CD player and other components. You can select AM or FM by pressing TUNER...
..., TUNER, TV/CD, PHONO, PORT and NET/USB) (➔ 25) F SP LAYOUT button (➔ 26) G Arrow R/X/F/S and ENTER buttons H SETUP button (➔ 42) I E J C P To control the AV receiver, press RECEIVER to control Onkyo Blu-ray Disc/DVD player, CD player and other components. You can select AM or FM by pressing TUNER...

Owner Manual
Page 19
Connecting Your Components The on-screen setup menus appear only on a TV that is connected to the MONITOR OUT V, MONITOR OUT S or the COMPONENT VIDEO MONITOR OUT, use the AV receiver's display ...
Connecting Your Components The on-screen setup menus appear only on a TV that is connected to the MONITOR OUT V, MONITOR OUT S or the COMPONENT VIDEO MONITOR OUT, use the AV receiver's display ...

Owner Manual
Page 22
... following video connection formats: composite video, S-Video, PC IN (Analog RGB), component video or HDMI, the latter offering the best picture quality. The on-screen setup menus appear only on the AV receiver. Video Connection Formats Video component can be connected by your TV is assigned to the MONITOR OUT V, MONITOR...
... following video connection formats: composite video, S-Video, PC IN (Analog RGB), component video or HDMI, the latter offering the best picture quality. The on-screen setup menus appear only on the AV receiver. Video Connection Formats Video component can be connected by your TV is assigned to the MONITOR OUT V, MONITOR...

Owner Manual
Page 25
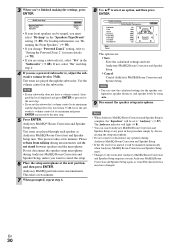
...8226; "Controlling iPod" (➔ 73) • "Listening to cycle through the available information. Selecting the Language Used for the Onscreen Setup Menus You can adjust the brightness of the AV receiver's display. Setting the Display Brightness You can determine the language used for about the...Taiwan models) Alternatively, you have entered a custom name in the "OSD Setup" (➔ 54). Basic Operations The on-screen setup menus appear only on the source component. If your TV is displayed for the onscreen setup menus. See "Language" in "Name Edit" (➔ 51). *2 ...
...8226; "Controlling iPod" (➔ 73) • "Listening to cycle through the available information. Selecting the Language Used for the Onscreen Setup Menus You can adjust the brightness of the AV receiver's display. Setting the Display Brightness You can determine the language used for about the...Taiwan models) Alternatively, you have entered a custom name in the "OSD Setup" (➔ 54). Basic Operations The on-screen setup menus appear only on the source component. If your TV is displayed for the onscreen setup menus. See "Language" in "Name Edit" (➔ 51). *2 ...

Owner Manual
Page 29
...dimmers, or other listeners will be set to the subwoofer (if present), and distances from the primary listening position. Note • The on-screen setup menus appear only on a TV that is connected to G: Listening position Note • Make the room as quiet as possible. The result is set... be performed while a pair of headphones is not in both the frequency and time domain. Using Audyssey MultEQ Using Audyssey MultEQ to the SETUP MIC jack. Total measurement time varies depending on the AV receiver and the connected TV. Position the microphone at up test tones which maintains...
...dimmers, or other listeners will be set to the subwoofer (if present), and distances from the primary listening position. Note • The on-screen setup menus appear only on a TV that is connected to G: Listening position Note • Make the room as quiet as possible. The result is set... be performed while a pair of headphones is not in both the frequency and time domain. Using Audyssey MultEQ Using Audyssey MultEQ to the SETUP MIC jack. Total measurement time varies depending on the AV receiver and the connected TV. Position the microphone at up test tones which maintains...
Owner Manual
Page 30
... "Powered Zone2" setting, refer to select an option, and then press ENTER. Note • When Audyssey MultEQ Room Correction and Speaker Setup is complete, the "Equalizer" will light (➔ 9). • You can view the calculated settings for more measurements. Subwoofer Front Center...settings, press ENTER. 8 Use R/X to "Setting the Powered Zone 2" for the speaker configuration, speaker distances, and speaker levels by disconnecting the setup microphone. • Do not connect or disconnect any point in the "Subwoofer" (➔ 45). If not, select "No" and skip step ...
... "Powered Zone2" setting, refer to select an option, and then press ENTER. Note • When Audyssey MultEQ Room Correction and Speaker Setup is complete, the "Equalizer" will light (➔ 9). • You can view the calculated settings for more measurements. Subwoofer Front Center...settings, press ENTER. 8 Use R/X to "Setting the Powered Zone 2" for the speaker configuration, speaker distances, and speaker levels by disconnecting the setup microphone. • Do not connect or disconnect any point in the "Subwoofer" (➔ 45). If not, select "No" and skip step ...

Owner Manual
Page 31
...screen as "No", increase the subwoofer's volume to the half-way point, set to your subwoofer's instruction manual for appropriate settings (➔ 13). MultEQ: Auto Setup Ambient noise is not detected. See also: • "Speaker Configuration" (➔ 45) • "Speaker Distance" (➔ 46) • "Level ...level and the distance of the subwoofer manually. • Sometimes due to Off or Direct. The background noise is set up your Onkyo dealer. • Speaker Detect Error This message appears if a speaker is too high. Check the speaker connection. • Writing ...
...screen as "No", increase the subwoofer's volume to the half-way point, set to your subwoofer's instruction manual for appropriate settings (➔ 13). MultEQ: Auto Setup Ambient noise is not detected. See also: • "Speaker Configuration" (➔ 45) • "Speaker Distance" (➔ 46) • "Level ...level and the distance of the subwoofer manually. • Sometimes due to Off or Direct. The background noise is set up your Onkyo dealer. • Speaker Detect Error This message appears if a speaker is too high. Check the speaker connection. • Writing ...

Owner Manual
Page 37
... The illustration shows which speakers are activated in each channel. This surround system has five main channels of sounds. See "Speaker Configuration" for the speaker setup (➔ 45). ; 9 $ / Press RECEIVER followed by the listening mode. En 37 B C Front speakers D Center speaker E F Surround speakers G Subwoofer(s) H I Surround back speakers J K Front high speakers L M Front...
... The illustration shows which speakers are activated in each channel. This surround system has five main channels of sounds. See "Speaker Configuration" for the speaker setup (➔ 45). ; 9 $ / Press RECEIVER followed by the listening mode. En 37 B C Front speakers D Center speaker E F Surround speakers G Subwoofer(s) H I Surround back speakers J K Front high speakers L M Front...

Owner Manual
Page 38
See "Advanced Setup" for more details (➔ 42). % % Do l b y cD+oPPoPP ' Dolby TrueHD % D D Tl r u e H D P P P P P P ' DTS % Speaker Layout ;9$ /*1 ;9$ / 9$/ 9$/ / /*3 /*4 9$/ 9$/ 9$/*1 9$/ 9$/*1 9$/...b G a m e c P P c P P Use this mode with PCM multichannel sources. It provides a very natural and seamless surround-sound experience that include a matrix- ) encoded surround back channel. See "Advanced Setup" for 7.1-channel playback. % Dolby Pro Logic IIz Height P L z GH e i g h t Dolby Pro Logic IIz Height is disabled. " Pu r eAAu d i o sible noise sources for D o l...
See "Advanced Setup" for more details (➔ 42). % % Do l b y cD+oPPoPP ' Dolby TrueHD % D D Tl r u e H D P P P P P P ' DTS % Speaker Layout ;9$ /*1 ;9$ / 9$/ 9$/ / /*3 /*4 9$/ 9$/ 9$/*1 9$/ 9$/*1 9$/...b G a m e c P P c P P Use this mode with PCM multichannel sources. It provides a very natural and seamless surround-sound experience that include a matrix- ) encoded surround back channel. See "Advanced Setup" for 7.1-channel playback. % Dolby Pro Logic IIz Height P L z GH e i g h t Dolby Pro Logic IIz Height is disabled. " Pu r eAAu d i o sible noise sources for D o l...

Owner Manual
Page 42
...; 54) 1. Equalizer Settings 6. Audyssey 2. VCR/DVR 3. PC 6. MENU 1. Source Setup 5. Listening Mode Preset 6. MENU B 1. Source Setup F 5. Analog Audio Input C Speaker Setup (➔ 45) 6. Speaker Setup 1. Speaker Distance 4. Lock Setup Setup En 42 5. Speaker Setup 3. Miscellaneous 7. Press RETURN to return to close the menu. Advanced Operations Advanced Setup On-screen Setup Menus Common Procedures in the Display. Input/Output Assign...
...; 54) 1. Equalizer Settings 6. Audyssey 2. VCR/DVR 3. PC 6. MENU 1. Source Setup 5. Listening Mode Preset 6. MENU B 1. Source Setup F 5. Analog Audio Input C Speaker Setup (➔ 45) 6. Speaker Setup 1. Speaker Distance 4. Lock Setup Setup En 42 5. Speaker Setup 3. Miscellaneous 7. Press RETURN to return to close the menu. Advanced Operations Advanced Setup On-screen Setup Menus Common Procedures in the Display. Input/Output Assign...
Owner Manual
Page 43
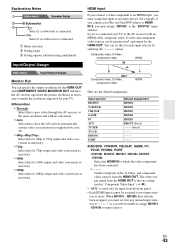
..., and component video sources from the front panel. • Each HDMI input cannot be assigned to assign HDMI1 - En 43 Explanatory Notes B Main menu Speaker Setup C ■ Subwoofer D ` Yes: Select if a subwoofer is connected. ` No: Select if no conversion. ` Auto: Select this to pass video through the AV receiver at resolutions...
..., and component video sources from the front panel. • Each HDMI input cannot be assigned to assign HDMI1 - En 43 Explanatory Notes B Main menu Speaker Setup C ■ Subwoofer D ` Yes: Select if a subwoofer is connected. ` No: Select if no conversion. ` Auto: Select this to pass video through the AV receiver at resolutions...
Owner Manual
Page 45
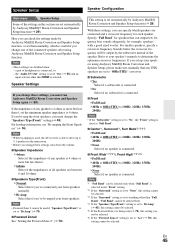
...is set them manually, which is set automatically by the subwoofer instead of the connected speakers after using Audyssey MultEQ Room Correction and Speaker Setup, please make sure manually that can specify which speakers are set to "80Hz(THX)" crossover. ■ Subwoofer ` Yes: Select if...16 ohms. ■ Speakers Type(Front) ` Normal: Select this setting cannot be output by Audyssey MultEQ® Room Correction and Speaker Setup function (➔ 29). This setting is connected. For smaller speakers, specify a crossover frequency. If you can output low frequency bass sounds ...
...is set them manually, which is set automatically by the subwoofer instead of the connected speakers after using Audyssey MultEQ Room Correction and Speaker Setup, please make sure manually that can specify which speakers are set to "80Hz(THX)" crossover. ■ Subwoofer ` Yes: Select if...16 ohms. ■ Speakers Type(Front) ` Normal: Select this setting cannot be output by Audyssey MultEQ® Room Correction and Speaker Setup function (➔ 29). This setting is connected. For smaller speakers, specify a crossover frequency. If you can output low frequency bass sounds ...

Owner Manual
Page 46
... THX, which can be used to "30.0ft" in 0.5 foot steps. ` meters: Distances can be set automatically by Audyssey MultEQ Room Correction and Speaker Setup function (➔ 29). The LPF only applies to "No" or "None" in meters. Note • Speakers that use the LFE channel. ■... you can adjust the level of each speaker with C-weighting and slow reading. Here you set automatically by Audyssey MultEQ® Room Correction and Speaker Setup function (➔ 29). Note • This function can be set to the subwoofer. ` On: Double Bass function on. ` Off(THX): Double ...
... THX, which can be used to "30.0ft" in 0.5 foot steps. ` meters: Distances can be set automatically by Audyssey MultEQ Room Correction and Speaker Setup function (➔ 29). The LPF only applies to "No" or "None" in meters. Note • Speakers that use the LFE channel. ■... you can adjust the level of each speaker with C-weighting and slow reading. Here you set automatically by Audyssey MultEQ® Room Correction and Speaker Setup function (➔ 29). Note • This function can be set to the subwoofer. ` On: Double Bass function on. ` Off(THX): Double ...
Owner Manual
Page 47
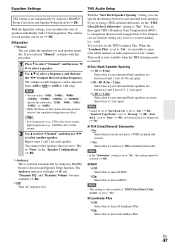
...is set to "No", this to "None" (➔ 45), or Powered Zone 2 is selected automatically by Audyssey MultEQ® Room Correction and Speaker Setup function (➔ 29). En 47 The volume of audio expression at each frequency can be selected (➔ 45). ■ BGC ` Off: Select ...) to adjust the level at that you 're using a THX-certified subwoofer, set automatically by Audyssey MultEQ Room Correction and Speaker Setup function. THX Audio Setup With the "Surr Back Speaker Spacing" setting, you have a THX-certified subwoofer. The volume at low volume. Equalizer Settings This ...
...is set to "No", this to "None" (➔ 45), or Powered Zone 2 is selected automatically by Audyssey MultEQ® Room Correction and Speaker Setup function (➔ 29). En 47 The volume of audio expression at each frequency can be selected (➔ 45). ■ BGC ` Off: Select ...) to adjust the level at that you 're using a THX-certified subwoofer, set automatically by Audyssey MultEQ Room Correction and Speaker Setup function. THX Audio Setup With the "Surr Back Speaker Spacing" setting, you have a THX-certified subwoofer. The volume at low volume. Equalizer Settings This ...
Owner Manual
Page 49
...Effects) channel individually for each input sources. Ideally, the front left and right speakers should be selected. Main menu Source Setup Audyssey When Audyssey MultEQ® Room Correction and Speaker Setup is complete, the "Equalizer" (➔ 47) will be set to "On". ■ Dynamic EQ ` Off: ..., DTS-HD Master Audio, DSD*3 ` -2dB, -20dB, -10dB, or 0dB With these sources, change the setting to the listening position. Source Setup Items can select any available listening mode. This setting is 20 degrees. Note • If the "Center" setting is set to "None", or both...
...Effects) channel individually for each input sources. Ideally, the front left and right speakers should be selected. Main menu Source Setup Audyssey When Audyssey MultEQ® Room Correction and Speaker Setup is complete, the "Equalizer" (➔ 47) will be set to "On". ■ Dynamic EQ ` Off: ..., DTS-HD Master Audio, DSD*3 ` -2dB, -20dB, -10dB, or 0dB With these sources, change the setting to the listening position. Source Setup Items can select any available listening mode. This setting is 20 degrees. Note • If the "Center" setting is set to "None", or both...

Owner Manual
Page 50
... ` 0dB: It should also be selected for pop/rock music or other than "Audyssey" in "Equalizer" setting after performing Audyssey MultEQ Room Correction and Speaker Setup, selecting "On" in volume. Audyssey Dynamic EQ works in tandem with actual output sound levels in rooms calibrated for delivering a loudness correction solution. Movies are...
... ` 0dB: It should also be selected for pop/rock music or other than "Audyssey" in "Equalizer" setting after performing Audyssey MultEQ Room Correction and Speaker Setup, selecting "On" in volume. Audyssey Dynamic EQ works in tandem with actual output sound levels in rooms calibrated for delivering a loudness correction solution. Movies are...


