Owner Manual
Page 1
Please read this manual thoroughly before making connections and plugging in this manual for purchasing an Onkyo AV Receiver. Please retain this manual will enable you for future reference. Contents Introduction 2 Connections 13 Turning On & Basic Operations ......24 Advanced Operations 42 Controlling iPod & Other Components 73 Others 84 En AV Receiver TX-NR708 Instruction Manual Thank you to obtain optimum performance and listening enjoyment from your new AV Receiver. Following the instructions in the unit.
Please read this manual thoroughly before making connections and plugging in this manual for purchasing an Onkyo AV Receiver. Please retain this manual will enable you for future reference. Contents Introduction 2 Connections 13 Turning On & Basic Operations ......24 Advanced Operations 42 Controlling iPod & Other Components 73 Others 84 En AV Receiver TX-NR708 Instruction Manual Thank you to obtain optimum performance and listening enjoyment from your new AV Receiver. Following the instructions in the unit.

Owner Manual
Page 3
... you should dust the unit all over with a weak solution of the following measures: • Reorient or relocate the receiving antenna. • Increase the separation between the equipment and receiver. • Connect the equipment into an outlet on , the user is readily operable (easily accessible) at all times....harmful interference to pack it how it on the unit, contact your Onkyo dealer. 8. If this unit for help. En 3 If you do not use the original packaging to radio or television reception, which the receiver is normal. • If you do not intend to select ...
... you should dust the unit all over with a weak solution of the following measures: • Reorient or relocate the receiving antenna. • Increase the separation between the equipment and receiver. • Connect the equipment into an outlet on , the user is readily operable (easily accessible) at all times....harmful interference to pack it how it on the unit, contact your Onkyo dealer. 8. If this unit for help. En 3 If you do not use the original packaging to radio or television reception, which the receiver is normal. • If you do not intend to select ...

Owner Manual
Page 4
... color. Check for this unit.) * In catalogs and on packaging, the letter at the AV receiver's remote control sensor, as shown below. For European Models Declaration of Conformity We, ONKYO EUROPE ELECTRONICS GmbH LIEGNITZERSTRASSE 6, 82194 GROEBENZELL, GERMANY declare in own responsibility, that indicated on the plug.../R6) (Note for China: The battery for the remote controller is fitted with the letter N or coloured black. Remote control sensor AV receiver Approx. 16 ft. (5 m) En 4 IMPORTANT The wires in the plug. Fit a suitable fuse in the mains lead are the same regardless...
... color. Check for this unit.) * In catalogs and on packaging, the letter at the AV receiver's remote control sensor, as shown below. For European Models Declaration of Conformity We, ONKYO EUROPE ELECTRONICS GmbH LIEGNITZERSTRASSE 6, 82194 GROEBENZELL, GERMANY declare in own responsibility, that indicated on the plug.../R6) (Note for China: The battery for the remote controller is fitted with the letter N or coloured black. Remote control sensor AV receiver Approx. 16 ft. (5 m) En 4 IMPORTANT The wires in the plug. Fit a suitable fuse in the mains lead are the same regardless...

Owner Manual
Page 5
...About Home Theater 12 Enjoying Home Theater 12 Connections Connecting the AV Receiver 13 Connecting Your Speakers 13 About AV Connections 17 Connecting Your Components with HDMI 18 Connecting Your Components 19 Connecting Onkyo V Components 20 Connecting Antenna 21 Connecting the Power Cord (European,... Australian and Asian models 21 Which Connections Should I Use 22 Turning On & Basic Operations Turning On/Off the AV Receiver 24 Turning On 24 Turning Off...
...About Home Theater 12 Enjoying Home Theater 12 Connections Connecting the AV Receiver 13 Connecting Your Speakers 13 About AV Connections 17 Connecting Your Components with HDMI 18 Connecting Your Components 19 Connecting Onkyo V Components 20 Connecting Antenna 21 Connecting the Power Cord (European,... Australian and Asian models 21 Which Connections Should I Use 22 Turning On & Basic Operations Turning On/Off the AV Receiver 24 Turning On 24 Turning Off...
Owner Manual
Page 7
... to connect specifically to iPod or iPhone, respectively, and has been certified by the developer to meet Apple performance standards. THX Select2 Plus receivers also feature proprietary THX technologies (e.g., THX Mode) which is a trademark of Sony Corporation. * Rhapsody and the Rhapsody logo are registered trademarks...audio amplifier is not responsible for both digital and analog domains. Only then can be THX Select2 Plus certified, it must install an Onkyo UP-HT1 HD Radio tuner module (sold separately). *8 In Europe, using banana plugs to connect speakers to come. iPhone, iPod,...
... to connect specifically to iPod or iPhone, respectively, and has been certified by the developer to meet Apple performance standards. THX Select2 Plus receivers also feature proprietary THX technologies (e.g., THX Mode) which is a trademark of Sony Corporation. * Rhapsody and the Rhapsody logo are registered trademarks...audio amplifier is not responsible for both digital and analog domains. Only then can be THX Select2 Plus certified, it must install an Onkyo UP-HT1 HD Radio tuner module (sold separately). *8 In Europe, using banana plugs to connect speakers to come. iPhone, iPod,...

Owner Manual
Page 10
... jacks U Speaker Terminals (FRONT L/R, CENTER, SURR L/R, SURR BACK L/R, FRONT HIGH L/R and FRONT WIDE/ZONE 2 L/R) V AC INLET (European, Australian and Asian models) See "Connecting the AV Receiver" for control. En 10
... jacks U Speaker Terminals (FRONT L/R, CENTER, SURR L/R, SURR BACK L/R, FRONT HIGH L/R and FRONT WIDE/ZONE 2 L/R) V AC INLET (European, Australian and Asian models) See "Connecting the AV Receiver" for control. En 10

Owner Manual
Page 11
... TUNER (or RECEIVER). For detailed information, see the pages in parentheses. B Arrow R/X buttons (➔ 32) C D.TUN button (TUNER remote mode only) (➔ 32) D CH +/- You can select AM or FM by pressing TUNER repeatedly. You can also use the remote controller to control Onkyo Blu-ray Disc.../DVD player, CD player and other components. Then, with the AV receiver's remote controller, you can control the component corresponding to the button you want to select...
... TUNER (or RECEIVER). For detailed information, see the pages in parentheses. B Arrow R/X buttons (➔ 32) C D.TUN button (TUNER remote mode only) (➔ 32) D CH +/- You can select AM or FM by pressing TUNER repeatedly. You can also use the remote controller to control Onkyo Blu-ray Disc.../DVD player, CD player and other components. Then, with the AV receiver's remote controller, you can control the component corresponding to the button you want to select...

Owner Manual
Page 12
...improve sound localization behind , about 2 to 3 feet (60 to 100 cm) above ear level. About Home Theater Enjoying Home Theater Thanks to the AV receiver's superb capabilities, you can also enjoy THX Surround EX (THX-certified THX speaker system recommended). BC JK D LM G EF HI Corner position 1/3 of ...Discs or DVDs, you can enjoy DTS and Dolby Digital. With analog or digital TV, you can enjoy Dolby Pro Logic IIx, DTS Neo:6, or Onkyo's original DSP listening modes. B C Front speakers (Left and Right) These output the overall sound. In movies it close to enjoy Dolby Digital EX...
...improve sound localization behind , about 2 to 3 feet (60 to 100 cm) above ear level. About Home Theater Enjoying Home Theater Thanks to the AV receiver's superb capabilities, you can also enjoy THX Surround EX (THX-certified THX speaker system recommended). BC JK D LM G EF HI Corner position 1/3 of ...Discs or DVDs, you can enjoy DTS and Dolby Digital. With analog or digital TV, you can enjoy Dolby Pro Logic IIx, DTS Neo:6, or Onkyo's original DSP listening modes. B C Front speakers (Left and Right) These output the overall sound. In movies it close to enjoy Dolby Digital EX...

Owner Manual
Page 13
...than 6 ohms, be sure to the positive (+) side of the wire does not have . Then all black). Doing so may damage the AV receiver. • Make sure the metal core of each speaker terminal. En 13 Doing so may be used at high volume levels for a long ...back speaker, connect it to short the positive and negative wires. To get them to set the speaker settings. Connections Connecting the AV Receiver Connecting Your Speakers Speaker Configuration The following before making any of time, the built-in accordance with the table above. Speaker Connection Precautions Read...
...than 6 ohms, be sure to the positive (+) side of the wire does not have . Then all black). Doing so may damage the AV receiver. • Make sure the metal core of each speaker terminal. En 13 Doing so may be used at high volume levels for a long ...back speaker, connect it to short the positive and negative wires. To get them to set the speaker settings. Connections Connecting the AV Receiver Connecting Your Speakers Speaker Configuration The following before making any of time, the built-in accordance with the table above. Speaker Connection Precautions Read...

Owner Manual
Page 15
... speakers LM Front wide speakers Dipole speakers J K G TV/screen G LBDCM Normal speakers J K G TV/screen G L BDCM E FE F H I H I Connecting a Powered Subwoofer Using a suitable cable, connect the AV receiver's SUBWOOFER PRE OUT jack to an input on the amp. Powered subwoofer LINE INPUT LINE INPUT LINE INPUT LINE INPUT En 15 Dipole speakers typically...
... speakers LM Front wide speakers Dipole speakers J K G TV/screen G LBDCM Normal speakers J K G TV/screen G L BDCM E FE F H I H I Connecting a Powered Subwoofer Using a suitable cable, connect the AV receiver's SUBWOOFER PRE OUT jack to an input on the amp. Powered subwoofer LINE INPUT LINE INPUT LINE INPUT LINE INPUT En 15 Dipole speakers typically...

Owner Manual
Page 16
... Specify "None" for a pair of front speakers that support bi-amping, providing improved bass and treble performance. • When bi-amping is used, the AV receiver is able to drive up to a 5.1 speaker system in the main room. • For bi-amping, the FRONT L/R terminal posts connect to the front speakers...-amped to provide separate tweeter and woofer feeds for the channel that you don't want to use a more powerful power amplifier and use the AV receiver as a preamp, connect it to the PRE OUT jacks, and connect all speakers to output (➔ 45). Bi-amping the Front Speakers The FRONT ...
... Specify "None" for a pair of front speakers that support bi-amping, providing improved bass and treble performance. • When bi-amping is used, the AV receiver is able to drive up to a 5.1 speaker system in the main room. • For bi-amping, the FRONT L/R terminal posts connect to the front speakers...-amped to provide separate tweeter and woofer feeds for the channel that you don't want to use a more powerful power amplifier and use the AV receiver as a preamp, connect it to the PRE OUT jacks, and connect all speakers to output (➔ 45). Bi-amping the Front Speakers The FRONT ...
Owner Manual
Page 17
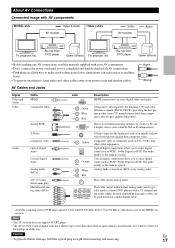
...Game console • Before making any AV connections, read the manuals supplied with AV components HDMI cable : Video & Audio AV receiver Other cables : Video AV receiver : Audio TV, projector, etc. Coaxial digital connections allow you to enjoy digital sound such as optical. This cable carries analog ... analog audio. Several standard analog audio cables can carry digital video and audio. Note • The AV receiver does not support SCART plugs. • The AV receiver's optical digital jacks have shutter-type covers that open when an optical plug is the same as PCM*, ...
...Game console • Before making any AV connections, read the manuals supplied with AV components HDMI cable : Video & Audio AV receiver Other cables : Video AV receiver : Audio TV, projector, etc. Coaxial digital connections allow you to enjoy digital sound such as optical. This cable carries analog ... analog audio. Several standard analog audio cables can carry digital video and audio. Note • The AV receiver does not support SCART plugs. • The AV receiver's optical digital jacks have shutter-type covers that open when an optical plug is the same as PCM*, ...

Owner Manual
Page 18
... VCR or DVD recorder/Digital Video Recorder Satellite, cable, set -top box, etc. Set your TV's speakers, by the HDMI IN jacks through the AV receiver, see "Connecting Your Components" (➔ 19). Connecting Your Components with Q or the "TV Control" setting to "Off". - Assignable Refer to "About HDMI... function enables an HDMI capable TV to send the audio stream to the HDMI OUT of the HDMI component connected to audio received by controlling the AV receiver's volume, the sound will produce sound while the TV's speakers are shown below. ✔: Assignment can be output from ...
... VCR or DVD recorder/Digital Video Recorder Satellite, cable, set -top box, etc. Set your TV's speakers, by the HDMI IN jacks through the AV receiver, see "Connecting Your Components" (➔ 19). Connecting Your Components with Q or the "TV Control" setting to "Off". - Assignable Refer to "About HDMI... function enables an HDMI capable TV to send the audio stream to the HDMI OUT of the HDMI component connected to audio received by controlling the AV receiver's volume, the sound will produce sound while the TV's speakers are shown below. ✔: Assignment can be output from ...

Owner Manual
Page 19
...-screen setup menus appear only on a TV that is connected to the MONITOR OUT V, MONITOR OUT S or the COMPONENT VIDEO MONITOR OUT, use the AV receiver's display when changing settings.
...-screen setup menus appear only on a TV that is connected to the MONITOR OUT V, MONITOR OUT S or the COMPONENT VIDEO MONITOR OUT, use the AV receiver's display when changing settings.

Owner Manual
Page 20
... audio from HDMI IN in a phono preamp to TV/CD IN or connect it . *2 When you connect your other V-capable Onkyo components, pointing the remote controller at the AV receiver's remote control sensor instead of the component. V cables are in Zone 2 as well, use $ and %.) ■ How... Remote Control You can enjoy Dolby Digital and DTS. (To record or listen in Zone 2. Connecting Onkyo V Components Step 1: Make sure that each Onkyo component is on Standby, the AV receiver will output signals from the external components while you are supplied with your personal computer to PC IN and...
... audio from HDMI IN in a phono preamp to TV/CD IN or connect it . *2 When you connect your other V-capable Onkyo components, pointing the remote controller at the AV receiver's remote control sensor instead of the component. V cables are in Zone 2 as well, use $ and %.) ■ How... Remote Control You can enjoy Dolby Digital and DTS. (To record or listen in Zone 2. Connecting Onkyo V Components Step 1: Make sure that each Onkyo component is on Standby, the AV receiver will output signals from the external components while you are supplied with your personal computer to PC IN and...

Owner Manual
Page 21
...FM antenna instead. • If you cannot achieve good reception with the supplied indoor AM loop antenna, try using thumbtacks. Insert wire. The AV receiver won't pick up any radio signals without any other equipment. • Never disconnect the power cord from the wall outlet first, and then the... AV receiver. Doing so may cause a momentary power surge that you 'll need to tune into an AC wall outlet. Always disconnect the power cord ...
...FM antenna instead. • If you cannot achieve good reception with the supplied indoor AM loop antenna, try using thumbtacks. Insert wire. The AV receiver won't pick up any radio signals without any other equipment. • Never disconnect the power cord from the wall outlet first, and then the... AV receiver. Doing so may cause a momentary power surge that you 'll need to tune into an AC wall outlet. Always disconnect the power cord ...

Owner Manual
Page 22
...video input is assigned to the input selector, this will be selected. Composite S-Video PC IN (Analog RGB) Component IN HDMI AV receiver Composite MONITOR OUT S-Video Component HDMI ■ Signal Selection If signals are present at both buttons. Signal Selection Example Blu-ray Disc...HDMI, component video, PC IN (Analog RGB), S-Video and composite video. Composite S-Video PC IN (Analog RGB) Component IN HDMI AV receiver MONITOR OUT Composite S-Video Component HDMI TV, projector, etc. Video Signal Flow Chart Blu-ray Disc/DVD player, etc. In the Signal ...
...video input is assigned to the input selector, this will be selected. Composite S-Video PC IN (Analog RGB) Component IN HDMI AV receiver Composite MONITOR OUT S-Video Component HDMI ■ Signal Selection If signals are present at both buttons. Signal Selection Example Blu-ray Disc...HDMI, component video, PC IN (Analog RGB), S-Video and composite video. Composite S-Video PC IN (Analog RGB) Component IN HDMI AV receiver MONITOR OUT Composite S-Video Component HDMI TV, projector, etc. Video Signal Flow Chart Blu-ray Disc/DVD player, etc. In the Signal ...

Owner Manual
Page 23
Analog Multichannel Optical Coaxial IN AV receiver *1 *1*3 *1 *1 *3 Analog OUT HDMI HDMI *1 *2 TV, projector, etc. *1 Depends on the "Audio TV Out" setting (➔ 55). *2 This setting is available, when "Audio Return Channel" setting ..., the inputs will be connected by the analog VCR/DVR OUT. Audio Connection Formats Audio component can be selected automatically in mind that the AV receiver does not convert digital input signals for analog line outputs and vice versa.
Analog Multichannel Optical Coaxial IN AV receiver *1 *1*3 *1 *1 *3 Analog OUT HDMI HDMI *1 *2 TV, projector, etc. *1 Depends on the "Audio TV Out" setting (➔ 55). *2 This setting is available, when "Audio Return Channel" setting ..., the inputs will be connected by the analog VCR/DVR OUT. Audio Connection Formats Audio component can be selected automatically in mind that the AV receiver does not convert digital input signals for analog line outputs and vice versa.

Owner Manual
Page 24
...you turn on the remote controller. To prevent any components connected via V. Turning On & Basic Operations Turning On/Off the AV Receiver ON/STANDBY STANDBY indicator STANDBY ON RECEIVER Turning On Press ON/STANDBY on the front panel. Turning Off Press ON/STANDBY on the front panel. or Press... RECEIVER followed by ON on , the display lights, and the STANDBY indicator goes off . or Press RECEIVER followed by STANDBY on the AV receiver, always turn down the volume before you turn it off . Pressing the ...
...you turn on the remote controller. To prevent any components connected via V. Turning On & Basic Operations Turning On/Off the AV Receiver ON/STANDBY STANDBY indicator STANDBY ON RECEIVER Turning On Press ON/STANDBY on the front panel. Turning Off Press ON/STANDBY on the front panel. or Press... RECEIVER followed by ON on , the display lights, and the STANDBY indicator goes off . or Press RECEIVER followed by STANDBY on the AV receiver, always turn down the volume before you turn it off . Pressing the ...

Owner Manual
Page 25
... You can determine the language used for about the current input source as follows. (Components connected to the UNIVERSAL PORT jack are excluded.) Press RECEIVER followed by DIMMER repeatedly to the Radio" (➔ 32) 3 To adjust the volume, use VOL R/X . 4 Select a listening mode ... on the source component. If the input signal is digital but not PCM, the signal format and the number of channels is displayed. Press RECEIVER followed by DISPLAY repeatedly to cycle through the available information. See also: • "Controlling Other Components" (➔ 78) • "Controlling...
... You can determine the language used for about the current input source as follows. (Components connected to the UNIVERSAL PORT jack are excluded.) Press RECEIVER followed by DIMMER repeatedly to the Radio" (➔ 32) 3 To adjust the volume, use VOL R/X . 4 Select a listening mode ... on the source component. If the input signal is digital but not PCM, the signal format and the number of channels is displayed. Press RECEIVER followed by DISPLAY repeatedly to cycle through the available information. See also: • "Controlling Other Components" (➔ 78) • "Controlling...


