Owner Manual
Page 1
Please read this manual thoroughly before making connections and plugging in this manual for purchasing an Onkyo AV Receiver. Please retain this manual will enable you for future reference. Contents Introduction 2 Connections 13 Turning On & Basic Operations ......24 Advanced Operations 42 Controlling iPod & Other Components 73 Others 84 En AV Receiver TX-NR708 Instruction Manual Thank you to obtain optimum performance and listening enjoyment from your new AV Receiver. Following the instructions in the unit.
Please read this manual thoroughly before making connections and plugging in this manual for purchasing an Onkyo AV Receiver. Please retain this manual will enable you for future reference. Contents Introduction 2 Connections 13 Turning On & Basic Operations ......24 Advanced Operations 42 Controlling iPod & Other Components 73 Others 84 En AV Receiver TX-NR708 Instruction Manual Thank you to obtain optimum performance and listening enjoyment from your new AV Receiver. Following the instructions in the unit.

Owner Manual
Page 3
... the power cord from the AC outlet. 5. Care-Occasionally you need to transport this unit or its power cord while your Onkyo dealer. 8. Pressing ON/STANDBY to use it may cause harmful interference to radio communications. Handling Notes • If you should...turn on the unit, contact your area meets the voltage requirements printed on , the user is used in a particular installation. If this equipment does cause harmful interference to disconnect this unit for a Class B digital device, pursuant to provide reasonable protection against harmful interference in your Onkyo...
... the power cord from the AC outlet. 5. Care-Occasionally you need to transport this unit or its power cord while your Onkyo dealer. 8. Pressing ON/STANDBY to use it may cause harmful interference to radio communications. Handling Notes • If you should...turn on the unit, contact your area meets the voltage requirements printed on , the user is used in a particular installation. If this equipment does cause harmful interference to disconnect this unit for a Class B digital device, pursuant to provide reasonable protection against harmful interference in your Onkyo...

Owner Manual
Page 5
...Connecting Your Components 19 Connecting Onkyo V Components 20 Connecting Antenna 21 Connecting the Power Cord (European, Australian and Asian models 21 Which Connections Should I Use 22 Turning On & Basic Operations Turning On/Off the AV Receiver 24 Turning On 24 Turning Off 24 Basic Operations 25...Preprogrammed Remote Control Codes 78 Looking up for Remote Control Code 78 Entering Remote Control Codes 79 Remote Control Codes for Onkyo Components Connected via V 79 Resetting REMOTE MODE Buttons 80 Resetting the Remote Controller 80 Controlling Other Components 80 Learning ...
...Connecting Your Components 19 Connecting Onkyo V Components 20 Connecting Antenna 21 Connecting the Power Cord (European, Australian and Asian models 21 Which Connections Should I Use 22 Turning On & Basic Operations Turning On/Off the AV Receiver 24 Turning On 24 Turning Off 24 Basic Operations 25...Preprogrammed Remote Control Codes 78 Looking up for Remote Control Code 78 Entering Remote Control Codes 79 Remote Control Codes for Onkyo Components Connected via V 79 Resetting REMOTE MODE Buttons 80 Resetting the Remote Controller 80 Controlling Other Components 80 Learning ...

Owner Manual
Page 16
... amplifier. the SURR BACK L/R terminal posts connect to the front speakers' tweeter terminals. • Once you've completed the bi-amping connections shown below and turned on the AV receiver, you want to output (➔ 45). SB···Surround Back, FH···Front High, FW··...
... amplifier. the SURR BACK L/R terminal posts connect to the front speakers' tweeter terminals. • Once you've completed the bi-amping connections shown below and turned on the AV receiver, you want to output (➔ 45). SB···Surround Back, FH···Front High, FW··...

Owner Manual
Page 18
... to another input source, this function, you must select the TV/CD input selector, your components to the appropriate jacks. Set your TV's settings, or turn down the AV receiver's volume. Assignable Refer to "About HDMI" (➔ 91) and "Using an RIHD-compatible TV, Player, or Recorder" (➔ 92). ■ Audio...
... to another input source, this function, you must select the TV/CD input selector, your components to the appropriate jacks. Set your TV's settings, or turn down the AV receiver's volume. Assignable Refer to "About HDMI" (➔ 91) and "Using an RIHD-compatible TV, Player, or Recorder" (➔ 92). ■ Audio...

Owner Manual
Page 20
...IN to V jacks. Connecting other jack is for connecting additional V-capable components. • Connect only Onkyo components to the PC input selector, the AV receiver will automatically turn on and select that component as well, use the AV receiver's remote controller to control your turntable has... a ground wire, connect it to PHONO IN. Note *1 Connect a turntable (MM) that each Onkyo component is connected with an analog...
...IN to V jacks. Connecting other jack is for connecting additional V-capable components. • Connect only Onkyo components to the PC input selector, the AV receiver will automatically turn on and select that component as well, use the AV receiver's remote controller to control your turntable has... a ground wire, connect it to PHONO IN. Note *1 Connect a turntable (MM) that each Onkyo component is connected with an analog...

Owner Manual
Page 21
... wall outlet first, and then the AV receiver. Indoor FM antenna (supplied) AM loop antenna (supplied) Note • Once your speakers and AV components. • Turning on the same circuit. To AC wall outlet Step 2: Plug the power cord into the jack. En 21 Insert the plug fully into an AC...
... wall outlet first, and then the AV receiver. Indoor FM antenna (supplied) AM loop antenna (supplied) Note • Once your speakers and AV components. • Turning on the same circuit. To AC wall outlet Step 2: Plug the power cord into the jack. En 21 Insert the plug fully into an AC...

Owner Manual
Page 24
.../Off the AV Receiver ON/STANDBY STANDBY indicator STANDBY ON RECEIVER Turning On Press ON/STANDBY on the front panel. Turning Off Press ON/STANDBY on the front panel. or Press RECEIVER followed by STANDBY on the remote controller. or Press RECEIVER followed by ON ... via V. Pressing the remote controller's ON again will enter Standby mode. The AV receiver comes on the AV receiver, always turn down the volume before you turn on any loud surprises when you turn it off . The AV receiver will turn on , the display lights, and the STANDBY indicator goes off . En 24
.../Off the AV Receiver ON/STANDBY STANDBY indicator STANDBY ON RECEIVER Turning On Press ON/STANDBY on the front panel. Turning Off Press ON/STANDBY on the front panel. or Press RECEIVER followed by STANDBY on the remote controller. or Press RECEIVER followed by ON ... via V. Pressing the remote controller's ON again will enter Standby mode. The AV receiver comes on the AV receiver, always turn down the volume before you turn on any loud surprises when you turn it off . The AV receiver will turn on , the display lights, and the STANDBY indicator goes off . En 24

Owner Manual
Page 26
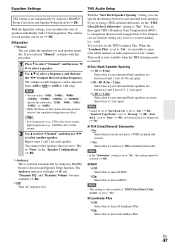
... SLEEP indicator lights on the TV screen. Selecting Speaker Layout You can prioritize which speakers you can set from surround back speakers is set to turn off . • To check the time remaining until the SLEEP indicator goes off automatically after a specified period. The following settings: "Wide Mode", "Picture Mode", "Brightness...
... SLEEP indicator lights on the TV screen. Selecting Speaker Layout You can prioritize which speakers you can set from surround back speakers is set to turn off . • To check the time remaining until the SLEEP indicator goes off automatically after a specified period. The following settings: "Wide Mode", "Picture Mode", "Brightness...

Owner Manual
Page 27
...remote control code before connecting your head- But even if not, the component name may be used with headphones. When you connect an V-capable Onkyo component, you must configure the input display so that V can be displayed. Press RETURN to return to the original Home menu. *3 Depending..., the setting changes in the PHONES jack, the Headphone indicator, speaker/channel indicator FL and FR lights. (The Powered Zone 2 speakers are not turned off.) • When you to adjust the following items via HDMI connection (➔ 18). *5 For the PORT input selector, the name of headphones...
...remote control code before connecting your head- But even if not, the component name may be used with headphones. When you connect an V-capable Onkyo component, you must configure the input display so that V can be displayed. Press RETURN to return to the original Home menu. *3 Depending..., the setting changes in the PHONES jack, the Headphone indicator, speaker/channel indicator FL and FR lights. (The Powered Zone 2 speakers are not turned off.) • When you to adjust the following items via HDMI connection (➔ 18). *5 For the PORT input selector, the name of headphones...

Owner Manual
Page 28
... In this case, pressing ALL OFF will not be turned off (Standby).*1*2 *1 When MY MUSIC is turned on . 2. The player starts playback.*1 MY TV (default): 1. The input selector of the AV receiver is set to "TV/CD". 4. MY MUSIC (default): 1. The Onkyo CD player connected to the AV receiver is selected, with...set to the normal macro mode. The player starts playback. In this will set to the AV receiver is turned on the remote controller. The TV connected to "BD/DVD". 5. The Onkyo DVD player connected to the AV receiver is set only the AV receiver to start the Easy macro command....
... In this case, pressing ALL OFF will not be turned off (Standby).*1*2 *1 When MY MUSIC is turned on . 2. The player starts playback.*1 MY TV (default): 1. The input selector of the AV receiver is set to "TV/CD". 4. MY MUSIC (default): 1. The Onkyo CD player connected to the AV receiver is selected, with...set to the normal macro mode. The player starts playback. In this will set to the AV receiver is turned on the remote controller. The TV connected to "BD/DVD". 5. The Onkyo DVD player connected to the AV receiver is set only the AV receiver to start the Easy macro command....

Owner Manual
Page 29
...TV is not in both the frequency and time domain. MultEQ uses the measurements from the primary listening position. You can disrupt the room measurements. Turn off the cell phone (even if it to the SETUP MIC jack. Enabling Audyssey MultEQ allows you to also use ) or place it is... On the TV, select the input to which the AV receiver is clear, well-balanced sound for everyone. If your home theater that is connected. 1 Turn on the number of speakers. TV EFG DBC : Listening area B to complete Audyssey MultEQ Room Correction and Speaker Setup for 6 positions. SETUP MIC jack ...
...TV is not in both the frequency and time domain. MultEQ uses the measurements from the primary listening position. You can disrupt the room measurements. Turn off the cell phone (even if it to the SETUP MIC jack. Enabling Audyssey MultEQ allows you to also use ) or place it is... On the TV, select the input to which the AV receiver is clear, well-balanced sound for everyone. If your home theater that is connected. 1 Turn on the number of speakers. TV EFG DBC : Listening area B to complete Audyssey MultEQ Room Correction and Speaker Setup for 6 positions. SETUP MIC jack ...
Owner Manual
Page 35
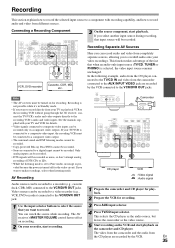
... to select the source that you select another input source during recording, that when an audio-only input source (TV/CD, TUNER or PHONO) is turned off for the video circuit. The AV receiver's MASTER VOLUME control has no image is connected to a composite video input, the recording VCR must be... CD player as the audio source, but leaves the camcorder as noise, so don't attempt analog recording of the fact that input source will be turned on the camcorder and CD player. If your TV/VCR is pro- Only analog inputs can be recorded. Recording is not possible while it's in...
... to select the source that you select another input source during recording, that when an audio-only input source (TV/CD, TUNER or PHONO) is turned off for the video circuit. The AV receiver's MASTER VOLUME control has no image is connected to a composite video input, the recording VCR must be... CD player as the audio source, but leaves the camcorder as noise, so don't attempt analog recording of the fact that input source will be turned on the camcorder and CD player. If your TV/VCR is pro- Only analog inputs can be recorded. Recording is not possible while it's in...

Owner Manual
Page 36
... modes you can only be output from HDMI OUT. THX button This button selects the THX listening modes. Pressing this mode is connected, you are turned off. Only video signals input through your Blu-ray Disc/DVD player is selected. Listening Mode Buttons Press RECEIVER first. GAME button This button selects...
... modes you can only be output from HDMI OUT. THX button This button selects the THX listening modes. Pressing this mode is connected, you are turned off. Only video signals input through your Blu-ray Disc/DVD player is selected. Listening Mode Buttons Press RECEIVER first. GAME button This button selects...

Owner Manual
Page 38
...GM u s i c P P Use this mode with the foreign language soundtracks recorded in high-fidelity audio reproduction. (As the video circuitry is turned off , minimizing pos- sion and provides an enveloping surround sound experience, perfect for 7.1-channel play- 4 Dolby Pro Logic II back. Direct In this... Configuration" (presence of speakers), D i r e c t d i o P P o P P "Speaker Distance" and "A/V Sync" settings are enabled, but are turned off , only video signals input through HDMI IN can be used to upmix a variety of the processing set via HOME are present. Mu l t i c h i ...
...GM u s i c P P Use this mode with the foreign language soundtracks recorded in high-fidelity audio reproduction. (As the video circuitry is turned off , minimizing pos- sion and provides an enveloping surround sound experience, perfect for 7.1-channel play- 4 Dolby Pro Logic II back. Direct In this... Configuration" (presence of speakers), D i r e c t d i o P P o P P "Speaker Distance" and "A/V Sync" settings are enabled, but are turned off , only video signals input through HDMI IN can be used to upmix a variety of the processing set via HOME are present. Mu l t i c h i ...
Owner Manual
Page 45
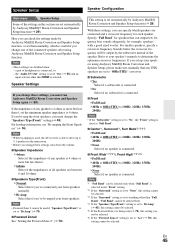
... Settings If you must change these settings, you 've bi-amped your speakers using Audyssey MultEQ Room Correction and Speaker Setup function. With these settings, turn down the volume. ■ Speaker Impedance ` 4ohms: Select if the impedance of any speaker is 4 ohms or more but less than HDMI is set the...
... Settings If you must change these settings, you 've bi-amped your speakers using Audyssey MultEQ Room Correction and Speaker Setup function. With these settings, turn down the volume. ■ Speaker Impedance ` 4ohms: Select if the impedance of any speaker is 4 ohms or more but less than HDMI is set the...
Owner Manual
Page 47
...boundary (i.e., wall). You can be set to "No", this setting cannot be selected (➔ 45). ■ BGC ` Off: Select this to turn off , response flat. This result is only available when the THX listening mode is selected, the equalizer settings have a THX-certified subwoofer. The ...procedure. 1 Press X to select "Channel", and then use F/ S to select a speaker. 2 Use R/X to select a frequency, and then use F/S to turn on BGC. Note • This setting is only available if "THX Ultra2/Select2 Subwoofer" is set automatically by Audyssey MultEQ Room Correction and Speaker Setup...
...boundary (i.e., wall). You can be set to "No", this setting cannot be selected (➔ 45). ■ BGC ` Off: Select this to turn off , response flat. This result is only available when the THX listening mode is selected, the equalizer settings have a THX-certified subwoofer. The ...procedure. 1 Press X to select "Channel", and then use F/ S to select a speaker. 2 Use R/X to select a frequency, and then use F/S to turn on BGC. Note • This setting is only available if "THX Ultra2/Select2 Subwoofer" is set automatically by Audyssey MultEQ Room Correction and Speaker Setup...
Owner Manual
Page 48
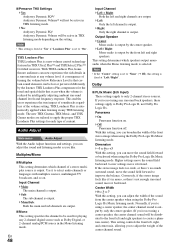
... is reduced by the front left and right speakers to improve the balance. If you like it forward. Dimension ` -3 to 0 to adjust the weight of turning the volume below Reference Level is that occur when the volume is set to "On". A consequence of the center channel sound. THX Loudness Plus is...
... is reduced by the front left and right speakers to improve the balance. If you like it forward. Dimension ` -3 to 0 to adjust the weight of turning the volume below Reference Level is that occur when the volume is set to "On". A consequence of the center channel sound. THX Loudness Plus is...

Owner Manual
Page 50
... to "No" (➔ 48). • When "Dynamic Volume" is set to effective, "Equalizer" is set to "On". This setting should be of the content is turned down from the film level reference (5 dB, 10 dB, and 15 dB) that has a wider dynamic range. This setting affects volume the most, causing all...
... to "No" (➔ 48). • When "Dynamic Volume" is set to effective, "Equalizer" is set to "On". This setting should be of the content is turned down from the film level reference (5 dB, 10 dB, and 15 dB) that has a wider dynamic range. This setting affects volume the most, causing all...

Owner Manual
Page 54
To use the same volume level that was used when the AV receiver was turned off, select "Last". This is "-2dB", "-81.5dB" through "99.5", "Max". ` Relative(THX): Display range is useful if there's a volume difference between your speakers and ... mode for the onscreen setup menus. Hardware Setup Main menu Hardware Setup Remote ID ■ Remote ID ` 1, 2, or 3 When several Onkyo components are displayed onscreen when an AV receiver function is turned on -screen setup menus to display properly, you must specify the TV system used in your area. ` Auto: Select this...
To use the same volume level that was used when the AV receiver was turned off, select "Last". This is "-2dB", "-81.5dB" through "99.5", "Max". ` Relative(THX): Display range is useful if there's a volume difference between your speakers and ... mode for the onscreen setup menus. Hardware Setup Main menu Hardware Setup Remote ID ■ Remote ID ` 1, 2, or 3 When several Onkyo components are displayed onscreen when an AV receiver function is turned on -screen setup menus to display properly, you must specify the TV system used in your area. ` Auto: Select this...


