
User Manual
Page 1
> Before start > Hookup > Setup > Playback > Part Names > Advanced Manual Troubleshooting | Appendix AV RECEIVER TX-NR656 Basic Manual Hookup Step1: Choose your Speaker Layout 3 Step2: Connect the Speakers 9 Step3: Connect the TV 11 Step4: Connect the AV Components 13 Step5: Connect Other... Basic Playback 20 Network Functions 21 Others 23 Part Names Front Panel 25 Rear Panel 26 Remote Controller 27 Display 27 The Basic Manual includes information needed when starting up and also instructions for frequently used operations. The Advanced Manual has more detailed information and...
> Before start > Hookup > Setup > Playback > Part Names > Advanced Manual Troubleshooting | Appendix AV RECEIVER TX-NR656 Basic Manual Hookup Step1: Choose your Speaker Layout 3 Step2: Connect the Speakers 9 Step3: Connect the TV 11 Step4: Connect the AV Components 13 Step5: Connect Other... Basic Playback 20 Network Functions 21 Others 23 Part Names Front Panel 25 Rear Panel 26 Remote Controller 27 Display 27 The Basic Manual includes information needed when starting up and also instructions for frequently used operations. The Advanced Manual has more detailed information and...
User Manual
Page 2
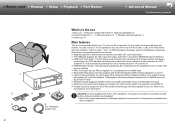
... even if this unit to standby when the TV is connected between your TV and your AV components. > Before start > Hookup > Setup > Playback > Part Names > Advanced Manual Troubleshooting | Appendix 1 2 5 2 3 4 6 (For Taiwanese models only) What's in a separate room (ZONE 2) $ We plan to provide support for the DTS:X audio format through a firmware update for...
... even if this unit to standby when the TV is connected between your TV and your AV components. > Before start > Hookup > Setup > Playback > Part Names > Advanced Manual Troubleshooting | Appendix 1 2 5 2 3 4 6 (For Taiwanese models only) What's in a separate room (ZONE 2) $ We plan to provide support for the DTS:X audio format through a firmware update for...
User Manual
Page 3
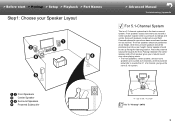
... up facing the listening position. > Before start > Hookup > Setup > Playback > Part Names Step1: Choose your Speaker Layout 1 2 Front Speakers 3 Center Speaker 4 5 Surround Speakers 6 Powered Subwoofer > Advanced Manual Troubleshooting | Appendix For 5.1-Channel System This is a 5.1-channel system that is counted as dialogs and vocals. Powered subwoofer reproduces bass sounds and creates rich sound...
... up facing the listening position. > Before start > Hookup > Setup > Playback > Part Names Step1: Choose your Speaker Layout 1 2 Front Speakers 3 Center Speaker 4 5 Surround Speakers 6 Powered Subwoofer > Advanced Manual Troubleshooting | Appendix For 5.1-Channel System This is a 5.1-channel system that is counted as dialogs and vocals. Powered subwoofer reproduces bass sounds and creates rich sound...
User Manual
Page 4
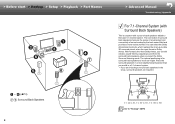
...; 3: 135e to -date 3D surround sound, when the input format is Dolby Atmos. > Before start > Hookup > Setup > Playback > Part Names 1 6 (ÄP3) 7 8 Surround Back Speakers 4 > Advanced Manual Troubleshooting | Appendix For 7.1-Channel System (with Surround Back Speakers) This is a system with surround back speakers added to be at ear height.
...; 3: 135e to -date 3D surround sound, when the input format is Dolby Atmos. > Before start > Hookup > Setup > Playback > Part Names 1 6 (ÄP3) 7 8 Surround Back Speakers 4 > Advanced Manual Troubleshooting | Appendix For 7.1-Channel System (with Surround Back Speakers) This is a system with surround back speakers added to be at ear height.
User Manual
Page 5
.... > Before start > Hookup > Setup > Playback > Part Names 1 6 (ÄP3) 7 8 Height Speakers Choose one of the following: $ Front High Speakers $ Rear High Speakers 3´ (0.9 m) or more > Advanced Manual Troubleshooting | Appendix For 7.1-Channel System (with the addition of height speakers, either as front high speakers or rear high speakers. You can still create a sound...
.... > Before start > Hookup > Setup > Playback > Part Names 1 6 (ÄP3) 7 8 Height Speakers Choose one of the following: $ Front High Speakers $ Rear High Speakers 3´ (0.9 m) or more > Advanced Manual Troubleshooting | Appendix For 7.1-Channel System (with the addition of height speakers, either as front high speakers or rear high speakers. You can still create a sound...
User Manual
Page 6
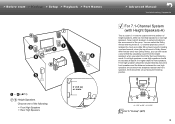
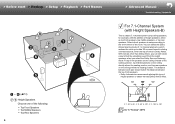
.... > Before start > Hookup > Setup > Playback > Part Names 1 6 (ÄP3) 7 8 Height Speakers Choose one of the following: $ Top Front Speakers $ Top Middle Speakers $ Top Rear Speakers 6 > Advanced Manual Troubleshooting | Appendix For 7.1-Channel System (with the addition of height speakers, either as top front speakers, top middle speakers, or top rear speakers. Select which...
.... > Before start > Hookup > Setup > Playback > Part Names 1 6 (ÄP3) 7 8 Height Speakers Choose one of the following: $ Top Front Speakers $ Top Middle Speakers $ Top Rear Speakers 6 > Advanced Manual Troubleshooting | Appendix For 7.1-Channel System (with the addition of height speakers, either as top front speakers, top middle speakers, or top rear speakers. Select which...
User Manual
Page 7
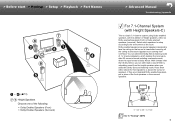
... room. > Before start > Hookup > Setup > Playback > Part Names 1 6 (ÄP3) 7 8 Height Speakers Choose one of the following: $ Dolby Enabled Speakers (Front) $ Dolby Enabled Speakers (Surround) > Advanced Manual Troubleshooting | Appendix For 7.1-Channel System (with Height Speakers-C) This is heard after bouncing off the ceiling so that sound is a basic 5.1-channel system using Dolby...
... room. > Before start > Hookup > Setup > Playback > Part Names 1 6 (ÄP3) 7 8 Height Speakers Choose one of the following: $ Dolby Enabled Speakers (Front) $ Dolby Enabled Speakers (Surround) > Advanced Manual Troubleshooting | Appendix For 7.1-Channel System (with Height Speakers-C) This is heard after bouncing off the ceiling so that sound is a basic 5.1-channel system using Dolby...
User Manual
Page 8
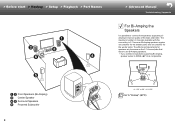
... 30e, ˎ 2: 120e Go To "Hookup" (ÄP10) > Before start > Hookup > Setup > Playback > Part Names 1 2 Front Speakers (Bi-Amping) 3 Center Speaker 4 5 Surround Speakers 6 Powered Subwoofer 8 > Advanced Manual Troubleshooting | Appendix For Bi-Amping the Speakers It is 5.1 because Bi-Amping speakers require one amplifier for the tweeter jacks and one amplifier for the...
... 30e, ˎ 2: 120e Go To "Hookup" (ÄP10) > Before start > Hookup > Setup > Playback > Part Names 1 2 Front Speakers (Bi-Amping) 3 Center Speaker 4 5 Surround Speakers 6 Powered Subwoofer 8 > Advanced Manual Troubleshooting | Appendix For Bi-Amping the Speakers It is 5.1 because Bi-Amping speakers require one amplifier for the tweeter jacks and one amplifier for the...
User Manual
Page 9
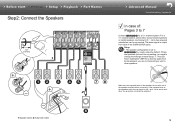
..., select either surround back speakers or height speakers, and connect 78. > Before start > Hookup > Setup > Playback > Part Names Step2: Connect the Speakers 1/2˝ (12 mm) 1 > Advanced Manual Troubleshooting | Appendix in Initial Setup, "1. Setup 0 The speaker configuration is sent to 7 Connect 123456 for a 5.1-channel system. wires touch each of the speaker terminals when...
..., select either surround back speakers or height speakers, and connect 78. > Before start > Hookup > Setup > Playback > Part Names Step2: Connect the Speakers 1/2˝ (12 mm) 1 > Advanced Manual Troubleshooting | Appendix in Initial Setup, "1. Setup 0 The speaker configuration is sent to 7 Connect 123456 for a 5.1-channel system. wires touch each of the speaker terminals when...
User Manual
Page 10
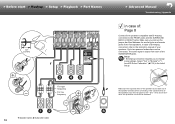
... FRONT jacks and the SURROUND BACK or HEIGHT jacks. In case of Bi-Amping connection, refer to the instruction manual of : Page 8 Connect front speakers compatible with Bi-Amping connection to change some settings. > Before start > Hookup > Setup > Playback > Part Names 1/2˝ (12 mm) 1 > Advanced Manual Troubleshooting | Appendix in case of your speakers.
... FRONT jacks and the SURROUND BACK or HEIGHT jacks. In case of Bi-Amping connection, refer to the instruction manual of : Page 8 Connect front speakers compatible with Bi-Amping connection to change some settings. > Before start > Hookup > Setup > Playback > Part Names 1/2˝ (12 mm) 1 > Advanced Manual Troubleshooting | Appendix in case of your speakers.
User Manual
Page 11
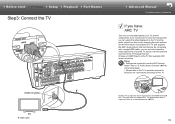
.... Setup 0 Settings are the connections for the TV. > Before start > Hookup > Setup > Playback > Part Names Step3: Connect the TV 1 HDMI IN (ARC) TV 1 HDMI cable > Advanced Manual Troubleshooting | Appendix if you can be connected to the HDMI OUT SUB jack. If you connect two or more AV components, you can select the...
.... Setup 0 Settings are the connections for the TV. > Before start > Hookup > Setup > Playback > Part Names Step3: Connect the TV 1 HDMI IN (ARC) TV 1 HDMI cable > Advanced Manual Troubleshooting | Appendix if you can be connected to the HDMI OUT SUB jack. If you connect two or more AV components, you can select the...

User Manual
Page 12
> Before start > Hookup > Setup > Playback > Part Names > Advanced Manual Troubleshooting | Appendix if you have a DIGITAL OPTICAL OUT jack, use a tuner built into the TV). 2 1 TV 1 HDMI cable, 2 Digital optical cable 12 Another TV or ...
> Before start > Hookup > Setup > Playback > Part Names > Advanced Manual Troubleshooting | Appendix if you have a DIGITAL OPTICAL OUT jack, use a tuner built into the TV). 2 1 TV 1 HDMI cable, 2 Digital optical cable 12 Another TV or ...
User Manual
Page 13
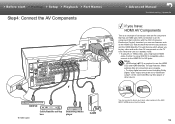
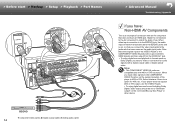
... settings after all connections are complete. 0 To enjoy digital surround sound including Dolby Digital, audio output should be set -top Streaming media box player GAME > Advanced Manual Troubleshooting | Appendix if you to play 4K or 1080p video, use the HDMI CEC and HDMI Standby Through features. > Before start > Hookup > Setup > Playback > Part...
... settings after all connections are complete. 0 To enjoy digital surround sound including Dolby Digital, audio output should be set -top Streaming media box player GAME > Advanced Manual Troubleshooting | Appendix if you to play 4K or 1080p video, use the HDMI CEC and HDMI Standby Through features. > Before start > Hookup > Setup > Playback > Part...
User Manual
Page 14
... make a connection for 480i, etc. > Before start > Hookup > Setup > Playback > Part Names 1 2 OR 3 BD/DVD 1 Component video cable, 2 Digital coaxial cable, 3 Analog audio cable 14 > Advanced Manual Troubleshooting | Appendix if you have an HDMI jack. If your player does not support 480i or 576i output, use the VIDEO IN jack. 0 To enjoy...
... make a connection for 480i, etc. > Before start > Hookup > Setup > Playback > Part Names 1 2 OR 3 BD/DVD 1 Component video cable, 2 Digital coaxial cable, 3 Analog audio cable 14 > Advanced Manual Troubleshooting | Appendix if you have an HDMI jack. If your player does not support 480i or 576i output, use the VIDEO IN jack. 0 To enjoy...
User Manual
Page 15
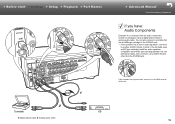
... with an audio component. OR 1 If the turntable has a ground wire, connect it to another AUDIO IN jack. > Before start > Hookup > Setup > Playback > Part Names > Advanced Manual Troubleshooting | Appendix if you have: Audio Components Example of this unit. 2 Turntable CD 1 Digital optical cable, 2 Analog audio cable 15 Connect a CD player using a digital...
... with an audio component. OR 1 If the turntable has a ground wire, connect it to another AUDIO IN jack. > Before start > Hookup > Setup > Playback > Part Names > Advanced Manual Troubleshooting | Appendix if you have: Audio Components Example of this unit. 2 Turntable CD 1 Digital optical cable, 2 Analog audio cable 15 Connect a CD player using a digital...

User Manual
Page 16
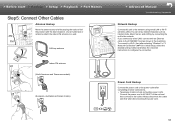
... main room (where this unit using an analog audio cable or digital optical cable, or digital coaxial cable. > Before start > Hookup > Setup > Playback > Part Names > Advanced Manual Troubleshooting | Appendix Multi-zone Connection You can enjoy audio in the separate room by, for the front speakers, you want to output their audio to...
... main room (where this unit using an analog audio cable or digital optical cable, or digital coaxial cable. > Before start > Hookup > Setup > Playback > Part Names > Advanced Manual Troubleshooting | Appendix Multi-zone Connection You can enjoy audio in the separate room by, for the front speakers, you want to output their audio to...
User Manual
Page 17
... wired LAN or Wi-Fi (wireless LAN). AM FM AM loop antenna Indoor FM antenna (North American and Taiwanese models) (European, Australian and Asian models) > Advanced Manual Troubleshooting | Appendix Network Hookup Connect this unit to a wall. If you connect by Wi-Fi, then after completing all other connections. 0 Taiwanese models include removable...
... wired LAN or Wi-Fi (wireless LAN). AM FM AM loop antenna Indoor FM antenna (North American and Taiwanese models) (European, Australian and Asian models) > Advanced Manual Troubleshooting | Appendix Network Hookup Connect this unit to a wall. If you connect by Wi-Fi, then after completing all other connections. 0 Taiwanese models include removable...
User Manual
Page 18
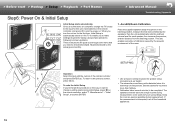
... microphone at high volume during measurement. To redo the Initial Setup If you need to be careful of the room. "Initial Setup", and press ENTER. > Advanced Manual Troubleshooting | Appendix 1. > Before start > Hookup > Setup > Playback > Part Names Step6: Power On & Initial Setup Initial Setup starts automatically Once all connections are complete, change a setting...
... microphone at high volume during measurement. To redo the Initial Setup If you need to be careful of the room. "Initial Setup", and press ENTER. > Advanced Manual Troubleshooting | Appendix 1. > Before start > Hookup > Setup > Playback > Part Names Step6: Power On & Initial Setup Initial Setup starts automatically Once all connections are complete, change a setting...

User Manual
Page 19
... privacy policy is displayed during network setting. Multi Zone Setup When you can connect without entering a password. 0 If the SSID of connection method. All Erase A/a > Advanced Manual HDMI Setup Troubleshooting | Appendix HDMI CEC Make this setting to the TV's audio through this unit is set "5. You can reduce power consumption in standby...
... privacy policy is displayed during network setting. Multi Zone Setup When you can connect without entering a password. 0 If the SSID of connection method. All Erase A/a > Advanced Manual HDMI Setup Troubleshooting | Appendix HDMI CEC Make this setting to the TV's audio through this unit is set "5. You can reduce power consumption in standby...
User Manual
Page 20
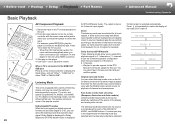
... have connected a CEC compliant TV and player to the HDMI OUT SUB jack Press Q on the listening modes, see the Advanced Manual. Start play the sound field according to suit the connected speaker configuration when the input signal is stereo for DTS-HD Master ...The listening mode last selected for the source is displayed for 2-channel input signals. > Before start > Hookup > Setup > Playback > Part Names > Advanced Manual Basic Playback Troubleshooting | Appendix a d b c 20 AV Component Playback 1. Switch the input on the main unit only) (European, Australian and Asian models...
... have connected a CEC compliant TV and player to the HDMI OUT SUB jack Press Q on the listening modes, see the Advanced Manual. Start play the sound field according to suit the connected speaker configuration when the input signal is stereo for DTS-HD Master ...The listening mode last selected for the source is displayed for 2-channel input signals. > Before start > Hookup > Setup > Playback > Part Names > Advanced Manual Basic Playback Troubleshooting | Appendix a d b c 20 AV Component Playback 1. Switch the input on the main unit only) (European, Australian and Asian models...

