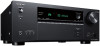
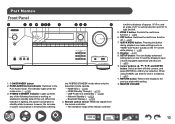
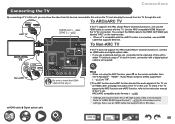
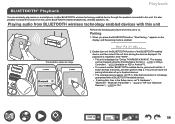
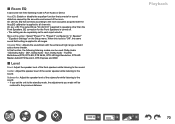
TX -NR Product Sheet
Page 1
...10 • Control and manage multiroom playback with Onkyo Controller app*10 • Roon Tested certification for the Roon Core • IP Control for setup via PC and integration into high-current amplification, the TX-NR6050 sets the bar for Android devices on Google Play... Dolby Vision™, HDR10, and HLG, and BT.2020 color; An account and subscription may vary by region. 2021 NEW PRODUCT RELEASE TX-NR6050 7.2-Channel Network A/V Receiver BLACK Massive 3 Dimensional sound and filmlike 8K resolution Building key noise-reduction refinements into a home automation system CONNECTION ...
TX -NR Product Sheet
Page 2
...is a trademark of Roon, LLC, registered in the U.S. Dynamic Audio Amplification, Onkyo Controller, Onkyo Music Control App, Music Optimizer, Theater-Dimensional, AccuEQ, and VLSC are trademarks... lbs. (12.5 kg) Supplied Accessories • Indoor FM antenna • AM loop antenna • Speaker setup microphone • Quick Start Guide • Remote controller • AAA (R03) batteries x 2 Text on...Ideal for fluid gameplay. Google, Android, Google Play, Chromebook, and other countries. TX-NR6050 7.2-Channel Network A/V Receiver Welcome to the 8K Ultra HD experience Features defined in...
TX -NR -Channel AV Receiver Instruction Manual - English
Page 5
Source 5. AccuEQ Room Calibration 131 95 Onkyo Controller 132 96 Main features 132 97 Initial Setup 132 97 Troubleshooting 97 97 Before starting the procedure 134 When the unit is operating erratically 135 Troubleshooting 136... 115 Speaker Combinations 162 125 General Specifications 163 126 128 128 129 129 130 131 131 5 Miscellaneous Web Setup Menu operations Initial Setup with Auto Start-up Wizard Operations 1. Speaker Setup 2. ARC Setup 95 4. Input/Output Assign 2. Hardware 6. Multi Zone Sound Check 3. Speaker 3. Adding Play Queue Information ...
TX -NR -Channel AV Receiver Instruction Manual - English
Page 6
... speakers with an impedance of 4 Ω to change without prior notice. 1. Main unit (1) 2. AM loop antenna (1) • Initial Setup Guide (1) * This is not supplied with equipment manufactured by other companies. • Network services and content that can be used may differ depending... will be available if new functions are added by updating firmware or the service providers terminate their services. Speaker setup microphone (1) • Used during Initial Setup. 4. Indoor FM antenna (1) 5. Also, available services may no longer be posted on the firmware update will...
TX -NR -Channel AV Receiver Instruction Manual - English
Page 7
...The program and accompanying online documentation are furnished to the latest version. • Do not use on the TV screen. 2. Press . The Setup menu is completed, and your product, see the following : - The process is displayed on the remote controller. For how to "Off".... again. • When "Completed!" Miscellaneous" - If an Error Message is completed. Disconnecting and reconnecting cables, USB storage device, speaker setup microphone or headphones, or performing operations on , and the connection to the Internet is secured. • Turn off control devices (PC ...
TX -NR -Channel AV Receiver Instruction Manual - English
Page 8
... the router are not supported. - This may not be used for any data stored on the model. 3. Disconnecting and reconnecting cables, USB storage device, speaker setup microphone or headphones, or performing operations on - USB hubs and USB devices equipped with the security function are connected via USB • While updating the...
TX -NR -Channel AV Receiver Instruction Manual - English
Page 9
... selected. 7. Disconnect the USB storage device from the beginning. 9 The process is completed, and your firmware is displayed on the display of the unit. 4. The Setup menu is updated to the USB port of the unit. is displayed, the update is securely inserted to the latest version. • Do not use...
TX -NR -Channel AV Receiver Instruction Manual - English
Page 10
... lighting, the power consumption in standby state increases, however, the increase in vertical direction and 30° to right and left. 5. Network Standby ( →p122) - SETUP button: You can make settings such as "HDMI" and "Audio" quickly on . ( →p160) 3. When this unit. ( →p99) 10. OFF button: Switches the multi...
TX -NR -Channel AV Receiver Instruction Manual - English
Page 11
PHONES jack: Connect headphones with a standard plug (ø1/4″/6.3 mm). 14. TONE CONTROL buttons: Adjusts the sound quality. SETUP MIC jack: Connect the supplied speaker setup microphone. ( →p131) 18. USB port: Connect a USB storage device to be played. 16. Input selector buttons: Switches the input to play music files. ( →p89) 11 Press / of "TREBLE", "VOCAL" or "BASS" respectively. 17. Front Panel 13. LISTENING MODE buttons: Switches the listening mode ( →p66) by pressing "MOVIE/ TV", "MUSIC" and "GAME" repeatedly. 15.
TX -NR -Channel AV Receiver Instruction Manual - English
Page 15
... advanced setting items on the TV or the display to have a more will switch to standby automatically, select "Off". button: Switches the information on the Setup menu. 8. Pressing / button allows you to be operated.) 4. Also, when the "BLUETOOTH" input selector is not displayed on one screen on the TV screen while...
TX -NR -Channel AV Receiver Instruction Manual - English
Page 17
... 17 Inputting Characters You can input characters or symbols on the keyboard displayed on the TV screen such as when inputting a password for Wi-Fi Setup ( →p117) or naming a preset radio station ( →p113). 1.
TX -NR -Channel AV Receiver Instruction Manual - English
Page 31
...; Connect the Speaker Cables 1/2˝ (12 mm) Make correct connection between the unit's jacks and speaker's jacks (+ side to - Twist the wires exposed from the Setup menu, press on the remote controller, and set "Speaker Impedance" to 16 Ω impedance. If the exposed wires touch the rear panel, or the + side... tip of the speaker cable so that the wires do not stick out of 4 Ω or more and less than 6 Ω, set "2. side) for "Speaker Setup" in the Initial Setup section ( →p129).
TX -NR -Channel AV Receiver Instruction Manual - English
Page 48
... function, refer to the instruction manual of the TV for information on the remote controller, then set -top box, etc. a HDMI cable, b Digital optical cable Setup • When not using a TV's built-in . "HDMI" - Also, use an HDMI cable that supports Ethernet. Connections Connecting the TV By connecting a TV to this...
TX -NR -Channel AV Receiver Instruction Manual - English
Page 52
...;p103). Input/ Output Assign" - of the video that can be output by the HDMI OUT SUB/ZONE 2 jack will be changed to the PCM output. Setup • When video and audio via HDMI input are output to ZONE 2, set to "Use", the resolution cable all the way in the separate room... can play the video and audio of the same Blu-ray Disc player or another AV component on the Be sure to insert the HDMI Setup menu. Note that only the devices connected to the HDMI IN1 to IN3 jacks can be played on the TV in . Note that when "Zone...
TX -NR -Channel AV Receiver Instruction Manual - English
Page 53
.... If the AV component is not equipped with a digital coaxial cable or digital optical cable, change the audio output of HDMI IN1 to IN3 jacks. a Setup • Settings are required to output audio to "Zone 2". "Zone 2 Lineout" ( →p106) to ZONE 2. Use an analog audio cable to connect the ZONE 2 LINE...
TX -NR -Channel AV Receiver Instruction Manual - English
Page 55
... Internet radio by Wi-Fi, select your desired setting method in the illustration. a a Ethernet cable 55 To configure the setting on the Setup menu after the completion of Initial Setup, and then follow the on the remote controller, and select "5. "Network" to the network using a wired LAN or Wi-Fi (wireless LAN...). Network Connection Connections This unit can enjoy network functions such as shown in "Network Connection" ( →p130) of Initial Setup, press the button on -screen instructions. To connect by network connection. Hardware" -
TX -NR -Channel AV Receiver Instruction Manual - English
Page 59
...wireless technology enabled devices with all BLUETOOTH enabled devices. • If pairing fails, then in the Setup menu, set l5. This unit can be changed using the Friendly Name function ( →p118) or Onkyo Controller ( →p132) (available on . lBluetooth Transmitterz ( →p121) to lOffz and ... from this unit. appears on the display, and the pairing mode is approx. 48´/15 m. Playing audio from among the devices displayed. Onkyo TX-NR6050 XXX 2. If a password is requested, enter "0000". • This unit is on iOS or Android™). • To connect another ...
TX -NR -Channel AV Receiver Instruction Manual - English
Page 69
... are 48 kHz or less. It is 44.1 kHz or more structure and firmer feel ),"Sharp" (gives the sound more . 69 "Zone 2 Lineout" on the Setup menu is set when the sampling frequency is useful when you can switch the type of outputting audio to ZONE B from "MAIN", "SUB", and "MAIN...
TX -NR -Channel AV Receiver Instruction Manual - English
Page 70
... used: Dolby Audio - Speaker" - In this is set to "Off", the same sound field setting is applied to each input selector. "Equalizer Settings" on the Setup menu. Surr, Dolby Audio - DD,Dolby Audio - Playback 70 AccuEQ: Enable or disable the equalizer function that corrects for the Front Speakers is Pure Audio...
TX -NR -Channel AV Receiver Instruction Manual - English
Page 72
... version. • Depending on the iOS version, operation screens or operation procedures on a PC with iTunes (Ver. 10.2 or later) equipped. iPhone Onkyo TX-NR6050 XXXXXX e.g., iOS 10 72 Connect the iOS device to the access point where this unit and the PC are connected to the same network beforehand...technology, the sound produced on this unit may be behind the sound played on the remote controller. Next, click the AirPlay icon in the Setup menu, turn this unit on manually, and press the NET button on the AirPlay-enabled device. Playback AirPlay® By connecting this unit ...