
Owner Manual
Page 1
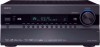
AV Receiver TX-NR3007 TX-NR5007 Instruction Manual Thank you to obtain optimum performance and listening enjoyment from your new AV Receiver. Please read this manual for purchasing an Onkyo AV Receiver. Contents Introduction 2 Connection 18 Turning On & First Time Setup .....48 Basic Operations 67 Using the Listening Modes ........81 Advanced Setup 92 NET/USB ...
AV Receiver TX-NR3007 TX-NR5007 Instruction Manual Thank you to obtain optimum performance and listening enjoyment from your new AV Receiver. Please read this manual for purchasing an Onkyo AV Receiver. Contents Introduction 2 Connection 18 Turning On & First Time Setup .....48 Basic Operations 67 Using the Listening Modes ........81 Advanced Setup 92 NET/USB ...
Owner Manual
Page 4
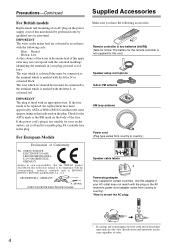
...the terminal which is fitted with the letter L or coloured red. For European Models Declaration of color. 4 GROEBENZELL, GERMANY K. MIYAGI ONKYO EUROPE ELECTRONICS GmbH 1 Speaker Cable 2 FRONT LEFT FRONT LEFT FRONT RIGHT FRONT RIGHT SURROUND LEFT SURROUND LEFT SURROUND RIGHT SURROUND RIGHT CENTER ...LEFT Supplied Accessories Make sure you have the same ampere rating as follows: The wire which is not supplied for this instruction manual is marked with the coloured markings identifying the terminals in the plug. IMPORTANT The plug is marked with an appropriate fuse. ...
...the terminal which is fitted with the letter L or coloured red. For European Models Declaration of color. 4 GROEBENZELL, GERMANY K. MIYAGI ONKYO EUROPE ELECTRONICS GmbH 1 Speaker Cable 2 FRONT LEFT FRONT LEFT FRONT RIGHT FRONT RIGHT SURROUND LEFT SURROUND LEFT SURROUND RIGHT SURROUND RIGHT CENTER ...LEFT Supplied Accessories Make sure you have the same ampere rating as follows: The wire which is not supplied for this instruction manual is marked with the coloured markings identifying the terminals in the plug. IMPORTANT The plug is marked with an appropriate fuse. ...
Owner Manual
Page 9
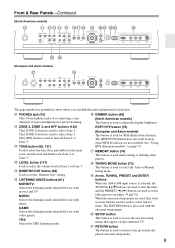
... (Radio Data System). R MEMORY button (74) This button is used to set items. The [ENTER] button is used to return to select the Auto or Manual tuning mode. S TUNING MODE button (73) This button is also used with movies and TV. V RETURN button This button is for connecting a standard pair of...
... (Radio Data System). R MEMORY button (74) This button is used to set items. The [ENTER] button is used to return to select the Auto or Manual tuning mode. S TUNING MODE button (73) This button is also used with movies and TV. V RETURN button This button is for connecting a standard pair of...

Owner Manual
Page 11
...to "BTL" for connecting components with the Universal Port option such as UP-A1 Dock. D DIGITAL OPTICAL IN 1 and 2 (TX-NR3007) DIGITAL OPTICAL IN 1, 2, and 3 (TX-NR5007) These optical digital audio inputs are plugged into the PHONES jack. FM STEREO (73): Lights when tuned to "Bi-Amp"....System). Front & Rear Panels-Continued H Tuning indicators RDS (European models) (75): Lights when tuned to suit your setup. Goes off when Manual Tuning mode is for connecting the component with optical digital audio outputs, such as the audio source: HDMI, ANALOG, or DIGITAL. I SLEEP indicator...
...to "BTL" for connecting components with the Universal Port option such as UP-A1 Dock. D DIGITAL OPTICAL IN 1 and 2 (TX-NR3007) DIGITAL OPTICAL IN 1, 2, and 3 (TX-NR5007) These optical digital audio inputs are plugged into the PHONES jack. FM STEREO (73): Lights when tuned to "Bi-Amp"....System). Front & Rear Panels-Continued H Tuning indicators RDS (European models) (75): Lights when tuned to suit your setup. Goes off when Manual Tuning mode is for connecting the component with optical digital audio outputs, such as the audio source: HDMI, ANALOG, or DIGITAL. I SLEEP indicator...
Owner Manual
Page 19
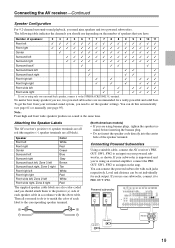
... for a really powerful and solid bass. Then all black). You can do is unpowered and you need to do this automatically (see page 61) or manually (see page 95). The following table indicates the channels you should use depending on the amp. No matter how many speakers you have. If your...
... for a really powerful and solid bass. Then all black). You can do is unpowered and you need to do this automatically (see page 61) or manually (see page 95). The following table indicates the channels you should use depending on the amp. No matter how many speakers you have. If your...
Owner Manual
Page 23
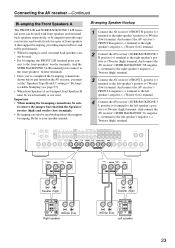
... AV receiver's FRONT R negative (-) terminal to the right speaker's negative (-) Woofer (low) terminal. 2 Connect the AV receiver's SURR BACK/ZONE 3 R positive (+) terminal to your speaker manual. Tweeter (high) Tweeter (high) Woofer (low) Right speaker Woofer (low) Left speaker 23 Important: • When making the bi-amping connections, be sure to remove...
... AV receiver's FRONT R negative (-) terminal to the right speaker's negative (-) Woofer (low) terminal. 2 Connect the AV receiver's SURR BACK/ZONE 3 R positive (+) terminal to your speaker manual. Tweeter (high) Tweeter (high) Woofer (low) Right speaker Woofer (low) Left speaker 23 Important: • When making the bi-amping connections, be sure to remove...

Owner Manual
Page 25
...'s FRONT WIDE/ZONE 2 R negative (-) terminal to the right speaker's negative (-) Woofer (low) terminal. 2 Connect the AV receiver's SURR BACK/ZONE 3 R positive (+) terminal to your speaker manual. And connect the AV receiver's SURR BACK/ZONE 3 L negative (-) terminal to the left speaker's negative (-) Tweeter (high) terminal. Refer to the right speaker's positive (+) Tweeter...
...'s FRONT WIDE/ZONE 2 R negative (-) terminal to the right speaker's negative (-) Woofer (low) terminal. 2 Connect the AV receiver's SURR BACK/ZONE 3 R positive (+) terminal to your speaker manual. And connect the AV receiver's SURR BACK/ZONE 3 L negative (-) terminal to the left speaker's negative (-) Tweeter (high) terminal. Refer to the right speaker's positive (+) Tweeter...
Owner Manual
Page 29
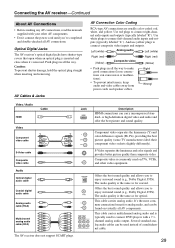
... connections can be used on virtually all the way. Connecting the AV receiver-Continued About AV Connections • Before making any AV connections, read the manuals supplied with a 7.1channel analog audio output. Wrong! This cable carries analog audio. Use red plugs to enjoy surround sound (e.g., Dolby Digital, DTS). Component video separates...
... connections can be used on virtually all the way. Connecting the AV receiver-Continued About AV Connections • Before making any AV connections, read the manuals supplied with a 7.1channel analog audio output. Wrong! This cable carries analog audio. Use red plugs to enjoy surround sound (e.g., Dolby Digital, DTS). Component video separates...
Owner Manual
Page 31
...; Video Signals Digital video signals received by the HDMI IN jacks are normally output by the speakers and headphones connected to the connected component's instruction manual for audio.) However, reliable operation with such an adapter is not guaranteed. Composite video, S-Video, and component video sources can be restricted by using an...
...; Video Signals Digital video signals received by the HDMI IN jacks are normally output by the speakers and headphones connected to the connected component's instruction manual for audio.) However, reliable operation with such an adapter is not guaranteed. Composite video, S-Video, and component video sources can be restricted by using an...

Owner Manual
Page 39
... without going through the AV receiver, connect the TV/VCR's audio and video outputs directly to the recording VCR's audio and video inputs. See the manuals supplied with your VCR or DVD recorder ( A or B ), and then make the connection. Connecting the AV receiver-Continued Connecting a VCR or DVD Recorder for Recording...
... without going through the AV receiver, connect the TV/VCR's audio and video outputs directly to the recording VCR's audio and video inputs. See the manuals supplied with your VCR or DVD recorder ( A or B ), and then make the connection. Connecting the AV receiver-Continued Connecting a VCR or DVD Recorder for Recording...

Owner Manual
Page 43
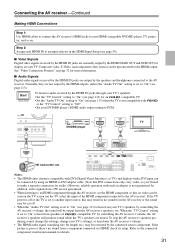
...and b , or a and c .) Connection a b c AV receiver CD IN L/R DIGITAL COAXIAL IN 2 (VCR/DVR) DIGITAL OPTICAL IN 2 (CD) (TX-NR3007) DIGITAL OPTICAL IN 3 (CD) (TX-NR5007) Signal flow ⇐ ⇐ ⇐ CD or turntable Analog audio L/R output Digital coaxial output Digital optical output When you use connection b , you... can listen to and record audio from your turntable to the head amp or transformer, and connect that matches your phono equalizer's manual for use a phono equalizer to assign the digital audio input (see page 56). Use connection a for a turntable with no Phono...
...and b , or a and c .) Connection a b c AV receiver CD IN L/R DIGITAL COAXIAL IN 2 (VCR/DVR) DIGITAL OPTICAL IN 2 (CD) (TX-NR3007) DIGITAL OPTICAL IN 3 (CD) (TX-NR5007) Signal flow ⇐ ⇐ ⇐ CD or turntable Analog audio L/R output Digital coaxial output Digital optical output When you use connection b , you... can listen to and record audio from your turntable to the head amp or transformer, and connect that matches your phono equalizer's manual for use a phono equalizer to assign the digital audio input (see page 56). Use connection a for a turntable with no Phono...

Owner Manual
Page 46
... mode slightly increases. 46 For information about which iPod models are supported by the RI Dock, see page 60). • See the RI Dock's instruction manual for the first time (see page 141). • Connect the RI Dock to the AV receiver with an V cable (see page 47). • Set the.../DVR IN S jack. ■ If Your iPod Doesn't Support Video: Connect your RI Dock's audio output jacks to the AV receiver's TV/TAPE IN L/R jacks. (Onkyo DSA2 hookup shown below.) IN L R TV/TAPE GAME V IN IN L R GAME VCR/DVR V IN IN L R VCR/DVR Make either connection. Connecting the AV receiver-Continued...
... mode slightly increases. 46 For information about which iPod models are supported by the RI Dock, see page 60). • See the RI Dock's instruction manual for the first time (see page 141). • Connect the RI Dock to the AV receiver with an V cable (see page 47). • Set the.../DVR IN S jack. ■ If Your iPod Doesn't Support Video: Connect your RI Dock's audio output jacks to the AV receiver's TV/TAPE IN L/R jacks. (Onkyo DSA2 hookup shown below.) IN L R TV/TAPE GAME V IN IN L R GAME VCR/DVR V IN IN L R VCR/DVR Make either connection. Connecting the AV receiver-Continued...

Owner Manual
Page 47
...outlet. To AC wall outlet Step 2: Plug the power cord into a different branch circuit. • Do not use a power cord other V-capable Onkyo components, pointing the remote controller at the AV receiver's remote control sensor instead of your other manufacturer's components may cause a malfunction. • Some ...; Auto Power On/Standby When you 're using an MD, CDR, or RI Dock, change the Input Display (see pages 35 to the manuals supplied with Onkyo players (DVD, CD, etc.). • Some components have two V jacks. The supplied power cord is a problem, plug the AV receiver ...
...outlet. To AC wall outlet Step 2: Plug the power cord into a different branch circuit. • Do not use a power cord other V-capable Onkyo components, pointing the remote controller at the AV receiver's remote control sensor instead of your other manufacturer's components may cause a malfunction. • Some ...; Auto Power On/Standby When you 're using an MD, CDR, or RI Dock, change the Input Display (see pages 35 to the manuals supplied with Onkyo players (DVD, CD, etc.). • Some components have two V jacks. The supplied power cord is a problem, plug the AV receiver ...

Owner Manual
Page 49
...). Notes: • See page 32 for charts showing how the "Monitor Out" and "Resolution" (see page 52). 49 Monitor Setup ■ Change "Monitor Out" setting manually If you can also be set so that the onscreen setup menus are displayed and composite video and S-Video sources are upconverted* and output. Composite...
...). Notes: • See page 32 for charts showing how the "Monitor Out" and "Resolution" (see page 52). 49 Monitor Setup ■ Change "Monitor Out" setting manually If you can also be set so that the onscreen setup menus are displayed and composite video and S-Video sources are upconverted* and output. Composite...

Owner Manual
Page 50
First Time Setup-Continued In this Instruction Manual, illustrations from the onscreen menu or explanations referring to select: English, Deutsch, Français, Español, Italiano, Nederlands, Svenska, ʕ˖ 1 Press the ... [R]/[X] buttons to select "Language", and then use the Left and Right [F]/ [S] buttons to the menu will be performed on your Instruction Manual is in the same language as the Instruction Manual. Menu 5 Press the [SETUP] button. Input/Output Assign 2. Audio Adjust 4. Hardware Setup 8. Miscella- neous", and then press [ENTER]. Miscellaneous 1. Volume ...
First Time Setup-Continued In this Instruction Manual, illustrations from the onscreen menu or explanations referring to select: English, Deutsch, Français, Español, Italiano, Nederlands, Svenska, ʕ˖ 1 Press the ... [R]/[X] buttons to select "Language", and then use the Left and Right [F]/ [S] buttons to the menu will be performed on your Instruction Manual is in the same language as the Instruction Manual. Menu 5 Press the [SETUP] button. Input/Output Assign 2. Audio Adjust 4. Hardware Setup 8. Miscella- neous", and then press [ENTER]. Miscellaneous 1. Volume ...
Owner Manual
Page 66
...due to the electrical complexities of subwoofers and the interaction with the room, THX recommends setting the level and the distance of the subwoofer manually. • Sometimes due to interaction with the room, you 're using Audyssey MultEQ XT Room Correction and Speaker Setup, please make ... Speaker Matching Error! Refer to step 2 and try again. The speaker may not be set it may be detected are set up your Onkyo dealer. Retry: Return to Off or Direct. Retry Cancel The number of the main speakers. Please check that output very low-frequency sound at...
...due to the electrical complexities of subwoofers and the interaction with the room, THX recommends setting the level and the distance of the subwoofer manually. • Sometimes due to interaction with the room, you 're using Audyssey MultEQ XT Room Correction and Speaker Setup, please make ... Speaker Matching Error! Refer to step 2 and try again. The speaker may not be set it may be detected are set up your Onkyo dealer. Retry: Return to Off or Direct. Retry Cancel The number of the main speakers. Please check that output very low-frequency sound at...

Owner Manual
Page 73
... this example, FM has been selected. Each time you release the button. You can enjoy AM and FM radio stations. TUNER TUNED AUTO ■ Manual Tuning Mode FM STEREO 1 Press the [TUNING MODE] but - In Manual Tuning mode, FM stations will be impossible to get good reception. In this case, switch to... Manual Tuning mode and listen to the station in mono. ■ Tuning into Stations by the [D.TUN] button. 2 Press the TUNING Up or Down [R]/[X] buttons. This ...
... this example, FM has been selected. Each time you release the button. You can enjoy AM and FM radio stations. TUNER TUNED AUTO ■ Manual Tuning Mode FM STEREO 1 Press the [TUNING MODE] but - In Manual Tuning mode, FM stations will be impossible to get good reception. In this case, switch to... Manual Tuning mode and listen to the station in mono. ■ Tuning into Stations by the [D.TUN] button. 2 Press the TUNING Up or Down [R]/[X] buttons. This ...

Owner Manual
Page 77
... selecting the iPod input source by mistake. • If any accessories are supported by the UP-A1 Dock, see the UP-A1 Dock instruction manual. Operating Notes: • Functionality depends on your iPod. The AV receiver's input source will automatically be charged when the AV receiver is turned on...-A1 Dock that seated iPod is on Standby, the AV receiver will automatically select your iPod and the AV receiver at : http://www.onkyo.com iPod adapter Dock connector Compatible iPod models For information about which iPod models are connected to your iPod, the AV receiver may take ...
... selecting the iPod input source by mistake. • If any accessories are supported by the UP-A1 Dock, see the UP-A1 Dock instruction manual. Operating Notes: • Functionality depends on your iPod. The AV receiver's input source will automatically be charged when the AV receiver is turned on...-A1 Dock that seated iPod is on Standby, the AV receiver will automatically select your iPod and the AV receiver at : http://www.onkyo.com iPod adapter Dock connector Compatible iPod models For information about which iPod models are connected to your iPod, the AV receiver may take ...

Owner Manual
Page 78
...control your iPod in the Dock with Universal Port connector: • Connect the Dock to the UNIVERSAL PORT jack. • See the Dock's instruction manual for controlling a Dock with the repeat function. tion. Press [PORT] button first. G H I ALBUM +/- Press it again to fast forward. D...song. button Selects the next or previous album. J VOL [R]/[X] button (67) Adjusts the volume of the iPod, please refer to the instruction manual. 78 B Arrow [R]/[X] and ENTER buttons Used to the previous menu. K PLAYLIST [F]/[S] buttons Selects the previous or next playlist on your iPod's ...
...control your iPod in the Dock with Universal Port connector: • Connect the Dock to the UNIVERSAL PORT jack. • See the Dock's instruction manual for controlling a Dock with the repeat function. tion. Press [PORT] button first. G H I ALBUM +/- Press it again to fast forward. D...song. button Selects the next or previous album. J VOL [R]/[X] button (67) Adjusts the volume of the iPod, please refer to the instruction manual. 78 B Arrow [R]/[X] and ENTER buttons Used to the previous menu. K PLAYLIST [F]/[S] buttons Selects the previous or next playlist on your iPod's ...

Owner Manual
Page 95
... frequencies. The setup menu closes. For smaller speakers, specify a crossover frequency. If the main menu doesn't appear, make sure manually that can set automatically by the subwoofer instead of the speaker. The other speakers (i.e., subwoofer, center, surround, and surround back)... a good sized woofer. Speaker Settings See "Speaker Settings" on your TV. 3 Use the Up and Down [R]/[X] buttons to set them manually, which speakers are set the crossover frequencies, distances, and levels of the front Speakers A and front Speakers B independently. Note: Speakers ...
... frequencies. The setup menu closes. For smaller speakers, specify a crossover frequency. If the main menu doesn't appear, make sure manually that can set automatically by the subwoofer instead of the speaker. The other speakers (i.e., subwoofer, center, surround, and surround back)... a good sized woofer. Speaker Settings See "Speaker Settings" on your TV. 3 Use the Up and Down [R]/[X] buttons to set them manually, which speakers are set the crossover frequencies, distances, and levels of the front Speakers A and front Speakers B independently. Note: Speakers ...

