
Owner Manual
Page 27
... into an FM radio station and adjust the position of the FM antenna to achieve the best possible reception. 2 Use thumbtacks or something similar to fix the FM antenna into the jack. (European and Asian models) 2 Connect both wires of the AM antenna to tune into the jack. Thumbtacks, etc. Connecting...
... into an FM radio station and adjust the position of the FM antenna to achieve the best possible reception. 2 Use thumbtacks or something similar to fix the FM antenna into the jack. (European and Asian models) 2 Connect both wires of the AM antenna to tune into the jack. Thumbtacks, etc. Connecting...
Owner Manual
Page 53
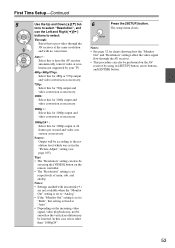
... same resolution and with an asterisk (* ) are not available when the "Monitor Out" setting is set to "Analog". • If the "Monitor Out" setting is fixed at 24 frames per second and video conversion as necessary.
... same resolution and with an asterisk (* ) are not available when the "Monitor Out" setting is set to "Analog". • If the "Monitor Out" setting is fixed at 24 frames per second and video conversion as necessary.

Owner Manual
Page 54
...Input. • When an HDMI IN is the one input selector. If the main menu doesn't appear, make 5 sure the appropriate external input is fixed at the option. • If you connect an input component (such as a priority. Input/Output Assign 1. HDMI Input", and then press [ENTER]. ... to select an input selector, and use the Left and Right [F]/ [S] buttons to select: HDMI1, HDMI2, HDMI3, HDMI4, HDMI5, HDMI6, HDMI7 (TX-NR5007): Select the HDMI IN to an input selector. Otherwise, appropriate CEC (Consumer Electronics Control) operation is used only for each input selector by using...
...Input. • When an HDMI IN is the one input selector. If the main menu doesn't appear, make 5 sure the appropriate external input is fixed at the option. • If you connect an input component (such as a priority. Input/Output Assign 1. HDMI Input", and then press [ENTER]. ... to select an input selector, and use the Left and Right [F]/ [S] buttons to select: HDMI1, HDMI2, HDMI3, HDMI4, HDMI5, HDMI6, HDMI7 (TX-NR5007): Select the HDMI IN to an input selector. Otherwise, appropriate CEC (Consumer Electronics Control) operation is used only for each input selector by using...
Owner Manual
Page 55
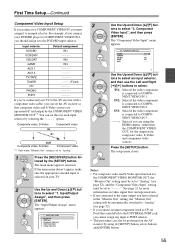
... connected to COMPO- Input selector DVD/BD VCR/DVR CBL/SAT GAME AUX 1 AUX 2 TV/TAPE TUNER CD PHONO PORT Default assignment IN1 ----IN2 IN3 Fixed If you've connected your TV. 2 Use the Up and Down [R]/[X] but- The main menu appears onscreen. Input/Output Assign", and then press [ENTER]. Digital...
... connected to COMPO- Input selector DVD/BD VCR/DVR CBL/SAT GAME AUX 1 AUX 2 TV/TAPE TUNER CD PHONO PORT Default assignment IN1 ----IN2 IN3 Fixed If you've connected your TV. 2 Use the Up and Down [R]/[X] but- The main menu appears onscreen. Input/Output Assign", and then press [ENTER]. Digital...

Owner Manual
Page 56
...SAT GAME AUX 1 COAX1 COAX2 COAX3 OPT1 FRONT 4 Use the Up and Down [R]/[X] but - The setup menu closes. OPT2 - - - - - (Fixed Fixed) OPT2 OPT3 ----- ----- ----- ----- 1 Press the [RECEIVER] button fol- tons to an input selector. Component Video Input 4. tons to "OPT2". If ...BD VCR/DVR CBL/SAT GAME AUX 1 AUX 2 TV/TAPE TUNER CD PHONO PORT Default assignment (TX-NR3007) (TX-NR5007) COAX1 COAX1 COAX2 COAX2 COAX3 COAX3 OPT1 OPT1 FRONT (Fixed) FRONT (Fixed) ----- ----- ----- The main menu appears onscreen. If the main menu doesn't appear, make sure...
...SAT GAME AUX 1 COAX1 COAX2 COAX3 OPT1 FRONT 4 Use the Up and Down [R]/[X] but - The setup menu closes. OPT2 - - - - - (Fixed Fixed) OPT2 OPT3 ----- ----- ----- ----- 1 Press the [RECEIVER] button fol- tons to an input selector. Component Video Input 4. tons to "OPT2". If ...BD VCR/DVR CBL/SAT GAME AUX 1 AUX 2 TV/TAPE TUNER CD PHONO PORT Default assignment (TX-NR3007) (TX-NR5007) COAX1 COAX1 COAX2 COAX2 COAX3 COAX3 OPT1 OPT1 FRONT (Fixed) FRONT (Fixed) ----- ----- ----- The main menu appears onscreen. If the main menu doesn't appear, make sure...

Owner Manual
Page 58
.... "8ohms". 5 Use the Up and Down [R]/[X] but - See "Setting the Powered Zone 2/3" on the display. 58 BTL: Select this if you select Impedance" setting is fixed at "Bi-Amp" or "BTL". for bridged operation. Speaker Set- Normal: Select this if you 've con- nected your front speakers A for bi-amped operation...
.... "8ohms". 5 Use the Up and Down [R]/[X] but - See "Setting the Powered Zone 2/3" on the display. 58 BTL: Select this if you select Impedance" setting is fixed at "Bi-Amp" or "BTL". for bridged operation. Speaker Set- Normal: Select this if you 've con- nected your front speakers A for bi-amped operation...

Owner Manual
Page 96
... If the Powered Zone 2 is being used to filter out unwanted hum. Notes: *1 If the "Subwoofer" setting is set to "No", the "Front" setting is fixed at "Full Band". *2 If the "Front" setting is set to anything other than "Full Band", "Full Band" cannot be selected here. *3 If the "Surround" setting...
... If the Powered Zone 2 is being used to filter out unwanted hum. Notes: *1 If the "Subwoofer" setting is set to "No", the "Front" setting is fixed at "Full Band". *2 If the "Front" setting is set to anything other than "Full Band", "Full Band" cannot be selected here. *3 If the "Surround" setting...

Owner Manual
Page 99
... is used by the listener. SurrBack Sp Spacing < 1ft (< 0.3m): Select this if your surround back speakers are tailored to "On". Note: This setting is fixed at any THX listening mode. This enables users experience the true impact of soundtracks regardless of content. 99 The new THX Cinema, THX Music, and...
... is used by the listener. SurrBack Sp Spacing < 1ft (< 0.3m): Select this if your surround back speakers are tailored to "On". Note: This setting is fixed at any THX listening mode. This enables users experience the true impact of soundtracks regardless of content. 99 The new THX Cinema, THX Music, and...

Owner Manual
Page 100
... sure the appropriate external input is selected on . The setup menu closes. Left / Right: Mono audio is output (default). Note: If the "Center" setting is fixed at "Left / Right". Off: Panorama function off (default). Dolby PLIIx Music (2ch Input) These settings apply to Dolby Pro Logic II, instead of the front...
... sure the appropriate external input is selected on . The setup menu closes. Left / Right: Mono audio is output (default). Note: If the "Center" setting is fixed at "Left / Right". Off: Panorama function off (default). Dolby PLIIx Music (2ch Input) These settings apply to Dolby Pro Logic II, instead of the front...

Owner Manual
Page 101
... High" and "Front Wide" settings are more perceptually flat listening experience as human ears are set to other than "None" (page 95), this setting is fixed at higher levels.
... High" and "Front Wide" settings are more perceptually flat listening experience as human ears are set to other than "None" (page 95), this setting is fixed at higher levels.

Owner Manual
Page 113
... HDMI OUT SUB. Notes: • If the color is unnatural when "x.v.Color" is set to "Enable", change your TV's settings, or turn this setting is fixed at the HDMI input is not output to the format supported by your HDMI-compatible TV supports HDMI Lip Sync. • You can be heard...
... HDMI OUT SUB. Notes: • If the color is unnatural when "x.v.Color" is set to "Enable", change your TV's settings, or turn this setting is fixed at the HDMI input is not output to the format supported by your HDMI-compatible TV supports HDMI Lip Sync. • You can be heard...
Owner Manual
Page 135
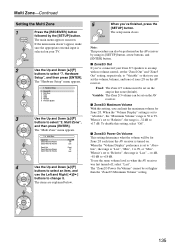
...setting, respectively, to select "2. Multi Zone Zone2 Out Zone2 Maximum Volume Zone2 Power On Volume Zone3 Out Zone3 Maximum Volume Zone3 Power On Volume Fixed Off Last Fixed Off Last 4 Use the Up and Down [R]/[X] buttons to select an item, and use the same volume level as when the AV receiver... the [SETUP] button. The main menu appears onscreen. If the main menu doesn't appear, make sure the appropriate external input is 50 to change it. Fixed: The Zone 2/3 volume must be set to "Absolute", the range is -32 dB to +18 dB. Hardware Setup 1. HDMI 5. Multi Zone", and then...
...setting, respectively, to select "2. Multi Zone Zone2 Out Zone2 Maximum Volume Zone2 Power On Volume Zone3 Out Zone3 Maximum Volume Zone3 Power On Volume Fixed Off Last Fixed Off Last 4 Use the Up and Down [R]/[X] buttons to select an item, and use the same volume level as when the AV receiver... the [SETUP] button. The main menu appears onscreen. If the main menu doesn't appear, make sure the appropriate external input is 50 to change it. Fixed: The Zone 2/3 volume must be set to "Absolute", the range is -32 dB to +18 dB. Hardware Setup 1. HDMI 5. Multi Zone", and then...

Owner Manual
Page 137
... remote controller, press the [ZONE] button repeatedly, and then press the [MUTING] button. If no sound is heard when an input source is set to "Fixed" (page 135) and "Powered Zone2" or "Powered Zone3" setting is selected, check if it's connected to other REMOTE MODE buttons after pressing the [ZONE] button...
... remote controller, press the [ZONE] button repeatedly, and then press the [MUTING] button. If no sound is heard when an input source is set to "Fixed" (page 135) and "Powered Zone2" or "Powered Zone3" setting is selected, check if it's connected to other REMOTE MODE buttons after pressing the [ZONE] button...

