
Owner Manual
Page 1
... 130 Controlling Other Components....139 Others 154 En AV Receiver TX-NR3007 TX-NR5007 Instruction Manual Thank you to obtain optimum performance and listening enjoyment from your new AV Receiver. Please read this manual thoroughly before making connections and plugging in this manual for purchasing an Onkyo AV Receiver. Please retain this manual will enable you for...
... 130 Controlling Other Components....139 Others 154 En AV Receiver TX-NR3007 TX-NR5007 Instruction Manual Thank you to obtain optimum performance and listening enjoyment from your new AV Receiver. Please read this manual thoroughly before making connections and plugging in this manual for purchasing an Onkyo AV Receiver. Please retain this manual will enable you for...

Owner Manual
Page 3
...to pack it how it was when you need to transport this equipment does cause harmful interference to radio or television reception, which the receiver is used in a particular installation. Handling Notes • If you originally bought it. • Do not leave rubber or plastic... equipment. Dry the unit immediately afterwards with the limits for User CAUTION: The user changes or modifications not expressly approved by your Onkyo dealer. 3. Batteries and Heat Exposure Warning Batteries (battery pack or batteries installed) shall not be determined by turning the equipment off...
...to pack it how it was when you need to transport this equipment does cause harmful interference to radio or television reception, which the receiver is used in a particular installation. Handling Notes • If you originally bought it. • Do not leave rubber or plastic... equipment. Dry the unit immediately afterwards with the limits for User CAUTION: The user changes or modifications not expressly approved by your Onkyo dealer. 3. Batteries and Heat Exposure Warning Batteries (battery pack or batteries installed) shall not be determined by turning the equipment off...
Owner Manual
Page 4
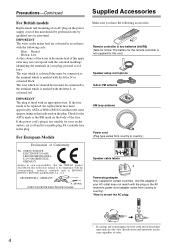
...with the letter N or coloured black. Use this adapter if your AC outlet does not match with the plug on the AV receiver's power cord (adapter varies from country to country.) Speaker cable labels * Power-plug adapter Only supplied in the plug. The wire...or coloured red. Check for your plug, proceed as EN60065, EN55013, EN55020 and EN61000-3-2, -3-3. For European Models Declaration of Conformity We, ONKYO EUROPE ELECTRONICS GmbH LIEGNITZERSTRASSE 6, 82194 GROEBENZELL, GERMANY declare in own responsibility, that indicated on packaging, the letter at the end of this instruction...
...with the letter N or coloured black. Use this adapter if your AC outlet does not match with the plug on the AV receiver's power cord (adapter varies from country to country.) Speaker cable labels * Power-plug adapter Only supplied in the plug. The wire...or coloured red. Check for your plug, proceed as EN60065, EN55013, EN55020 and EN61000-3-2, -3-3. For European Models Declaration of Conformity We, ONKYO EUROPE ELECTRONICS GmbH LIEGNITZERSTRASSE 6, 82194 GROEBENZELL, GERMANY declare in own responsibility, that indicated on packaging, the letter at the end of this instruction...
Owner Manual
Page 5
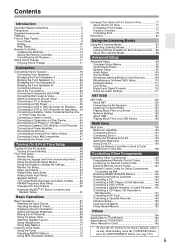
...139 Preprogrammed Remote Control Codes 139 Looking up for Remote Control Code 139 Entering Remote Control Codes 141 Remote Control Codes for Onkyo Components Connected via V 142 Resetting REMOTE MODE Buttons 142 Resetting the Remote Controller 142 Controlling a TV 143 Controlling a ...Recorder 149 Activities Setup 150 Learning Commands 152 Using Normal Macros 153 Others Troubleshooting 154 Specifications (TX-NR3007 160 Specifications (TX-NR5007 161 Video Resolution Chart 162 * To reset the AV receiver to its factory defaults, turn it on and, while holding down the [VCR/DVR] button...
...139 Preprogrammed Remote Control Codes 139 Looking up for Remote Control Code 139 Entering Remote Control Codes 141 Remote Control Codes for Onkyo Components Connected via V 142 Resetting REMOTE MODE Buttons 142 Resetting the Remote Controller 142 Controlling a TV 143 Controlling a ...Recorder 149 Activities Setup 150 Learning Commands 152 Using Normal Macros 153 Others Troubleshooting 154 Specifications (TX-NR3007 160 Specifications (TX-NR5007 161 Video Resolution Chart 162 * To reset the AV receiver to its factory defaults, turn it on and, while holding down the [VCR/DVR] button...

Owner Manual
Page 7
... Ready logo are trademarks of this copyright protection technology must install an Onkyo UP-HT1 HD Radio tuner module (sold separately). *7. THX Ultra2 Plus Before any technology or software incorporated in receivers compatible with the SIRIUS or XM Satellite Radio Systems. Service not available... jurisdictions. THX Ultra2 Plus requirements define hundreds of quality and performance tests. In Europe, using banana plugs to connect speakers to receive the SIRIUS or XM satellite radio service. All rights reserved. and its subsidiaries. Taxes and a one-time activation fee may ...
... Ready logo are trademarks of this copyright protection technology must install an Onkyo UP-HT1 HD Radio tuner module (sold separately). *7. THX Ultra2 Plus Before any technology or software incorporated in receivers compatible with the SIRIUS or XM Satellite Radio Systems. Service not available... jurisdictions. THX Ultra2 Plus requirements define hundreds of quality and performance tests. In Europe, using banana plugs to connect speakers to receive the SIRIUS or XM satellite radio service. All rights reserved. and its subsidiaries. Taxes and a one-time activation fee may ...
Owner Manual
Page 8
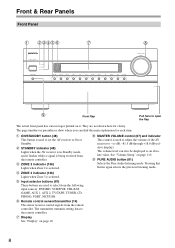
... -2 dB, -81.5 dB through +18.0 dB (relative display). B ON/STANDBY button (48) This button is used to set the AV receiver to select from the following input sources: DVD/BD, VCR/DVR, CBL/SAT, GAME, AUX 1, AUX 2, TV/TAPE, TUNER, CD, PHONO, PORT, NET/USB. H Display ... in parentheses show where you can also be displayed as an absolute value. G Remote control sensor/transmitter (14) The sensor receives control signals from the remote controller. J PURE AUDIO button (81) Selects the Pure Audio listening mode. Front & Rear Panels Front Panel B CDEFG H I MASTER VOLUME control (...
... -2 dB, -81.5 dB through +18.0 dB (relative display). B ON/STANDBY button (48) This button is used to set the AV receiver to select from the following input sources: DVD/BD, VCR/DVR, CBL/SAT, GAME, AUX 1, AUX 2, TV/TAPE, TUNER, CD, PHONO, PORT, NET/USB. H Display ... in parentheses show where you can also be displayed as an absolute value. G Remote control sensor/transmitter (14) The sensor receives control signals from the remote controller. J PURE AUDIO button (81) Selects the Pure Audio listening mode. Front & Rear Panels Front Panel B CDEFG H I MASTER VOLUME control (...

Owner Manual
Page 10
...There are outputted for Zone 2 or Zone 3. [ DISPLAY button (68) This button is selected. 10 Lights when the "Equalizer Settings" is set the AV receiver to connect a camcorder, game console, and so on. Front & Rear Panels-Continued W SETUP MIC jack (62) Audyssey MultEQ® XT Room Correction and ... a USB flash drive or MP3 player, containing music files can be used to On or Standby. When set is being used to OFF, the AV receiver is selected. Dynamic EQ (102): Lights when "Dynamic EQ" is enabled. Vol (102, 118): Lights when "Dynamic Volume" is enabled. AUX 1 INPUT ...
...There are outputted for Zone 2 or Zone 3. [ DISPLAY button (68) This button is selected. 10 Lights when the "Equalizer Settings" is set the AV receiver to connect a camcorder, game console, and so on. Front & Rear Panels-Continued W SETUP MIC jack (62) Audyssey MultEQ® XT Room Correction and ... a USB flash drive or MP3 player, containing music files can be used to On or Standby. When set is being used to OFF, the AV receiver is selected. Dynamic EQ (102): Lights when "Dynamic EQ" is enabled. Vol (102, 118): Lights when "Dynamic Volume" is enabled. AUX 1 INPUT ...

Owner Manual
Page 11
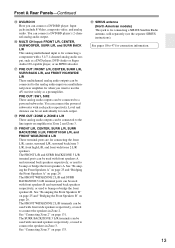
...receiver can assign each one to an input selector to other components. TUNED (73): Lights when tuned to a radio station that 's selected as CD and DVD/BD players. Front & Rear Panels-Continued H Tuning indicators RDS (European models) (75): Lights when tuned to a radio station. D DIGITAL OPTICAL IN 1 and 2 (TX-NR3007...) DIGITAL OPTICAL IN 1, 2, and 3 (TX-NR5007) These optical digital audio inputs are plugged into the PHONES jack.
...receiver can assign each one to an input selector to other components. TUNED (73): Lights when tuned to a radio station that 's selected as CD and DVD/BD players. Front & Rear Panels-Continued H Tuning indicators RDS (European models) (75): Lights when tuned to a radio station. D DIGITAL OPTICAL IN 1 and 2 (TX-NR3007...) DIGITAL OPTICAL IN 1, 2, and 3 (TX-NR5007) These optical digital audio inputs are plugged into the PHONES jack.

Owner Manual
Page 12
..., or for listening to suit your Ethernet network (e.g., router or switch) for connecting an FM antenna. See "Digital Audio Input Setup" on another Onkyo AV component. N ZONE 2 OUT This composite video output can then be connected to control that component. The other AV component, even if they ... for connecting the AV receiver to your setup. X CBL/SAT IN Here you can be connected to the 12-volt trigger input on a TV in Zone 2. Input and output jacks include S-Video, composite video, and analog audio. 12 J HDMI IN 1-6, OUT MAIN, and OUT SUB (TX-NR3007) HDMI IN 1-7, OUT...
..., or for listening to suit your Ethernet network (e.g., router or switch) for connecting an FM antenna. See "Digital Audio Input Setup" on another Onkyo AV component. N ZONE 2 OUT This composite video output can then be connected to control that component. The other AV component, even if they ... for connecting the AV receiver to your setup. X CBL/SAT IN Here you can be connected to the 12-volt trigger input on a TV in Zone 2. Input and output jacks include S-Video, composite video, and analog audio. 12 J HDMI IN 1-6, OUT MAIN, and OUT SUB (TX-NR3007) HDMI IN 1-7, OUT...
Owner Manual
Page 13
... antenna (North American models) This jack is for connection information. 13 Front & Rear Panels-Continued Z DVD/BD IN Here you want to use the AV receiver solely as a DVD player, DVD-Audio or Super Audio CD-capable player, or an MPEG decoder. Input jacks include S-Video, composite video, and analog audio...
... antenna (North American models) This jack is for connection information. 13 Front & Rear Panels-Continued Z DVD/BD IN Here you want to use the AV receiver solely as a DVD player, DVD-Audio or Super Audio CD-capable player, or an MPEG decoder. Input jacks include S-Video, composite video, and analog audio...

Owner Manual
Page 14
... remote controller will not work if there's an obstacle between it . • When you intend not to use it and the AV receiver's remote con- Remote Controller Installing the Batteries 1 To open the battery compartment, press the small lever and remove the cover. troller, because... without V connection, point the remote controller at the other component to operate an Onkyo component with the polarity diagram inside the battery compartment. 3 Replace the cover and push it at the AV receiver's remote con- trol sensor. Keep this in mind when installing. • If ...
... remote controller will not work if there's an obstacle between it . • When you intend not to use it and the AV receiver's remote con- Remote Controller Installing the Batteries 1 To open the battery compartment, press the small lever and remove the cover. troller, because... without V connection, point the remote controller at the other component to operate an Onkyo component with the polarity diagram inside the battery compartment. 3 Replace the cover and push it at the AV receiver's remote con- trol sensor. Keep this in mind when installing. • If ...
Owner Manual
Page 15
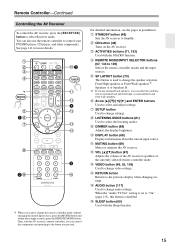
... [MODE] button and within about the current input source. L MUTING button (69) Mutes or unmutes the AV receiver. M VOL [R]/[X] button (67) Adjusts the volume of the AV receiver regardless of surround back and front high, or surround back and front wide speakers. F SP LAYOUT button (70... component corresponding to the button you want to change the speaker selection: Front High speakers or Front Wide speakers*2. Then, with the AV receiver's remote controller, you can select the combination of the currently selected remote controller mode. Speakers A or Speakers B. *2 If you use ...
... [MODE] button and within about the current input source. L MUTING button (69) Mutes or unmutes the AV receiver. M VOL [R]/[X] button (67) Adjusts the volume of the AV receiver regardless of surround back and front high, or surround back and front wide speakers. F SP LAYOUT button (70... component corresponding to the button you want to change the speaker selection: Front High speakers or Front Wide speakers*2. Then, with the AV receiver's remote controller, you can select the combination of the currently selected remote controller mode. Speakers A or Speakers B. *2 If you use ...

Owner Manual
Page 16
Also you can select AM or FM by pressing the [TUNER] button repeatedly. 1 Arrow [R]/[X] buttons Used to select radio stations directly in Receiver mode (see page 149). 16 button (74) Used to select radio presets. 5 Number buttons (73, 74) Used to tune into radio stations...frequency, preset number, and so on. 4 CH +/- Remote Controller-Continued ■ Controlling the tuner To control the AV receiver's tuner, press the [TUNER] (or [RECEIVER]) button. Note: An Onkyo cassette recorder connected via V can also be controlled in the Direct tuning mode. You can select a preset directly.
Also you can select AM or FM by pressing the [TUNER] button repeatedly. 1 Arrow [R]/[X] buttons Used to select radio stations directly in Receiver mode (see page 149). 16 button (74) Used to select radio presets. 5 Number buttons (73, 74) Used to tune into radio stations...frequency, preset number, and so on. 4 CH +/- Remote Controller-Continued ■ Controlling the tuner To control the AV receiver's tuner, press the [TUNER] (or [RECEIVER]) button. Note: An Onkyo cassette recorder connected via V can also be controlled in the Direct tuning mode. You can select a preset directly.

Owner Manual
Page 17
... left and right speakers, making sound movements distinct and providing a full sound image. About Home Theater Enjoying Home Theater Thanks to the AV receiver's superb capabilities, you can also enjoy THX Surround EX (THX-certified THX speaker system recommended). You can enjoy surround sound with good bass...wall position Surround back left and right speakers. With analog or digital TV, you can enjoy Dolby Pro Logic IIx, DTS Neo:6, or Onkyo's original DSP listening modes. Position them inward so as possible) and at the apex. Angle them well outside of the LFE (Low-...
... left and right speakers, making sound movements distinct and providing a full sound image. About Home Theater Enjoying Home Theater Thanks to the AV receiver's superb capabilities, you can also enjoy THX Surround EX (THX-certified THX speaker system recommended). You can enjoy surround sound with good bass...wall position Surround back left and right speakers. With analog or digital TV, you can enjoy Dolby Pro Logic IIx, DTS Neo:6, or Onkyo's original DSP listening modes. Position them inward so as possible) and at the apex. Angle them well outside of the LFE (Low-...

Owner Manual
Page 18
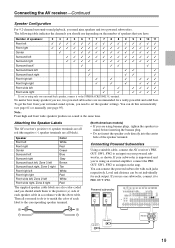
... Front Speakers In this example, Speakers A provides 7.2-channel surround sound for enjoying DVD movies, while Speakers B is used, the AV receiver can only be wired normally. See pages 22 to 7.2 speakers. Speaker Settings Speaker Impedance Speakers Type(FrontA) Speakers Type(FrontB) Powered ... by using the [SP LAYOUT] button on page 95. Connecting the AV receiver Connecting Your Speakers About Speakers A and Speakers B Speakers A and Speakers B allows you can configure the AV receiver to 5.2 speakers in the main room. Only one configuration can only be wired...
... Front Speakers In this example, Speakers A provides 7.2-channel surround sound for enjoying DVD movies, while Speakers B is used, the AV receiver can only be wired normally. See pages 22 to 7.2 speakers. Speaker Settings Speaker Impedance Speakers Type(FrontA) Speakers Type(FrontB) Powered ... by using the [SP LAYOUT] button on page 95. Connecting the AV receiver Connecting Your Speakers About Speakers A and Speakers B Speakers A and Speakers B allows you can configure the AV receiver to 5.2 speakers in the main room. Only one configuration can only be wired...
Owner Manual
Page 19
...Note: Front high and front wide speakers produce no sound at the same time. Connecting Powered Subwoofers Using a suitable cable, connect the AV receiver's PRE OUT: SW1, SW2 to an input on the amp. Level and distance can be set the speaker settings. If you use one ...respectively. No matter how many speakers you use depending on the number of each speaker cable in accordance with each output. Connecting the AV receiver-Continued Speaker Configuration For 9.2-channel surround-sound playback, you need to set individually for a really powerful and solid bass. You can connect ...
...Note: Front high and front wide speakers produce no sound at the same time. Connecting Powered Subwoofers Using a suitable cable, connect the AV receiver's PRE OUT: SW1, SW2 to an input on the amp. Level and distance can be set the speaker settings. If you use one ...respectively. No matter how many speakers you use depending on the number of each speaker cable in accordance with each output. Connecting the AV receiver-Continued Speaker Configuration For 9.2-channel surround-sound playback, you need to set individually for a really powerful and solid bass. You can connect ...
Owner Manual
Page 20
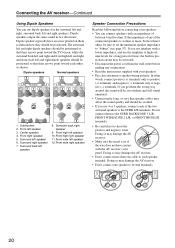
... the sound will be out of phase and will sound unnatural. • Unnecessarily long, or very thin speaker cables may damage the AV receiver. • Don't connect one cable to negative (-) terminals. Doing so may be activated. • Disconnect the power cord from the ... back left speaker 6. Front right speaker 5. Surround back right speaker 9. Surround right speaker 7. Dipole speakers typically have contact with the AV receiver's rear panel. Front left and right speakers. If you get them to the SURR L/R terminals. Dipole speakers output the same sound in ...
... the sound will be out of phase and will sound unnatural. • Unnecessarily long, or very thin speaker cables may damage the AV receiver. • Don't connect one cable to negative (-) terminals. Doing so may be activated. • Disconnect the power cord from the ... back left speaker 6. Front right speaker 5. Surround back right speaker 9. Surround right speaker 7. Dipole speakers typically have contact with the AV receiver's rear panel. Front left and right speakers. If you get them to the SURR L/R terminals. Dipole speakers output the same sound in ...

Owner Manual
Page 21
... speaker Front high left speaker Center speaker Surround right speaker Surround back right speaker Surround back left speaker Surround left speaker 21 Connecting the AV receiver-Continued Connecting the Speaker Cables 1 Strip 1/2" to 5/8" (12 to 15 mm) of insulation from the ends of the speaker cables, and twist the bare wires...
... speaker Front high left speaker Center speaker Surround right speaker Surround back right speaker Surround back left speaker Surround left speaker 21 Connecting the AV receiver-Continued Connecting the Speaker Cables 1 Strip 1/2" to 5/8" (12 to 15 mm) of insulation from the ends of the speaker cables, and twist the bare wires...
Owner Manual
Page 22
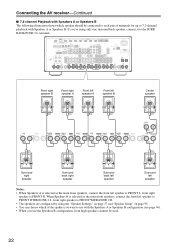
When Speakers B is selected as the main front speakers, connect the front left speaker to FRONT L, front right speaker to FRONT R. Connecting the AV receiver-Continued ■ 7.2-channel Playback with Speakers A or Speakers B The following illustration shows which of terminals for up to 7.2-channel playback with the Speakers A or Speakers B ...
When Speakers B is selected as the main front speakers, connect the front left speaker to FRONT L, front right speaker to FRONT R. Connecting the AV receiver-Continued ■ 7.2-channel Playback with Speakers A or Speakers B The following illustration shows which of terminals for up to 7.2-channel playback with the Speakers A or Speakers B ...
Owner Manual
Page 23
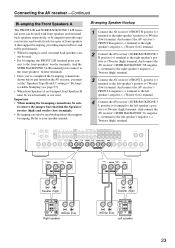
...amping the Front Speakers A The FRONT L/R and SURR BACK/ZONE 3 L/R terminal posts can - And connect the AV receiver's FRONT L negative (-) terminal to the left speaker's negative (-) Woofer (low) terminal. 4 Connect the AV receiver's SURR BACK/ZONE 3 L positive (+) terminal to enable biamping (see page 57). • When front Speakers A ... to the front speakers' tweeter terminals. • Once you've completed the bi-amping connections shown below and turned on the AV receiver, you must be used . not be wired normally or not used . • For bi-amping, the FRONT L/R terminal posts con-
...amping the Front Speakers A The FRONT L/R and SURR BACK/ZONE 3 L/R terminal posts can - And connect the AV receiver's FRONT L negative (-) terminal to the left speaker's negative (-) Woofer (low) terminal. 4 Connect the AV receiver's SURR BACK/ZONE 3 L positive (+) terminal to enable biamping (see page 57). • When front Speakers A ... to the front speakers' tweeter terminals. • Once you've completed the bi-amping connections shown below and turned on the AV receiver, you must be used . not be wired normally or not used . • For bi-amping, the FRONT L/R terminal posts con-


