

Owner Manual
Page 1
Artistry in Sound ONKYQ Audio Video Control Receiver TX-DS838 Instruction Manual = = 00 o 0 *O 1 I I I 1 I I OOO All models except European models c= 0 0 0O CO 0 0) I I I I I 000 European models CONTENTS Features 2 Important safeguards 3 Precautions 4 Supplied accessories 4 Before operating this unit 5 Control positions ... in the U.S. and other 34 Entering characters 36 Recording a source 37 Using TAPE-2 MONITOR 40 Selecting a Surround mode 42 Setting the Surround mode parameters 44 TX-DS838 parameters 46 Troubleshooting guide 47 Specifications 49
Artistry in Sound ONKYQ Audio Video Control Receiver TX-DS838 Instruction Manual = = 00 o 0 *O 1 I I I 1 I I OOO All models except European models c= 0 0 0O CO 0 0) I I I I I 000 European models CONTENTS Features 2 Important safeguards 3 Precautions 4 Supplied accessories 4 Before operating this unit 5 Control positions ... in the U.S. and other 34 Entering characters 36 Recording a source 37 Using TAPE-2 MONITOR 40 Selecting a Surround mode 42 Setting the Surround mode parameters 44 TX-DS838 parameters 46 Troubleshooting guide 47 Specifications 49
Owner Manual
Page 2
... from your new A/V Receiver. NOTE: • This equipment has been tested and found to comply with the limits for purchasing the Onkyo TX-DS838 Audio Video Control Receiver. ATTENTION: POUR NITER LES CHOCS ELECTRIQUES, INTRODUIRE LA LAME LA PLUS LARGE DE LA FICHE DANS LA BORNE CORRESPONDANTE...9632; 8 Pre Out jacks for a powered subwoofer and external amplifiers ■ Rec Out selector for future reference. Please retain this manual thoroughly before making connections and operating the unit. Declaration of the FCC Rules. and Canadian models are designed to the point of cable ...
... from your new A/V Receiver. NOTE: • This equipment has been tested and found to comply with the limits for purchasing the Onkyo TX-DS838 Audio Video Control Receiver. ATTENTION: POUR NITER LES CHOCS ELECTRIQUES, INTRODUIRE LA LAME LA PLUS LARGE DE LA FICHE DANS LA BORNE CORRESPONDANTE...9632; 8 Pre Out jacks for a powered subwoofer and external amplifiers ■ Rec Out selector for future reference. Please retain this manual thoroughly before making connections and operating the unit. Declaration of the FCC Rules. and Canadian models are designed to the point of cable ...
Owner Manual
Page 7
... MODE indicators C) REC OUT (record out) indicator C) Source indicators © MULTI SOURCE indicator 7 round mode. Turning it will light up . Even if the knob is manually turned to its highest possible setting. ERP to MULTI SOURCE button [22] © MEMORY button [32] n FM MUTE/MODE button [31] C) Display ® DIRECT TUNING...
... MODE indicators C) REC OUT (record out) indicator C) Source indicators © MULTI SOURCE indicator 7 round mode. Turning it will light up . Even if the knob is manually turned to its highest possible setting. ERP to MULTI SOURCE button [22] © MEMORY button [32] n FM MUTE/MODE button [31] C) Display ® DIRECT TUNING...
Owner Manual
Page 12
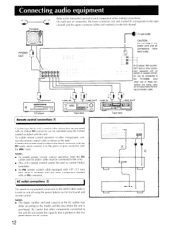
...the audio cables must be connected to the units. • This unit's remote control cannot be connected to the TX-DS838. Connecting audio equipment Refer to the instruction manual of each pair of connectors, the lower connector (red and marked R) corresponds to the right channel and the upper...outlet CAUTION: Do not plug in the power cord until all connections have been made. AC outlet connections [1] The power to components connected to control Onkyo turntables. • An RI remote control cable equipped with 1/8" (3.5 mm) mini jacks is printed on the front panel and remote control. C ...
...the audio cables must be connected to the units. • This unit's remote control cannot be connected to the TX-DS838. Connecting audio equipment Refer to the instruction manual of each pair of connectors, the lower connector (red and marked R) corresponds to the right channel and the upper...outlet CAUTION: Do not plug in the power cord until all connections have been made. AC outlet connections [1] The power to components connected to control Onkyo turntables. • An RI remote control cable equipped with 1/8" (3.5 mm) mini jacks is printed on the front panel and remote control. C ...
Owner Manual
Page 13
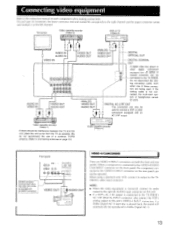
...recorder (Video-1) If there should be reproduced in Dolby Digital (AC-3). 13 If a Dolby Digital (AC-3) laser disc is connected to the TX-DS838's AC-3 RF DIGITAL INPUT connector, also connect the VDP's analog output to the TXDS838's video input connector. DIGITAL AC-3 RF OUT This connection... can be operated. Connecting video equipment Refer to the instruction manual of each pair of connectors, the lower connector (red and marked R) corresponds to the right channel and the upper connector (white and ...
...recorder (Video-1) If there should be reproduced in Dolby Digital (AC-3). 13 If a Dolby Digital (AC-3) laser disc is connected to the TX-DS838's AC-3 RF DIGITAL INPUT connector, also connect the VDP's analog output to the TXDS838's video input connector. DIGITAL AC-3 RF OUT This connection... can be operated. Connecting video equipment Refer to the instruction manual of each pair of connectors, the lower connector (red and marked R) corresponds to the right channel and the upper connector (white and ...

Owner Manual
Page 15
... much, so you can install it with a built-in the reproduction of the room and the wall coverings used in order to the speaker instruction manual for standard speaker placement. Surround: Place the left , right and center speakers should be placed at ear level. The manner in which the speakers are...
... much, so you can install it with a built-in the reproduction of the room and the wall coverings used in order to the speaker instruction manual for standard speaker placement. Surround: Place the left , right and center speakers should be placed at ear level. The manner in which the speakers are...

Owner Manual
Page 31
II TUNING FM, AM ;,010001\ El O 070, Oo o 0 0 GROUP TUNER 1 2 099 1 2 3 DIREC JNI 1 ASC DEP STU 0 10 FM MUTE OFF Manual tuning 1. Press either the FM or AM button on the main unit. While "-- --" flashes, enter the frequency using the -1 DOWN or UP IP- The TUNED ...
II TUNING FM, AM ;,010001\ El O 070, Oo o 0 0 GROUP TUNER 1 2 099 1 2 3 DIREC JNI 1 ASC DEP STU 0 10 FM MUTE OFF Manual tuning 1. Press either the FM or AM button on the main unit. While "-- --" flashes, enter the frequency using the -1 DOWN or UP IP- The TUNED ...
Owner Manual
Page 41
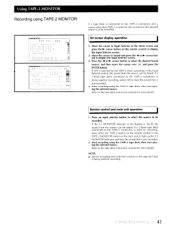
...sound that is just recorded. 2. Refer to be heard. Press an input selector button to select the source to the tape deck instruction manual for more details. Refer to display the Input Selector screen. 2. StAD7 ** ESC -1 PP S OFF (on the remote control to the tape... deck instruction manual for more details. Start recording using the TAPE-2 tape deck, then start playing the selected source. Start recording using TAPE-2 MONITOR: COM.TNE'SE...
...sound that is just recorded. 2. Refer to be heard. Press an input selector button to select the source to the tape deck instruction manual for more details. Refer to display the Input Selector screen. 2. StAD7 ** ESC -1 PP S OFF (on the remote control to the tape... deck instruction manual for more details. Start recording using the TAPE-2 tape deck, then start playing the selected source. Start recording using TAPE-2 MONITOR: COM.TNE'SE...

Owner Manual
Page 47
...of the other electrical equip- • Move the AM loop antenna to the respective instruction manuals of the outdoor antenna. high range is not • The pick-up • The ... Install an FM outdoor antenna as far as possible from the outlet. • Contact your Onkyo service center. Also refer to a different position. ONTrstoIntegra 47 Crackling noise on AM or FM .... • Adjust the position or direction antenna. Rough or scratchy sound; an extended period of the TX-DS838. • The AC fuse is blown. • Connect the power cord. • Turn the power...
...of the other electrical equip- • Move the AM loop antenna to the respective instruction manuals of the outdoor antenna. high range is not • The pick-up • The ... Install an FM outdoor antenna as far as possible from the outlet. • Contact your Onkyo service center. Also refer to a different position. ONTrstoIntegra 47 Crackling noise on AM or FM .... • Adjust the position or direction antenna. Rough or scratchy sound; an extended period of the TX-DS838. • The AC fuse is blown. • Connect the power cord. • Turn the power...

