Owner Manual
Page 1
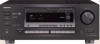
... 4 Supplied accessories 4 Before operating this manual for purchasing the Onkyo Audio Video Control Receiver. Please read this manual will enable you for future reference...a Macro function 54 Troubleshooting guide 58 Specifications 60 Control positions and names 62 A / V Receiver TX-DS777 TX-DS676 Instruction Manual STANDBY/ON STAND-BY POWER ON OFF...TX-DS777 Thank you to it 42 Other setup operations 43 Recording a source 44 Receiving RDS broadcasts (European models only 46 The initial settings 48 Appendix Using the remote controller 49 Programming the remote controller...
... 4 Supplied accessories 4 Before operating this manual for purchasing the Onkyo Audio Video Control Receiver. Please read this manual will enable you for future reference...a Macro function 54 Troubleshooting guide 58 Specifications 60 Control positions and names 62 A / V Receiver TX-DS777 TX-DS676 Instruction Manual STANDBY/ON STAND-BY POWER ON OFF...TX-DS777 Thank you to it 42 Other setup operations 43 Recording a source 44 Receiving RDS broadcasts (European models only 46 The initial settings 48 Appendix Using the remote controller 49 Programming the remote controller...
Owner Manual
Page 4
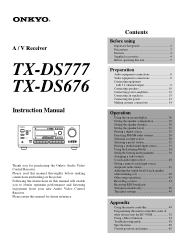
... display s Main-in jacks for front left & right channels (TX-DS777 only) s Pre outs for all channels s Banana-plug posts for all channels s Aluminum volume control s New user-friendly smart scan s New backlit learning remote with this unit. "Dolby", "Pro Logic" and the double-D...Select logo, which accurately translate film soundtracks for all channels s High-quality extruded heat sink s Oversized power transformer s (TX-DS777) 105 W x 5 (8 Ω 20 Hz-20 kHz 0.08% THD FTC) 135 W x 5 (6 Ω 1 kHz 0.1% THD FTC) s (TX-DS676) 85 W x 5 (8 Ω 20 Hz-20 kHz 0.08% THD FTC) 110 W x 5 (6 ...
... display s Main-in jacks for front left & right channels (TX-DS777 only) s Pre outs for all channels s Banana-plug posts for all channels s Aluminum volume control s New user-friendly smart scan s New backlit learning remote with this unit. "Dolby", "Pro Logic" and the double-D...Select logo, which accurately translate film soundtracks for all channels s High-quality extruded heat sink s Oversized power transformer s (TX-DS777) 105 W x 5 (8 Ω 20 Hz-20 kHz 0.08% THD FTC) 135 W x 5 (6 Ω 1 kHz 0.1% THD FTC) s (TX-DS676) 85 W x 5 (8 Ω 20 Hz-20 kHz 0.08% THD FTC) 110 W x 5 (6 ...
Owner Manual
Page 5
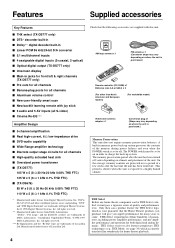
Before operating this switch to match the voltage of the remote controller may prevent proper remote controller operation. • If there is about six months but tons of the power supply in your area. TX-DS777 TAPE V S IN (PLAY) R L VIDEO S VIDEO OSD SELECTOR 9 kHz 10 kHz AM FREQUENCY STEP SURROUND SPEAKERS FRONT SPEAKERS A R L R L CENTER SPEAKER CAUTION...
Before operating this switch to match the voltage of the remote controller may prevent proper remote controller operation. • If there is about six months but tons of the power supply in your area. TX-DS777 TAPE V S IN (PLAY) R L VIDEO S VIDEO OSD SELECTOR 9 kHz 10 kHz AM FREQUENCY STEP SURROUND SPEAKERS FRONT SPEAKERS A R L R L CENTER SPEAKER CAUTION...
Owner Manual
Page 6
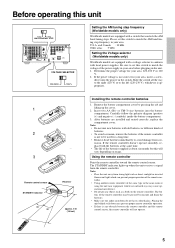
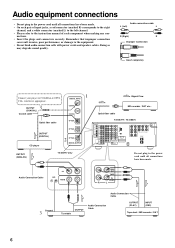
Doing so may degrade sound quality. Optial fiber cable TX-DS777 / TX-DS676 DIGITAL INPUT R AMP IN COAXIAL 1 COAXIAL 2 OPTICAL 1 FRONT PRE OUT FRONT SUB WOOFER CENTER OPTICAL 2 SURROUND FRONT OPTICAL DIGITAL OUTPUT SUB WOOFER CENTER ...right channel, and a white connector (marked L) to the left channel. • Please refer to the instruction manual of each component when making any con- W REMOTE CONTROL Do not plug in the power cord until all connections have been made . OUTPUT (COAXIAL) Coaxial cable Optial fiber cable 1 DIGITAL INPUT COAXIAL 1 COAXIAL 2 OPTICAL...
Doing so may degrade sound quality. Optial fiber cable TX-DS777 / TX-DS676 DIGITAL INPUT R AMP IN COAXIAL 1 COAXIAL 2 OPTICAL 1 FRONT PRE OUT FRONT SUB WOOFER CENTER OPTICAL 2 SURROUND FRONT OPTICAL DIGITAL OUTPUT SUB WOOFER CENTER ...right channel, and a white connector (marked L) to the left channel. • Please refer to the instruction manual of each component when making any con- W REMOTE CONTROL Do not plug in the power cord until all connections have been made . OUTPUT (COAXIAL) Coaxial cable Optial fiber cable 1 DIGITAL INPUT COAXIAL 1 COAXIAL 2 OPTICAL...

Owner Manual
Page 7
...from another audio device to connect CD players, MD recorders, DAT decks, etc. OPTICAL DIGITAL OUTPUT connector (TX-DS777 only) If you can use the remote controller of Onkyo turntables. • If the connecting device has two z connectors lined-up vertically or horizontally, you can...to control a Onkyo DVD player or MD recorder that is printed on the unit are analog signals only. • The digital inputs, COAXIAL 1, 2 and OPTICAL 1, 2can be sure to replace them . If so, do not connect any ground wire. REMOTE CONTROL Worldwide and European models U.S.A. TX-DS777/TX-DS676 ...
...from another audio device to connect CD players, MD recorders, DAT decks, etc. OPTICAL DIGITAL OUTPUT connector (TX-DS777 only) If you can use the remote controller of Onkyo turntables. • If the connecting device has two z connectors lined-up vertically or horizontally, you can...to control a Onkyo DVD player or MD recorder that is printed on the unit are analog signals only. • The digital inputs, COAXIAL 1, 2 and OPTICAL 1, 2can be sure to replace them . If so, do not connect any ground wire. REMOTE CONTROL Worldwide and European models U.S.A. TX-DS777/TX-DS676 ...
Owner Manual
Page 8
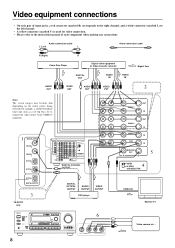
REMOTE CONTROL DIGITAL COAXIAL OUTPUT DIGITAL OPTICAL ... left channel. • A yellow connector (marked V) is used for example, a satellite-broadcast tuner unit such as a set-top box). TX-DS777 IN (PLAY) R L VIDEO S VIDEO OSD SELECTOR SURROUND SPEAKERS FRONT SPEAKERS A R L R L CENTER SPEAKER CAUTION: SPEAKER IMPEDANCE 6...60Hz SWITCHED TOTAL 120W 1A MAX. R L 1 DIGITAL INPUT COAXIAL 1 COAXIAL 2 OPTICAL 1 OPTICAL 2 OPTICAL DIGITAL OUTPUT 3 TX-DS777 only DIGITAL INPUT R AMP IN COAXIAL 1 COAXIAL 2 OPTICAL 1 FRONT PRE OUT FRONT SUB WOOFER CENTER OPTICAL 2 SURROUND ...
REMOTE CONTROL DIGITAL COAXIAL OUTPUT DIGITAL OPTICAL ... left channel. • A yellow connector (marked V) is used for example, a satellite-broadcast tuner unit such as a set-top box). TX-DS777 IN (PLAY) R L VIDEO S VIDEO OSD SELECTOR SURROUND SPEAKERS FRONT SPEAKERS A R L R L CENTER SPEAKER CAUTION: SPEAKER IMPEDANCE 6...60Hz SWITCHED TOTAL 120W 1A MAX. R L 1 DIGITAL INPUT COAXIAL 1 COAXIAL 2 OPTICAL 1 OPTICAL 2 OPTICAL DIGITAL OUTPUT 3 TX-DS777 only DIGITAL INPUT R AMP IN COAXIAL 1 COAXIAL 2 OPTICAL 1 FRONT PRE OUT FRONT SUB WOOFER CENTER OPTICAL 2 SURROUND ...
Owner Manual
Page 9
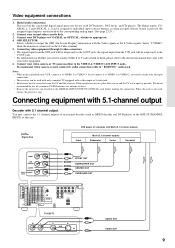
...whether to the VIDEO-4 / VIDEO CAM INPUT jacks. Select "S VIDEO" when the monitor is used instead of them, please refer to " R(MONO)" audio jack. TX-DS777 IN (PLAY) R L VIDEO S VIDEO OSD SELECTOR SURROUND SPEAKERS FRONT SPEAKERS A R L R L CENTER SPEAKER CAUTION: SPEAKER IMPEDANCE 6 OHMS MIN. /...occurs, place the receiver and the TV as far apart as possible. Connect your DVD player to VIDEO 3 or VIDEO 4. When this receiver. REMOTE CONTROL TX-DS777 R L V S DVD IN AUDIO OUT VIDEO OUT 9 Video equipment connections 1. Notes: • When using a playback-only VCR, ...
...whether to the VIDEO-4 / VIDEO CAM INPUT jacks. Select "S VIDEO" when the monitor is used instead of them, please refer to " R(MONO)" audio jack. TX-DS777 IN (PLAY) R L VIDEO S VIDEO OSD SELECTOR SURROUND SPEAKERS FRONT SPEAKERS A R L R L CENTER SPEAKER CAUTION: SPEAKER IMPEDANCE 6 OHMS MIN. /...occurs, place the receiver and the TV as far apart as possible. Connect your DVD player to VIDEO 3 or VIDEO 4. When this receiver. REMOTE CONTROL TX-DS777 R L V S DVD IN AUDIO OUT VIDEO OUT 9 Video equipment connections 1. Notes: • When using a playback-only VCR, ...

Owner Manual
Page 11
Please check the following information and choose speakers with impedances within the specified ranges are connected. Screw No! Unscrew 3. TX-DS777 IN (PLAY) R L VIDEO S VIDEO OSD SELECTOR SURROUND SPEAKERS FRONT SPEAKERS A R L R L CENTER SPEAKER CAUTION: SPEAKER IMPEDANCE 6... ohms min./speaker 6 ohms min./speaker 6 ohms min. Note: To prevent damage to both the right and left channel terminals simultaneously. 2. REMOTE CONTROL TX-DS777/TX-DS676 Front SpeakerA L ch. Twist wire ends very tight. 15mm No! +- -+ RL +- -+ RL • When you use only one ...
Please check the following information and choose speakers with impedances within the specified ranges are connected. Screw No! Unscrew 3. TX-DS777 IN (PLAY) R L VIDEO S VIDEO OSD SELECTOR SURROUND SPEAKERS FRONT SPEAKERS A R L R L CENTER SPEAKER CAUTION: SPEAKER IMPEDANCE 6... ohms min./speaker 6 ohms min./speaker 6 ohms min. Note: To prevent damage to both the right and left channel terminals simultaneously. 2. REMOTE CONTROL TX-DS777/TX-DS676 Front SpeakerA L ch. Twist wire ends very tight. 15mm No! +- -+ RL +- -+ RL • When you use only one ...
Owner Manual
Page 12
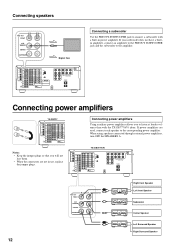
... will not lose them. • When the connectors are used, connect each speaker to connect a subwoofer with the TX-DS777/676 alone. REMOTE CONTROL R L PRE OUT FRONT SUB WOOFER CENTER SURROUND Right front Speaker Left front Speaker Subwoofer Center Speaker 12 Left Surround ...Speaker Right Surround Speaker TX-DS777/676 DIGITAL INPUT COAXIAL 1 COAXIAL 2 OPTICAL 1 PRE OUT FRONT SUB WOOFER CENTER OPTICAL 2 SURROUND FRONT...
... will not lose them. • When the connectors are used, connect each speaker to connect a subwoofer with the TX-DS777/676 alone. REMOTE CONTROL R L PRE OUT FRONT SUB WOOFER CENTER SURROUND Right front Speaker Left front Speaker Subwoofer Center Speaker 12 Left Surround ...Speaker Right Surround Speaker TX-DS777/676 DIGITAL INPUT COAXIAL 1 COAXIAL 2 OPTICAL 1 PRE OUT FRONT SUB WOOFER CENTER OPTICAL 2 SURROUND FRONT...
Owner Manual
Page 13
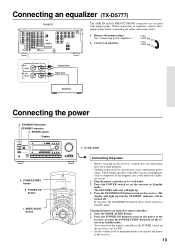
... VIDEO L AUDIO R(MONO) AV RECEIVER TX-DS777 2. MODE AUDIO button 1. Turning the power on the receiver. When connecting an equalizer, remove these jumper plugs before you press the STANDBY/ON button, the receiver returns to Standby mode. POWER ON button 1. If you turn on from the remote controller: 1. The STANDBY indicator will light...
... VIDEO L AUDIO R(MONO) AV RECEIVER TX-DS777 2. MODE AUDIO button 1. Turning the power on the receiver. When connecting an equalizer, remove these jumper plugs before you press the STANDBY/ON button, the receiver returns to Standby mode. POWER ON button 1. If you turn on from the remote controller: 1. The STANDBY indicator will light...
Owner Manual
Page 16
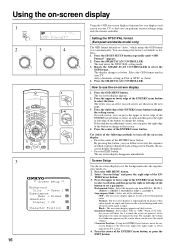
...Black : The on-screen display appears on the next page. 3. You can change this button, you can perform various settings using only the remote controller. Press the SP/SYS SETUP button repeatedly until "OSD Format?" appears. 2. Select the OSD format used in which means the OSD format is ...setting. Select "Screen Setup" and press the right edge of the ENTER/Cursor button. Press the center of the EN- Rotate the SMART SCAN CONTROLLER to use the on the selected background color. Using the on-screen display 1 SP/SYS SETUP SPEAKERS A TUNED AUTO 2 PRESET/MODE ADJ 3...
...Black : The on-screen display appears on the next page. 3. You can change this button, you can perform various settings using only the remote controller. Press the SP/SYS SETUP button repeatedly until "OSD Format?" appears. 2. Select the OSD format used in which means the OSD format is ...setting. Select "Screen Setup" and press the right edge of the ENTER/Cursor button. Press the center of the EN- Rotate the SMART SCAN CONTROLLER to use the on the selected background color. Using the on-screen display 1 SP/SYS SETUP SPEAKERS A TUNED AUTO 2 PRESET/MODE ADJ 3...
Owner Manual
Page 21
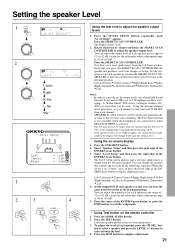
..., except for the subwoofer whose adjustment range is -30 to +10 dB. Set the output level of each speaker by rotating the SMART SCAN CONTROLLER so that you read 75 dB SPL from the speaker that has been set each channel. • SPEAKER B, when selected, will change the...adjust the speaker output level. Each time you raise the volume level. • Using the on the remote controller 1. To adjust the level of test tone at the listening position. Press the SMART SCAN CONTROLLER. A Radio Shack® SPL meter (catalogue number 3302055) or equivalent can hear the same level ...
..., except for the subwoofer whose adjustment range is -30 to +10 dB. Set the output level of each speaker by rotating the SMART SCAN CONTROLLER so that you read 75 dB SPL from the speaker that has been set each channel. • SPEAKER B, when selected, will change the...adjust the speaker output level. Each time you raise the volume level. • Using the on the remote controller 1. To adjust the level of test tone at the listening position. Press the SMART SCAN CONTROLLER. A Radio Shack® SPL meter (catalogue number 3302055) or equivalent can hear the same level ...
Owner Manual
Page 27
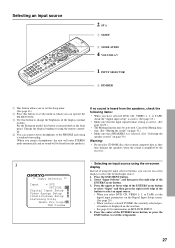
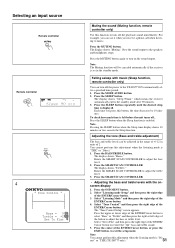
..., this button to select an input source. • When you select DVD, CD, VIDEO 1- 3, or TAPE, set the mode in which you can operate the TX-DS777/676. 3 Use this button is correct. (See page 28,29.) • The Muting function may damage the speakers when the sound is displayed on... ** Input = DVD OPTICAL 1 Digital Input Setup Video Assign Setup IntelliVolume Setup Listening Dolby Mode= Pro Logic THX Cinema • Selecting an input source using the remote controller. 4 You can use on the front panel.
..., this button to select an input source. • When you select DVD, CD, VIDEO 1- 3, or TAPE, set the mode in which you can operate the TX-DS777/676. 3 Use this button is correct. (See page 28,29.) • The Muting function may damage the speakers when the sound is displayed on... ** Input = DVD OPTICAL 1 Digital Input Setup Video Assign Setup IntelliVolume Setup Listening Dolby Mode= Pro Logic THX Cinema • Selecting an input source using the remote controller. 4 You can use on the front panel.
Owner Manual
Page 31
... the power to the TX-DS777/676 automatically after 90 minutes. 3. Press the MUTING button again to turn off the playback sound immediately. Select "Listening mode Setup" and then press the right edge of the button to adjust the bass or treble level. Selecting an input source Remote controller Remote controller SPEAKERS A SLEEP STEREO AUTO...
... the power to the TX-DS777/676 automatically after 90 minutes. 3. Press the MUTING button again to turn off the playback sound immediately. Select "Listening mode Setup" and then press the right edge of the button to adjust the bass or treble level. Selecting an input source Remote controller Remote controller SPEAKERS A SLEEP STEREO AUTO...
Owner Manual
Page 33
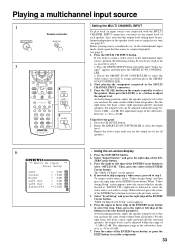
...Input ** Level Setup Left Center Right Left Sur Left Sur Subwoofer = 0dB = +5dB = 0dB = 0dB = 0dB =+10dB • Using the on the remote controller to step 5. Select "Level Setup" and press the right edge of the EN- Also, note that you can be adjusted within the range of the.... Press the upper or lower edge of the ENTER/ Cursor button. TER/Cursor button. 3. Playing a multichannel input source 1 MULTI CH INPUT Remote controller 3 3 3 Setting the MULTI CHANNEL INPUT To play back an input source you connected with the MULTI CHANNEL INPUT connectors, you must be performed...
...Input ** Level Setup Left Center Right Left Sur Left Sur Subwoofer = 0dB = +5dB = 0dB = 0dB = 0dB =+10dB • Using the on the remote controller to step 5. Select "Level Setup" and press the right edge of the EN- Also, note that you can be adjusted within the range of the.... Press the upper or lower edge of the ENTER/ Cursor button. TER/Cursor button. 3. Playing a multichannel input source 1 MULTI CH INPUT Remote controller 3 3 3 Setting the MULTI CHANNEL INPUT To play back an input source you connected with the MULTI CHANNEL INPUT connectors, you must be performed...
Owner Manual
Page 35
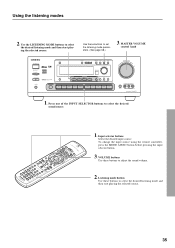
... VIDEO-3 VIDEO-4 TAPE FM AM PHONO C D DOWN MASTER VOLUME UP VIDEO 4/VIDEO CAM INPUT S VIDEO VIDEO L AUDIO R(MONO) AV RECEIVER TX-DS777 1. Press one of the INPUT SELECTOR buttons to adjust the sound volume. 2. Listening mode button Use these buttons to set the listening mode... the selected source. 35 VOLUME buttons Use these buttons to select the desired sound source. 1. To change the input source using the remote controller, press the MODE AUDIO button before pressing the input selector button. 3. Using the listening modes 2. ing the selected source. Use the...
... VIDEO-3 VIDEO-4 TAPE FM AM PHONO C D DOWN MASTER VOLUME UP VIDEO 4/VIDEO CAM INPUT S VIDEO VIDEO L AUDIO R(MONO) AV RECEIVER TX-DS777 1. Press one of the INPUT SELECTOR buttons to adjust the sound volume. 2. Listening mode button Use these buttons to set the listening mode... the selected source. 35 VOLUME buttons Use these buttons to select the desired sound source. 1. To change the input source using the remote controller, press the MODE AUDIO button before pressing the input selector button. 3. Using the listening modes 2. ing the selected source. Use the...
Owner Manual
Page 42
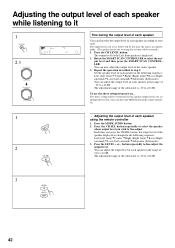
... set as below will be lost once the unit is in stand-by the speaker output levels you set using the remote controller 1. put level and then press the SMART SCAN CONTROL- You can adjust the output level of each speaker in the range of - 12 to +12 dB. The above ...setting from now on the remote controller. 1 • Adjusting the output level of each speaker using the test tone will be restored.) db 1. button repeatedly to select the out- Rotate the SMART SCAN CONTROLLER to fine-adjust the 2 output level. Press the CH SEL button ...
... set as below will be lost once the unit is in stand-by the speaker output levels you set using the remote controller 1. put level and then press the SMART SCAN CONTROL- You can adjust the output level of each speaker in the range of - 12 to +12 dB. The above ...setting from now on the remote controller. 1 • Adjusting the output level of each speaker using the test tone will be restored.) db 1. button repeatedly to select the out- Rotate the SMART SCAN CONTROLLER to fine-adjust the 2 output level. Press the CH SEL button ...
Owner Manual
Page 49
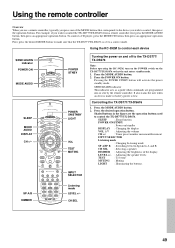
... POWER ON/STNBY : Power on and off to control the TX-DS777/TX-DS676. Press the desired operation button. CH SEL 49 INPUT SELECTOR SP A/B DIMMER Listening mode LEVEL +/- Using the remote controller Overview When you use a remote controller, typically you press one of the display LEVEL ... speaker levels TEST : Test tone MUTING : Muting LIGHT : Illuminating the buttons. Using the RC-392M to control the TX-DS777/TX-DS676 from a remote controller, first press the MODE AUDIO button, then press an appropriate operation button. SEND/LEARN indicator This indicator acts ...
... POWER ON/STNBY : Power on and off to control the TX-DS777/TX-DS676. Press the desired operation button. CH SEL 49 INPUT SELECTOR SP A/B DIMMER Listening mode LEVEL +/- Using the remote controller Overview When you use a remote controller, typically you press one of the display LEVEL ... speaker levels TEST : Test tone MUTING : Muting LIGHT : Illuminating the buttons. Using the RC-392M to control the TX-DS777/TX-DS676 from a remote controller, first press the MODE AUDIO button, then press an appropriate operation button. SEND/LEARN indicator This indicator acts ...
Owner Manual
Page 50
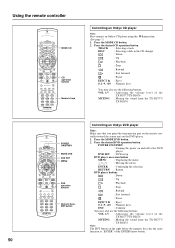
... button. Press the desired DVD operation button. troller toward the sensor area on the remote con- Using the remote controller MODE CD CD operation buttons Numeric keys Controlling an Onkyo CD player Note: First connect an Onkyo CD player using the zconnection. (See page 7.) 1. POWER ON/STNBY : Turning...keys has the same function as "ENTER" of the TX-DS777/TX-DS676 MUTING : Muting the sound from the TX-DS777/ TX-DS676 POWER ON/STNBY MODE DVD DVD SET MENU DVD operation buttons Numeric keys, ENT button Controlling an Onkyo DVD player Note: Make sure that you point the ...
... button. Press the desired DVD operation button. troller toward the sensor area on the remote con- Using the remote controller MODE CD CD operation buttons Numeric keys Controlling an Onkyo CD player Note: First connect an Onkyo CD player using the zconnection. (See page 7.) 1. POWER ON/STNBY : Turning...keys has the same function as "ENTER" of the TX-DS777/TX-DS676 MUTING : Muting the sound from the TX-DS777/ TX-DS676 POWER ON/STNBY MODE DVD DVD SET MENU DVD operation buttons Numeric keys, ENT button Controlling an Onkyo DVD player Note: Make sure that you point the ...
Owner Manual
Page 51
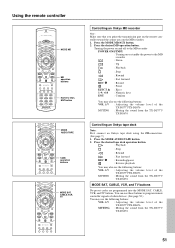
... use the following buttons: VOL ∆/∇ : Adjusting the volume level of the TX-DS777/TX-DS676 MUTING : Muting the sound from the TX-DS777/ TX-DS676 Controlling an Onkyo tape deck Note: First connect an Onkyo tape deck using the zconnection. (See page 7.) 1. Using the remote controller MODE MD MD operation buttons Numeric keys, ENT button MODE AUDIO/TAPE TAPE...
... use the following buttons: VOL ∆/∇ : Adjusting the volume level of the TX-DS777/TX-DS676 MUTING : Muting the sound from the TX-DS777/ TX-DS676 Controlling an Onkyo tape deck Note: First connect an Onkyo tape deck using the zconnection. (See page 7.) 1. Using the remote controller MODE MD MD operation buttons Numeric keys, ENT button MODE AUDIO/TAPE TAPE...


