Owner Manual
Page 1
... an equalizer 13 Connecting the power 13 Making antenna connections 14 Operation Using the on the power. A / V Receiver TX-DS777 TX-DS676 Instruction Manual STANDBY/ON STAND-BY POWER ON OFF A SPEAKERS B PHONES DIMMER FM MUTE/ MODE DOWN TUNING UP CHARACTER/...48 Appendix Using the remote controller 49 Programming the remote controller codes of each speaker while listening to obtain optimum performance and listening enjoyment from your new Audio Video Control Receiver. Following the instructions in this manual for purchasing the Onkyo Audio Video Control Receiver. Contents Before...
... an equalizer 13 Connecting the power 13 Making antenna connections 14 Operation Using the on the power. A / V Receiver TX-DS777 TX-DS676 Instruction Manual STANDBY/ON STAND-BY POWER ON OFF A SPEAKERS B PHONES DIMMER FM MUTE/ MODE DOWN TUNING UP CHARACTER/...48 Appendix Using the remote controller 49 Programming the remote controller codes of each speaker while listening to obtain optimum performance and listening enjoyment from your new Audio Video Control Receiver. Following the instructions in this manual for purchasing the Onkyo Audio Video Control Receiver. Contents Before...
Owner Manual
Page 4
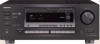
...amplifier technology s Discrete output stage circuits for all channels s High-quality extruded heat sink s Oversized power transformer s (TX-DS777) 105 W x 5 (8 Ω 20 Hz-20 kHz 0.08% THD FTC) 135 W x 5 (6 Ω 1 kHz 0.1% THD FTC) s (TX-DS676) 85 W x 5 (8 Ω 20 Hz-20 kHz 0.08% THD FTC) 110 W x 5 (6 ... s Main-in jacks for front left & right channels (TX-DS777 only) s Pre outs for all channels s Banana-plug posts for all channels s Aluminum volume control s New user-friendly smart scan s New backlit learning remote with this unit. All rights reserved. ** Manufactured under license...
...amplifier technology s Discrete output stage circuits for all channels s High-quality extruded heat sink s Oversized power transformer s (TX-DS777) 105 W x 5 (8 Ω 20 Hz-20 kHz 0.08% THD FTC) 135 W x 5 (6 Ω 1 kHz 0.1% THD FTC) s (TX-DS676) 85 W x 5 (8 Ω 20 Hz-20 kHz 0.08% THD FTC) 110 W x 5 (6 ... s Main-in jacks for front left & right channels (TX-DS777 only) s Pre outs for all channels s Banana-plug posts for all channels s Aluminum volume control s New user-friendly smart scan s New backlit learning remote with this unit. All rights reserved. ** Manufactured under license...
Owner Manual
Page 5
... DVD IN (REC) OUT MONITOR OUT AV RECEIVER MODEL NO. TX-DS777 TAPE V S IN (PLAY) R L VIDEO S VIDEO OSD SELECTOR 9 kHz 10 kHz AM FREQUENCY STEP SURROUND SPEAKERS FRONT SPEAKERS A R L R L CENTER SPEAKER CAUTION: SPEAKER IMPEDANCE 6 OHMS MIN. / SPEAKER R L FRONT SPEAKERS B VOLTAGE SELECTOR REMOTE CONTROL 220-230V 120V AC OUTLETS AC 230V 50Hz SWITCHED TOTAL...
... DVD IN (REC) OUT MONITOR OUT AV RECEIVER MODEL NO. TX-DS777 TAPE V S IN (PLAY) R L VIDEO S VIDEO OSD SELECTOR 9 kHz 10 kHz AM FREQUENCY STEP SURROUND SPEAKERS FRONT SPEAKERS A R L R L CENTER SPEAKER CAUTION: SPEAKER IMPEDANCE 6 OHMS MIN. / SPEAKER R L FRONT SPEAKERS B VOLTAGE SELECTOR REMOTE CONTROL 220-230V 120V AC OUTLETS AC 230V 50Hz SWITCHED TOTAL...
Owner Manual
Page 6
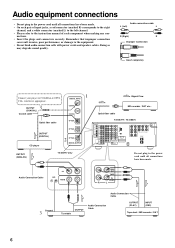
...R Improper Connection Insert completely Connect your player to the equipment. • Do not bind audio connection calls with power cords and speaker cables. W REMOTE CONTROL Do not plug in the power cord until all connections have been made . Audio Connection Cable CD GND PHONO R L (REC) OUT TAPE IN... to the left channel. • Please refer to the instruction manual of each component when making any con- Optial fiber cable TX-DS777 / TX-DS676 DIGITAL INPUT R AMP IN COAXIAL 1 COAXIAL 2 OPTICAL 1 FRONT PRE OUT FRONT SUB WOOFER CENTER OPTICAL 2 SURROUND FRONT OPTICAL ...
...R Improper Connection Insert completely Connect your player to the equipment. • Do not bind audio connection calls with power cords and speaker cables. W REMOTE CONTROL Do not plug in the power cord until all connections have been made . Audio Connection Cable CD GND PHONO R L (REC) OUT TAPE IN... to the left channel. • Please refer to the instruction manual of each component when making any con- Optial fiber cable TX-DS777 / TX-DS676 DIGITAL INPUT R AMP IN COAXIAL 1 COAXIAL 2 OPTICAL 1 FRONT PRE OUT FRONT SUB WOOFER CENTER OPTICAL 2 SURROUND FRONT OPTICAL ...

Owner Manual
Page 7
... IN VIDEO-2 VIDEO-3 OUT IN IN ANTENNA AM FM 75 DVD IN (REC) OUT MONITOR OUT AV RECEIVER MODEL NO. REMOTE CONTROL Worldwide and European models U.S.A. TX-DS777/TX-DS676 DIGITAL INPUT R AMP IN COAXIAL 1 COAXIAL 2 OPTICAL 1 FRONT PRE OUT FRONT SUB WOOFER CENTER OPTICAL 2 SURROUND FRONT OPTICAL...Compact Disc Recorder), connect the recorder's digital input connector to control a Onkyo DVD player or MD recorder that has an z connector. • Remote control operation is not possible if only the remote control cable is not connected via the audio connection cables. Turntable ...
... IN VIDEO-2 VIDEO-3 OUT IN IN ANTENNA AM FM 75 DVD IN (REC) OUT MONITOR OUT AV RECEIVER MODEL NO. REMOTE CONTROL Worldwide and European models U.S.A. TX-DS777/TX-DS676 DIGITAL INPUT R AMP IN COAXIAL 1 COAXIAL 2 OPTICAL 1 FRONT PRE OUT FRONT SUB WOOFER CENTER OPTICAL 2 SURROUND FRONT OPTICAL...Compact Disc Recorder), connect the recorder's digital input connector to control a Onkyo DVD player or MD recorder that has an z connector. • Remote control operation is not possible if only the remote control cable is not connected via the audio connection cables. Turntable ...
Owner Manual
Page 8
... RECEIVER MODEL NO. TX-DS777 IN (PLAY) R L VIDEO S VIDEO OSD SELECTOR SURROUND SPEAKERS FRONT SPEAKERS A R L R L CENTER SPEAKER CAUTION: SPEAKER IMPEDANCE 6 OHMS MIN. / SPEAKER R L FRONT SPEAKERS B AC OUTLETS AC 120V 60Hz SWITCHED TOTAL 120W 1A MAX. REMOTE CONTROL DIGITAL COAXIAL OUTPUT DIGITAL... VIDEO-2 VIDEO-3 VIDEO-4 TAPE FM AM PHONO C D DOWN MASTER VOLUME UP VIDEO 4/VIDEO CAM INPUT S VIDEO VIDEO L AUDIO R(MONO) AV RECEIVER TX-DS777 8 6 VIDEO 4/VIDEO CAM INPUT S VIDEO VIDEO L AUDIO R(MONO) V S OUT VIDEO-1 IN VIDEO-2 VIDEO-3 DVD OUT IN IN IN ...
... RECEIVER MODEL NO. TX-DS777 IN (PLAY) R L VIDEO S VIDEO OSD SELECTOR SURROUND SPEAKERS FRONT SPEAKERS A R L R L CENTER SPEAKER CAUTION: SPEAKER IMPEDANCE 6 OHMS MIN. / SPEAKER R L FRONT SPEAKERS B AC OUTLETS AC 120V 60Hz SWITCHED TOTAL 120W 1A MAX. REMOTE CONTROL DIGITAL COAXIAL OUTPUT DIGITAL... VIDEO-2 VIDEO-3 VIDEO-4 TAPE FM AM PHONO C D DOWN MASTER VOLUME UP VIDEO 4/VIDEO CAM INPUT S VIDEO VIDEO L AUDIO R(MONO) AV RECEIVER TX-DS777 8 6 VIDEO 4/VIDEO CAM INPUT S VIDEO VIDEO L AUDIO R(MONO) V S OUT VIDEO-1 IN VIDEO-2 VIDEO-3 DVD OUT IN IN IN ...
Owner Manual
Page 9
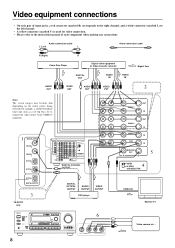
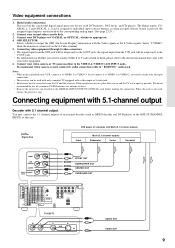
...the signals input from the S IN jack will be used , connect its audio connection cable to the VIDEO-4 / VIDEO CAM INPUT jacks. REMOTE CONTROL TX-DS777 R L V S DVD IN AUDIO OUT VIDEO OUT 9 Connect your second video cassette deck. 3. If a momaural video camera is ... OSD (On-Screen Display) information with 5.1 channel output You may connect the 5.1 channel outputs of the corresponding analog input. (See page 23,29.) 2. TX-DS777 IN (PLAY) R L VIDEO S VIDEO OSD SELECTOR SURROUND SPEAKERS FRONT SPEAKERS A R L R L CENTER SPEAKER CAUTION: SPEAKER IMPEDANCE 6 OHMS MIN....
...the signals input from the S IN jack will be used , connect its audio connection cable to the VIDEO-4 / VIDEO CAM INPUT jacks. REMOTE CONTROL TX-DS777 R L V S DVD IN AUDIO OUT VIDEO OUT 9 Connect your second video cassette deck. 3. If a momaural video camera is ... OSD (On-Screen Display) information with 5.1 channel output You may connect the 5.1 channel outputs of the corresponding analog input. (See page 23,29.) 2. TX-DS777 IN (PLAY) R L VIDEO S VIDEO OSD SELECTOR SURROUND SPEAKERS FRONT SPEAKERS A R L R L CENTER SPEAKER CAUTION: SPEAKER IMPEDANCE 6 OHMS MIN....

Owner Manual
Page 11
...sound, a single speaker should never be connected in parallel to produce optimum sound quality when speakers with appropriate impedances for the connections. TX-DS777 IN (PLAY) R L VIDEO S VIDEO OSD SELECTOR SURROUND SPEAKERS FRONT SPEAKERS A R L R L CENTER SPEAKER CAUTION: ...RECEIVER MODEL NO. Unscrew 3. Please check the following information and choose speakers with impedances within the specified ranges are connected. REMOTE CONTROL TX-DS777/TX-DS676 Front SpeakerA L ch. FRONTSPEAKERS: SURROUNDSPEAKERS: CENTERSPEAKER: A or B: 6 ohms min./speaker 6 ohms min./speaker 6 ...
...sound, a single speaker should never be connected in parallel to produce optimum sound quality when speakers with appropriate impedances for the connections. TX-DS777 IN (PLAY) R L VIDEO S VIDEO OSD SELECTOR SURROUND SPEAKERS FRONT SPEAKERS A R L R L CENTER SPEAKER CAUTION: ...RECEIVER MODEL NO. Unscrew 3. Please check the following information and choose speakers with impedances within the specified ranges are connected. REMOTE CONTROL TX-DS777/TX-DS676 Front SpeakerA L ch. FRONTSPEAKERS: SURROUNDSPEAKERS: CENTERSPEAKER: A or B: 6 ohms min./speaker 6 ohms min./speaker 6 ...
Owner Manual
Page 12
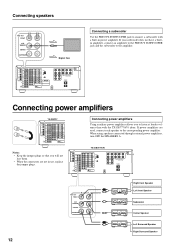
... SPEAKER CAUTION: SPEAKER IMPEDANCE 6 OHMS MIN. / SPEAKER R L FRONT SPEAKERS B AC OUTLETS AC 120V 60Hz SWITCHED TOTAL 120W 1A MAX. TX-DS777/676 DIGITAL INPUT COAXIAL 1 COAXIAL 2 OPTICAL 1 PRE OUT FRONT SUB WOOFER CENTER OPTICAL 2 SURROUND FRONT SUB WOOFER CENTER SURROUND MULTI CHANNEL...SPEAKER CAUTION: SPEAKER IMPEDANCE 6 OHMS MIN. / SPEAKER R L FRONT SPEAKERS B AC OUTLETS AC 120V 60Hz SWITCHED TOTAL 120W 1A MAX. REMOTE CONTROL Connecting a subwoofer Use the PREOUT SUBWOOFER jack to listen at louder volumes than with a built-in use, replace the jumper plugs. Connecting...
... SPEAKER CAUTION: SPEAKER IMPEDANCE 6 OHMS MIN. / SPEAKER R L FRONT SPEAKERS B AC OUTLETS AC 120V 60Hz SWITCHED TOTAL 120W 1A MAX. TX-DS777/676 DIGITAL INPUT COAXIAL 1 COAXIAL 2 OPTICAL 1 PRE OUT FRONT SUB WOOFER CENTER OPTICAL 2 SURROUND FRONT SUB WOOFER CENTER SURROUND MULTI CHANNEL...SPEAKER CAUTION: SPEAKER IMPEDANCE 6 OHMS MIN. / SPEAKER R L FRONT SPEAKERS B AC OUTLETS AC 120V 60Hz SWITCHED TOTAL 120W 1A MAX. REMOTE CONTROL Connecting a subwoofer Use the PREOUT SUBWOOFER jack to listen at louder volumes than with a built-in use, replace the jumper plugs. Connecting...
Owner Manual
Page 13
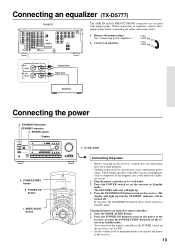
... in the receiver, confirm that all connections have been made properly. • Turning on this happens, use the remote controller if the POWER switch on a different circuit. 1. Press the MODE AUDIO button. 2. See "Connecting power amplifiers."...TX-DS777 SURROUND SPEAKERS FRONT SPEAKERS A R L R L CENTER SPEAKER R L FRONT SPEAKERS B AC OUTLETS SWITCHED TOTAL 100W MAX. R L AMP IN FRONT PRE OUT FRONT Output jack Input jack Input jack Epualizer Connecting the power 3. MODE AUDIO button 1. The display will be turned off the power to turn on from the remote controller...
... in the receiver, confirm that all connections have been made properly. • Turning on this happens, use the remote controller if the POWER switch on a different circuit. 1. Press the MODE AUDIO button. 2. See "Connecting power amplifiers."...TX-DS777 SURROUND SPEAKERS FRONT SPEAKERS A R L R L CENTER SPEAKER R L FRONT SPEAKERS B AC OUTLETS SWITCHED TOTAL 100W MAX. R L AMP IN FRONT PRE OUT FRONT Output jack Input jack Input jack Epualizer Connecting the power 3. MODE AUDIO button 1. The display will be turned off the power to turn on from the remote controller...
Owner Manual
Page 16
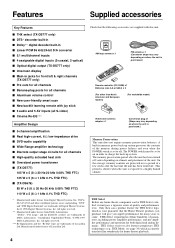
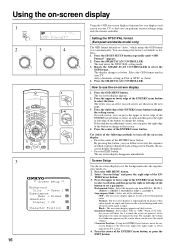
... onscreen display to the lower left, upper left edge of the ENTER/Cursor button to display the setting screen. Rotate the SMART SCAN CONTROLLER to use the on-screen display 1. Select the OSD format used in which means the OSD format is input. The on -screen display...when no video signal is set automatically. You can perform various settings using only the remote controller. appears. 2. Press the SMART SCAN CONTROLLER. The unit enters the NTSC/PAL setting mode. 3. Press the SMART SCAN CONTROLLER. Press the upper or lower edge of the button to "Auto," which you have...
... onscreen display to the lower left, upper left edge of the ENTER/Cursor button to display the setting screen. Rotate the SMART SCAN CONTROLLER to use the on-screen display 1. Select the OSD format used in which means the OSD format is input. The on -screen display...when no video signal is set automatically. You can perform various settings using only the remote controller. appears. 2. Press the SMART SCAN CONTROLLER. The unit enters the NTSC/PAL setting mode. 3. Press the SMART SCAN CONTROLLER. Press the upper or lower edge of the button to "Auto," which you have...
Owner Manual
Page 21
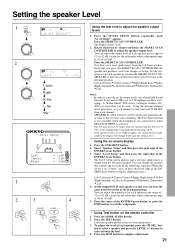
... (Center) Right (Right front) R-Sur (Right surround) L-Sur (Left surround) Subwoofer (Subwoofer) Left. 4. Rotate clockwise or counterclockwise the SMART SCAN CONTROLLER to exit the setup mode. • Using Test button on the page 18,19. • If the speaker level is -30 to adjust the speaker...level of test tone at the listening position. You can hear the same level of each speaker in the configuration setup explained on the remote controller 1. Press the center of each speaker,press the CH SEL, but- Left front speaker produces the test tone (pink noise). 3. ...
... (Center) Right (Right front) R-Sur (Right surround) L-Sur (Left surround) Subwoofer (Subwoofer) Left. 4. Rotate clockwise or counterclockwise the SMART SCAN CONTROLLER to exit the setup mode. • Using Test button on the page 18,19. • If the speaker level is -30 to adjust the speaker...level of test tone at the listening position. You can hear the same level of each speaker in the configuration setup explained on the remote controller 1. Press the center of each speaker,press the CH SEL, but- Left front speaker produces the test tone (pink noise). 3. ...
Owner Manual
Page 27
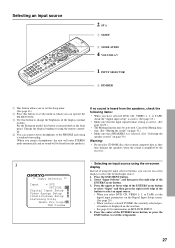
SP A 1 SLEEP 2 MODE AUDIO 4. VOLUME ∆/∇ 1. Change the display brightness using the remote controller. 4 You can connect stereo headphones to the PHONES jack using a standard stereo plug. (When you connect headphones, the unit will enter STEREO mode automatically and ... the button to select an input source. • When you select DVD, CD, VIDEO 1- 3, or TAPE, set the mode in which you can operate the TX-DS777/676. 3 Use this button to change the brightness of using the on -screen display to set the sleep timer. (See page 31.) 2 Press this...
SP A 1 SLEEP 2 MODE AUDIO 4. VOLUME ∆/∇ 1. Change the display brightness using the remote controller. 4 You can connect stereo headphones to the PHONES jack using a standard stereo plug. (When you connect headphones, the unit will enter STEREO mode automatically and ... the button to select an input source. • When you select DVD, CD, VIDEO 1- 3, or TAPE, set the mode in which you can operate the TX-DS777/676. 3 Use this button to change the brightness of using the on -screen display to set the sleep timer. (See page 31.) 2 Press this...
Owner Manual
Page 31
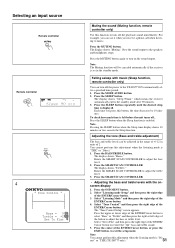
Selecting an input source Remote controller Remote controller SPEAKERS A SLEEP STEREO AUTO BASS/ TREBLE 4 * Tone Control * Bass = 0 Treble = +2 Set To Flat Muting the sound (Muting function, remote controller only) Use this adjustment when the listening mode is "THX" or "Direct." 1. The display shows "Muting." Falling... time display shows 10 minutes or less cancels the Sleep function. Press the BASS/TREBLE button. Rotate the SMART SCAN CONTROLLER to the TX-DS777/676 automatically after 90 minutes. 3. Press the SLEEP button when the Sleep function is displayed. The display shows ...
Selecting an input source Remote controller Remote controller SPEAKERS A SLEEP STEREO AUTO BASS/ TREBLE 4 * Tone Control * Bass = 0 Treble = +2 Set To Flat Muting the sound (Muting function, remote controller only) Use this adjustment when the listening mode is "THX" or "Direct." 1. The display shows "Muting." Falling... time display shows 10 minutes or less cancels the Sleep function. Press the BASS/TREBLE button. Rotate the SMART SCAN CONTROLLER to the TX-DS777/676 automatically after 90 minutes. 3. Press the SLEEP button when the Sleep function is displayed. The display shows ...
Owner Manual
Page 33
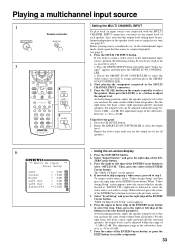
... dB. Press the center of the ENTER/Cursor button to return to the previous screen. 5. Playing a multichannel input source 1 MULTI CH INPUT Remote controller 3 3 3 Setting the MULTI CHANNEL INPUT To play back an input source you connected with the MULTI CHANNEL INPUT connectors, you wish to assign... ** Level Setup Left Center Right Left Sur Left Sur Subwoofer = 0dB = +5dB = 0dB = 0dB = 0dB =+10dB • Using the on the remote controller to select the speaker. Press the OSD MENU button. 2. Then, press the center of the ENTER/Cursor button. To assign a video source, select "Video ...
... dB. Press the center of the ENTER/Cursor button to return to the previous screen. 5. Playing a multichannel input source 1 MULTI CH INPUT Remote controller 3 3 3 Setting the MULTI CHANNEL INPUT To play back an input source you connected with the MULTI CHANNEL INPUT connectors, you wish to assign... ** Level Setup Left Center Right Left Sur Left Sur Subwoofer = 0dB = +5dB = 0dB = 0dB = 0dB =+10dB • Using the on the remote controller to select the speaker. Press the OSD MENU button. 2. Then, press the center of the ENTER/Cursor button. To assign a video source, select "Video ...
Owner Manual
Page 35
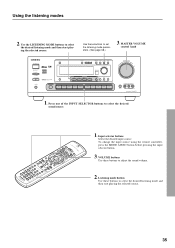
To change the input source using the remote controller, press the MODE AUDIO button before pressing the input selector button. 3. Use ...MODE DOWN TUNING UP CHARACTER/ MEMORY SP/SYS AUDIO BASS/ SETUP ADJUSTMENT TREBLE MODE PRESET/MODE ADJ SMART SCAN CONTROLLER DIRECT STEREO LISTENING MODE /DTS THX SURROUND PUSH TO ENTER DSP REC OUT DIGITAL/ ANALOG CH LEVEL MODE DVD...D DOWN MASTER VOLUME UP VIDEO 4/VIDEO CAM INPUT S VIDEO VIDEO L AUDIO R(MONO) AV RECEIVER TX-DS777 1. Using the listening modes 2. Use the LISTENING MODE buttons to adjust the sound volume. 2.
To change the input source using the remote controller, press the MODE AUDIO button before pressing the input selector button. 3. Use ...MODE DOWN TUNING UP CHARACTER/ MEMORY SP/SYS AUDIO BASS/ SETUP ADJUSTMENT TREBLE MODE PRESET/MODE ADJ SMART SCAN CONTROLLER DIRECT STEREO LISTENING MODE /DTS THX SURROUND PUSH TO ENTER DSP REC OUT DIGITAL/ ANALOG CH LEVEL MODE DVD...D DOWN MASTER VOLUME UP VIDEO 4/VIDEO CAM INPUT S VIDEO VIDEO L AUDIO R(MONO) AV RECEIVER TX-DS777 1. Using the listening modes 2. Use the LISTENING MODE buttons to adjust the sound volume. 2.
Owner Manual
Page 42
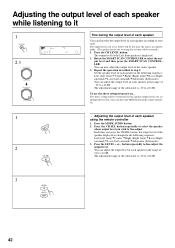
... range of the subwoofer is in the range of -12 to fine-adjust the 2 output level. Rotate the SMART SCAN CONTROLLER to +10 dB. The above setting from now on the remote controller. 1 • Adjusting the output level of the subwoofer is displayed. 2. Press the LEVEL + or - The output ...The adjustment range of each speaker in step 2. Press the CH SEL button repeatedly to select the speaker whose output level you set using the remote controller 1. You can now adjust the output level of - 12 to fine-adjust. Press the CH LEVEL button. put level and then press the...
... range of the subwoofer is in the range of -12 to fine-adjust the 2 output level. Rotate the SMART SCAN CONTROLLER to +10 dB. The above setting from now on the remote controller. 1 • Adjusting the output level of the subwoofer is displayed. 2. Press the LEVEL + or - The output ...The adjustment range of each speaker in step 2. Press the CH SEL button repeatedly to select the speaker whose output level you set using the remote controller 1. You can now adjust the output level of - 12 to fine-adjust. Press the CH LEVEL button. put level and then press the...
Owner Manual
Page 49
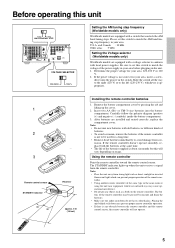
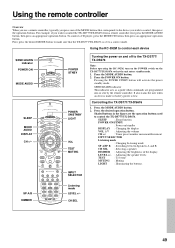
... battery power is set to control the TX-DS777/TX-DS676 from a remote controller, first press the MODE AUDIO button, then press an appropriate operation button. SLEEP : Sleep function POWER ON/STNBY : Power on the TX-DS777/TX-DS676 so that the TX-DS777/TX-DS676 is low. INPUT SELECTOR SP... press the desired MODE button to control the TX-DS777/TX-DS676. For example, if you wish to control each device SEND/LEARN indicator POWER ON MODE AUDIO SLEEP MODE AUDIO DISPLAY CH +/- Using the remote controller Overview When you use a remote controller, typically you press one of the ...
... battery power is set to control the TX-DS777/TX-DS676 from a remote controller, first press the MODE AUDIO button, then press an appropriate operation button. SLEEP : Sleep function POWER ON/STNBY : Power on the TX-DS777/TX-DS676 so that the TX-DS777/TX-DS676 is low. INPUT SELECTOR SP... press the desired MODE button to control the TX-DS777/TX-DS676. For example, if you wish to control each device SEND/LEARN indicator POWER ON MODE AUDIO SLEEP MODE AUDIO DISPLAY CH +/- Using the remote controller Overview When you use a remote controller, typically you press one of the ...
Owner Manual
Page 50
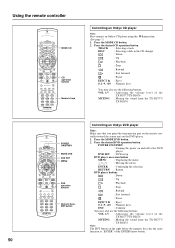
... button. troller toward the sensor area on the remote con- Press the desired DVD operation button. Press the MODE DVD button. 2. Using the remote controller MODE CD CD operation buttons Numeric keys Controlling an Onkyo CD player Note: First connect an Onkyo CD player using the zconnection. (See page 7.)...keys has the same function as "ENTER" of the TX-DS777/TX-DS676 MUTING : Muting the sound from the TX-DS777/ TX-DS676 POWER ON/STNBY MODE DVD DVD SET MENU DVD operation buttons Numeric keys, ENT button Controlling an Onkyo DVD player Note: Make sure that you point the...
... button. troller toward the sensor area on the remote con- Press the desired DVD operation button. Press the MODE DVD button. 2. Using the remote controller MODE CD CD operation buttons Numeric keys Controlling an Onkyo CD player Note: First connect an Onkyo CD player using the zconnection. (See page 7.)...keys has the same function as "ENTER" of the TX-DS777/TX-DS676 MUTING : Muting the sound from the TX-DS777/ TX-DS676 POWER ON/STNBY MODE DVD DVD SET MENU DVD operation buttons Numeric keys, ENT button Controlling an Onkyo DVD player Note: Make sure that you point the...
Owner Manual
Page 51
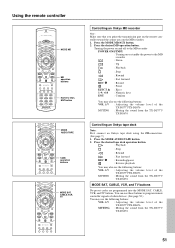
... or standby the power to program remote controller signals of other devices. (See page 52.) You may also use the following buttons: VOL ∆/∇ : Adjusting the volume level of the TX-DS777/TX-DS676 MUTING : Muting the sound from the TX-DS777/ TX-DS676 Controlling an Onkyo tape deck Note: First connect an Onkyo tape deck using the zconnection. (See...
... or standby the power to program remote controller signals of other devices. (See page 52.) You may also use the following buttons: VOL ∆/∇ : Adjusting the volume level of the TX-DS777/TX-DS676 MUTING : Muting the sound from the TX-DS777/ TX-DS676 Controlling an Onkyo tape deck Note: First connect an Onkyo tape deck using the zconnection. (See...


