

SP-810UZ Instruction Manual (English)
Page 5
... 4/30 '11/10/26 00:00 19 00:12/00:34 Still image Movie ● Advanced display 1 2 3 45 6 7 8 3D 10 4/30 10 21 1/1000 F3.0 2.0 20 P ISO WB 100 AUTO NORM 14M FILE 100 0004 '11/10/26 00:00 11 12 13 14 1/...1000 F3.0 2.0 P ISO WB 100 AUTO NORM 14M FILE 100 0004 '11/10/26 00:00 1 Battery check..........p. 13, 55 2 3D image p. 32 3 Print reservation/number of prints p. 52/p. 51 4 Eye-Fi transferred.........p. 42 5 Protect p. 41 9 6 7 Adding sound .........p. 38, 39 Current memory ...........p. 60 8 8 Frame number/total...
... 4/30 '11/10/26 00:00 19 00:12/00:34 Still image Movie ● Advanced display 1 2 3 45 6 7 8 3D 10 4/30 10 21 1/1000 F3.0 2.0 20 P ISO WB 100 AUTO NORM 14M FILE 100 0004 '11/10/26 00:00 11 12 13 14 1/...1000 F3.0 2.0 P ISO WB 100 AUTO NORM 14M FILE 100 0004 '11/10/26 00:00 1 Battery check..........p. 13, 55 2 3D image p. 32 3 Print reservation/number of prints p. 52/p. 51 4 Eye-Fi transferred.........p. 42 5 Protect p. 41 9 6 7 Adding sound .........p. 38, 39 Current memory ...........p. 60 8 8 Frame number/total...

SP-810UZ Instruction Manual (English)
Page 8
... mode (p. 23). Function menu Press H during shooting to set the function menu. 8 EN Press the A button to display the function menu. Selected option Program Auto 3D P Shooting mode 4 14M NORM Shooting 0.0 WB AUTO ISO AUTO MENU Function menu Setup menu To select the shooting mode Use HI to frequently used shooting...
... mode (p. 23). Function menu Press H during shooting to set the function menu. 8 EN Press the A button to display the function menu. Selected option Program Auto 3D P Shooting mode 4 14M NORM Shooting 0.0 WB AUTO ISO AUTO MENU Function menu Setup menu To select the shooting mode Use HI to frequently used shooting...
SP-810UZ Instruction Manual (English)
Page 10
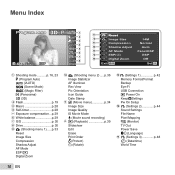
...Pixel Mapping s (Monitor) TV Out Power Save l (Language) e t (Settings 3 p. 48 X (Date/time) World Time 10 EN Menu Index Program Auto 4 14M NORM 3D P 1 2 3 4 0.0 5 WB AUTO 6 ISO AUTO 7 8 MENU 9 1 Reset 0 2 Image Size 14M a Compression Normal b Shadow Adjust Auto c 1 AF... Digital Zoom Off Exit MENU Set OK 1 Shooting mode ...........p. 16, 23 P (Program Auto) M (iAUTO) (Scene Mode) P (Magic Filter) p (Panorama) W (3D) 2 Flash p. 19 3 Macro p. 28 4 Self-timer p. 28 5 Exposure compensation ...p. 29 6 White balance p. 29 7 ISO p. 30 8 Drive p. 30 9 p (...
...Pixel Mapping s (Monitor) TV Out Power Save l (Language) e t (Settings 3 p. 48 X (Date/time) World Time 10 EN Menu Index Program Auto 4 14M NORM 3D P 1 2 3 4 0.0 5 WB AUTO 6 ISO AUTO 7 8 MENU 9 1 Reset 0 2 Image Size 14M a Compression Normal b Shadow Adjust Auto c 1 AF... Digital Zoom Off Exit MENU Set OK 1 Shooting mode ...........p. 16, 23 P (Program Auto) M (iAUTO) (Scene Mode) P (Magic Filter) p (Panorama) W (3D) 2 Flash p. 19 3 Macro p. 28 4 Self-timer p. 28 5 Exposure compensation ...p. 29 6 White balance p. 29 7 ISO p. 30 8 Drive p. 30 9 p (...

SP-810UZ Instruction Manual (English)
Page 16
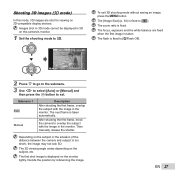
... not displayed, press H to display the function menu screen and then set the shooting mode to P. "Using the Menu" (p. 8) Current shooting mode display Program Auto 3D P Vertical grip 4 Press the shutter button halfway down to focus if the AF target mark flashes red. P mode indicator. Try focusing again. 4 14M NORM...
... not displayed, press H to display the function menu screen and then set the shooting mode to P. "Using the Menu" (p. 8) Current shooting mode display Program Auto 3D P Vertical grip 4 Press the shutter button halfway down to focus if the AF target mark flashes red. P mode indicator. Try focusing again. 4 14M NORM...

SP-810UZ Instruction Manual (English)
Page 22
Index view and close -up view Use FGHI to move the viewing area. Normal 3D 10 4/30 '11/10/26 00:00 T W T Index view '11/10/26 2 4 W T '11/10/26 4 4 4 4 '11/10/26 00:00 To select an image in ... is pressed. Single-image view 4/30 W Close-up to display the selected image in single-image view. '11/10/26 00:00 No information Detailed 3D 10 4/30 1/1000 F3.0 2.0 P ISO WB 100 AUTO NORM 14M FILE 100 0004 '11/10/26 00:00 "Reading a histogram" (p. 20) Using the menu guide...
Index view and close -up view Use FGHI to move the viewing area. Normal 3D 10 4/30 '11/10/26 00:00 T W T Index view '11/10/26 2 4 W T '11/10/26 4 4 4 4 '11/10/26 00:00 To select an image in ... is pressed. Single-image view 4/30 W Close-up to display the selected image in single-image view. '11/10/26 00:00 No information Detailed 3D 10 4/30 1/1000 F3.0 2.0 P ISO WB 100 AUTO NORM 14M FILE 100 0004 '11/10/26 00:00 "Reading a histogram" (p. 20) Using the menu guide...

SP-810UZ Instruction Manual (English)
Page 25
Panorama 4 14M NORM 3D AUTO 0.0 WB AUTO MENU 2 Press G to go to the submenu. 3 Use HI to 2MB or equivalent. When selecting [Auto], press G. Submenu 1 Auto Manual PC Application ...
Panorama 4 14M NORM 3D AUTO 0.0 WB AUTO MENU 2 Press G to go to the submenu. 3 Use HI to 2MB or equivalent. When selecting [Auto], press G. Submenu 1 Auto Manual PC Application ...
SP-810UZ Instruction Manual (English)
Page 27
... the image in the monitor. EN 27 After shooting the first frame, move the camera to overlap the subject with the image in 3D on this mode, 3D images are fixed when the first image is displayed on the subject, etc. Images shot in...to select [Auto] or [Manual] and then press the A button to set. The 3D viewing angle varies depending on the monitor lightly. Shooting 3D images (W mode) In this camera's monitor. 1 Set the shooting mode to W. 3D Photo 3D P AUTO To exit 3D shooting mode without saving an image, press the button. The [Image Size...
... the image in the monitor. EN 27 After shooting the first frame, move the camera to overlap the subject with the image in 3D on this mode, 3D images are fixed when the first image is displayed on the subject, etc. Images shot in...to select [Auto] or [Manual] and then press the A button to set. The 3D viewing angle varies depending on the monitor lightly. Shooting 3D images (W mode) In this camera's monitor. 1 Set the shooting mode to W. 3D Photo 3D P AUTO To exit 3D shooting mode without saving an image, press the button. The [Image Size...

SP-810UZ Instruction Manual (English)
Page 32
... back on a computer, playback of JPEG files and MPO files. To stop the slideshow, press the or A button. 3D images are deleted on 3D-compatible devices connected to pause playback. Pause: Press the A button. Then turn the zoom lever to play back and then press the A button.... If any files are composed of 3D images may not be scrolled for viewing. For the connection and setting method, see "Connection via HDMI cable" (p. 46) 2 Use the wheel controller or...
... back on a computer, playback of JPEG files and MPO files. To stop the slideshow, press the or A button. 3D images are deleted on 3D-compatible devices connected to pause playback. Pause: Press the A button. Then turn the zoom lever to play back and then press the A button.... If any files are composed of 3D images may not be scrolled for viewing. For the connection and setting method, see "Connection via HDMI cable" (p. 46) 2 Use the wheel controller or...
SP-810UZ Instruction Manual (English)
Page 37
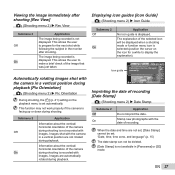
... not displayed. EN 37 Submenu 2 Off On Application Information about the vertical/ horizontal orientation of the camera during playback. Icon guide Program Auto 3D P Functions can not be displayed when a shooting mode or function menu icon is selected (position the cursor on the playback menu is not ... icon for the next shot while following the subject in a vertical position are not rotated during shooting is recorded with the camera in [Panorama] or [3D] mode. "Date, time, time zone, and language" (p. 15) The date stamp can be set. This allows the user to prepare for a ...
... not displayed. EN 37 Submenu 2 Off On Application Information about the vertical/ horizontal orientation of the camera during playback. Icon guide Program Auto 3D P Functions can not be displayed when a shooting mode or function menu icon is selected (position the cursor on the playback menu is not ... icon for the next shot while following the subject in a vertical position are not rotated during shooting is recorded with the camera in [Panorama] or [3D] mode. "Date, time, time zone, and language" (p. 15) The date stamp can be set. This allows the user to prepare for a ...
SP-810UZ Instruction Manual (English)
Page 74
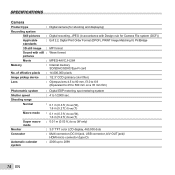
of effective pixels : 14,000,000 pixels Image pickup device : 1/2.3" CCD (primary color filter) Lens : Olympus lens 4.5 to 90 mm, f3.0 to 6.9 (Equivalent to 25 to 500 mm on a 35 mm film) Photometric system Shutter speed Shooting range Normal ...recording, JPEG (in accordance with Design rule for Camera File system (DCF)) Applicable standards : Exif 2.2, Digital Print Order Format (DPOF), PRINT Image Matching III, PictBridge 3D still image : MP format Sound with still : Wave format pictures Movie : MPEG-4AVC./H.264 Memory : Internal memory SD/SDHC/SDXC/Eye-Fi card No.
of effective pixels : 14,000,000 pixels Image pickup device : 1/2.3" CCD (primary color filter) Lens : Olympus lens 4.5 to 90 mm, f3.0 to 6.9 (Equivalent to 25 to 500 mm on a 35 mm film) Photometric system Shutter speed Shooting range Normal ...recording, JPEG (in accordance with Design rule for Camera File system (DCF)) Applicable standards : Exif 2.2, Digital Print Order Format (DPOF), PRINT Image Matching III, PictBridge 3D still image : MP format Sound with still : Wave format pictures Movie : MPEG-4AVC./H.264 Memory : Internal memory SD/SDHC/SDXC/Eye-Fi card No.
