

SP-810UZ Instruction Manual (English)
Page 3
Pull the strap tight so that it does not come loose. 3 4 1 5 6 2 7 8 9 10 11 Attaching the camera strap and lens cap 1 2 1 Monitor 2 button 3 R button (record movies) 4 q button (switching between shooting and playback) 5 A button (OK) 6 Wheel controller INFO button (changing information display) button (erase) 7 E button (menu guide) 12 8 Connector cover 13 9 Multi-connector 10 HDMI micro connector 14 11 Indicator lamp 12 Zoom lever 13 Shutter button 14 n button 3 4 5 • Attach the strap to the other eyelet in the same manner. EN 3
Pull the strap tight so that it does not come loose. 3 4 1 5 6 2 7 8 9 10 11 Attaching the camera strap and lens cap 1 2 1 Monitor 2 button 3 R button (record movies) 4 q button (switching between shooting and playback) 5 A button (OK) 6 Wheel controller INFO button (changing information display) button (erase) 7 E button (menu guide) 12 8 Connector cover 13 9 Multi-connector 10 HDMI micro connector 14 11 Indicator lamp 12 Zoom lever 13 Shutter button 14 n button 3 4 5 • Attach the strap to the other eyelet in the same manner. EN 3
SP-810UZ Instruction Manual (English)
Page 4
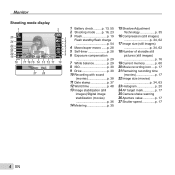
... display 1 2 25 24 23 22 21 20 00:34 19 4 14M NORM P 3 4 5 0.0 6 WB AUTO ISO AUTO 7 8 9 DATE 18 17 16 15 14 13 12 11 10 1/100 F3.0 27 26 1 Battery check..........p. 13, 55 2 Shooting mode .......p. 16, 23 3 Flash p. 19 Flash standby/flash charge p. 54 4...10 Recording with sound (movies p. 38 11 Date stamp p. 37 12 World time p. 48 13 Image stabilization (still images)/Digital image stabilization (movies p. 36 14 Metering p. 35 15 Shadow Adjustment Technology p. 35 16 Compression (still images p. 34, 62 17 Image size (still images p. 34, 62 18 Number of ...
... display 1 2 25 24 23 22 21 20 00:34 19 4 14M NORM P 3 4 5 0.0 6 WB AUTO ISO AUTO 7 8 9 DATE 18 17 16 15 14 13 12 11 10 1/100 F3.0 27 26 1 Battery check..........p. 13, 55 2 Shooting mode .......p. 16, 23 3 Flash p. 19 Flash standby/flash charge p. 54 4...10 Recording with sound (movies p. 38 11 Date stamp p. 37 12 World time p. 48 13 Image stabilization (still images)/Digital image stabilization (movies p. 36 14 Metering p. 35 15 Shadow Adjustment Technology p. 35 16 Compression (still images p. 34, 62 17 Image size (still images p. 34, 62 18 Number of ...

SP-810UZ Instruction Manual (English)
Page 5
... 6 7 8 3D 10 4/30 10 21 1/1000 F3.0 2.0 20 P ISO WB 100 AUTO NORM 14M FILE 100 0004 '11/10/26 00:00 11 12 13 14 1/1000 F3.0 2.0 P ISO WB 100 AUTO NORM 14M FILE 100 0004 '11/10/26 00:00 1 Battery check..........p. 13, 55 2 3D image p. 32 3 Print ... time/total shooting time (movies) p. 21 9 Volume p. 20, 44 10 Histogram p. 20 11 Shutter speed p. 17 12 Aperture value p. 17 15 16 13 ISO p. 30 14 Exposure compensation 17 p. 29 18 15 White balance p. 29 19 16 Compression (still images) p. 34, 62 Image quality (movies) p. 34, 63 17 Image size ........p. 34...
... 6 7 8 3D 10 4/30 10 21 1/1000 F3.0 2.0 20 P ISO WB 100 AUTO NORM 14M FILE 100 0004 '11/10/26 00:00 11 12 13 14 1/1000 F3.0 2.0 P ISO WB 100 AUTO NORM 14M FILE 100 0004 '11/10/26 00:00 1 Battery check..........p. 13, 55 2 3D image p. 32 3 Print ... time/total shooting time (movies) p. 21 9 Volume p. 20, 44 10 Histogram p. 20 11 Shutter speed p. 17 12 Aperture value p. 17 15 16 13 ISO p. 30 14 Exposure compensation 17 p. 29 18 15 White balance p. 29 19 16 Compression (still images) p. 34, 62 Image quality (movies) p. 34, 63 17 Image size ........p. 34...
SP-810UZ Instruction Manual (English)
Page 14
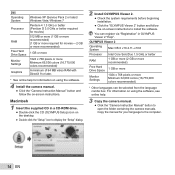
OLYMPUS Viewer 2 Operating System Mac OS ...-ROM drive. ● Double-click the CD (OLYMPUS Setup) icon on the desktop. ● Double-click the "Setup" icon to display the "Setup" ...dialog. 2 Install OLYMPUS Viewer 2. ● Check the system requirements before beginning installation. ● Click the "OLYMPUS Viewer 2" button and follow the on using the software,... You can be selected from the language combo box. Macintosh 1 Insert the supplied CD in OLYMPUS Viewer 2 "Help". Copy the manual for information on using the software. 4 Install the ...
OLYMPUS Viewer 2 Operating System Mac OS ...-ROM drive. ● Double-click the CD (OLYMPUS Setup) icon on the desktop. ● Double-click the "Setup" icon to display the "Setup" ...dialog. 2 Install OLYMPUS Viewer 2. ● Check the system requirements before beginning installation. ● Click the "OLYMPUS Viewer 2" button and follow the on using the software,... You can be selected from the language combo box. Macintosh 1 Insert the supplied CD in OLYMPUS Viewer 2 "Help". Copy the manual for information on using the software. 4 Install the ...

SP-810UZ Instruction Manual (English)
Page 21
To operate with HI *1 Press I or H pressed for continuous advance or rewind. EN 21 Operations while playback is paused Elapsed time /Total shooting time 00:14/00:34 During pause Cueing Use F to display the first frame and press G to erase and press G (). Multiple images or all images can ...
To operate with HI *1 Press I or H pressed for continuous advance or rewind. EN 21 Operations while playback is paused Elapsed time /Total shooting time 00:14/00:34 During pause Cueing Use F to display the first frame and press G to erase and press G (). Multiple images or all images can ...
SP-810UZ Instruction Manual (English)
Page 74
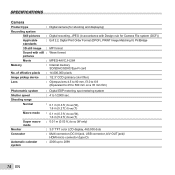
... format pictures Movie : MPEG-4AVC./H.264 Memory : Internal memory SD/SDHC/SDXC/Eye-Fi card No. of effective pixels : 14,000,000 pixels Image pickup device : 1/2.3" CCD (primary color filter) Lens : Olympus lens 4.5 to 90 mm, f3.0 to 6.9 (Equivalent to 25 to 500 mm on a 35 mm film) Photometric system...
... format pictures Movie : MPEG-4AVC./H.264 Memory : Internal memory SD/SDHC/SDXC/Eye-Fi card No. of effective pixels : 14,000,000 pixels Image pickup device : 1/2.3" CCD (primary color filter) Lens : Olympus lens 4.5 to 90 mm, f3.0 to 6.9 (Equivalent to 25 to 500 mm on a 35 mm film) Photometric system...


