SP-550UZ Instruction Manual (English)
Page 1
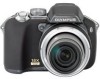
... optimum performance and a longer service life. Button operations Menu operations Printing pictures Using OLYMPUS Master Getting to know your camera before taking important photographs. DIGITAL CAMERA SP-550UZ Instruction Manual Quick Start Guide This manual will help you get accustomed to your camera better Appendix Thank you for future reference. Before you start to update or modify...
... optimum performance and a longer service life. Button operations Menu operations Printing pictures Using OLYMPUS Master Getting to know your camera before taking important photographs. DIGITAL CAMERA SP-550UZ Instruction Manual Quick Start Guide This manual will help you get accustomed to your camera better Appendix Thank you for future reference. Before you start to update or modify...
SP-550UZ Instruction Manual (English)
Page 2
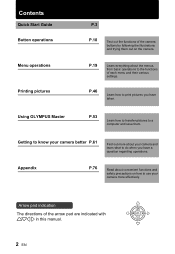
...the menus, from basic operations to do when you have a question regarding operations. Using OLYMPUS Master P.53 Learn how to transfer pictures to print pictures you have taken. Getting to know your camera better P.61 Find out more about convenient functions and safety precautions on the... camera. Arrow pad indication The directions of the arrow pad are indicated with 124 3 in this ...
...the menus, from basic operations to do when you have a question regarding operations. Using OLYMPUS Master P.53 Learn how to transfer pictures to print pictures you have taken. Getting to know your camera better P.61 Find out more about convenient functions and safety precautions on the... camera. Arrow pad indication The directions of the arrow pad are indicated with 124 3 in this ...
SP-550UZ Instruction Manual (English)
Page 3
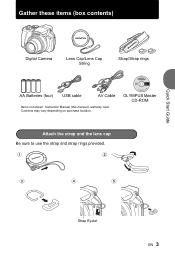
Quick Start Guide Strap Eyelet EN 3 Gather these items (box contents) Digital Camera Lens Cap/Lens Cap String Strap/Strap rings AA Batteries (four) USB cable AV Cable Items not shown: Instruction Manual (this manual), warranty card. OLYMPUS Master CD-ROM Attach the strap and the lens cap Be sure to use the strap and strap rings provided. Contents may vary depending on purchase location.
Quick Start Guide Strap Eyelet EN 3 Gather these items (box contents) Digital Camera Lens Cap/Lens Cap String Strap/Strap rings AA Batteries (four) USB cable AV Cable Items not shown: Instruction Manual (this manual), warranty card. OLYMPUS Master CD-ROM Attach the strap and the lens cap Be sure to use the strap and strap rings provided. Contents may vary depending on purchase location.

SP-550UZ Instruction Manual (English)
Page 4
Quick Start Guide • Attach the strap to "Inserting and removing the card" (P.78). 4 EN For details on inserting the card, please refer to the other eyelet in the same manner. Pull the strap tight so that it does not come loose. Prepare the battery This camera allows you to take pictures without using an optional xDPicture Card (hereinafter called the card).
Quick Start Guide • Attach the strap to "Inserting and removing the card" (P.78). 4 EN For details on inserting the card, please refer to the other eyelet in the same manner. Pull the strap tight so that it does not come loose. Prepare the battery This camera allows you to take pictures without using an optional xDPicture Card (hereinafter called the card).

SP-550UZ Instruction Manual (English)
Page 5
... screen will appear. This function allows you to change the aperture manually. To turn on the camera in shooting mode. Set the mode dial to h. To turn off the camera, press the o button once again. The camera automatically sets the optimum aperture value and shutter speed. Press the o button. s This function allows you... MENU • When the date and time have not yet been set each shooting function manually and use as your original shooting mode. Turn the camera on This explains how to turn on the camera, press the o button after removing the lens cap.
... screen will appear. This function allows you to change the aperture manually. To turn on the camera in shooting mode. Set the mode dial to h. To turn off the camera, press the o button once again. The camera automatically sets the optimum aperture value and shutter speed. Press the o button. s This function allows you... MENU • When the date and time have not yet been set each shooting function manually and use as your original shooting mode. Turn the camera on This explains how to turn on the camera, press the o button after removing the lens cap.

SP-550UZ Instruction Manual (English)
Page 8
... can see [ ] (AF target mark) clearly, adjustment is displayed. Shutter button (Pressed Completely) The card access lamp blinks. Take a picture a. Press the u button. Hold the camera Horizontal grip Vertical grip Quick Start Guide b. Focus c. Adjusting the viewfinder's focus using the diopter a. While looking through the viewfinder, rotate the diopter adjustment dial...
... can see [ ] (AF target mark) clearly, adjustment is displayed. Shutter button (Pressed Completely) The card access lamp blinks. Take a picture a. Press the u button. Hold the camera Horizontal grip Vertical grip Quick Start Guide b. Focus c. Adjusting the viewfinder's focus using the diopter a. While looking through the viewfinder, rotate the diopter adjustment dial...
SP-550UZ Instruction Manual (English)
Page 10
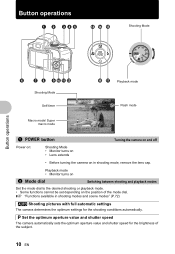
...playback mode. • Some functions cannot be set depending on in shooting modes and scene modes" (P.72) h Shooting pictures with full automatic settings The camera determines the optimum settings for the brightness of the mode dial. P Set the optimum aperture value and shutter speed The... camera automatically sets the optimum aperture value and shutter speed for the shooting conditions automatically. Button operations Shooting Mode Button operations Shooting Mode Self-...
...playback mode. • Some functions cannot be set depending on in shooting modes and scene modes" (P.72) h Shooting pictures with full automatic settings The camera determines the optimum settings for the brightness of the mode dial. P Set the optimum aperture value and shutter speed The... camera automatically sets the optimum aperture value and shutter speed for the shooting conditions automatically. Button operations Shooting Mode Button operations Shooting Mode Self-...

SP-550UZ Instruction Manual (English)
Page 11
... cannot be obtained, the aperture value is set to 1/2000 (The shutter speed varies depending on the aperture value.) 2 : Sets the shutter speed slower. The camera automatically sets the shutter speed. [] Adjustment range W : F2.8 to F8.0 T : F4.5 to BULB. Button operations A Changing the aperture value for shooting pictures Press 124 3 after...
... cannot be obtained, the aperture value is set to 1/2000 (The shutter speed varies depending on the aperture value.) 2 : Sets the shutter speed slower. The camera automatically sets the shutter speed. [] Adjustment range W : F2.8 to F8.0 T : F4.5 to BULB. Button operations A Changing the aperture value for shooting pictures Press 124 3 after...
SP-550UZ Instruction Manual (English)
Page 12
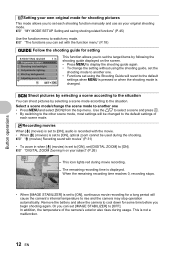
...begin shooting again. s Shoot pictures by selecting a scene mode according to switch my mode. nRecording movies When [R] (movies) is set [DIGITAL ZOOM] to [ON]. Select a scene mode/change the setting without using the Shooting Guide will revert to the default settings when m is... Shooting into backlight. 3 Set particular lighting. 4 Blurring background. 5 Adjusting area in when [R] (movies) is changed to the default settings of the camera's exterior also rises during the shooting. Use the 12 to select a scene and press o. • By switching to the other scene mode, most ...
...begin shooting again. s Shoot pictures by selecting a scene mode according to switch my mode. nRecording movies When [R] (movies) is set [DIGITAL ZOOM] to [ON]. Select a scene mode/change the setting without using the Shooting Guide will revert to the default settings when m is... Shooting into backlight. 3 Set particular lighting. 4 Blurring background. 5 Adjusting area in when [R] (movies) is changed to the default settings of the camera's exterior also rises during the shooting. Use the 12 to select a scene and press o. • By switching to the other scene mode, most ...

SP-550UZ Instruction Manual (English)
Page 16
Check each picture before erasing to avoid accidentally erasing pictures you want to close the menu guide. Checking the time While the camera is off, press DISP./E to display the set alarm time (when [ALARM CLOCK] is set ) and the current time for taking pictures. Release DISP./E to ...
Check each picture before erasing to avoid accidentally erasing pictures you want to close the menu guide. Checking the time While the camera is off, press DISP./E to display the set alarm time (when [ALARM CLOCK] is set ) and the current time for taking pictures. Release DISP./E to ...

SP-550UZ Instruction Manual (English)
Page 17
... as 1 cm/0.39 in playback mode, and press q. b q button Viewing pictures/Printing pictures Shooting mode: Viewing pictures The last picture taken is connected to the camera, display a picture to set depending on the monitor.
... as 1 cm/0.39 in playback mode, and press q. b q button Viewing pictures/Printing pictures Shooting mode: Viewing pictures The last picture taken is connected to the camera, display a picture to set depending on the monitor.
SP-550UZ Instruction Manual (English)
Page 19
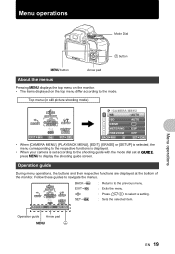
... on the top menu differ according to display the shooting guide screen. Top menu (in still picture shooting mode) IMAGE QUALITY RESET CAMERA SETUP MENU SCN SILENT MODE EXIT MENU SET OK CAMERA MENU 1 WB AUTO 2 ISO 3 DRIVE AUTO o 4 METERING ESP 5 FINE ZOOM OFF BACK MENU SET OK • When...[PLAYBACK MENU], [EDIT], [ERASE] or [SETUP] is selected, the menu corresponding to the respective functions is displayed. • When your camera is set according to the shooting guide with the mode dial set at the bottom of the monitor. Operation guide During menu operations, the buttons...
... on the top menu differ according to display the shooting guide screen. Top menu (in still picture shooting mode) IMAGE QUALITY RESET CAMERA SETUP MENU SCN SILENT MODE EXIT MENU SET OK CAMERA MENU 1 WB AUTO 2 ISO 3 DRIVE AUTO o 4 METERING ESP 5 FINE ZOOM OFF BACK MENU SET OK • When...[PLAYBACK MENU], [EDIT], [ERASE] or [SETUP] is selected, the menu corresponding to the respective functions is displayed. • When your camera is set according to the shooting guide with the mode dial set at the bottom of the monitor. Operation guide During menu operations, the buttons...
SP-550UZ Instruction Manual (English)
Page 20
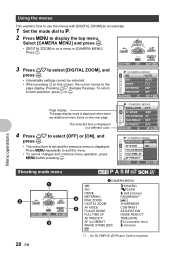
...4 Press 12 to select [DIGITAL ZOOM], and press o. Press m repeatedly to display the top menu. IMAGE STABILIZER 1 (conversion lens) R (movies) w *1 An OLYMPUS xD-Picture Card is displayed. The selected item is displayed in [CAMERA MENU]. RESET CAMERA SETUP MENU SCN SILENT MODE ... Shooting mode menu h P A S M r s n 4CAMERA MENU 1 WB #SYNCRO ISO QFLASH IMAGE DRIVE 2 QUALITY RESET CAMERA SETUP MENU 4 METERING FINE ZOOM DIGITAL ZOOM R (still pictures) PANORAMA*1 > SHARPNESS SCN SILENT MODE 5 AF MODE FOCUS MODE CONTRAST SATURATION EXIT MENU SET OK FULLTIME ...
...4 Press 12 to select [DIGITAL ZOOM], and press o. Press m repeatedly to display the top menu. IMAGE STABILIZER 1 (conversion lens) R (movies) w *1 An OLYMPUS xD-Picture Card is displayed. The selected item is displayed in [CAMERA MENU]. RESET CAMERA SETUP MENU SCN SILENT MODE ... Shooting mode menu h P A S M r s n 4CAMERA MENU 1 WB #SYNCRO ISO QFLASH IMAGE DRIVE 2 QUALITY RESET CAMERA SETUP MENU 4 METERING FINE ZOOM DIGITAL ZOOM R (still pictures) PANORAMA*1 > SHARPNESS SCN SILENT MODE 5 AF MODE FOCUS MODE CONTRAST SATURATION EXIT MENU SET OK FULLTIME ...
SP-550UZ Instruction Manual (English)
Page 23
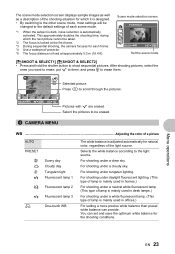
... the default settings of each frame. *4 Use a waterproof protector. *5 The focus distance is locked at the first frame. *3 During sequential shooting, the camera focuses for natural color, regardless of the light source. Scene mode selection screen 1 PORTRAIT B F D j G BACK MENU SET OK Set the scene ... EN 23 For shooting under a cloudy sky. You can set and save the optimum white balance for which the next picture cannot be erased. 4 CAMERA MENU WB Adjusting the color of a picture AUTO PRESET 5 Sunny day 3 Cloudy day 1 Tungsten light w Fluorescent lamp 1 x Fluorescent lamp 2 ...
... the default settings of each frame. *4 Use a waterproof protector. *5 The focus distance is locked at the first frame. *3 During sequential shooting, the camera focuses for natural color, regardless of the light source. Scene mode selection screen 1 PORTRAIT B F D j G BACK MENU SET OK Set the scene ... EN 23 For shooting under a cloudy sky. You can set and save the optimum white balance for which the next picture cannot be erased. 4 CAMERA MENU WB Adjusting the color of a picture AUTO PRESET 5 Sunny day 3 Cloudy day 1 Tungsten light w Fluorescent lamp 1 x Fluorescent lamp 2 ...
SP-550UZ Instruction Manual (English)
Page 24
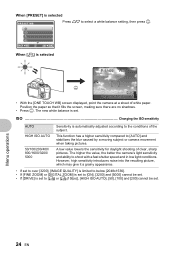
... automatically adjusted according to the conditions of the subject. The higher the value, the better the camera's light sensitivity and ability to [AUTO] and stabilizes the blur caused by a moving subject or camera movement when taking pictures. The new white balance is selected o • With the [ONE TOUCH... it a grainy appearance. • If set to over [3200], [IMAGE QUALITY] is limited to below [2048x1536]. • If [FINE ZOOM] or [DIGITAL ZOOM] is set to [ON], [3200] and [5000] cannot be set. When [PRESET] is selected PRESET WB Press 12 to select a white balance setting...
... automatically adjusted according to the conditions of the subject. The higher the value, the better the camera's light sensitivity and ability to [AUTO] and stabilizes the blur caused by a moving subject or camera movement when taking pictures. The new white balance is selected o • With the [ONE TOUCH... it a grainy appearance. • If set to over [3200], [IMAGE QUALITY] is limited to below [2048x1536]. • If [FINE ZOOM] or [DIGITAL ZOOM] is set to [ON], [3200] and [5000] cannot be set. When [PRESET] is selected PRESET WB Press 12 to select a white balance setting...

SP-550UZ Instruction Manual (English)
Page 25
...cannot be used when you do not want to allow surrounding light to shoot the preset number of pictures at the first frame. The camera will take a sequence of pictures. Meters the brightness over a wide area with balanced brightness. When [BKT] is set to [RAW...]. • Flash cannot be set to [ON].) • If [FINE ZOOM] or [DIGITAL ZOOM] is selected BKT 0.3 0.7 1.0 BACK MENU ×3 ×5 SET OK Exposure differential ± 0.3 / ± 0.7 / ± 1.0 Number of a subject ESP ...
...cannot be used when you do not want to allow surrounding light to shoot the preset number of pictures at the first frame. The camera will take a sequence of pictures. Meters the brightness over a wide area with balanced brightness. When [BKT] is set to [RAW...]. • Flash cannot be set to [ON].) • If [FINE ZOOM] or [DIGITAL ZOOM] is selected BKT 0.3 0.7 1.0 BACK MENU ×3 ×5 SET OK Exposure differential ± 0.3 / ± 0.7 / ± 1.0 Number of a subject ESP ...
SP-550UZ Instruction Manual (English)
Page 26
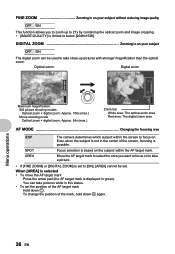
...used to take a picture. • If [FINE ZOOM] or [DIGITAL ZOOM] is possible. Optical zoom Digital zoom Maximum magnification: Still picture shooting modes Optical zoom × digital zoom: Approx. 100x (max.) Movie shooting mode Optical zoom × digital zoom: Approx. 54x (max.) Zoom bar White area: The optical ...zoom area Red area: The digital zoom area AF MODE Changing the focusing area iESP SPOT The camera determines which subject within the AF target mark. To change the position of the mark, hold down o. Focus ...
...used to take a picture. • If [FINE ZOOM] or [DIGITAL ZOOM] is possible. Optical zoom Digital zoom Maximum magnification: Still picture shooting modes Optical zoom × digital zoom: Approx. 100x (max.) Movie shooting mode Optical zoom × digital zoom: Approx. 54x (max.) Zoom bar White area: The optical ...zoom area Red area: The digital zoom area AF MODE Changing the focusing area iESP SPOT The camera determines which subject within the AF target mark. To change the position of the mark, hold down o. Focus ...
SP-550UZ Instruction Manual (English)
Page 27
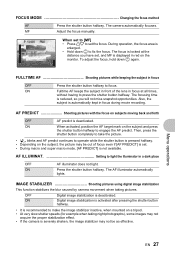
...taking pictures. To adjust the focus, hold down o to set , and MF is deactivated. Also, the subject is not available. The camera automatically focuses. Menu operations EN 27 The focusing time is enlarged. • Hold down o again. ON When activated, position the AF ...focus. The focus is locked at all times, without having to focus. IMAGE STABILIZER Shooting pictures using digital image stabilization This function stabilizes the blur caused by camera movement when taking night photographs), some images may not acquire the proper stabilization effect. • If ...
...taking pictures. To adjust the focus, hold down o to set , and MF is deactivated. Also, the subject is not available. The camera automatically focuses. Menu operations EN 27 The focusing time is enlarged. • Hold down o again. ON When activated, position the AF ...focus. The focus is locked at all times, without having to focus. IMAGE STABILIZER Shooting pictures using digital image stabilization This function stabilizes the blur caused by camera movement when taking night photographs), some images may not acquire the proper stabilization effect. • If ...
SP-550UZ Instruction Manual (English)
Page 28
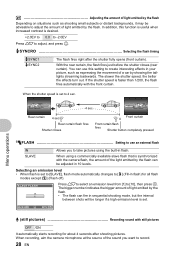
... fires automatically with still pictures OFF /ON It automatically starts recording for all flash modes except [$] (Flash off). Menu operations 4 sec. When recording, aim the camera microphone at the source of the sound you to take pictures using a commercially available slave flash that is synchronized with the... camera flash, the amount of the light emitted by the flash can fire in flash. w Adjusting the amount of light emitted by the flash Depending on ...
... fires automatically with still pictures OFF /ON It automatically starts recording for all flash modes except [$] (Flash off). Menu operations 4 sec. When recording, aim the camera microphone at the source of the sound you to take pictures using a commercially available slave flash that is synchronized with the... camera flash, the amount of the light emitted by the flash can fire in flash. w Adjusting the amount of light emitted by the flash Depending on ...

SP-550UZ Instruction Manual (English)
Page 30
... If you want to edit images on a computer. Shooting time takes twice as long as usual. CONTRAST Adjusting the contrast of the image CAMERA MENU 1R 2 PANORAMA 3> 4 SHARPNESS 5 CONTRAST 0 BACK MENU SET OK 1 (Toward +) 2 (Toward -) : The light and... dark areas are defined more vivid. SATURATION Adjusting the saturation of the image CAMERA MENU 1 SATURATION 0 2 NOISE REDUCT. 3 TIMELAPSE 4 5 BACK MENU SET OK 1 (Toward +) 2 (Toward -) : Colors become stronger. : Colors become less defined...
... If you want to edit images on a computer. Shooting time takes twice as long as usual. CONTRAST Adjusting the contrast of the image CAMERA MENU 1R 2 PANORAMA 3> 4 SHARPNESS 5 CONTRAST 0 BACK MENU SET OK 1 (Toward +) 2 (Toward -) : The light and... dark areas are defined more vivid. SATURATION Adjusting the saturation of the image CAMERA MENU 1 SATURATION 0 2 NOISE REDUCT. 3 TIMELAPSE 4 5 BACK MENU SET OK 1 (Toward +) 2 (Toward -) : Colors become stronger. : Colors become less defined...


