SP-310 Advanced Manual (English)
Page 142
... camera to Windows 2000 Professional. • If you must log on as a user with the following system requirements. Using OLYMPUS Master Installing OLYMPUS Master Before installing the OLYMPUS Master software, please confirm that your computer. • Windows XP corresponds to Windows XP Professional/Home Edition. • Windows.... For newer operating systems, please refer to the Olympus web site as shown on the back cover of this manual. (Operating environment Windows OS CPU RAM Hard disk capacity Connector Monitor Windows 98SE/Me/2000 Professional/XP Pentium III 500MHz or ...
... camera to Windows 2000 Professional. • If you must log on as a user with the following system requirements. Using OLYMPUS Master Installing OLYMPUS Master Before installing the OLYMPUS Master software, please confirm that your computer. • Windows XP corresponds to Windows XP Professional/Home Edition. • Windows.... For newer operating systems, please refer to the Olympus web site as shown on the back cover of this manual. (Operating environment Windows OS CPU RAM Hard disk capacity Connector Monitor Windows 98SE/Me/2000 Professional/XP Pentium III 500MHz or ...

SP-310 Advanced Manual (English)
Page 143
... and the need to reboot. • Disconnect the cable connecting the camera to the computer • Turn off the camera • Open the camera's card cover • Open the camera's battery compartment cover Windows 1 Insert the CD-ROM into the CD-ROM drive. • The OLYMPUS Master setup screen is displayed. • If the screen is...
... and the need to reboot. • Disconnect the cable connecting the camera to the computer • Turn off the camera • Open the camera's card cover • Open the camera's battery compartment cover Windows 1 Insert the CD-ROM into the CD-ROM drive. • The OLYMPUS Master setup screen is displayed. • If the screen is...

SP-310 Advanced Manual (English)
Page 145
.... 145 Macintosh 1 Insert the CD-ROM into the CD-ROM drive. • The CD-ROM window is displayed. • If the CD-ROM window is not displayed, double- Using OLYMPUS Master 7 Select the option to restart immediately when the screen asking you if you wish to proceed ...with the installation. • The screen confirming that installation is completed is displayed. Click "Finish". Connecting the camera to a computer 6 ...
.... 145 Macintosh 1 Insert the CD-ROM into the CD-ROM drive. • The CD-ROM window is displayed. • If the CD-ROM window is not displayed, double- Using OLYMPUS Master 7 Select the option to restart immediately when the screen asking you if you wish to proceed ...with the installation. • The screen confirming that installation is completed is displayed. Click "Finish". Connecting the camera to a computer 6 ...

SP-310 Advanced Manual (English)
Page 146
...and press Z. 5 The camera is connected to your digital camera for managing digital images. The camera is recognized as a "Removable Disk". • Macintosh The iPhoto program is displayed. When you connect the camera to recognize the SELECT GO OK camera. USB P C EASY PRINT • Windows CUSTOM PRINT When you ... first time, the iPhoto application starts automatically, so close this application and start OLYMPUS Master. Monitor • Refer to a computer. 146 Note • The camera functions are disabled while the camera is recognized by the computer.
...and press Z. 5 The camera is connected to your digital camera for managing digital images. The camera is recognized as a "Removable Disk". • Macintosh The iPhoto program is displayed. When you connect the camera to recognize the SELECT GO OK camera. USB P C EASY PRINT • Windows CUSTOM PRINT When you ... first time, the iPhoto application starts automatically, so close this application and start OLYMPUS Master. Monitor • Refer to a computer. 146 Note • The camera functions are disabled while the camera is recognized by the computer.

SP-310 Advanced Manual (English)
Page 147
...the main menu. on the • The main menu is displayed. • When OLYMPUS Master is started up OLYMPUS Master Windows 1 Double-click the "OLYMPUS Master" icon desktop. Enter your "Name" and "OLYMPUS Master Serial Number", and select your region. • After the "User Information" ...dialog box, the "Registration" dialog box is displayed. Follow the prompts and fill in the 9 147 in the registration form. Follow the prompts and fill in the registration form. Connecting the camera...
...the main menu. on the • The main menu is displayed. • When OLYMPUS Master is started up OLYMPUS Master Windows 1 Double-click the "OLYMPUS Master" icon desktop. Enter your "Name" and "OLYMPUS Master Serial Number", and select your region. • After the "User Information" ...dialog box, the "Registration" dialog box is displayed. Follow the prompts and fill in the 9 147 in the registration form. Follow the prompts and fill in the registration form. Connecting the camera...

SP-310 Advanced Manual (English)
Page 148
Starting up OLYMPUS Master (OLYMPUS Master main menu 7 1 6 2 3 5 4 Connecting the camera to a computer 1 "Transfer Images" button Downloads images from the camera or other media. 2 "Browse Images" button Displays the browse window. 3 "Online Print" button The online print window is displayed. 4 "Print Images at Home" button Displays the print menu. 5 "Create and Share" button Displays the editing menu...
Starting up OLYMPUS Master (OLYMPUS Master main menu 7 1 6 2 3 5 4 Connecting the camera to a computer 1 "Transfer Images" button Downloads images from the camera or other media. 2 "Browse Images" button Displays the browse window. 3 "Online Print" button The online print window is displayed. 4 "Print Images at Home" button Displays the print menu. 5 "Create and Share" button Displays the editing menu...

SP-310 Advanced Manual (English)
Page 149
... "Browse images now.". • The downloaded images are displayed in the browse window. • To return to a computer Displaying camera images on a computer Downloading and saving images You can save camera images on your computer. 1 Click "Transfer Images" on the OLYMPUS Master main menu. • The menu for selecting the source is displayed. 2 Click...
... "Browse images now.". • The downloaded images are displayed in the browse window. • To return to a computer Displaying camera images on a computer Downloading and saving images You can save camera images on your computer. 1 Click "Transfer Images" on the OLYMPUS Master main menu. • The menu for selecting the source is displayed. 2 Click...

SP-310 Advanced Manual (English)
Page 150
Orange lamp Connecting the camera to display the menu. 2 Click "Eject" on the menu. Drag and drop it on the eject icon. 9 150 Windows 98SE 1 Double-click the "My Computer" icon and right-click the "Removable Disk" icon to a computer Windows Me/2000/XP 1 Click the "Unplug or Eject ...Hardware" icon in the system tray. 2 Click the message that is displayed. 3 When a message is dragged. Macintosh 1 The trash icon changes to your computer. 1 Make sure that the hardware can disconnect the camera after downloading the ...
Orange lamp Connecting the camera to display the menu. 2 Click "Eject" on the menu. Drag and drop it on the eject icon. 9 150 Windows 98SE 1 Double-click the "My Computer" icon and right-click the "Removable Disk" icon to a computer Windows Me/2000/XP 1 Click the "Unplug or Eject ...Hardware" icon in the system tray. 2 Click the message that is displayed. 3 When a message is dragged. Macintosh 1 The trash icon changes to your computer. 1 Make sure that the hardware can disconnect the camera after downloading the ...

SP-310 Advanced Manual (English)
Page 151
...the main menu, click 9 "Menu" in the "Browse" window. 151 Viewing still pictures and movies 1 Click "Browse Images" on the OLYMPUS Master main menu. 2 • The "Browse" window is not being downloaded from the camera. Make sure that image data is displayed. Double-click the... still picture thumbnail that all applications are closed. Connecting the camera to a computer Viewing still pictures...
...the main menu, click 9 "Menu" in the "Browse" window. 151 Viewing still pictures and movies 1 Click "Browse Images" on the OLYMPUS Master main menu. 2 • The "Browse" window is not being downloaded from the camera. Make sure that image data is displayed. Double-click the... still picture thumbnail that all applications are closed. Connecting the camera to a computer Viewing still pictures...

SP-310 Advanced Manual (English)
Page 152
...are shown below uses the photo menu. 1 Click "Print Images at Home" on the OLYMPUS Master main menu. • The print menu is displayed. 2 To play back the movie..., click playback button at the bottom of the movie is displayed. 152 Connecting the camera to a computer Printing pictures Pictures can be printed from the photo, index, postcard and calendar 9 menus.... to select a frame. 2 Time display Displays the time that you want to see in the "Browse" window. • View mode is enabled and the first frame of the screen. Printing pictures (To view a ...
...are shown below uses the photo menu. 1 Click "Print Images at Home" on the OLYMPUS Master main menu. • The print menu is displayed. 2 To play back the movie..., click playback button at the bottom of the movie is displayed. 152 Connecting the camera to a computer Printing pictures Pictures can be printed from the photo, index, postcard and calendar 9 menus.... to select a frame. 2 Time display Displays the time that you want to see in the "Browse" window. • View mode is enabled and the first frame of the screen. Printing pictures (To view a ...

SP-310 Advanced Manual (English)
Page 153
Printing pictures 9 153 Make the necessary printer settings. 4 Select a layout and size. • To print the date and time with your image, check the box next to "Print Date", and select between "Date" and "Date & Time". 5 Select the thumbnail image that you want to a computer 2 Click "Photo" . • The "Photo Print" window is displayed. 3 Click "Settings" in the "Photo Print" window. • The printer settings screen is displayed on the layout. 6 Select the number of copies. Connecting the camera to print and click "Add". • A preview of the selected image is displayed.
Printing pictures 9 153 Make the necessary printer settings. 4 Select a layout and size. • To print the date and time with your image, check the box next to "Print Date", and select between "Date" and "Date & Time". 5 Select the thumbnail image that you want to a computer 2 Click "Photo" . • The "Photo Print" window is displayed. 3 Click "Settings" in the "Photo Print" window. • The printer settings screen is displayed on the layout. 6 Select the number of copies. Connecting the camera to print and click "Add". • A preview of the selected image is displayed.

SP-310 Advanced Manual (English)
Page 154
... use the USB cable to connect the camera to install the USB driver. Before connecting the camera to download and save images without using OLYMPUS Master. To download and save images to a computer without using OLYMPUS Master This camera is equipped with a USB port. • Windows 95/98/NT 4.0 • Windows 98SE upgrades from the following environments...
... use the USB cable to connect the camera to install the USB driver. Before connecting the camera to download and save images without using OLYMPUS Master. To download and save images to a computer without using OLYMPUS Master This camera is equipped with a USB port. • Windows 95/98/NT 4.0 • Windows 98SE upgrades from the following environments...

SP-310 Basic Manual (English, Français, Español)
Page 8
... CUSTOM PRINT EXIT SELECT GO OK 8 Macintosh: Double-click the En "Installer" icon. 3 Simply follow the on the monitor, and press Z. Connect the camera to the computer 1 Connect the camera and computer using the USB cable (included). USB Your computer will turn on automatically. 2 1 USB Cable 2 Select [PC] on -screen instructions. Step...
... CUSTOM PRINT EXIT SELECT GO OK 8 Macintosh: Double-click the En "Installer" icon. 3 Simply follow the on the monitor, and press Z. Connect the camera to the computer 1 Connect the camera and computer using the USB cable (included). USB Your computer will turn on automatically. 2 1 USB Cable 2 Select [PC] on -screen instructions. Step...

SP-310 Basic Manual (English, Français, Español)
Page 9
.... c. En [Transfer Images] button Tips • For more detailed information regarding camera setup and usage, please refer to the camera's "Advanced Manual" provided on CD-ROM. • For more details on the OLYMPUS Master main menu. The [Transfer Images] window is not displayed automatically: a. Transfer images to transfer, and click the [Transfer Images] button...
.... c. En [Transfer Images] button Tips • For more detailed information regarding camera setup and usage, please refer to the camera's "Advanced Manual" provided on CD-ROM. • For more details on the OLYMPUS Master main menu. The [Transfer Images] window is not displayed automatically: a. Transfer images to transfer, and click the [Transfer Images] button...

SP-310 Basic Manual (English, Français, Español)
Page 20
...camera when you install OLYMPUS Master to activate your warranty, receive notifications of software and camera firmware updates, and more , allowing you to greatly expand your digital pictures and movies and more! You can upgrade your software to download pictures from the camera, view, organize, retouch, e-mail and print your digital...colors (Windows), 32,000 colors (Macintosh) For the latest support information, visit the Olympus website (http://www.olympus.com/digital) (Upgrade (OLYMPUS Master Plus) In addition to have OLYMPUS Master installed in OLYMPUS Master, the OLYMPUS Master...
...camera when you install OLYMPUS Master to activate your warranty, receive notifications of software and camera firmware updates, and more , allowing you to greatly expand your digital pictures and movies and more! You can upgrade your software to download pictures from the camera, view, organize, retouch, e-mail and print your digital...colors (Windows), 32,000 colors (Macintosh) For the latest support information, visit the Olympus website (http://www.olympus.com/digital) (Upgrade (OLYMPUS Master Plus) In addition to have OLYMPUS Master installed in OLYMPUS Master, the OLYMPUS Master...
SP-310 Basic Manual (English, Français, Español)
Page 27
... Model Number : SP-310/SP-350 Trade Name : OLYMPUS Responsible Party : Address : Two Corporate Center Drive, P.O. Trademarks • IBM is a registered trademark of International Business Machines Corporation. • Microsoft and Windows are registered trademarks of... a trademark. • All other company and product names are the "Design Rule for camera file systems referred to the following two conditions: (1) This device may not cause harmful interference...Canada This Class B digital apparatus meets all requirements of the Canadian Interference-Causing Equipment Regulations.
... Model Number : SP-310/SP-350 Trade Name : OLYMPUS Responsible Party : Address : Two Corporate Center Drive, P.O. Trademarks • IBM is a registered trademark of International Business Machines Corporation. • Microsoft and Windows are registered trademarks of... a trademark. • All other company and product names are the "Design Rule for camera file systems referred to the following two conditions: (1) This device may not cause harmful interference...Canada This Class B digital apparatus meets all requirements of the Canadian Interference-Causing Equipment Regulations.
SP-310 Quick Start Guide (English)
Page 1
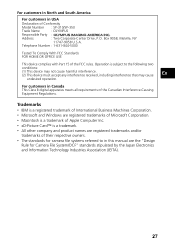
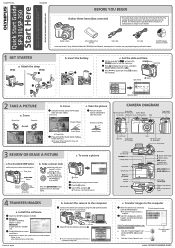
Quick Start Guide SP-310/SP-350 Start Here For more information, please refer to select the next field. Digital Camera Lithium Battery Pack (CR-V3) USB Cable AV Cable Items not shown: Strap, Advanced Manual (CD-ROM), Basic ...camera now connected, open OLYMPUS Master. Attach the strap SP-350 1 2 3 b. The green lamp indicates the focus and exposure are based on the monitor, and press Z. P C EASY PRINT CUSTOM PRINT EXIT SELECT GO OK c. Transfer images to the computer 1 Connect the camera and computer using the USB cable (included). The [Transfer Images] window...
Quick Start Guide SP-310/SP-350 Start Here For more information, please refer to select the next field. Digital Camera Lithium Battery Pack (CR-V3) USB Cable AV Cable Items not shown: Strap, Advanced Manual (CD-ROM), Basic ...camera now connected, open OLYMPUS Master. Attach the strap SP-350 1 2 3 b. The green lamp indicates the focus and exposure are based on the monitor, and press Z. P C EASY PRINT CUSTOM PRINT EXIT SELECT GO OK c. Transfer images to the computer 1 Connect the camera and computer using the USB cable (included). The [Transfer Images] window...


