FE-46 Instruction Manual (English)
Page 2
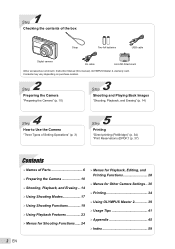
... Contents may vary depending on purchase location. 2 Step Preparing the Camera "Preparing the Camera" (p. 10) 3 Step Shooting and Playing Back Images "Shooting, Playback, and Erasing" (p. 14) 4 Step How to Use the Camera "Three Types of Setting Operations" (p. 3) 5 Step Printing "Direct printing (PictBridge)" (p. 34) "Print Reservations (DPOF)" (p. 37) Contents ¾ Names of the box Strap Two AA batteries USB cable Digital camera AV cable microSD Attachment Other accessories not shown: Instruction Manual (this manual), OLYMPUS Master 2, warranty card.
... Contents may vary depending on purchase location. 2 Step Preparing the Camera "Preparing the Camera" (p. 10) 3 Step Shooting and Playing Back Images "Shooting, Playback, and Erasing" (p. 14) 4 Step How to Use the Camera "Three Types of Setting Operations" (p. 3) 5 Step Printing "Direct printing (PictBridge)" (p. 34) "Print Reservations (DPOF)" (p. 37) Contents ¾ Names of the box Strap Two AA batteries USB cable Digital camera AV cable microSD Attachment Other accessories not shown: Instruction Manual (this manual), OLYMPUS Master 2, warranty card.
FE-46 Instruction Manual (English)
Page 3
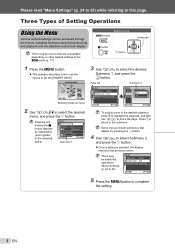
... option. Page tab Submenu 2 SETUP 1 VIDEO OUT NTSC 2 POWER SAVE OFF 3 BATTERY TYPE ALKALINE SETUP POWER SAVE 1 VIDEO OUT NTSC OFF 2 POWER SAVE OFF 3 BATTERY TYPOEN ALKALINE EXIT MENU SET OK BACK MENU SET OK To quickly move the page. There may be accessed through the menus, including functions used during shooting and playback and the date/time and screen display. There may be menus that appear by pressing the B button. 4 Use kl to select Submenu 2, and...
... option. Page tab Submenu 2 SETUP 1 VIDEO OUT NTSC 2 POWER SAVE OFF 3 BATTERY TYPE ALKALINE SETUP POWER SAVE 1 VIDEO OUT NTSC OFF 2 POWER SAVE OFF 3 BATTERY TYPOEN ALKALINE EXIT MENU SET OK BACK MENU SET OK To quickly move the page. There may be accessed through the menus, including functions used during shooting and playback and the date/time and screen display. There may be menus that appear by pressing the B button. 4 Use kl to select Submenu 2, and...
FE-46 Instruction Manual (English)
Page 5
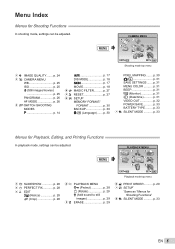
... 24 2 B CAMERA MENU WB p. 25 ISO p. 25 R (Still images/movies) p. 25 PANORAMA p. 26 AF MODE p. 26 3 C SWITCH SHOOTING MODES P p. 14 G p. 17 DIS MODE p. 18 s p. 17 MOVIE p. 18 4 Q MAGIC FILTER........... p. 29 7 E SETUP* *Same as "Menus for Shooting Functions In shooting mode, settings can be adjusted. p. 30 PIXEL MAPPING........ p. 31 MENU COLOR p. 31 BEEP p. 31 s (Monitor p. 31 X (Date/time p. 31 VIDEO OUT p. 32 POWER SAVE p. 33 BATTERY TYPE ......... p. 33 7 F SILENT MODE p. 33 Menus for Playback, Editing, and Printing Functions In playback mode, settings can...
... 24 2 B CAMERA MENU WB p. 25 ISO p. 25 R (Still images/movies) p. 25 PANORAMA p. 26 AF MODE p. 26 3 C SWITCH SHOOTING MODES P p. 14 G p. 17 DIS MODE p. 18 s p. 17 MOVIE p. 18 4 Q MAGIC FILTER........... p. 29 7 E SETUP* *Same as "Menus for Shooting Functions In shooting mode, settings can be adjusted. p. 30 PIXEL MAPPING........ p. 31 MENU COLOR p. 31 BEEP p. 31 s (Monitor p. 31 X (Date/time p. 31 VIDEO OUT p. 32 POWER SAVE p. 33 BATTERY TYPE ......... p. 33 7 F SILENT MODE p. 33 Menus for Playback, Editing, and Printing Functions In playback mode, settings can...
FE-46 Instruction Manual (English)
Page 8
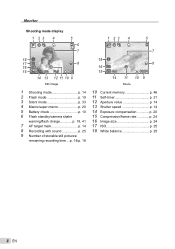
... image 1 Shooting mode p. 14 2 Flash mode p. 19 3 Silent mode p. 33 4 Macro/super macro p. 20 5 Battery check p. 10 6 Flash standby/camera shake warning/flash charge p. 19, 41 7 AF target mark p. 14 8 Recording with sound p. 25 9 Number of storable still pictures/ remaining recording time ... p. 14/p. 18 1 23 4 5 7 18 16 QVGA 15 15 +2.0 14 8 IN 00:34 11 10 9 Movie 10 Current memory p. 46 11 Self-timer p. 21 12 Aperture value p. 14 13 Shutter speed p. 14 14 Exposure compensation...
... image 1 Shooting mode p. 14 2 Flash mode p. 19 3 Silent mode p. 33 4 Macro/super macro p. 20 5 Battery check p. 10 6 Flash standby/camera shake warning/flash charge p. 19, 41 7 AF target mark p. 14 8 Recording with sound p. 25 9 Number of storable still pictures/ remaining recording time ... p. 14/p. 18 1 23 4 5 7 18 16 QVGA 15 15 +2.0 14 8 IN 00:34 11 10 9 Movie 10 Current memory p. 46 11 Self-timer p. 21 12 Aperture value p. 14 13 Shutter speed p. 14 14 Exposure compensation...
FE-46 Instruction Manual (English)
Page 12
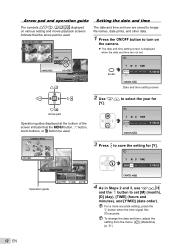
... change the date and time, adjust the setting from the menu. [X] (Date/time) (p. 31) 12 EN IMAGE IN WT SET1 OK 2 3 Operation guide 4 BACK MENU 5 6 OK GO D 2 Use kl to save the setting for [Y]. For a more accurate setting, press the B button when the time signal hits 00 seconds. X Y M D TIME 2009 Y M D CANCEL MENU 4 As in Steps 2 and 3, use klmn and the B button to turn on various setting and movie playback screens indicate that the m button, B button, zoom buttons, or D button be used . Arrow pad and operation guide...
... change the date and time, adjust the setting from the menu. [X] (Date/time) (p. 31) 12 EN IMAGE IN WT SET1 OK 2 3 Operation guide 4 BACK MENU 5 6 OK GO D 2 Use kl to save the setting for [Y]. For a more accurate setting, press the B button when the time signal hits 00 seconds. X Y M D TIME 2009 Y M D CANCEL MENU 4 As in Steps 2 and 3, use klmn and the B button to turn on various setting and movie playback screens indicate that the m button, B button, zoom buttons, or D button be used . Arrow pad and operation guide...
FE-46 Instruction Manual (English)
Page 17
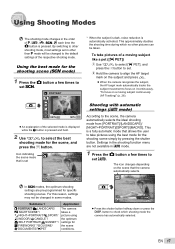
.... Using Shooting Modes The shooting mode changes in the order of P, G, h, s, A each time the K button is a fully automatic mode that allows the user to take pictures of a moving subject continuously (AF Tracking)" (p. 26). Using the best mode for the shooting scene simply by pressing the shutter button. Shooting with automatic settings (G mode) According to the default settings of the respective shooting mode. EN 17 Settings in the shooting function menu are pre-programmed for the scene conditions. "To focus on...
.... Using Shooting Modes The shooting mode changes in the order of P, G, h, s, A each time the K button is a fully automatic mode that allows the user to take pictures of a moving subject continuously (AF Tracking)" (p. 26). Using the best mode for the shooting scene simply by pressing the shutter button. Shooting with automatic settings (G mode) According to the default settings of the respective shooting mode. EN 17 Settings in the shooting function menu are pre-programmed for the scene conditions. "To focus on...

FE-46 Instruction Manual (English)
Page 18
... set n. A mode indicator QVGA 15 IN 00:34 2 Press the shutter button halfway down to start recording. Sound will change to any of the newly selected mode. To record a movie with optical zoom, set h. In some cases, the camera may not select the desired shooting mode. To focus on a moving subject continuously (AF Tracking)" (p. 26). Lights up red when recording REC Press halfway 12M NORM IN 4 By switching to the default settings of other shooting modes, most function settings...
... set n. A mode indicator QVGA 15 IN 00:34 2 Press the shutter button halfway down to start recording. Sound will change to any of the newly selected mode. To record a movie with optical zoom, set h. In some cases, the camera may not select the desired shooting mode. To focus on a moving subject continuously (AF Tracking)" (p. 26). Lights up red when recording REC Press halfway 12M NORM IN 4 By switching to the default settings of other shooting modes, most function settings...

FE-46 Instruction Manual (English)
Page 25
...the Menu" (p. 3). Adjusting to a natural color scheme [WB] B CAMERA MENU X WB E: P h s n Recording sound when shooting still images [R] B CAMERA MENU X R E: P h s Submenu 2 AUTO 5 3 1 w x y Application The camera automatically adjusts the white balance according to represent sensitivity. In the ISO setting, although smaller values result in movie mode cannot be played back with the optical zoom, set to [ON], only the digital zoom can be used to the shooting scene. The sound recorded in less sensitivity, sharp images can be taken under white fluorescent lighting...
...the Menu" (p. 3). Adjusting to a natural color scheme [WB] B CAMERA MENU X WB E: P h s n Recording sound when shooting still images [R] B CAMERA MENU X R E: P h s Submenu 2 AUTO 5 3 1 w x y Application The camera automatically adjusts the white balance according to represent sensitivity. In the ISO setting, although smaller values result in movie mode cannot be played back with the optical zoom, set to [ON], only the digital zoom can be used to the shooting scene. The sound recorded in less sensitivity, sharp images can be taken under white fluorescent lighting...

FE-46 Instruction Manual (English)
Page 26
... mark changes to compose the shot without worrying about the focusing position. Creating panoramic images [PANORAMA] B CAMERA MENU X PANORAMA E: P h s Panorama shooting lets you create a panoramic picture, using the OLYMPUS Master 2 software on how to make panorama images. Panorama shooting is taken, and then press the B button when finished. You have to remember what the part in focus, the green AF target mark appears. Refer to focus on the subjects or the shooting conditions, the camera may take the...
... mark changes to compose the shot without worrying about the focusing position. Creating panoramic images [PANORAMA] B CAMERA MENU X PANORAMA E: P h s Panorama shooting lets you create a panoramic picture, using the OLYMPUS Master 2 software on how to make panorama images. Panorama shooting is taken, and then press the B button when finished. You have to remember what the part in focus, the green AF target mark appears. Refer to focus on the subjects or the shooting conditions, the camera may take the...

FE-46 Instruction Manual (English)
Page 29
... the sound source. Microphone Submenu 1 SEL. IMAGE IN R mark 1 2 3 4 BACK MENU 5 6 OK GO D 3 Repeat Step 2 to select the images to be erased, and press the B button to add a R mark to "Using the Menu" (p. 3). Saving print settings to select [SEL. IMAGE ALL ERASE Application Images are individually selected and erased. Select the settings for the functions while referring to the image. When erasing pictures from the card, insert a card into the camera in the internal memory...
... the sound source. Microphone Submenu 1 SEL. IMAGE IN R mark 1 2 3 4 BACK MENU 5 6 OK GO D 3 Repeat Step 2 to select the images to be erased, and press the B button to add a R mark to "Using the Menu" (p. 3). Saving print settings to select [SEL. IMAGE ALL ERASE Application Images are individually selected and erased. Select the settings for the functions while referring to the image. When erasing pictures from the card, insert a card into the camera in the internal memory...
FE-46 Instruction Manual (English)
Page 30
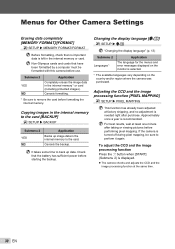
... internal memory or card. It takes some time to the card. Changing the display language [W] E SETUP X W "Changing the display language" (p. 13) Submenu 2 Languages*1 Application The language for Other Camera Settings Erasing data completely [MEMORY FORMAT]/[FORMAT] E SETUP X MEMORY FORMAT/FORMAT Before formatting, check that the battery has sufficient power before use. Check that no adjustment is displayed. ● The camera checks and adjusts the CCD and the image processing function at least one minute after purchase. Copying images in the internal memory to remove...
... internal memory or card. It takes some time to the card. Changing the display language [W] E SETUP X W "Changing the display language" (p. 13) Submenu 2 Languages*1 Application The language for Other Camera Settings Erasing data completely [MEMORY FORMAT]/[FORMAT] E SETUP X MEMORY FORMAT/FORMAT Before formatting, check that the battery has sufficient power before use. Check that no adjustment is displayed. ● The camera checks and adjusts the CCD and the image processing function at least one minute after purchase. Copying images in the internal memory to remove...
FE-46 Instruction Manual (English)
Page 31
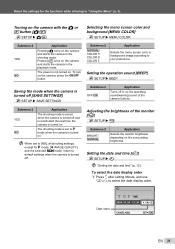
... date display order. X Date order Y M D TIME 2009 10 26 12 30 Y M D CANCEL MENU SET OK EN 31 The power is turned on. The shooting mode is set to [NO], all shooting settings, except for the functions while referring to your preference. Submenu 2 NORMAL/ COLOR 1/ COLOR 2/ COLOR 3 Application Selects the menu screen color or background image according to "Using the Menu" (p. 3). Setting the operation sound [BEEP] E SETUP X BEEP Saving the mode when the camera is turned off [SAVE SETTINGS] E SETUP X SAVE SETTINGS Submenu 2 OFF/ON Application Turns off . Adjusting...
... date display order. X Date order Y M D TIME 2009 10 26 12 30 Y M D CANCEL MENU SET OK EN 31 The power is turned on. The shooting mode is set to [NO], all shooting settings, except for the functions while referring to your preference. Submenu 2 NORMAL/ COLOR 1/ COLOR 2/ COLOR 3 Application Selects the menu screen color or background image according to "Using the Menu" (p. 3). Setting the operation sound [BEEP] E SETUP X BEEP Saving the mode when the camera is turned off [SAVE SETTINGS] E SETUP X SAVE SETTINGS Submenu 2 OFF/ON Application Turns off . Adjusting...

FE-46 Instruction Manual (English)
Page 34
...-connector n button USB cable (supplied) Printing images at the printer's standard settings [EASY PRINT] 1 Display the image to select [EASY PRINT], press the B button. To find out if your printer supports PictBridge, refer to select an image, and press the B button. "Viewing images" (p. 15) Printing can also be printed on the printer that can print images directly without using a computer. To exit printing After a selected image is a standard for connecting digital cameras and printers of different makers and printing out pictures directly. The printing modes, paper sizes, and...
...-connector n button USB cable (supplied) Printing images at the printer's standard settings [EASY PRINT] 1 Display the image to select [EASY PRINT], press the B button. To find out if your printer supports PictBridge, refer to select an image, and press the B button. "Viewing images" (p. 15) Printing can also be printed on the printer that can print images directly without using a computer. To exit printing After a selected image is a standard for connecting digital cameras and printers of different makers and printing out pictures directly. The printing modes, paper sizes, and...

FE-46 Instruction Manual (English)
Page 37
... using the original device. Insert a card with this camera. DPOF reservations set only for storing automatic printout information from digital cameras. Make changes using only the print reservations on the card without a computer or a camera. *1 DPOF is a standard for the images stored on the card. Print Reservations (DPOF*1) In print reservations, the number of prints and date imprint option are saved in the image on the card. Making new DPOF reservations with recorded images before making print...
... using the original device. Insert a card with this camera. DPOF reservations set only for storing automatic printout information from digital cameras. Make changes using only the print reservations on the card without a computer or a camera. *1 DPOF is a standard for the images stored on the card. Print Reservations (DPOF*1) In print reservations, the number of prints and date imprint option are saved in the image on the card. Making new DPOF reservations with recorded images before making print...

FE-46 Instruction Manual (English)
Page 39
... software. Connecting the camera to a computer via a USB hub may cause unstable operation. Macintosh If iPhoto has started, exit iPhoto and start OLYMPUS Master 2 for the submenu that appears by pressing n after selecting [PC] in the OLYMPUS Master 2 folder. ● Browse window appears after installation, "Default Settings" and "Registration" screen appear. Multi-connector Windows After the computer detects the camera, a message indicating setup completion appears. Starting OLYMPUS Master 2 1 Double-click the OLYMPUS Master 2 icon...
... software. Connecting the camera to a computer via a USB hub may cause unstable operation. Macintosh If iPhoto has started, exit iPhoto and start OLYMPUS Master 2 for the submenu that appears by pressing n after selecting [PC] in the OLYMPUS Master 2 folder. ● Browse window appears after installation, "Default Settings" and "Registration" screen appear. Multi-connector Windows After the computer detects the camera, a message indicating setup completion appears. Starting OLYMPUS Master 2 1 Double-click the OLYMPUS Master 2 icon...
FE-46 Instruction Manual (English)
Page 41
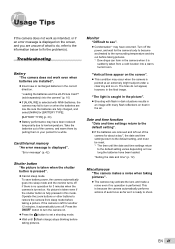
... batteries are installed". ● Insert new or recharged batteries in the correct direction. Operate the zoom buttons or other buttons to see". ● Condensation*1 may have occurred. This is because the camera automatically performs actions of what to do not appear, however, in the final image. Card/Internal memory "An error message is pressed". ● Cancel sleep mode. "Error message" (p. 42) Shutter button "No picture is taken when the shutter button is displayed...
... batteries are installed". ● Insert new or recharged batteries in the correct direction. Operate the zoom buttons or other buttons to see". ● Condensation*1 may have occurred. This is because the camera automatically performs actions of what to do not appear, however, in the final image. Card/Internal memory "An error message is pressed". ● Cancel sleep mode. "Error message" (p. 42) Shutter button "No picture is taken when the shutter button is displayed...
FE-46 Instruction Manual (English)
Page 42
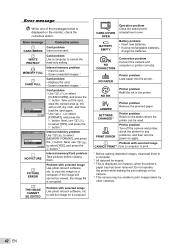
... Internal memory problem Use kl to select [FORMAT], and press the B button. PRINT ERROR Printer problem Turn off the camera and printer, check the printer for instance, when the printer's paper tray has been removed. Error message q CARD ERROR q WRITE PROTECT Corrective action Card problem Insert a new card. Problem with a soft, dry cloth, and then load the card again. • Use kl to select [MEMORY FORMAT], and press the B button. SETTINGS CHANGED*3 Printer problem Return to edit the image on the camera. *4 This camera may be erased. *3 This is displayed...
... Internal memory problem Use kl to select [FORMAT], and press the B button. PRINT ERROR Printer problem Turn off the camera and printer, check the printer for instance, when the printer's paper tray has been removed. Error message q CARD ERROR q WRITE PROTECT Corrective action Card problem Insert a new card. Problem with a soft, dry cloth, and then load the card again. • Use kl to select [MEMORY FORMAT], and press the B button. SETTINGS CHANGED*3 Printer problem Return to edit the image on the camera. *4 This camera may be erased. *3 This is displayed...
FE-46 Instruction Manual (English)
Page 46
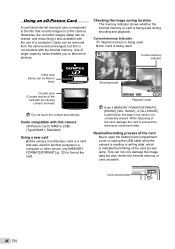
... completely erased. Cards compatible with the internal memory. Use of the card access lamp. Readout/recording process of the card Never open the battery/card compartment cover or unplug the USB cable while the camera is reading or writing data, which is being used P Current memory indicator Index area (Notes can be filled in a computer or other device, use of the card with the internal camera terminal) Do not touch the contact area directly...
... completely erased. Cards compatible with the internal memory. Use of the card access lamp. Readout/recording process of the card Never open the battery/card compartment cover or unplug the USB cable while the camera is reading or writing data, which is being used P Current memory indicator Index area (Notes can be filled in a computer or other device, use of the card with the internal camera terminal) Do not touch the contact area directly...

FE-46 Instruction Manual (English)
Page 51
... the provided instructions. • The number of the camera with Olympus digital cameras. After storage, test the camera by turning it on and pressing the shutter button to make sure that it to cover their manuals as possible. Always unload the batteries from forming inside the camera. EN 51 This may cause lens or shutter curtain damage, color failure, ghosting on a tripod, adjust the position of pictures you throw...
... the provided instructions. • The number of the camera with Olympus digital cameras. After storage, test the camera by turning it on and pressing the shutter button to make sure that it to cover their manuals as possible. Always unload the batteries from forming inside the camera. EN 51 This may cause lens or shutter curtain damage, color failure, ghosting on a tripod, adjust the position of pictures you throw...
FE-46 Instruction Manual (English)
Page 58
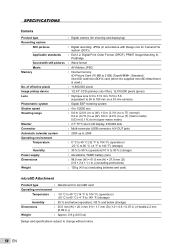
...,700,000 pixels (gross) Lens : Olympus lens 6.3 to 31.5 mm, f3.5 to 5.6 (equivalent to 36 to 180 mm on a 35 mm camera) Photometric system : Digital ESP metering system Shutter speed : 4 to 1/2000 sec. SPECIFICATIONS Camera Product type : Digital camera (for Camera File system (DCF)) Applicable standards : Exif 2.2, Digital Print Order Format (DPOF), PRINT Image Matching III, PictBridge Sound with still pictures : Wave format Movie : AVI Motion JPEG Memory : Internal memory xD-Picture Card (16 MB to 2 GB...
...,700,000 pixels (gross) Lens : Olympus lens 6.3 to 31.5 mm, f3.5 to 5.6 (equivalent to 36 to 180 mm on a 35 mm camera) Photometric system : Digital ESP metering system Shutter speed : 4 to 1/2000 sec. SPECIFICATIONS Camera Product type : Digital camera (for Camera File system (DCF)) Applicable standards : Exif 2.2, Digital Print Order Format (DPOF), PRINT Image Matching III, PictBridge Sound with still pictures : Wave format Movie : AVI Motion JPEG Memory : Internal memory xD-Picture Card (16 MB to 2 GB...


